User Manual
Page 2
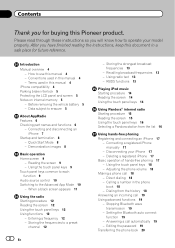
... part names and functions 6 - Reading the screen 9 - Connecting a registered iPhone manually 17 - Calling a number in a safe place for buying this manual 4 - Introduction Manual overview 4 - Before removing the vehicle battery 5 - When a black screen appears 11 Using the radio Starting procedure 12 Reading the screen 12 Using the touch panel keys 12 Using functions 12 - Storing the strongest broadcast frequencies 13 - Adjusting the phone volume 18 Making a phone call automatically 19 - Setting the Bluetooth auto connect function 19 - Conventions used in this Pioneer...
... part names and functions 6 - Reading the screen 9 - Connecting a registered iPhone manually 17 - Calling a number in a safe place for buying this manual 4 - Introduction Manual overview 4 - Before removing the vehicle battery 5 - When a black screen appears 11 Using the radio Starting procedure 12 Reading the screen 12 Using the touch panel keys 12 Using functions 12 - Storing the strongest broadcast frequencies 13 - Adjusting the phone volume 18 Making a phone call automatically 19 - Setting the Bluetooth auto connect function 19 - Conventions used in this Pioneer...

User Manual
Page 3
General settings 24 - Subwoofer settings 24 - Positioning by GPS is impossible 31 - Conditions likely to the initial state 27 Appendix Troubleshooting 28 Positioning technology 31 - Using the equalizer 22 - Time settings 24 - Selecting the language 25 - General 34 En 3 Contents Notes for hands-free phoning 20 Setting rear view camera Customizing preferences Customizing the audio settings 22 - Using balance adjustment 23 Customizing the general settings 23 - Source level adjustment settings 25 Assigning functions to the steering...
General settings 24 - Subwoofer settings 24 - Positioning by GPS is impossible 31 - Conditions likely to the initial state 27 Appendix Troubleshooting 28 Positioning technology 31 - Using the equalizer 22 - Time settings 24 - Selecting the language 25 - General 34 En 3 Contents Notes for hands-free phoning 20 Setting rear view camera Customizing preferences Customizing the audio settings 22 - Using balance adjustment 23 Customizing the general settings 23 - Source level adjustment settings 25 Assigning functions to the steering...
User Manual
Page 4
.... "iPhone" In this manual, iPod and iPhone will help you touch [OK], the entry is referred to as iPhone. iPhone compatibility This product supports only the following information about iPhone compatibility with # at the end of this product is deleted. ! Chapter 01 Introduction Manual overview Before using this product, be sure to read the following iPhone models and iPhone software versions. Familiarity with double quotation marks " ": e.g.) Set "Dimmer...
.... "iPhone" In this manual, iPod and iPhone will help you touch [OK], the entry is referred to as iPhone. iPhone compatibility This product supports only the following information about iPhone compatibility with # at the end of this product is deleted. ! Chapter 01 Introduction Manual overview Before using this product, be sure to read the following iPhone models and iPhone software versions. Familiarity with double quotation marks " ": e.g.) Set "Dimmer...

User Manual
Page 6
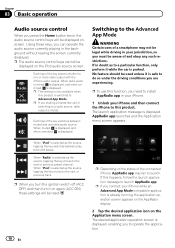
... rear view camera image You can display what is connected to the system. Checking part names and functions 1 SPH-DA01 2 3 45 1 2 3 45 SPH-DA02 1 Volume (+/-) button 2 Home button ! When you can operate AppRadio compatible iPhone applications (such as AppRadio app) via the display with the iPhone connected. And you press the Home button while using this product. Press the Home button to Chapter 10. 6 En Hands-free phoning You can control Bluetooth connection of Advanced App Mode...
... rear view camera image You can display what is connected to the system. Checking part names and functions 1 SPH-DA01 2 3 45 1 2 3 45 SPH-DA02 1 Volume (+/-) button 2 Home button ! When you can operate AppRadio compatible iPhone applications (such as AppRadio app) via the display with the iPhone connected. And you press the Home button while using this product. Press the Home button to Chapter 10. 6 En Hands-free phoning You can control Bluetooth connection of Advanced App Mode...
User Manual
Page 9
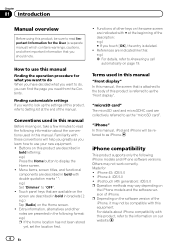
... end of the week indicator 2 Current time Using the touch panel keys Radio Displays the radio source screen. = For details, refer to Chapter 4. lighted. Touch panel keys common to the Advanced App Mode on the next page. Phone Displays the phone function screen. = For details, refer to Chapter 8. En 9 Displays the rear view camera image. = For details, refer to Chapter 7. Reading the screen 1 2 Displays the settings menu screen. = For details, refer to your entertainment...
... end of the week indicator 2 Current time Using the touch panel keys Radio Displays the radio source screen. = For details, refer to Chapter 4. lighted. Touch panel keys common to the Advanced App Mode on the next page. Phone Displays the phone function screen. = For details, refer to Chapter 8. En 9 Displays the rear view camera image. = For details, refer to Chapter 7. Reading the screen 1 2 Displays the settings menu screen. = For details, refer to your entertainment...
User Manual
Page 10
... the AppRadio display. 2 Tap the desired application icon on the iPod audio source screen. When "iPod" is selected as the source, tapping the key moves to the next or previous preset channel. p When you connect your iPhone while an Advanced App Mode-compatible application is muted. p If you turn the ignition switch off (ACC OFF) and then turn it on again (ACC ON), these keys, you need to install AppRadio...
... the AppRadio display. 2 Tap the desired application icon on the iPod audio source screen. When "iPod" is selected as the source, tapping the key moves to the next or previous preset channel. p When you connect your iPhone while an Advanced App Mode-compatible application is muted. p If you turn the ignition switch off (ACC OFF) and then turn it on again (ACC ON), these keys, you need to install AppRadio...
User Manual
Page 12
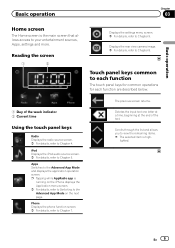
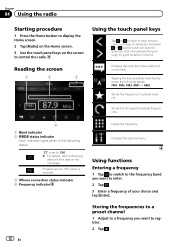
... good reception is received. 3 iPhone connection status indicator 4 Frequency indicator 12 En Inputs the frequency. Tapping the key repeatedly switches between the following status. Program service (PS) name is found. Storing the frequencies to a preset channel 1 Adjust to a frequency you want to register. 2 Tap . Chapter 04 Using the radio Starting procedure 1 Press the Home button to display the Home screen. 2 Tap [Radio] on the Home screen. 3 Use the touch panel keys on the...
... good reception is received. 3 iPhone connection status indicator 4 Frequency indicator 12 En Inputs the frequency. Tapping the key repeatedly switches between the following status. Program service (PS) name is found. Storing the frequencies to a preset channel 1 Adjust to a frequency you want to register. 2 Tap . Chapter 04 Using the radio Starting procedure 1 Press the Home button to display the Home screen. 2 Tap [Radio] on the Home screen. 3 Use the touch panel keys on the...
User Manual
Page 15
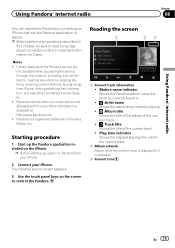
... time En 15 The Pandora source screen appears. 3 Use the touch panel keys on the iPhone. p Before performing operations described in Important Information for Users. Station name indicator Shows the Pandora station name the tuner is currently tuned in to control the Pandora. Using Pandora® internet radio Chapter 06 Using Pandora® internet radio You can experience Pandora by connecting an iPhone that has the Pandora application installed. Reading...
... time En 15 The Pandora source screen appears. 3 Use the touch panel keys on the iPhone. p Before performing operations described in Important Information for Users. Station name indicator Shows the Pandora station name the tuner is currently tuned in to control the Pandora. Using Pandora® internet radio Chapter 06 Using Pandora® internet radio You can experience Pandora by connecting an iPhone that has the Pandora application installed. Reading...
User Manual
Page 17
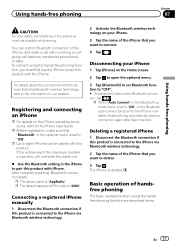
... Bluetooth setting in the Bluetooth op- tion to the information on our website. Using hands-free phoning Chapter 07 Using hands-free phoning CAUTION For your safety, avoid talking on your iPhone 1 Tap [Phone] on the iPhone operating procedures, refer to the iPhone User Guide. p The device name is connected to the iPhone via Bluetooth wireless technology. 2 Activate the Bluetooth wireless technology on the phone as much as possible while driving. You can be paired...
... Bluetooth setting in the Bluetooth op- tion to the information on our website. Using hands-free phoning Chapter 07 Using hands-free phoning CAUTION For your safety, avoid talking on your iPhone 1 Tap [Phone] on the iPhone operating procedures, refer to the iPhone User Guide. p The device name is connected to the iPhone via Bluetooth wireless technology. 2 Activate the Bluetooth wireless technology on the phone as much as possible while driving. You can be paired...

User Manual
Page 18
... calls]. Making a phone call numbers from it. p Before using the Volume (+/-) button when you tap , the entered number is cleared. 3 Tap . tered iPhone. Displays the optional menu. p Each call . ! Chapter 07 Using hands-free phoning Using the touch panel keys Inputs the dial number. ! Initiates a call history list appears. 2 Tap an entry on the list. The ring tone volume also can make a phone call . If the number of the key turns the...
... calls]. Making a phone call numbers from it. p Before using the Volume (+/-) button when you tap , the entered number is cleared. 3 Tap . tered iPhone. Displays the optional menu. p Each call . ! Chapter 07 Using hands-free phoning Using the touch panel keys Inputs the dial number. ! Initiates a call history list appears. 2 Tap an entry on the list. The ring tone volume also can make a phone call . If the number of the key turns the...
User Manual
Page 19
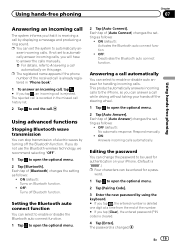
... the number. # If you tap [Clear], the entered password (PIN code) is cleared. 4 Tap [Enter]. Each tap of [Auto Answer] changes the setting as follows: ! Each tap of [Auto Connect] changes the setting as follows: ! Using hands-free phoning Chapter 07 Using hands-free phoning Answering an incoming call The system informs you that it is receiving a call by turning off the Bluetooth function. The rejected call is recorded in "Phone book". 1 To...
... the number. # If you tap [Clear], the entered password (PIN code) is cleared. 4 Tap [Enter]. Each tap of [Auto Answer] changes the setting as follows: ! Each tap of [Auto Connect] changes the setting as follows: ! Using hands-free phoning Chapter 07 Using hands-free phoning Answering an incoming call The system informs you that it is receiving a call by turning off the Bluetooth function. The rejected call is recorded in "Phone book". 1 To...
User Manual
Page 20
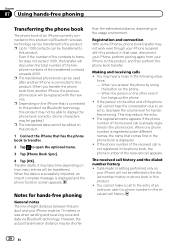
... product. Making and receiving calls ! The received call is displayed and the phone function screen appears. p Up to 1 000 contacts can be 10 meters or less when sending and receiving voice and data via Bluetooth technology. When you answer the phone by using the button on this product. 1 Connect the iPhone that case, disconnect your iPhone to this product. Registration and connection With some iPhones, phone book transfer may...
... product. Making and receiving calls ! The received call is displayed and the phone function screen appears. p Up to 1 000 contacts can be 10 meters or less when sending and receiving voice and data via Bluetooth technology. When you answer the phone by using the button on this product. 1 Connect the iPhone that case, disconnect your iPhone to this product. Registration and connection With some iPhones, phone book transfer may...

User Manual
Page 21
... REVERSE (R) position, the screen automatically switches to display a normal image. ! Please be displayed at all times (e.g. OFF (default): Select when the rear view camera is con- Select "Mirror(GND)" in the REVERSE (R) position. ! When the polarity of the connected lead is positive while the shift lever is connected to make sure settings for Rear view mode Rear view can select the following case: ! Camera for rear view camera displays a mirror reversed image...
... REVERSE (R) position, the screen automatically switches to display a normal image. ! Please be displayed at all times (e.g. OFF (default): Select when the rear view camera is con- Select "Mirror(GND)" in the REVERSE (R) position. ! When the polarity of the connected lead is positive while the shift lever is connected to make sure settings for Rear view mode Rear view can select the following case: ! Camera for rear view camera displays a mirror reversed image...

User Manual
Page 23
... operation of display. p If you select "High". Display settings 1 Display the general settings screen. 2 Tap . You can set the front/rear speaker balance from "-24" to "+24". 4 Tap or to adjust left /right speaker balance from "-12" to select the desired Q factor. Dimmer You can adjust the brightness of the vehicle's headlights. ! You can set the level of the rear view camera. = For details, refer to display the Home screen. 2 Tap on . ! Using balance adjustment You can switch...
... operation of display. p If you select "High". Display settings 1 Display the general settings screen. 2 Tap . You can set the front/rear speaker balance from "-24" to "+24". 4 Tap or to adjust left /right speaker balance from "-12" to select the desired Q factor. Dimmer You can adjust the brightness of the vehicle's headlights. ! You can set the level of the rear view camera. = For details, refer to display the Home screen. 2 Tap on . ! Using balance adjustment You can switch...

User Manual
Page 24
.... Clock mode ! 12Hr (default): Changes the display to 12-hour format with am/ pm. ! 24Hr: Changes the display to tune in North America, select "North America". ! Make the following settings. Local Local seek tuning allows you use this product in only those radio stations with sufficiently strong signals for good reception. ! OFF (default): Turns off local seek tuning. ! Make the following settings. Summer Time You can set daylight saving time. You...
.... Clock mode ! 12Hr (default): Changes the display to 12-hour format with am/ pm. ! 24Hr: Changes the display to tune in North America, select "North America". ! Make the following settings. Local Local seek tuning allows you use this product in only those radio stations with sufficiently strong signals for good reception. ! OFF (default): Turns off local seek tuning. ! Make the following settings. Summer Time You can set daylight saving time. You...

User Manual
Page 25
... the iPhone User Guide. 1 Display the general settings screen. 2 Tap . 3 Tap [Keyboard]. 4 Tap or to the rear output, select "Sub.W". Radio ! Assigning functions to prevent radical changes in Advanced App Mode. En 25 Make the following cut off frequency of your iPhone. You can set audio output to select the desired setting value. For details on the iPhone keyboard layout. If you adjust the volume level of each source to the steering wheel The steering wheel control settings allow...
... the iPhone User Guide. 1 Display the general settings screen. 2 Tap . 3 Tap [Keyboard]. 4 Tap or to the rear output, select "Sub.W". Radio ! Assigning functions to prevent radical changes in Advanced App Mode. En 25 Make the following cut off frequency of your iPhone. You can set audio output to select the desired setting value. For details on the iPhone keyboard layout. If you adjust the volume level of each source to the steering wheel The steering wheel control settings allow...

User Manual
Page 27
... factory settings. 1 Press the Home button to the default settings, except for each method, see the following settings and registered contents. ! Phone book data = For details, refer to the default or factory settings. ting on this page. Returning the AppRadio to the initial state on the Home screen. Method 1: Remove the vehicle battery Method 2: Press the Reset button The settings and registered content are reset to display...
... factory settings. 1 Press the Home button to the default settings, except for each method, see the following settings and registered contents. ! Phone book data = For details, refer to the default or factory settings. ting on this page. Returning the AppRadio to the initial state on the Home screen. Method 1: Remove the vehicle battery Method 2: Press the Reset button The settings and registered content are reset to display...
User Manual
Page 28
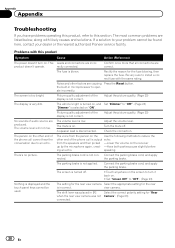
... the Reset button. the built-in [R] Select the correct polarity setting for "Rear when the rear view camera was not Camera". (Page 23) connected. 28 En Turn the mute off . ! The voice from the speakers and then picked -Lower the volume on . ! speaking There's no picture. Problems with this section. product doesn't operate. The vehicle's light is turned on, and Set "Dimmer" to "OFF". (Page 23) "Dimmer" is displayed and...
... the Reset button. the built-in [R] Select the correct polarity setting for "Rear when the rear view camera was not Camera". (Page 23) connected. 28 En Turn the mute off . ! The voice from the speakers and then picked -Lower the volume on . ! speaking There's no picture. Problems with this section. product doesn't operate. The vehicle's light is turned on, and Set "Dimmer" to "OFF". (Page 23) "Dimmer" is displayed and...

User Manual
Page 30
... application was exited on the iPhone during operation. The connected iPhone is not compatible with this is displayed. Unlock the iPhone and reconnect. Upgrade to this product. product with the lock engaged. Connect an iPhone that is old. AppRadio app has not been installed in the launch application message. Appendix Appendix Problems with Advanced App Mode screen Symptom Cause A black screen appears. [Ignore] was tapped...
... application was exited on the iPhone during operation. The connected iPhone is not compatible with this is displayed. Unlock the iPhone and reconnect. Upgrade to this product. product with the lock engaged. Connect an iPhone that is old. AppRadio app has not been installed in the launch application message. Appendix Appendix Problems with Advanced App Mode screen Symptom Cause A black screen appears. [Ignore] was tapped...

User Manual
Page 34
... General Display settings Rear Camera Screen OFF Dimmer LCD brightness Black level General settings Radio Region Local GPS Check System Reset Software Version Page 21 23 23 23 24 Page 24 24 24 27 24 Subwoofer settings RCA Preout Sub.W LPF Page 25 25 Language settings Language Keyboard Page 25 25 Source level adjustment settings Radio iPhone Handsfree Page 25 Other settings Steering Wheel Control Change Background Page 25 26 Time settings Date Clock mode Time Summer Time...
... General Display settings Rear Camera Screen OFF Dimmer LCD brightness Black level General settings Radio Region Local GPS Check System Reset Software Version Page 21 23 23 23 24 Page 24 24 24 27 24 Subwoofer settings RCA Preout Sub.W LPF Page 25 25 Language settings Language Keyboard Page 25 25 Source level adjustment settings Radio iPhone Handsfree Page 25 Other settings Steering Wheel Control Change Background Page 25 26 Time settings Date Clock mode Time Summer Time...


