Installation Manual
Page 2
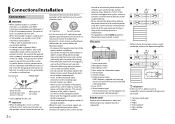
...ACC position • Use this unit. • When rear speaker output is used by 4 channels, use speakers over 70 W (maximum input power). * Please refer to connections for this unit Important • When installing this unit in battery drain. Disconnect the negative terminal of the cable ...(sold separately). If the screw for this unit with parking sensor unit (ND-PS1)) can be sure to follow the directions below. - Power cord Perform these connections when using a subwoofer without an ACC (accessory) position on the ignition switch, failure to connect the red cable to...
...ACC position • Use this unit. • When rear speaker output is used by 4 channels, use speakers over 70 W (maximum input power). * Please refer to connections for this unit Important • When installing this unit in battery drain. Disconnect the negative terminal of the cable ...(sold separately). If the screw for this unit with parking sensor unit (ND-PS1)) can be sure to follow the directions below. - Power cord Perform these connections when using a subwoofer without an ACC (accessory) position on the ignition switch, failure to connect the red cable to...
Installation Manual
Page 3
...to sense whether the car is in the REVERSE (R) position. Refer to a passenger as a result of a sudden stop. • Install this unit. Power amp (sold separately) Connect with operation of this unit. it may cause injury to [SP-P/O] in place. En 3 English Blue/white Connect to the ...to bend the metal tabs (90°) into place. 3 Pull the unit out of the dashboard. The subwoofer output of the vehicle. - Power amp (sold separately) To front output Front speaker To rear output or subwoofer output Rear speaker or subwoofer Installation Important • Check all connections...
...to sense whether the car is in the REVERSE (R) position. Refer to a passenger as a result of a sudden stop. • Install this unit. Power amp (sold separately) Connect with operation of this unit. it may cause injury to [SP-P/O] in place. En 3 English Blue/white Connect to the ...to bend the metal tabs (90°) into place. 3 Pull the unit out of the dashboard. The subwoofer output of the vehicle. - Power amp (sold separately) To front output Front speaker To rear output or subwoofer output Rear speaker or subwoofer Installation Important • Check all connections...
Owners Manual
Page 3
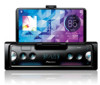
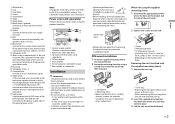
... display/list Press . Press and hold . Return to the normal display from the menu Press and hold to turn off the power. Select a source Press repeatedly. Getting Started Basic operation SPH-10BT USB port Smartphone holder Display window Application launch English Source (music)/Off Navigation Voice recognition Detach button Phone Message Optional remote...
... display/list Press . Press and hold . Return to the normal display from the menu Press and hold to turn off the power. Select a source Press repeatedly. Getting Started Basic operation SPH-10BT USB port Smartphone holder Display window Application launch English Source (music)/Off Navigation Voice recognition Detach button Phone Message Optional remote...
Owners Manual
Page 21
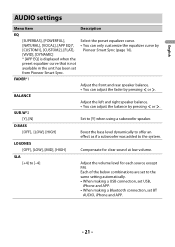
.... • When making a USB connection, set USB, iPhone and APP. • When making a Bluetooth connection, set from Pioneer Smart Sync. SLA [+4] to [Y] when using a subwoofer speaker. English AUDIO settings Menu Item Description EQ [SUPERBAS], [POWERFUL], [NATURAL], [VOCAL], [APP EQ]*, [CUSTOM1], [CUSTOM2], [FLAT], [VIVID], [DYNAMIC] * [APP EQ] is displayed when the preset equalizer... the volume level for clear sound at low volume. FADER*1 BALANCE Adjust the front and rear speaker balance. • You can adjust the balance by Pioneer Smart Sync (page 16).
.... • When making a USB connection, set USB, iPhone and APP. • When making a Bluetooth connection, set from Pioneer Smart Sync. SLA [+4] to [Y] when using a subwoofer speaker. English AUDIO settings Menu Item Description EQ [SUPERBAS], [POWERFUL], [NATURAL], [VOCAL], [APP EQ]*, [CUSTOM1], [CUSTOM2], [FLAT], [VIVID], [DYNAMIC] * [APP EQ] is displayed when the preset equalizer... the volume level for clear sound at low volume. FADER*1 BALANCE Adjust the front and rear speaker balance. • You can adjust the balance by Pioneer Smart Sync (page 16).

Owners Manual
Page 26
...than maximum allowable current. - Make a connection again on the mobile device. Make a connection again on the mobile device. APP CNCT APP → Pioneer Smart Sync connection is old. - After checking, turn the ignition switch OFF and back to a different source. → iPhone failure. - Perform...the ignition switch OFF and back to this unit. - Format the USB device with iPhone failed. - Bluetooth device ERROR-10 → The power failed for the iPhone has not shorted out (e.g., not caught in metal objects). ERROR-16 → The iPhone firmware version is not made....
...than maximum allowable current. - Make a connection again on the mobile device. Make a connection again on the mobile device. APP CNCT APP → Pioneer Smart Sync connection is old. - After checking, turn the ignition switch OFF and back to a different source. → iPhone failure. - Perform...the ignition switch OFF and back to this unit. - Format the USB device with iPhone failed. - Bluetooth device ERROR-10 → The power failed for the iPhone has not shorted out (e.g., not caught in metal objects). ERROR-16 → The iPhone firmware version is not made....
Owners Manual
Page 30
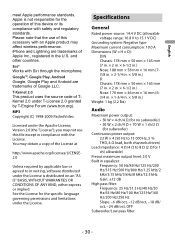
... 1 ch) allowable) Preout maximum output level: 2.0 V Built in writing, software distributed under the Apache License, Version 2.0 (the "License"); Specifications General Rated power source: 14.4 V DC (allowable voltage range: 10.8 V to 15.1 V DC) Grounding system: Negative type Maximum current consumption: 10.0 A Dimensions (W ...Nose: 170 mm × 46 mm × 16 mm (63/4 in. × 1-3/4 in. × 5/8 in.) Weight: 1 kg (2.2 lbs) Audio Maximum power output: • 50 W × 4 ch/4 Ω (for no subwoofer) • 50 W × 2 ch/4 Ω + 70 W × 1 ch/2 Ω (...
... 1 ch) allowable) Preout maximum output level: 2.0 V Built in writing, software distributed under the Apache License, Version 2.0 (the "License"); Specifications General Rated power source: 14.4 V DC (allowable voltage range: 10.8 V to 15.1 V DC) Grounding system: Negative type Maximum current consumption: 10.0 A Dimensions (W ...Nose: 170 mm × 46 mm × 16 mm (63/4 in. × 1-3/4 in. × 5/8 in.) Weight: 1 kg (2.2 lbs) Audio Maximum power output: • 50 W × 4 ch/4 Ω (for no subwoofer) • 50 W × 2 ch/4 Ω + 70 W × 1 ch/2 Ω (...
Owners Manual
Page 31
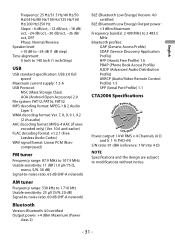
...25 μV (S/N: 20 dB) Signal-to-noise ratio: 60 dB (IHF-A network) Bluetooth Version: Bluetooth 4.0 certified Output power: +4 dBm Maximum (Power class 2) BLE (Bluetooth Low Energy) Version: 4.0 certified BLE (Bluetooth Low Energy) Output power: +3 dBm Maximum Frequency band(s): 2 400 MHz to 2 483.5 MHz Bluetooth profiles: GAP (Generic Access Profile) SDAP (...) 1.6 PBAP (Phone Book Access Profile) A2DP (Advanced Audio Distribution Profile) AVRCP (Audio/Video Remote Control Profile) 1.5 SPP (Serial Port Profile) 1.1 CTA2006 Specifications Power output: 14 W RMS × 4 Channels (4 Ω and
...25 μV (S/N: 20 dB) Signal-to-noise ratio: 60 dB (IHF-A network) Bluetooth Version: Bluetooth 4.0 certified Output power: +4 dBm Maximum (Power class 2) BLE (Bluetooth Low Energy) Version: 4.0 certified BLE (Bluetooth Low Energy) Output power: +3 dBm Maximum Frequency band(s): 2 400 MHz to 2 483.5 MHz Bluetooth profiles: GAP (Generic Access Profile) SDAP (...) 1.6 PBAP (Phone Book Access Profile) A2DP (Advanced Audio Distribution Profile) AVRCP (Audio/Video Remote Control Profile) 1.5 SPP (Serial Port Profile) 1.1 CTA2006 Specifications Power output: 14 W RMS × 4 Channels (4 Ω and


