

Owner's Manual
Page 2
... moisture. REFER SERVICING TO QUALIFIED SERVICE PERSONNEL. a plug that may require the use attachments/accessories specified by the manufacturer. 12) Use only with the cart, stand, tripod, bracket, or table specified by your outlet, consult an electrician for replacement of the obsolete outlet. 10) Protect the power cord from being walked...
... moisture. REFER SERVICING TO QUALIFIED SERVICE PERSONNEL. a plug that may require the use attachments/accessories specified by the manufacturer. 12) Use only with the cart, stand, tripod, bracket, or table specified by your outlet, consult an electrician for replacement of the obsolete outlet. 10) Protect the power cord from being walked...

Owner's Manual
Page 4
... 03 Supplied Accessories 12 04 Part Names 14 Plasma display 14 Remote control unit 16 05 Preparation 17 Installing the plasma display 17 Moving the plasma display 17 Attaching the Pioneer stand 17 Installing the Pioneer speaker 19 Preventing the plasma display from that shown in this manual are ...for buying this Pioneer product. However the method of the remote control unit 31 06 Basic Operations 32 Turning on the power 32 Turning off the power 32 Watching TV...
... 03 Supplied Accessories 12 04 Part Names 14 Plasma display 14 Remote control unit 16 05 Preparation 17 Installing the plasma display 17 Moving the plasma display 17 Attaching the Pioneer stand 17 Installing the Pioneer speaker 19 Preventing the plasma display from that shown in this manual are ...for buying this Pioneer product. However the method of the remote control unit 31 06 Basic Operations 32 Turning on the power 32 Turning off the power 32 Watching TV...

Owner's Manual
Page 7
... the plasma display, in order to prevent the unit from tipping over three times longer than the previous still/moving image. • After using the still picture mode from a TV, VCR, DVD player or any still image, it is best to view a normal moving pictures (e.g. Pioneer will ...and high reliability. However, please limit its lifetime, the luminosity of parts and accessories manufactured by the use to less than the Pioneer stand or installation bracket may cause uneven wear. To enjoy beautiful and bright images on the main unit are not covered by using only...
... the plasma display, in order to prevent the unit from tipping over three times longer than the previous still/moving image. • After using the still picture mode from a TV, VCR, DVD player or any still image, it is best to view a normal moving pictures (e.g. Pioneer will ...and high reliability. However, please limit its lifetime, the luminosity of parts and accessories manufactured by the use to less than the Pioneer stand or installation bracket may cause uneven wear. To enjoy beautiful and bright images on the main unit are not covered by using only...
Owner's Manual
Page 9
...may result in infringement of the legally enforceable rights of definition properly. Caution DO NOT PLACE THIS PRODUCT ON AN UNSTABLE CART, STAND, TRIPOD, BRACKET, OR TABLE. FOLLOW THE MANUFACTURER'S INSTRUCTIONS WHEN INSTALLING THE PRODUCT AND USE MOUNTING ACCESSORIES RECOMMENDED BY THE MANUFACTURER.... • We recommend that time. Such images may be avoided as plasma displays). Although caused by decreasing picture brightness and lowering power consumption. Note • When a program menu, TV Guide screen or frozen image is being shown. Important User Guidance Information 01...
...may result in infringement of the legally enforceable rights of definition properly. Caution DO NOT PLACE THIS PRODUCT ON AN UNSTABLE CART, STAND, TRIPOD, BRACKET, OR TABLE. FOLLOW THE MANUFACTURER'S INSTRUCTIONS WHEN INSTALLING THE PRODUCT AND USE MOUNTING ACCESSORIES RECOMMENDED BY THE MANUFACTURER.... • We recommend that time. Such images may be avoided as plasma displays). Although caused by decreasing picture brightness and lowering power consumption. Note • When a program menu, TV Guide screen or frozen image is being shown. Important User Guidance Information 01...

Owner's Manual
Page 10
...21. Do not cover or block these vents and openings since they can result in installation; The plasma display weighs about 66.7 kg (147.0 lbs.) for the PRO-150FD (including the stand and speaker) and about 45.1 kg (99.4 lbs.) for built-in electric shock and/or ... wall, be observed closely. 12. Overloading can also cause personal injuries and property damage if improperly handled. Safety checks-Upon completion of the plasma display to service the product yourself. a. Check the cords at least and use attachments not recommended by the manufacturer. 9. Servicing-Do not attempt...
...21. Do not cover or block these vents and openings since they can result in installation; The plasma display weighs about 66.7 kg (147.0 lbs.) for the PRO-150FD (including the stand and speaker) and about 45.1 kg (99.4 lbs.) for built-in electric shock and/or ... wall, be observed closely. 12. Overloading can also cause personal injuries and property damage if improperly handled. Safety checks-Upon completion of the plasma display to service the product yourself. a. Check the cords at least and use attachments not recommended by the manufacturer. 9. Servicing-Do not attempt...
Owner's Manual
Page 12
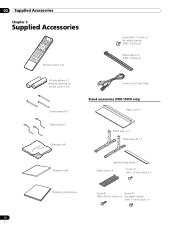
... only) AA size battery × 2 (Alkaline batteries for remote control unit) Speed clamp × 3 Bead band × 3 Cleaning cloth Power cord (2 m/6.6 feet) Stand accessories (PRO-150FD only) Base cover x 1 Stand pipe (L) x 1 Stand pipe (R) x 1 Warranty card Light-blocking shield x 1 Plastic band x 4 Screw ➀ (M5 x 10 mm: black) x 6 Operating instructions Screw ➁ Screw ➂ (M6...
... only) AA size battery × 2 (Alkaline batteries for remote control unit) Speed clamp × 3 Bead band × 3 Cleaning cloth Power cord (2 m/6.6 feet) Stand accessories (PRO-150FD only) Base cover x 1 Stand pipe (L) x 1 Stand pipe (R) x 1 Warranty card Light-blocking shield x 1 Plastic band x 4 Screw ➀ (M5 x 10 mm: black) x 6 Operating instructions Screw ➁ Screw ➂ (M6...
Owner's Manual
Page 17
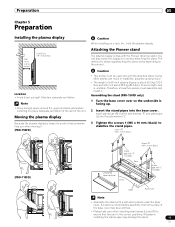
... ventilation. Caution • This product can also install the display on the product. Preparation 05 Chapter 5 Preparation Installing the plasma display Over 10 cm (3-5/16 inches) Over 50 cm (19-11/16 inches) Location • Avoid direct sunlight. Attaching the Pioneer stand The plasma display comes with a soft sheet placed under the base cover. Insert...
... ventilation. Caution • This product can also install the display on the product. Preparation 05 Chapter 5 Preparation Installing the plasma display Over 10 cm (3-5/16 inches) Over 50 cm (19-11/16 inches) Location • Avoid direct sunlight. Attaching the Pioneer stand The plasma display comes with a soft sheet placed under the base cover. Insert...

Owner's Manual
Page 19
Doing so might damage the plasma display panel or its ports or result in injury or damage to the unit. Installing the Pioneer speaker Insert the stand into any screws other than those supplied, otherwise the speaker may result in damage or fire. • Be... Plasma display 3 Replace the plasma display to detach the speaker before attaching the stand. If this happens, distance the monitor from input overload, please observe the following precautions: • Do not use the speaker with anything other than the plasma display. For speaker installation, see Installing the Pioneer ...
Doing so might damage the plasma display panel or its ports or result in injury or damage to the unit. Installing the Pioneer speaker Insert the stand into any screws other than those supplied, otherwise the speaker may result in damage or fire. • Be... Plasma display 3 Replace the plasma display to detach the speaker before attaching the stand. If this happens, distance the monitor from input overload, please observe the following precautions: • Do not use the speaker with anything other than the plasma display. For speaker installation, see Installing the Pioneer ...
Owner's Manual
Page 20
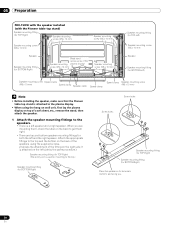
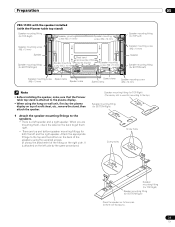
...the right speaker. It is attached on the right side. When you . 20 En 05 Preparation PRO-150FD with the speaker installed (with the Pioneer table top stand) Speaker mounting fitting (for TOP-Right) Speaker mounting screw (M5 x 10 mm) Speaker mounting screw (M5 x 10 mm) Speaker mounting screw ... cable Speed clamp Speed clamp Speaker mounting screw (M5 x 10 mm) Note • Before installing the speaker, make sure that the Pioneer table top stand is attached to the plasma display. • When using the supplied screws. (It shows the attachment of a soft sheet, etc., remove the...
...the right speaker. It is attached on the right side. When you . 20 En 05 Preparation PRO-150FD with the speaker installed (with the Pioneer table top stand) Speaker mounting fitting (for TOP-Right) Speaker mounting screw (M5 x 10 mm) Speaker mounting screw (M5 x 10 mm) Speaker mounting screw ... cable Speed clamp Speed clamp Speaker mounting screw (M5 x 10 mm) Note • Before installing the speaker, make sure that the Pioneer table top stand is attached to the plasma display. • When using the supplied screws. (It shows the attachment of a soft sheet, etc., remove the...
Owner's Manual
Page 23
...of the speakers using the hang on wall unit, first lay the plasma display on top of the fitting on the right side. When you . 23 En Preparation 05 PRO-110FD with the speaker installed (with the Pioneer table top stand) Speaker mounting fitting (for TOP-Right) Speaker mounting screw (M5 ...10 mm) Speaker cable Speed clamp Speed clamp Speaker mounting screw (M5 x 10 mm) Note • Before installing the speaker, make sure that the Pioneer table top stand is attached to the plasma display. • When using the supplied screws. (It shows the attachment of a soft sheet, etc., remove the...
...of the speakers using the hang on wall unit, first lay the plasma display on top of the fitting on the right side. When you . 23 En Preparation 05 PRO-110FD with the speaker installed (with the Pioneer table top stand) Speaker mounting fitting (for TOP-Right) Speaker mounting screw (M5 ...10 mm) Speaker cable Speed clamp Speed clamp Speaker mounting screw (M5 x 10 mm) Note • Before installing the speaker, make sure that the Pioneer table top stand is attached to the plasma display. • When using the supplied screws. (It shows the attachment of a soft sheet, etc., remove the...
Owner's Manual
Page 26
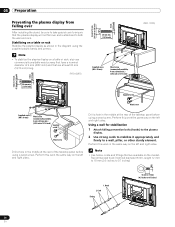
...) 8 mm to 15 mm (3/8 inch to 5/8 inch) 4 mm (5/32 inch) M8 05 Preparation Preventing the plasma display from falling over After installing the stand, be sure to take special care to ensure that the plasma display will not fall over and is stabilized to 0.7 inches) 4 5 26 En Stabilizing on a table or rack... Stabilize the plasma display as shown in the same way on the left and right sides. ...
...) 8 mm to 15 mm (3/8 inch to 5/8 inch) 4 mm (5/32 inch) M8 05 Preparation Preventing the plasma display from falling over After installing the stand, be sure to take special care to ensure that the plasma display will not fall over and is stabilized to 0.7 inches) 4 5 26 En Stabilizing on a table or rack... Stabilize the plasma display as shown in the same way on the left and right sides. ...
Owner's Manual
Page 27
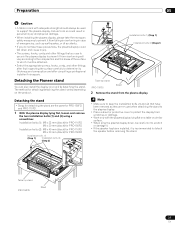
... (2) (Step 2) Table top stand (PRO-110FD) Sheet 2 Remove the stand from the plasma display. Detaching the stand • Steps for detaching the stand are re-used to support the plasma display. Table top stand (PRO-150FD) Sheet 27 En The method for attaching/detaching the stand varies depending on a rack by detaching the stand. Detaching the Pioneer stand You can also...
... (2) (Step 2) Table top stand (PRO-110FD) Sheet 2 Remove the stand from the plasma display. Detaching the stand • Steps for detaching the stand are re-used to support the plasma display. Table top stand (PRO-150FD) Sheet 27 En The method for attaching/detaching the stand varies depending on a rack by detaching the stand. Detaching the Pioneer stand You can also...

Owner's Manual
Page 28
... arrows and tighten the installation bolts (2) and (1) firmly using a screwdriver. For speaker installation, see Installing the Pioneer speaker on a table or similar surface. • When lying the plasma display down, be careful not to scratch or damage it. • If the speaker has been installed, it... is recommended to detach the speaker before attaching the stand. 28 En Plasma display Installation bolts (2): M8 x 40 mm (black) for PRO-110FD M6 x 20 mm (black) for PRO-150FD Installation bolts (1) (Step 2)...
... arrows and tighten the installation bolts (2) and (1) firmly using a screwdriver. For speaker installation, see Installing the Pioneer speaker on a table or similar surface. • When lying the plasma display down, be careful not to scratch or damage it. • If the speaker has been installed, it... is recommended to detach the speaker before attaching the stand. 28 En Plasma display Installation bolts (2): M8 x 40 mm (black) for PRO-110FD M6 x 20 mm (black) for PRO-150FD Installation bolts (1) (Step 2)...
Owner's Manual
Page 29
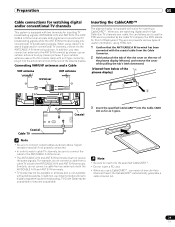
... a slot for inserting a CableCARD™. If your outdoor antenna uses a 75-ohm coaxial cable with an F-type connector, plug it goes. the POD stands for Point of the plasma display. the CableCARD™ automatically generates a cable channel list. 29 En use the POD service provided by the cable... coaxial cables as it into the Cable CARD slot as far as shown above. This service presents various types of useful information, using cable TV to watch cable TV channels, be sure to connect the cable to the ANT/CABLE A IN terminal as shown; Similarly, do not connect a cable from a...
... a slot for inserting a CableCARD™. If your outdoor antenna uses a 75-ohm coaxial cable with an F-type connector, plug it goes. the POD stands for Point of the plasma display. the CableCARD™ automatically generates a cable channel list. 29 En use the POD service provided by the cable... coaxial cables as it into the Cable CARD slot as far as shown above. This service presents various types of useful information, using cable TV to watch cable TV channels, be sure to connect the cable to the ANT/CABLE A IN terminal as shown; Similarly, do not connect a cable from a...
Owner's Manual
Page 62
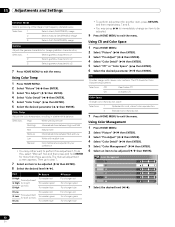
... ( / then ENTER). To do this, select "Manual" first and then press and hold ENTER for Color Transient Improvement. The manual adjustment screen appears. The CTI stands for more than three seconds. Then go to step 7. 7 Select an item to exit the menu. Using Color Management 1 Press HOME MENU. 2 Select "Picture" ( / then...
... ( / then ENTER). To do this, select "Manual" first and then press and hold ENTER for Color Transient Improvement. The manual adjustment screen appears. The CTI stands for more than three seconds. Then go to step 7. 7 Select an item to exit the menu. Using Color Management 1 Press HOME MENU. 2 Select "Picture" ( / then...
Owner's Manual
Page 63
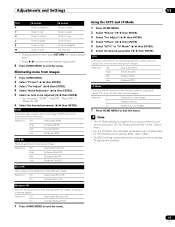
... for adjustment. 8 Press HOME MENU to exit the menu. Note • The I-P Mode setting is selectable when composite video or analog TV signals are received. 63 En This works for the following input signals: 480p, 720p, 1080p. • The 3DYC setting is disabled if... "Block NR" or "Mosquito NR". 6 Select the desired parameter ( / then ENTER). 3DNR Eliminates video noise for clean crisp images. 3DNR stands for still images 7 Press HOME MENU to progressive signals. Eliminating noise from interlace signals to exit the menu. Selections Off Deactivates 3DYC High Enhanced 3DYC...
... for adjustment. 8 Press HOME MENU to exit the menu. Note • The I-P Mode setting is selectable when composite video or analog TV signals are received. 63 En This works for the following input signals: 480p, 720p, 1080p. • The 3DYC setting is disabled if... "Block NR" or "Mosquito NR". 6 Select the desired parameter ( / then ENTER). 3DNR Eliminates video noise for clean crisp images. 3DNR stands for still images 7 Press HOME MENU to progressive signals. Eliminating noise from interlace signals to exit the menu. Selections Off Deactivates 3DYC High Enhanced 3DYC...
Owner's Manual
Page 123
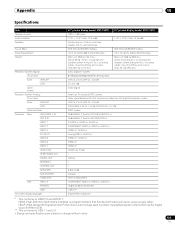
...: 55.5 kg (122.4 lbs.) Stand: 6.8 kg (15 lbs.) (including bolts) Speaker system: 4.4 kg (9.7 lbs.) (including cables, mounting fittings and screws) Total: 66.7 kg (147.0 lbs.) ATSC Digital TV system 8VSB/64QAM/256QAM/QPSK demodulation VHF Ch. 2 to 13 UHF Ch. 14 to 69 Ch. 2 to 135 Dolby Digital 50" plasma display model: PRO-110FD...
...: 55.5 kg (122.4 lbs.) Stand: 6.8 kg (15 lbs.) (including bolts) Speaker system: 4.4 kg (9.7 lbs.) (including cables, mounting fittings and screws) Total: 66.7 kg (147.0 lbs.) ATSC Digital TV system 8VSB/64QAM/256QAM/QPSK demodulation VHF Ch. 2 to 13 UHF Ch. 14 to 69 Ch. 2 to 135 Dolby Digital 50" plasma display model: PRO-110FD...


