

Owner's Manual
Page 4
...44 Setting the voluntary movie rating system (MPAA 44 Setting the TV ratings 44 Setting the TV Parental Guidelines (TV Guidelines 45 Blocking Not Rated TV programs ........ 45 Canadian rating systems 45 Setting Canadian English ratings ...Remote control unit 16 05 Preparation 17 Installing the plasma display 17 Moving the plasma display 17 Attaching the Pioneer stand 17 Installing the Pioneer speaker 19 Preventing the plasma display from that shown in this manual are for buying this Pioneer product. Illustrations shown in the explanatory drawings. Contents Thank you for the PRO...
...44 Setting the voluntary movie rating system (MPAA 44 Setting the TV ratings 44 Setting the TV Parental Guidelines (TV Guidelines 45 Blocking Not Rated TV programs ........ 45 Canadian rating systems 45 Setting Canadian English ratings ...Remote control unit 16 05 Preparation 17 Installing the plasma display 17 Moving the plasma display 17 Attaching the Pioneer stand 17 Installing the Pioneer speaker 19 Preventing the plasma display from that shown in this manual are for buying this Pioneer product. Illustrations shown in the explanatory drawings. Contents Thank you for the PRO...
Owner's Manual
Page 12
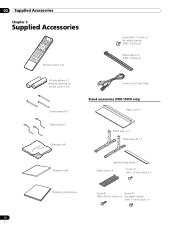
... unit Screw (M4 x 10 mm) x 2 (for plastic bands) (PRO-110FD only) Plastic band x 2 (PRO-110FD only) AA size battery × 2 (Alkaline batteries for remote control unit) Speed clamp × 3 Bead band × 3 Cleaning cloth Power cord (2 m/6.6 feet) Stand accessories (PRO-150FD only) Base cover x 1 Stand pipe (L) x 1 Stand pipe (R) x 1 Warranty card Light-blocking shield x 1 Plastic...
... unit Screw (M4 x 10 mm) x 2 (for plastic bands) (PRO-110FD only) Plastic band x 2 (PRO-110FD only) AA size battery × 2 (Alkaline batteries for remote control unit) Speed clamp × 3 Bead band × 3 Cleaning cloth Power cord (2 m/6.6 feet) Stand accessories (PRO-150FD only) Base cover x 1 Stand pipe (L) x 1 Stand pipe (R) x 1 Warranty card Light-blocking shield x 1 Plastic...
Owner's Manual
Page 14
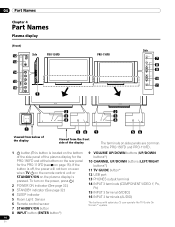
... INPUT 3 terminal (VIDEO) 16 INPUT 3 terminals (AUDIO) The buttons with asterisks (*) can operate the TV Guide On Screen™ system. 14 En To turn on even when TV a on the remote control unit or STANDBY/ON on the plasma display is located on the bottom of the side panel of the display The terminals... on side panels are common to the PRO-150FD and PRO-110FD. 1 a button (This button is pressed. If the...
... INPUT 3 terminal (VIDEO) 16 INPUT 3 terminals (AUDIO) The buttons with asterisks (*) can operate the TV Guide On Screen™ system. 14 En To turn on even when TV a on the remote control unit or STANDBY/ON on the plasma display is located on the bottom of the side panel of the display The terminals... on side panels are common to the PRO-150FD and PRO-110FD. 1 a button (This button is pressed. If the...
Owner's Manual
Page 32
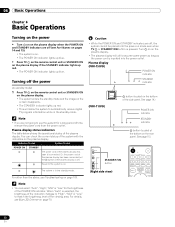
...are off, the system cannot be placed into the power outlet. Turning off the power (to standby mode) 1 Press TV a on the remote control unit or STANDBY/ON on the plasma display. • The system enters the standby mode and the image on the screen disappears. • The STANDBY ...lights up blue. Plasma display status indicators The table below shows the operational status of the system with the indicators on the bottom of the plasma display has been disconnected. Indicator Status System Status POWER ON STANDBY The power cord of the side panel. Plasma display (PRO-150FD) POWER ON...
...are off, the system cannot be placed into the power outlet. Turning off the power (to standby mode) 1 Press TV a on the remote control unit or STANDBY/ON on the plasma display. • The system enters the standby mode and the image on the screen disappears. • The STANDBY ...lights up blue. Plasma display status indicators The table below shows the operational status of the system with the indicators on the bottom of the plasma display has been disconnected. Indicator Status System Status POWER ON STANDBY The power cord of the side panel. Plasma display (PRO-150FD) POWER ON...
Owner's Manual
Page 44
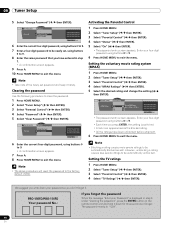
...ratings have entered in step 6 under "Clearing the password", press the ENTER button on the remote control unit and hold it down your password so you forget the password When the message "Enter...8226; A confirmation screen appears. 9 Press A. 10 Press HOME MENU to exit the menu. PRO-150FD/PRO-110FD Your password No.: If you don't forget it handy. We suggest you write down for ...). 5 Select the desired rating and change the setting ( / then ENTER). Setting the TV ratings 1 Press HOME MENU. 2 Select "Tuner Setup" ( / then ENTER). 3 Select "Parental Control" ( / then ENTER). 4 Select...
...ratings have entered in step 6 under "Clearing the password", press the ENTER button on the remote control unit and hold it down your password so you forget the password When the message "Enter...8226; A confirmation screen appears. 9 Press A. 10 Press HOME MENU to exit the menu. PRO-150FD/PRO-110FD Your password No.: If you don't forget it handy. We suggest you write down for ...). 5 Select the desired rating and change the setting ( / then ENTER). Setting the TV ratings 1 Press HOME MENU. 2 Select "Tuner Setup" ( / then ENTER). 3 Select "Parental Control" ( / then ENTER). 4 Select...
Owner's Manual
Page 59
...STANDARD DYNAMIC Description Automatically adjusts the brightness of the image to check image materials. This selection is shared by the external input and TV input sources. Item MOVIE PURE GAME USER Description For movies. For example, you may be seen on the screen. This selection is...not allow manual image quality adjustment. Note • You can also press AV SELECTION on the remote control unit to switch the viewing option. • If you have selected "OPTIMUM", you cannot select "Pro Adjust"; This is not a malfunction. • When "OPTIMUM" is switched between STANDARD and USER...
...STANDARD DYNAMIC Description Automatically adjusts the brightness of the image to check image materials. This selection is shared by the external input and TV input sources. Item MOVIE PURE GAME USER Description For movies. For example, you may be seen on the screen. This selection is...not allow manual image quality adjustment. Note • You can also press AV SELECTION on the remote control unit to switch the viewing option. • If you have selected "OPTIMUM", you cannot select "Pro Adjust"; This is not a malfunction. • When "OPTIMUM" is switched between STANDARD and USER...

Owner's Manual
Page 64
...and the image adjusted last time appears for "Reset" from the "Picture" menu or - Note • You cannot adjust any item while on the remote control unit. when you exit the selection from the "After" screen, the new entry is stored in the memory and the button no operation is...• If you perform sound adjustments with the following settings. when you select this function, "OPTIMUM" on the "AV Selection" menu, "Intelligent Mode" for "Pro Adjust" on the "Picture" menu and "Room Light Sensor" on the "Option" menu are stored in step 3, and then press ENTER. Each press of the...
...and the image adjusted last time appears for "Reset" from the "Picture" menu or - Note • You cannot adjust any item while on the remote control unit. when you exit the selection from the "After" screen, the new entry is stored in the memory and the button no operation is...• If you perform sound adjustments with the following settings. when you select this function, "OPTIMUM" on the "AV Selection" menu, "Intelligent Mode" for "Pro Adjust" on the "Picture" menu and "Room Light Sensor" on the "Option" menu are stored in step 3, and then press ENTER. Each press of the...

