
Operating Instructions
Page 5
...captions ........ 42 Sound adjustments 58 Selecting digital closed caption Power Control 59 parameters 43 Energy Save 59 Clock Setting 43 No Signal off (AV source only 59 10 TV Guide On Screen™ System Operation 44 Using the TV Guide On Screen™ system 44 Screen components 44...the screen (Side Mask 63 Room Light Sensor 64 Blue LED Dimmer 64 Orbiter 64 Video Pattern 64 11 Adjustments and Settings 53 AV Selection 53 Basic picture adjustments 54 Advanced picture adjustments 55 Using PureCinema 55 Using Intelligent Mode 55 Using the Picture Detail 55 Using ...
...captions ........ 42 Sound adjustments 58 Selecting digital closed caption Power Control 59 parameters 43 Energy Save 59 Clock Setting 43 No Signal off (AV source only 59 10 TV Guide On Screen™ System Operation 44 Using the TV Guide On Screen™ system 44 Screen components 44...the screen (Side Mask 63 Room Light Sensor 64 Blue LED Dimmer 64 Orbiter 64 Video Pattern 64 11 Adjustments and Settings 53 AV Selection 53 Basic picture adjustments 54 Advanced picture adjustments 55 Using PureCinema 55 Using Intelligent Mode 55 Using the Picture Detail 55 Using ...
Operating Instructions
Page 7
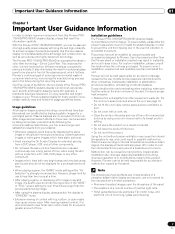
... for over . • Do not invert the product. The Pioneer PRO-1150HD/PRO-950HD incorporates the latest in the future during the manufacturing process and in color filter technology - Installation guidelines The Pioneer PRO-1150HD/PRO-950HD plasma display incorporates a very thin design. For custom installation, please...side should be displayed for a prolonged period of time. • When playing a game, the "GAME" mode setting within "AV Selection" is best to previous models. By following are typical effects and characteristics of a phosphor-based matrix display and as with top...
... for over . • Do not invert the product. The Pioneer PRO-1150HD/PRO-950HD incorporates the latest in the future during the manufacturing process and in color filter technology - Installation guidelines The Pioneer PRO-1150HD/PRO-950HD plasma display incorporates a very thin design. For custom installation, please...side should be displayed for a prolonged period of time. • When playing a game, the "GAME" mode setting within "AV Selection" is best to previous models. By following are typical effects and characteristics of a phosphor-based matrix display and as with top...

Operating Instructions
Page 15
...: Selects an input source of the plasma display. ("INPUT 1", "INPUT 2", "INPUT 3", "INPUT 4", "INPUT 5", "INPUT 6" and "INPUT 7") 4 SCREEN SIZE: Selects the screen size. 5 AV SELECTION: Selects audio and video settings. (AV source: OPTIMUM, STANDARD, DYNAMIC, MOVIE, PURE, GAME, USER. PC source: STANDARD, USER.) 6 INFO: Displays a channel banner when a TV program is used for...
...: Selects an input source of the plasma display. ("INPUT 1", "INPUT 2", "INPUT 3", "INPUT 4", "INPUT 5", "INPUT 6" and "INPUT 7") 4 SCREEN SIZE: Selects the screen size. 5 AV SELECTION: Selects audio and video settings. (AV source: OPTIMUM, STANDARD, DYNAMIC, MOVIE, PURE, GAME, USER. PC source: STANDARD, USER.) 6 INFO: Displays a channel banner when a TV program is used for...

Operating Instructions
Page 35
... HOME MENU Picture Sound Power Control Sleep Timer Option Tuner Setup Home Media Gallery HDMI Control Item AV Selection Contrast Brightness Color Tint Sharpness Pro Adjust Reset Treble Bass Balance Reset Sound Effect Energy Save No Signal off No Operation off Position Auto Size Side Mask HDMI Input HDMI ... 08 For PC source HOME MENU Picture Sound Power Control Sleep Timer Option Home Media Gallery HDMI Control Item AV Selection Contrast Brightness Red Green Blue Reset Same as the AV source Energy Save Power Management Auto Setup Manual Setup HDMI Input HDMI Control Setting Page 53 54 54 54 ...
... HOME MENU Picture Sound Power Control Sleep Timer Option Tuner Setup Home Media Gallery HDMI Control Item AV Selection Contrast Brightness Color Tint Sharpness Pro Adjust Reset Treble Bass Balance Reset Sound Effect Energy Save No Signal off No Operation off Position Auto Size Side Mask HDMI Input HDMI ... 08 For PC source HOME MENU Picture Sound Power Control Sleep Timer Option Home Media Gallery HDMI Control Item AV Selection Contrast Brightness Red Green Blue Reset Same as the AV source Energy Save Power Management Auto Setup Manual Setup HDMI Input HDMI Control Setting Page 53 54 54 54 ...
Operating Instructions
Page 53
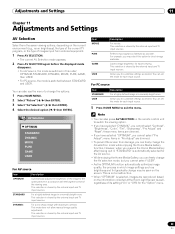
...each input source. menu items in "Pro Adjust" are dimmed. • To prevent the screen from external equipment. 1 Press AV SELECTION. • The current AV Selection mode appears. 2 Press AV SELECTION again before the displayed mode disappears. • For AV source, the mode is switched in ...you have selected "OPTIMUM", you cannot select "Pro Adjust"; You can also use the menu to the optimum level in which image settings such as desired. AV Selection OPTIMUM STANDARD DYNAMIC MOVIE PURE GAME USER For AV source Item OPTIMUM STANDARD DYNAMIC Description Automatically adjusts ...
...each input source. menu items in "Pro Adjust" are dimmed. • To prevent the screen from external equipment. 1 Press AV SELECTION. • The current AV Selection mode appears. 2 Press AV SELECTION again before the displayed mode disappears. • For AV source, the mode is switched in ...you have selected "OPTIMUM", you cannot select "Pro Adjust"; You can also use the menu to the optimum level in which image settings such as desired. AV Selection OPTIMUM STANDARD DYNAMIC MOVIE PURE GAME USER For AV source Item OPTIMUM STANDARD DYNAMIC Description Automatically adjusts ...

Operating Instructions
Page 54
... functions, such as you open the "Picture" menu. • When an adjustment screen is displayed. Picture AV Selection Contrast Brightness Color Tint Sharpness Pro Adjust Reset OPTIMUM 40 0 0 0 0 For PC source, the following screen appears: Picture AV Selection Contrast Brightness Red Green Blue Reset STANDARD 40 0 0 0 0 4 Select the desired level ( / ). A confirmation screen appears...
... functions, such as you open the "Picture" menu. • When an adjustment screen is displayed. Picture AV Selection Contrast Brightness Color Tint Sharpness Pro Adjust Reset OPTIMUM 40 0 0 0 0 For PC source, the following screen appears: Picture AV Selection Contrast Brightness Red Green Blue Reset STANDARD 40 0 0 0 0 4 Select the desired level ( / ). A confirmation screen appears...

Operating Instructions
Page 58
... image adjusted last time appears for comparison. A warning message appears. • When you switch to another parameter, make sure to change the "AV Selection" parameter, the new entry in the current parameter is performed for 60 seconds, all the items, press / to select "Reset" in ... menu. Each press of the button toggles between different parameters on the "AV Selection" menu ("STANDARD" and "MOVIE", for example). • When you select this function, "OPTIMUM" on the "AV Selection" menu, "Intelligent Mode" for "Pro Adjust" on the "Picture" menu and "Room Light Sensor" on the...
... image adjusted last time appears for comparison. A warning message appears. • When you switch to another parameter, make sure to change the "AV Selection" parameter, the new entry in the current parameter is performed for 60 seconds, all the items, press / to select "Reset" in ... menu. Each press of the button toggles between different parameters on the "AV Selection" menu ("STANDARD" and "MOVIE", for example). • When you select this function, "OPTIMUM" on the "AV Selection" menu, "Intelligent Mode" for "Pro Adjust" on the "Picture" menu and "Room Light Sensor" on the...

Operating Instructions
Page 59
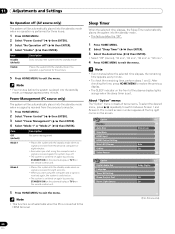
... differs depending on . • You cannot adjust the sound effect for 15 minutes. 1 Press HOME MENU. 2 Select "Power Control" ( / then ENTER). 3 Select "No Signal off (AV source only) The system will become effective as soon as you may notice a change the Energy Save mode, you disconnect the headphones. • The effect...
... differs depending on . • You cannot adjust the sound effect for 15 minutes. 1 Press HOME MENU. 2 Select "Power Control" ( / then ENTER). 3 Select "No Signal off (AV source only) The system will become effective as soon as you may notice a change the Energy Save mode, you disconnect the headphones. • The effect...
Operating Instructions
Page 60
... min". 4 Press HOME MENU to exit the menu. To select the desired menu, press / repeatedly to the HDMI terminal. (For AV source) 60 En 11 Adjustments and Settings No Operation off (AV source only) The system will be automatically placed into the standby mode when no operation is performed for eight seconds...
... min". 4 Press HOME MENU to exit the menu. To select the desired menu, press / repeatedly to the HDMI terminal. (For AV source) 60 En 11 Adjustments and Settings No Operation off (AV source only) The system will be automatically placed into the standby mode when no operation is performed for eight seconds...

Operating Instructions
Page 61
... plasma display and switch it on before starting Auto Setup. • Depending on the levels of broadcasting signals. Adjustments and Settings 11 Image position adjustment (AV source only) Adjusts the horizontal and vertical positions of images on conditions. Option Auto Setup Manual Setup 1 Press HOME MENU. 2 Select "Option" ( / then ENTER). 3 Select...
... plasma display and switch it on before starting Auto Setup. • Depending on the levels of broadcasting signals. Adjustments and Settings 11 Image position adjustment (AV source only) Adjusts the horizontal and vertical positions of images on conditions. Option Auto Setup Manual Setup 1 Press HOME MENU. 2 Select "Option" ( / then ENTER). 3 Select...

Operating Instructions
Page 62
...8226; The "On" setting is changed. • This function may differ depending on some programs For 14:9 letterbox pictures. For the PRO-950HD, the number of panel pixels is different, and thus signal processing and actual viewing conditions will vary slightly. • It is not recommended...of the screen For 16:9 squeezed pictures For 16:9 letterbox pictures. If this function to exit the menu. Bars may cause uneven wear. AV source Item 4:3 WIDE FULL ZOOM CINEMA Description For 4:3 "standard" pictures. 11 Adjustments and Settings 7 Press HOME MENU to establish a preference...
...8226; The "On" setting is changed. • This function may differ depending on some programs For 14:9 letterbox pictures. For the PRO-950HD, the number of panel pixels is different, and thus signal processing and actual viewing conditions will vary slightly. • It is not recommended...of the screen For 16:9 squeezed pictures For 16:9 letterbox pictures. If this function to exit the menu. Bars may cause uneven wear. AV source Item 4:3 WIDE FULL ZOOM CINEMA Description For 4:3 "standard" pictures. 11 Adjustments and Settings 7 Press HOME MENU to establish a preference...
Operating Instructions
Page 64
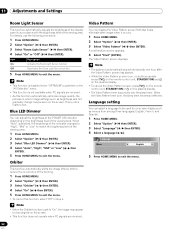
..." ( / then ENTER). 5 Press HOME MENU to reduce the occurrence of the viewing area. Note • This function is disabled when "OPTIMUM" is selected on the "AV Selection" menu. • This function is set to "On", the image may be used for on-screen display such as brightness and tint gradually change...
..." ( / then ENTER). 5 Press HOME MENU to reduce the occurrence of the viewing area. Note • This function is disabled when "OPTIMUM" is selected on the "AV Selection" menu. • This function is set to "On", the image may be used for on-screen display such as brightness and tint gradually change...
Operating Instructions
Page 65
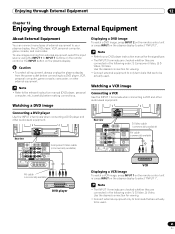
... a DVD image Connecting a DVD player Use the INPUT 2 terminals when connecting a DVD player and other audiovisual equipment. 4 5 Rear view S-Video cable (commercially available) AV cable (commercially available) AV cable (commercially available) DVD player VCR Displaying a VCR image To watch a DVD image, press INPUT 2 on the remote control unit or press INPUT on...
... a DVD image Connecting a DVD player Use the INPUT 2 terminals when connecting a DVD player and other audiovisual equipment. 4 5 Rear view S-Video cable (commercially available) AV cable (commercially available) AV cable (commercially available) DVD player VCR Displaying a VCR image To watch a DVD image, press INPUT 2 on the remote control unit or press INPUT on...
Operating Instructions
Page 68
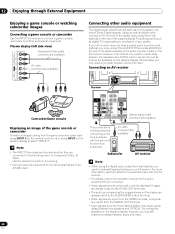
... Optical digital cable (commercially available) Displaying an image of the plasma display. This connection is not required when connecting an AV amp equipped with the AV receiver. • For details, refer to the operation manual for viewing. • Connect external equipment to only terminals ...OUT terminals (AUDIO) on the rear of the plasma display to a subwoofer. Try muting the speakers on the AV receiver. AV cable (commercially available) Subwoofer AV receiver Note • When using the digital audio output terminal (optical), you may cause audio delays between the ...
... Optical digital cable (commercially available) Displaying an image of the plasma display. This connection is not required when connecting an AV amp equipped with the AV receiver. • For details, refer to the operation manual for viewing. • Connect external equipment to only terminals ...OUT terminals (AUDIO) on the rear of the plasma display to a subwoofer. Try muting the speakers on the AV receiver. AV cable (commercially available) Subwoofer AV receiver Note • When using the digital audio output terminal (optical), you may cause audio delays between the ...

Operating Instructions
Page 69
... For Dolby Digital encoded signals, outputs in the PCM format regardless of the types of the plasma display RGB cable (commercially available) AV cable with a mini plug (commercially available) (When PC audio is connected) Personal computer Displaying an image from a personal computer When... Setup. Signal names for audio-visual equipment. If the personal computer image does not come in clearly, you may not correctly function, depending on your AV receiver. 1 Press HOME MENU. 2 Select "Option" ( / then ENTER). 3 Select "Digital Audio Out" ( / then ENTER). 4 Select "Dolby Digital" or ...
... For Dolby Digital encoded signals, outputs in the PCM format regardless of the types of the plasma display RGB cable (commercially available) AV cable with a mini plug (commercially available) (When PC audio is connected) Personal computer Displaying an image from a personal computer When... Setup. Signal names for audio-visual equipment. If the personal computer image does not come in clearly, you may not correctly function, depending on your AV receiver. 1 Press HOME MENU. 2 Select "Option" ( / then ENTER). 3 Select "Digital Audio Out" ( / then ENTER). 4 Select "Dolby Digital" or ...

Operating Instructions
Page 70
... display and other equipment between the plasma display and other Pioneer equipment. Note • Make sure that came with a Pioneer AV receiver. SR+ presents functions such as option). 70 En Do not connect other Pioneer equipment having the logo. Face the remote control units to...SR+. For more pieces of the plasma display supports SR+, which allows linked operations with the Pioneer AV receiver supporting SR+. You can then operate the connected equipment by sending commands from other Pioneer equipment. Plasma display 4 5 Rear view a CONTROL IN OUT b CONTROL IN OUT c ...
... display and other equipment between the plasma display and other Pioneer equipment. Note • Make sure that came with a Pioneer AV receiver. SR+ presents functions such as option). 70 En Do not connect other Pioneer equipment having the logo. Face the remote control units to...SR+. For more pieces of the plasma display supports SR+, which allows linked operations with the Pioneer AV receiver supporting SR+. You can then operate the connected equipment by sending commands from other Pioneer equipment. Plasma display 4 5 Rear view a CONTROL IN OUT b CONTROL IN OUT c ...

Operating Instructions
Page 88
... Function Description Usable devices Playback of The proper input source is automatically selected Recorder/ content and the content is turned Off Recorder/ player/AV system Note • When using on-screen control panel on the display menu language is transferred to the recorder or player connected to .../player operation can be controlled onscreen or with the recorder or player. For details, see the operation manual that can operate such Pioneer devices as a recorder, player or AV system support the HDMI Control functions using the remote control of the plasma display.
... Function Description Usable devices Playback of The proper input source is automatically selected Recorder/ content and the content is turned Off Recorder/ player/AV system Note • When using on-screen control panel on the display menu language is transferred to the recorder or player connected to .../player operation can be controlled onscreen or with the recorder or player. For details, see the operation manual that can operate such Pioneer devices as a recorder, player or AV system support the HDMI Control functions using the remote control of the plasma display.

Operating Instructions
Page 89
... CONTROL turns the control panel screen off to return to the HDMI Control menu. Using the HDMI Control 13 On-screen control panel For an AV system HDMI Control 1 SURROUND+ 2 INPUT3 INPUT+ SURROUND4 HDMI CONTROL Exit 1 Switches the surround mode in order 5 2 Switches the input source ...'s pop-up menu on the player or to the HDMI Control menu. Connecting an AV amp/BD player 4 5 Rear view 4 5 Optical digital cable (commercially available) AV cable (commercially available) AV amp HDMI compliant cable (HDMI cable having the HDMI mark) BD player 89 En To resume ...
... CONTROL turns the control panel screen off to return to the HDMI Control menu. Using the HDMI Control 13 On-screen control panel For an AV system HDMI Control 1 SURROUND+ 2 INPUT3 INPUT+ SURROUND4 HDMI CONTROL Exit 1 Switches the surround mode in order 5 2 Switches the input source ...'s pop-up menu on the player or to the HDMI Control menu. Connecting an AV amp/BD player 4 5 Rear view 4 5 Optical digital cable (commercially available) AV cable (commercially available) AV amp HDMI compliant cable (HDMI cable having the HDMI mark) BD player 89 En To resume ...

Operating Instructions
Page 90
... "INPUT 4", "INPUT 5", "INPUT 6" or "INPUT 7" ( / then ENTER). For details, see the operation manual that support the HDMI Control functions, check the Pioneer Web site (see the illustration). Be sure that supports the HDMI Control and is connected through the selected INPUT terminal is available for "HDMI Control... "Input Setting" for the HDMI Control functions. 6 Press HOME MENU to the HDMI terminal using an optical digital cable and an AV cable (commercially available), and the recorder/ player to exit the menu. 90 En Setting the HDMI Control Selecting the input terminal Select...
... "INPUT 4", "INPUT 5", "INPUT 6" or "INPUT 7" ( / then ENTER). For details, see the operation manual that support the HDMI Control functions, check the Pioneer Web site (see the illustration). Be sure that supports the HDMI Control and is connected through the selected INPUT terminal is available for "HDMI Control... "Input Setting" for the HDMI Control functions. 6 Press HOME MENU to the HDMI terminal using an optical digital cable and an AV cable (commercially available), and the recorder/ player to exit the menu. 90 En Setting the HDMI Control Selecting the input terminal Select...

Operating Instructions
Page 91
... connected devices. • The HDMI Control menu is not selectable when "Off" is selected in "Input Setting" for the connected Pioneer AV system even if the system is placed into standby during HDMI Control operations. (factory default is valid for the connection and setting. ...between the plasma display and the connected device. • To use the HDMI Control functions, a Pioneer recorder, player or AV system that can enjoy various functions with the connected Pioneer recorder, player or AV system that the HDMI Control function does not operate. 3 Select the desired device ( / then ...
... connected devices. • The HDMI Control menu is not selectable when "Off" is selected in "Input Setting" for the connected Pioneer AV system even if the system is placed into standby during HDMI Control operations. (factory default is valid for the connection and setting. ...between the plasma display and the connected device. • To use the HDMI Control functions, a Pioneer recorder, player or AV system that can enjoy various functions with the connected Pioneer recorder, player or AV system that the HDMI Control function does not operate. 3 Select the desired device ( / then ...