Owner's Manual
Page 18
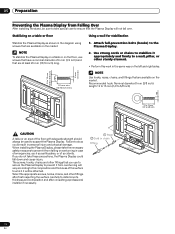
...) CAUTION A table or an area of the floor with adequate strength should always be used to the Plasma Display. 2. Attach fall-prevention bolts (hooks) to support the Plasma Display. NOTE Use hooks, ropes, chains, and fittings that are available on the market. Failure to a wall, pillar, or other sturdy element. •...
...) CAUTION A table or an area of the floor with adequate strength should always be used to the Plasma Display. 2. Attach fall-prevention bolts (hooks) to support the Plasma Display. NOTE Use hooks, ropes, chains, and fittings that are available on the market. Failure to a wall, pillar, or other sturdy element. •...
Owner's Manual
Page 20
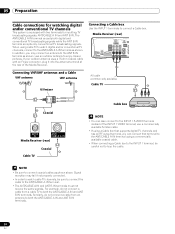
... is equipped with an F-type connector, plug it into the antenna terminal at the rear of the INPUT 1 VIDEO terminal; When using a Cable box that supports digital TV channels and has an RF output terminal, you may fail if not properly connected. • In order to watch digital and/or conventional...
... is equipped with an F-type connector, plug it into the antenna terminal at the rear of the INPUT 1 VIDEO terminal; When using a Cable box that supports digital TV channels and has an RF output terminal, you may fail if not properly connected. • In order to watch digital and/or conventional...
Owner's Manual
Page 69
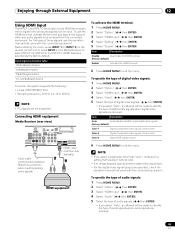
... the connected equipment. To use the HDMI terminal, activate the terminal and specify the types of digital video signals when digital video signals are not supported. Input signal correlation table 1920[email protected]/60Hz 720[email protected]/60Hz 1280[email protected]/60Hz 720(1440)...;[email protected]/60Hz For audio, the system supports the following: • Linear PCM (STEREO 2ch) • Sampling frequency: 32 kHz, 44.1 kHz, 48 kHz NOTE • PC signals are received...
... the connected equipment. To use the HDMI terminal, activate the terminal and specify the types of digital video signals when digital video signals are not supported. Input signal correlation table 1920[email protected]/60Hz 720[email protected]/60Hz 1280[email protected]/60Hz 720(1440)...;[email protected]/60Hz For audio, the system supports the following: • Linear PCM (STEREO 2ch) • Sampling frequency: 32 kHz, 44.1 kHz, 48 kHz NOTE • PC signals are received...
Owner's Manual
Page 72
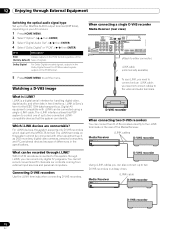
... coming from external input sources and personal computers. Connecting D-VHS recorders Use the i.LINK terminals when connecting D-VHS recorders. The i.LINK interface allows this system supports only D-VHS recorders which deal with other data in the Dolby Digital format. For PCM encoded signals, outputs in the specifications.
... coming from external input sources and personal computers. Connecting D-VHS recorders Use the i.LINK terminals when connecting D-VHS recorders. The i.LINK interface allows this system supports only D-VHS recorders which deal with other data in the Dolby Digital format. For PCM encoded signals, outputs in the specifications.
Owner's Manual
Page 73
... the case, connect the analog output terminals on the D-VHS recorder to play back properly. See page 68. • This system supports the Digital Transmission Content Protection (DTCP) technology. You cannot use D-VHS tape. If this system. You can result in image and sound... interruption. • Some D-VHS recorders that support i.LINK. Enjoying through External Equipment 12 Precautions about i.LINK connections • Use S400 i.LINK cables that came with your D-VHS recorder. ...
... the case, connect the analog output terminals on the D-VHS recorder to play back properly. See page 68. • This system supports the Digital Transmission Content Protection (DTCP) technology. You cannot use D-VHS tape. If this system. You can result in image and sound... interruption. • Some D-VHS recorders that support i.LINK. Enjoying through External Equipment 12 Precautions about i.LINK connections • Use S400 i.LINK cables that came with your D-VHS recorder. ...
Owner's Manual
Page 75
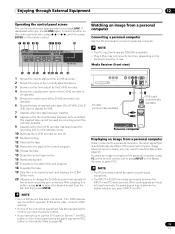
...-compatible. • Plug & Play may need to use Auto Setup. The inserted tape cannot be operated. 6 Shows the type of the connected equipment has been supported for audio-visual equipment. • The INPUT 4 AUDIO terminals are input to these terminals, the same signal type is in the standby mode. 10 Switches...
...-compatible. • Plug & Play may need to use Auto Setup. The inserted tape cannot be operated. 6 Shows the type of the connected equipment has been supported for audio-visual equipment. • The INPUT 4 AUDIO terminals are input to these terminals, the same signal type is in the standby mode. 10 Switches...
Owner's Manual
Page 78
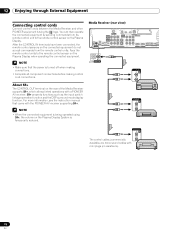
...manual that the power is temporarily reduced. Face the remote control units to the remote control sensor on the rear of the Media Receiver supports SR+, which allows linked operations with mini plugs (no resistance). 78 En You can then operate the connected equipment by sending commands from... the remote control units. NOTE • Make sure that came with the PIONEER AV receiver supporting SR+. 12 Enjoying through External Equipment Connecting control cords Connect control cords between the Media Receiver and other...
...manual that the power is temporarily reduced. Face the remote control units to the remote control sensor on the rear of the Media Receiver supports SR+, which allows linked operations with mini plugs (no resistance). 78 En You can then operate the connected equipment by sending commands from... the remote control units. NOTE • Make sure that came with the PIONEER AV receiver supporting SR+. 12 Enjoying through External Equipment Connecting control cords Connect control cords between the Media Receiver and other...
Owner's Manual
Page 88
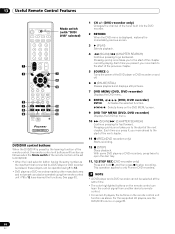
... color-highlighted buttons on the remote control can also be operated using the remote control unit if 1 to 12 have learned the functions. For the supported LD players, see the DVD/DVR column on the remote control unit function as the input terminal connected to a DVD player or DVD recorder is... recorders, press twice to open the disc tray. 11, 12 STOP REC (DVD recorder only) Press and hold , and then press to only Pioneer DVD recorders.
... color-highlighted buttons on the remote control can also be operated using the remote control unit if 1 to 12 have learned the functions. For the supported LD players, see the DVD/DVR column on the remote control unit function as the input terminal connected to a DVD player or DVD recorder is... recorders, press twice to open the disc tray. 11, 12 STOP REC (DVD recorder only) Press and hold , and then press to only Pioneer DVD recorders.