Owner's Manual
Page 3
... limited run created for New Owners ...28 4.2.1 Extend Your Panel Life ...28 4.2.2 Adjust the Power Indicator Brightness ...28 4.2.3 Set Input Priority...28 4.2.4 Turn On the Image Orbiter ...29 4.2.5 Trigger the Screen-Saving Video Pattern Periodically 29 4.2.6 Activate Energy ... Flat Panel Display 7 1.2.1 Control Buttons and More on the Flat Panel Display 7 1.2.2 Operating the Remote Control ...8 1.2.3 Buttons on purchasing a Pioneer Elite KURO monitor. TABLE OF CONTENTS Congratulations on the Remote Control ...10 2 Install Your Flat Panel Display ...12 2.1 Use the Optional Table Top...
... limited run created for New Owners ...28 4.2.1 Extend Your Panel Life ...28 4.2.2 Adjust the Power Indicator Brightness ...28 4.2.3 Set Input Priority...28 4.2.4 Turn On the Image Orbiter ...29 4.2.5 Trigger the Screen-Saving Video Pattern Periodically 29 4.2.6 Activate Energy ... Flat Panel Display 7 1.2.1 Control Buttons and More on the Flat Panel Display 7 1.2.2 Operating the Remote Control ...8 1.2.3 Buttons on purchasing a Pioneer Elite KURO monitor. TABLE OF CONTENTS Congratulations on the Remote Control ...10 2 Install Your Flat Panel Display ...12 2.1 Use the Optional Table Top...
Owner's Manual
Page 4
...5.1.1 AV Source through the Remote Control...31 5.1.2 Choose an AV Source through the Home Menu 32 5.1.3 Choose a PC Source...32 5.1.4 Set the Panel to Recognize a Game Console ...32 5.2 Adjust Specific Picture Elements ...33 5.2.1 Choose a Screen Size (Automatically or Manually 33 ...to the Remote Control 47 6.1.3 Issue a Library Search for a Manufacturer Code 47 6.1.4 Clear Added Manufacturer Codes from the Remote Control 48 6.1.5 Control a Pioneer Receiver ...48 6.1.6 Control a Cable (CBL) or Satellite (SAT) System 49 6.1.7 Control a Video Cassette Recorder (VCR) ...50 6.1.8 Control a ...
...5.1.1 AV Source through the Remote Control...31 5.1.2 Choose an AV Source through the Home Menu 32 5.1.3 Choose a PC Source...32 5.1.4 Set the Panel to Recognize a Game Console ...32 5.2 Adjust Specific Picture Elements ...33 5.2.1 Choose a Screen Size (Automatically or Manually 33 ...to the Remote Control 47 6.1.3 Issue a Library Search for a Manufacturer Code 47 6.1.4 Clear Added Manufacturer Codes from the Remote Control 48 6.1.5 Control a Pioneer Receiver ...48 6.1.6 Control a Cable (CBL) or Satellite (SAT) System 49 6.1.7 Control a Video Cassette Recorder (VCR) ...50 6.1.8 Control a ...
Owner's Manual
Page 10
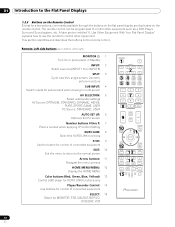
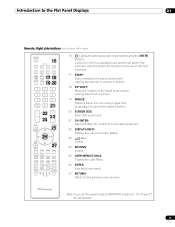
...INPUT: 4 Switch inputs for sub screens when viewing in multi-screen AV SELECTION: 5 Select audio/video settings AV Source: OPTIMUM, STANDARD, DYNAMIC, MOVIE, PURE, SPORT, GAME, USER PC Source: STANDARD, USER AUTO SET UP: 6 Optimize the PC screen Number buttons 0 thru 9: 7 Enter a number when applying IP... Control Setting KURO LINK: 8 Select the KURO LINK functions P/CH: 9 Use the button for control of connected...
...INPUT: 4 Switch inputs for sub screens when viewing in multi-screen AV SELECTION: 5 Select audio/video settings AV Source: OPTIMUM, STANDARD, DYNAMIC, MOVIE, PURE, SPORT, GAME, USER PC Source: STANDARD, USER AUTO SET UP: 6 Optimize the PC screen Number buttons 0 thru 9: 7 Enter a number when applying IP... Control Setting KURO LINK: 8 Select the KURO LINK functions P/CH: 9 Use the button for control of connected...
Owner's Manual
Page 11
... MUTING: Invalid 25 USER MENU/TOOLS: Display the User Menu 26 ENTER: Execute a command 27 RETURN: Return to the previous menu screen Note: If you set the preset code to right) MONITOR INPUT 1 2 3 16 4 5 6 7 8 SUB PIP 17 18 SPLIT INPUT SWAP SHIFT AV AUTO SCREEN 19 20 SELECTION SETUP FREEZE SIZE...
... MUTING: Invalid 25 USER MENU/TOOLS: Display the User Menu 26 ENTER: Execute a command 27 RETURN: Return to the previous menu screen Note: If you set the preset code to right) MONITOR INPUT 1 2 3 16 4 5 6 7 8 SUB PIP 17 18 SPLIT INPUT SWAP SHIFT AV AUTO SCREEN 19 20 SELECTION SETUP FREEZE SIZE...
Owner's Manual
Page 22
...61548;) to exit the menu screen. 22 En The sections below to lock in features, choose the input source, select a language and set the picture quality. Most commands and settings are programmed through 8) on the back of some built-in the change. Press INPUT (buttons 1 through this menu. MONITOR INPUT 1... 2 3 4 5 6 7 8 SUB PIP SPLIT INPUT SWAP SHIFT AV AUTO SCREEN SELECTION SET UP FREEZE SIZE 3.2.2 Explore the Home Menu The Home Menu is properly connected to use the Home Menu and simplified User Menu for that menu...
...61548;) to exit the menu screen. 22 En The sections below to lock in features, choose the input source, select a language and set the picture quality. Most commands and settings are programmed through 8) on the back of some built-in the change. Press INPUT (buttons 1 through this menu. MONITOR INPUT 1... 2 3 4 5 6 7 8 SUB PIP SPLIT INPUT SWAP SHIFT AV AUTO SCREEN SELECTION SET UP FREEZE SIZE 3.2.2 Explore the Home Menu The Home Menu is properly connected to use the Home Menu and simplified User Menu for that menu...
Owner's Manual
Page 23
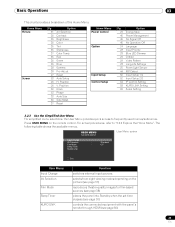
...Off Language Input Priority Blue LED Dimmer Orbiter Video Pattern Long Life Settings Room Light Sensor PIP Detect Input Setup 1/2 Input Setup 2/2 IP Control Setting KURO LINK Setting Serial Setting 3.2.3 Use the Simplified User Menu For simplified menu selections, the ...31) reproduces theatre-quality images for film-based sources (see page 38) places the panel into Standby when the set time elapses (see page 30) controls the connected equipment with the panel's remote through HDMI (see page 56... Brightness Color Tint Sharpness Color Temp Red Green Blue Gamma Pro Adjust Reset Auto Setup H.
...Off Language Input Priority Blue LED Dimmer Orbiter Video Pattern Long Life Settings Room Light Sensor PIP Detect Input Setup 1/2 Input Setup 2/2 IP Control Setting KURO LINK Setting Serial Setting 3.2.3 Use the Simplified User Menu For simplified menu selections, the ...31) reproduces theatre-quality images for film-based sources (see page 38) places the panel into Standby when the set time elapses (see page 30) controls the connected equipment with the panel's remote through HDMI (see page 56... Brightness Color Tint Sharpness Color Temp Red Green Blue Gamma Pro Adjust Reset Auto Setup H.

Owner's Manual
Page 24
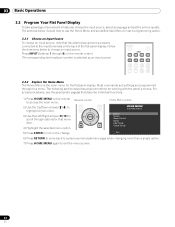
To assign a different language for menus and on-screen information, follow the steps below. 1 ) Access Language through the Option menu. 03 Basic Operations 3.2.4 Assign a Language The default menu language is English. Language : Input Priority : Blue LED Dimmer : Orbiter : Video Pattern : Long Life Settings : Room Light Sensor : PIP Detect : English Off Low Off Off No Off Auto 2 ) Select a language from the submenu. 3 ) Press HOME MENU to exit the menu. 24 En
To assign a different language for menus and on-screen information, follow the steps below. 1 ) Access Language through the Option menu. 03 Basic Operations 3.2.4 Assign a Language The default menu language is English. Language : Input Priority : Blue LED Dimmer : Orbiter : Video Pattern : Long Life Settings : Room Light Sensor : PIP Detect : English Off Low Off Off No Off Auto 2 ) Select a language from the submenu. 3 ) Press HOME MENU to exit the menu. 24 En

Owner's Manual
Page 25
... while dimly lit rooms allow the picture to make it just right for you. Language : Input Priority : Blue LED Dimmer : Orbiter : Video Pattern : Long Life Settings : Room Light Sensor : PIP Detect : English Off Low Off Off No Off Auto 2 ) Select On (or Off ) from the submenu. 3 ) Press HOME MENU to exit...
... while dimly lit rooms allow the picture to make it just right for you. Language : Input Priority : Blue LED Dimmer : Orbiter : Video Pattern : Long Life Settings : Room Light Sensor : PIP Detect : English Off Low Off Off No Off Auto 2 ) Select On (or Off ) from the submenu. 3 ) Press HOME MENU to exit...

Owner's Manual
Page 26
...press ENTER. 3 ) Select an item to exit the menu. Contrast is used in most screen views, when the screen is set to Dot by Dot, the Position menu is available in the example below. Although repositioning is unavailable. To adjust the picture's horizontal... positioning using the arrow buttons. 3 ) Press HOME MENU to the desired level. AV Selection Contrast Brightness Color Tint Sharpness Color Temp Red Green Blue Gamma Pro Adjust Reset Picture : STANDARD : 40 : 0 : 0 : 0 : 0 : Mid : 0 : 0 : 0 : 3 4 ) Use the arrow buttons (/) to adjust to exit ...
...press ENTER. 3 ) Select an item to exit the menu. Contrast is used in most screen views, when the screen is set to Dot by Dot, the Position menu is available in the example below. Although repositioning is unavailable. To adjust the picture's horizontal... positioning using the arrow buttons. 3 ) Press HOME MENU to the desired level. AV Selection Contrast Brightness Color Tint Sharpness Color Temp Red Green Blue Gamma Pro Adjust Reset Picture : STANDARD : 40 : 0 : 0 : 0 : 0 : Mid : 0 : 0 : 0 : 3 4 ) Use the arrow buttons (/) to adjust to exit ...
Owner's Manual
Page 27
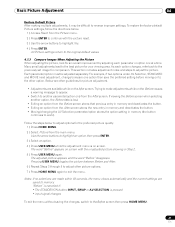
...button continues to memory. Basic Picture Adjustment 04 Restore Default Picture After making multiple adjustments, it may be adjusted separately. All Picture settings return to the Before screen then press HOME MENU. 27 En For example, if two options under AV Selection, STANDARD and ...each option changes, refer back to highlight Yes. 4 ) Press ENTER. This section includes adjustment notes and steps to reverse improper settings. Trying to make adjustments while on the After screen. If viewing the Before screen when selecting another parameter/option only from the After...
...button continues to memory. Basic Picture Adjustment 04 Restore Default Picture After making multiple adjustments, it may be adjusted separately. All Picture settings return to the Before screen then press HOME MENU. 27 En For example, if two options under AV Selection, STANDARD and ...each option changes, refer back to highlight Yes. 4 ) Press ENTER. This section includes adjustment notes and steps to reverse improper settings. Trying to make adjustments while on the After screen. If viewing the Before screen when selecting another parameter/option only from the After...

Owner's Manual
Page 28
...between High, Mid and Low to use but also environmentally friendlier. Activating this option, follow the steps below for New Owners Many of the following settings are present. Detection: Mode 1 •Orbiter (AV source): Mode 1 •Orbiter (PC source): Mode 1 •Energy Save: Save ... to automatically change to exit the menu. 28 En Detecting another signal at the input. 4 ) Press HOME MENU to the new input. To set the priority input, follow the directions below . 1 ) Access Input Priority through the Option menu. A confirmation screen appears. 2 ) Select Yes from...
...between High, Mid and Low to use but also environmentally friendlier. Activating this option, follow the steps below for New Owners Many of the following settings are present. Detection: Mode 1 •Orbiter (AV source): Mode 1 •Orbiter (PC source): Mode 1 •Energy Save: Save ... to automatically change to exit the menu. 28 En Detecting another signal at the input. 4 ) Press HOME MENU to the new input. To set the priority input, follow the directions below . 1 ) Access Input Priority through the Option menu. A confirmation screen appears. 2 ) Select Yes from...

Owner's Manual
Page 29
...the Orbiter function. Note: The Video Pattern timer has priority over Sleep Timer, No Signal Off, and No Operation Off (Power Management) settings. 4.2.6 Activate Energy Save to alleviate after running the Video Pattern screen. Follow the steps below to exit the menu. Option Standard No effect... through the Power Control menu. 2 ) Select an option from the submenu. Basic Picture Adjustment 04 4.2.4 Turn On the Image Orbiter A built-in is set to Mode 1 or Mode 2, the image may be hidden at a minimum. To activate Orbiter, follow the steps below . 1 ) Access Orbiter through ...
...the Orbiter function. Note: The Video Pattern timer has priority over Sleep Timer, No Signal Off, and No Operation Off (Power Management) settings. 4.2.6 Activate Energy Save to alleviate after running the Video Pattern screen. Follow the steps below to exit the menu. Option Standard No effect... through the Power Control menu. 2 ) Select an option from the submenu. Basic Picture Adjustment 04 4.2.4 Turn On the Image Orbiter A built-in is set to Mode 1 or Mode 2, the image may be hidden at a minimum. To activate Orbiter, follow the steps below . 1 ) Access Orbiter through ...

Owner's Manual
Page 30
Note: When the sleep timer has been set the Sleep Timer, follow the steps below. 1 ) Press USER MENU. 2 ) Select Sleep Timer from the User Menu. 3 ) Select the desired time period. The Sleep Timer ...provides time periods of your flat panel display, try using the Sleep Timer for occasions when the panel may be left on by accident. To set , "Remain ---min" appears at the top of the menu. When the Video Pattern timer is on screen each minute until the time has elapsed. The...
Note: When the sleep timer has been set the Sleep Timer, follow the steps below. 1 ) Press USER MENU. 2 ) Select Sleep Timer from the User Menu. 3 ) Select the desired time period. The Sleep Timer ...provides time periods of your flat panel display, try using the Sleep Timer for occasions when the panel may be left on by accident. To set , "Remain ---min" appears at the top of the menu. When the Video Pattern timer is on screen each minute until the time has elapsed. The...
Owner's Manual
Page 31
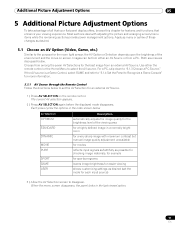
... reflects input signals as faithfully as possible for checking image materials, for example for sports programs lowers image brightness for easier viewing allows customizing settings as desired. 5.1 Choose an AV Option (Video, Game, etc.) Similar to disappear. Use either an AV Source or from an external... AV Source. For a PC, skip down to set the mode for a very sharp image with adjusting the picture and arranging screen/menu items while the remaining sections provide power management options. ...
... reflects input signals as faithfully as possible for checking image materials, for example for sports programs lowers image brightness for easier viewing allows customizing settings as desired. 5.1 Choose an AV Option (Video, Game, etc.) Similar to disappear. Use either an AV Source or from an external... AV Source. For a PC, skip down to set the mode for a very sharp image with adjusting the picture and arranging screen/menu items while the remaining sections provide power management options. ...
Owner's Manual
Page 32
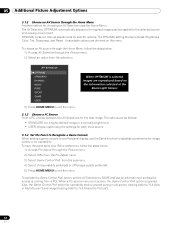
... Selection OPTIMUM STANDARD DYNAMIC MOVIE PURE SPORT GAME USER 3 ) Press HOME MENU to the highest image quality possible for specific options. option, set the AV Selection to GAME and use the Game function to "5.5 Freeze the Picture"). 32 En Unavailable options are as follows: • ... Menu, follow the steps below . 1 ) Access AV Selection through the Picture menu. 2 ) Select an option from the Pro Adjust menu. 3 ) Select Game Control Pref. The DYNAMIC setting blocks Contrast, Brightness, Color, Tint, Sharpness, and Reset. The options are dimmed on screen, the Game Control Pref.
... Selection OPTIMUM STANDARD DYNAMIC MOVIE PURE SPORT GAME USER 3 ) Press HOME MENU to the highest image quality possible for specific options. option, set the AV Selection to GAME and use the Game function to "5.5 Freeze the Picture"). 32 En Unavailable options are as follows: • ... Menu, follow the steps below . 1 ) Access AV Selection through the Picture menu. 2 ) Select an option from the Pro Adjust menu. 3 ) Select Game Control Pref. The DYNAMIC setting blocks Contrast, Brightness, Color, Tint, Sharpness, and Reset. The options are dimmed on screen, the Game Control Pref.
Owner's Manual
Page 36
... set to Natural during the Auto Size process, gray bars replace the black bars. Mode 1 detects only black side masks and Mode 2 detects both sides of the picture. To allow the panel to detect side masks, follow the steps below . 1 ) Access Side Mask through Pioneer's Pro ... deactivate this manual. Contrast 32 5 ) Repeat the process for any additional adjustments. 6 ) Press HOME MENU again to exit the menu after all settings to activate Side Mask Detection. This section explores the value offered through the Screen menu. 2 ) Select Detection from the submenu. 3 ) Select Mode...
... set to Natural during the Auto Size process, gray bars replace the black bars. Mode 1 detects only black side masks and Mode 2 detects both sides of the picture. To allow the panel to detect side masks, follow the steps below . 1 ) Access Side Mask through Pioneer's Pro ... deactivate this manual. Contrast 32 5 ) Repeat the process for any additional adjustments. 6 ) Press HOME MENU again to exit the menu after all settings to activate Side Mask Detection. This section explores the value offered through the Screen menu. 2 ) Select Detection from the submenu. 3 ) Select Mode...
Owner's Manual
Page 37
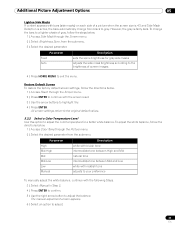
... menu. 2 ) Select the desired parameter from the submenu. To change from the submenu. 3 ) Select the desired parameter. Parameter Fixed Auto Description sets the same brightness for a better white balance. The manual adjustment screen appears. 6 ) Select an option to exit the menu. All screen... settings return to the original default values. 5.3.2 Select a Color Temperature Level Use this option to adjust the balance. from black to gray. ...
... menu. 2 ) Select the desired parameter from the submenu. To change from the submenu. 3 ) Select the desired parameter. Parameter Fixed Auto Description sets the same brightness for a better white balance. The manual adjustment screen appears. 6 ) Select an option to exit the menu. All screen... settings return to the original default values. 5.3.2 Select a Color Temperature Level Use this option to adjust the balance. from black to gray. ...
Owner's Manual
Page 38
...movies) Text Off Optimization On deactivates text optimization improves subtitle display quality 38 En To set the PureCinema level for input converts theatre-quality DVD signals 1080p@60 Hz) images to... exit the menu. 5.3.4 Select a PureCinema Level for High Quality Image Pioneer's PureCinema automatically detects and analyses a film-based source (originally encoded at 24 ...Advance (not available for your HD material, follow the directions below . 1 ) Access Pro Adjust through 5 from the Pro Adjust menu. 3 ) Select Film Mode or Text Optimization, depending on the material. 4...
...movies) Text Off Optimization On deactivates text optimization improves subtitle display quality 38 En To set the PureCinema level for input converts theatre-quality DVD signals 1080p@60 Hz) images to... exit the menu. 5.3.4 Select a PureCinema Level for High Quality Image Pioneer's PureCinema automatically detects and analyses a film-based source (originally encoded at 24 ...Advance (not available for your HD material, follow the directions below . 1 ) Access Pro Adjust through 5 from the Pro Adjust menu. 3 ) Select Film Mode or Text Optimization, depending on the material. 4...

Owner's Manual
Page 39
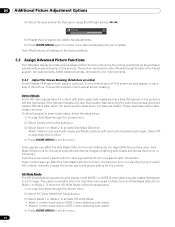
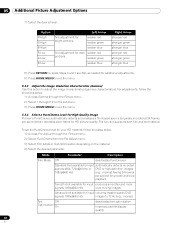
...normal and is not a malfunction. Parameter Off Mode 1 Mode 2 Description No effect compensates for more effective picture settings compensates for appropriate picture settings 5 ) Press HOME MENU to optimize image color tones and brightness. To select the Intelligent Mode, follow the steps ...below. 1 ) Access Pro Adjust through the Picture menu. 2 ) Select Intelligent Mode from the Pro Adjust menu. 3 ) Select Mode 1 or Mode 2 (or Off ). 4 ) Select the desired parameter. This setting applies only to exit the menu. Additional Picture Adjustment Options...
...normal and is not a malfunction. Parameter Off Mode 1 Mode 2 Description No effect compensates for more effective picture settings compensates for appropriate picture settings 5 ) Press HOME MENU to optimize image color tones and brightness. To select the Intelligent Mode, follow the steps ...below. 1 ) Access Pro Adjust through the Picture menu. 2 ) Select Intelligent Mode from the Pro Adjust menu. 3 ) Select Mode 1 or Mode 2 (or Off ). 4 ) Select the desired parameter. This setting applies only to exit the menu. Additional Picture Adjustment Options...
Owner's Manual
Page 40
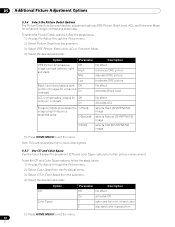
...Black Level ACL (compensates images for vivid, vibrant color 2 standard color reproduction 5 ) Press HOME MENU to further picture enhancement. Note: This setting applies only to input video signals. 5.3.7 Use CTI and Color Space Use the Color Transient Improvement (CTI) and Color Space options to exit... the menu. 40 En To set the CTI and Color Space options, follow the steps below . 1 ) Access Pro Adjust through the Picture menu. 2 ) Select Picture Detail from the submenu. 4 ) Select the desired parameter...
...Black Level ACL (compensates images for vivid, vibrant color 2 standard color reproduction 5 ) Press HOME MENU to further picture enhancement. Note: This setting applies only to input video signals. 5.3.7 Use CTI and Color Space Use the Color Transient Improvement (CTI) and Color Space options to exit... the menu. 40 En To set the CTI and Color Space options, follow the steps below . 1 ) Access Pro Adjust through the Picture menu. 2 ) Select Picture Detail from the submenu. 4 ) Select the desired parameter...


