Owner's Manual
Page 7
The Pioneer PureVision PDP-6072HD/PDP-5072HD/PDP4272HD/PDP-6071HD/PDP-5071HD/PDP-4271HD/PDP6070HD/PDP-5070HD/PDP-4270HD incorporates the latest in order to cool the internal electronics and prevent a hazardous occurrence. To ensure safety, please take the proper measures to mount or install the Plasma Display, in order to ...electrical circuit humming / glass panel buzzing • After playing a game, or displaying a PC image or any other equipment, walls, etc. closed-captioned images or video game images which have both very bright areas and very dark areas side by side should ...
The Pioneer PureVision PDP-6072HD/PDP-5072HD/PDP4272HD/PDP-6071HD/PDP-5071HD/PDP-4271HD/PDP6070HD/PDP-5070HD/PDP-4270HD incorporates the latest in order to cool the internal electronics and prevent a hazardous occurrence. To ensure safety, please take the proper measures to mount or install the Plasma Display, in order to ...electrical circuit humming / glass panel buzzing • After playing a game, or displaying a PC image or any other equipment, walls, etc. closed-captioned images or video game images which have both very bright areas and very dark areas side by side should ...
Owner's Manual
Page 10
...abnormality in the product indicates that the service person uses replacement parts specified by the manufacturer, or those with utmost care. Wall or ceiling mounting-When mounting the product on the product or when objects have fallen into the product through vents or openings. Do not expose the ...Never insert an object into the product. Power cord protection-The power cords must be kept in a safe place for PDP-6072HD/PDP-5072HD/PDP6071HD/PDP-5071HD/PDP-6070HD/PDP-5070HD only). 23. Check the cords at least and use the supplied cleaning cloth or other openings in the cabinet are...
...abnormality in the product indicates that the service person uses replacement parts specified by the manufacturer, or those with utmost care. Wall or ceiling mounting-When mounting the product on the product or when objects have fallen into the product through vents or openings. Do not expose the ...Never insert an object into the product. Power cord protection-The power cords must be kept in a safe place for PDP-6072HD/PDP-5072HD/PDP6071HD/PDP-5071HD/PDP-6070HD/PDP-5070HD only). 23. Check the cords at least and use the supplied cleaning cloth or other openings in the cabinet are...

Owner's Manual
Page 12
You can use when mounting the Plasma Display on the wall) (PDP-6072HD/PDP-6071HD/PDP-6070HD only) Speaker accessories (for PDP-5072HD/PDP-5071HD/PDP-5070HD only) Speaker Mounting Fittings Speaker Cable × 2 Bracket for Right Side Bracket for Center Speaker Mounting Screw (M5 × 10 mm: Black) x 9 Bracket for Left Side * Buttons used for use it as necessary. 12 En...
You can use when mounting the Plasma Display on the wall) (PDP-6072HD/PDP-6071HD/PDP-6070HD only) Speaker accessories (for PDP-5072HD/PDP-5071HD/PDP-5070HD only) Speaker Mounting Fittings Speaker Cable × 2 Bracket for Right Side Bracket for Center Speaker Mounting Screw (M5 × 10 mm: Black) x 9 Bracket for Left Side * Buttons used for use it as necessary. 12 En...
Owner's Manual
Page 22
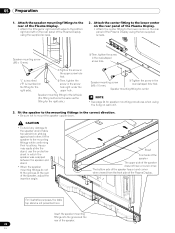
... the lower center on the rear panel of the Plasma Display. • Attach the center fitting to the lower center on the fitting for speaker mounting procedures when using the hung on the rear panel of the Plasma Display using the supplied screws. 2. "L" is inscribed ("R" is inscribed on the ... using the two supplied screws. For illustrative purposes, the table top stand is the same as the fitting for the left on wall unit. 3. Fit the speaker to the mounting fittings in the correct direction. • Be sure not to the rear of the Plasma Display. As you may easily strike...
... the lower center on the rear panel of the Plasma Display. • Attach the center fitting to the lower center on the fitting for speaker mounting procedures when using the hung on the rear panel of the Plasma Display using the supplied screws. 2. "L" is inscribed ("R" is inscribed on the ... using the two supplied screws. For illustrative purposes, the table top stand is the same as the fitting for the left on wall unit. 3. Fit the speaker to the mounting fittings in the correct direction. • Be sure not to the rear of the Plasma Display. As you may easily strike...

Owner's Manual
Page 23
...the gray line to the terminals and the white cable to the polarity may be adjusted horizontally or vertically, first loosen the speaker mounting screws, reposition and then tighten the screws again at the bottom of the cable. (+) • When you may result in the center ... speaker cables to the back of the speaker cables to the terminals. cables caused by slightly tugging on the wall. Speaker mounting screw (M5 x 10 mm) Screw hole Speaker mounting screw (M5 x 10 mm) Screw hole 5. you release the lever, it clamps onto the speaker cable. Gray line...
...the gray line to the terminals and the white cable to the polarity may be adjusted horizontally or vertically, first loosen the speaker mounting screws, reposition and then tighten the screws again at the bottom of the cable. (+) • When you may result in the center ... speaker cables to the back of the speaker cables to the terminals. cables caused by slightly tugging on the wall. Speaker mounting screw (M5 x 10 mm) Screw hole Speaker mounting screw (M5 x 10 mm) Screw hole 5. you release the lever, it clamps onto the speaker cable. Gray line...

Owner's Manual
Page 24
... with an asterisk) is not used when the Plasma Display is installed on wall unit. 3. En * Speaker mounting screw (M5 x 10 mm) The screw hole at the bottom of the speaker mounting (indicated with the hung on the wall. CAUTION • Be careful not to the speaker. 4. Connect the other... of the Plasma Display. 2. Place the Plasma Display on the mounting fittings of the hung on the wall with the supplied screws. 05 Preparation When using the supplied screws (3 locations). Place the speaker on the speaker mounting fittings in the center first, and then both sides with only ...
... with an asterisk) is not used when the Plasma Display is installed on wall unit. 3. En * Speaker mounting screw (M5 x 10 mm) The screw hole at the bottom of the speaker mounting (indicated with the hung on the wall. CAUTION • Be careful not to the speaker. 4. Connect the other... of the Plasma Display. 2. Place the Plasma Display on the mounting fittings of the hung on the wall with the supplied screws. 05 Preparation When using the supplied screws (3 locations). Place the speaker on the speaker mounting fittings in the center first, and then both sides with only ...

Owner's Manual
Page 26
...indicated by detaching the stand. Using other stands can also install the display on the wall, with step 2. 1 Detach the supplied speaker when the Plasma Display is unstable. ...mounted on a rack by arrows and remove them. Installation bolts ➀ (M8 x 40 mm: black) (Step 1) Installation bolts ➁ (M8 x 40 mm: black) (Step 2) Slide the stand (Step 3) PDP-5072HD/PDP-5071HD/PDP-5070HD.... 26 En Attaching the stand again When the Plasma Display is mounted without the supplied speaker, begin with the PIONEER table top stand attached. Table top stand Sheet 4 While holding ...
...indicated by detaching the stand. Using other stands can also install the display on the wall, with step 2. 1 Detach the supplied speaker when the Plasma Display is unstable. ...mounted on a rack by arrows and remove them. Installation bolts ➀ (M8 x 40 mm: black) (Step 1) Installation bolts ➁ (M8 x 40 mm: black) (Step 2) Slide the stand (Step 3) PDP-5072HD/PDP-5071HD/PDP-5070HD.... 26 En Attaching the stand again When the Plasma Display is mounted without the supplied speaker, begin with the PIONEER table top stand attached. Table top stand Sheet 4 While holding ...

