
Owner's Manual
Page 2
... the cart/apparatus combination to avoid injury from the apparatus. 11) Only use attachments/accessories specified by the manufacturer. 12) Use only with the cart, stand, tripod, bracket, or table specified by the manufacturer, or sold with one wider than the other apparatus (including amplifiers) that the cable ground-shall be...
... the cart/apparatus combination to avoid injury from the apparatus. 11) Only use attachments/accessories specified by the manufacturer. 12) Use only with the cart, stand, tripod, bracket, or table specified by the manufacturer, or sold with one wider than the other apparatus (including amplifiers) that the cable ground-shall be...
Owner's Manual
Page 6
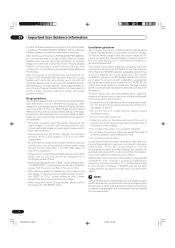
... course of its lifetime, the luminosity of the Pioneer PDP-5040HD/PDP-4340HD Plasma Display System will diminish very slowly, such...the Plasma Display, in order to prevent the unit from tipping over 3 times longer than the PIONEER stand or installation bracket may cause the internal temperature to rise, and could cause injury. To ensure ...prevent a hazardous occurrence. 01 Important User Guidance Information In order to obtain maximum enjoyment from this Pioneer PureVision PDP-5040HD/PDP-4340HD Plasma Display System, please first read and follow the usage guidelines below , you can ...
... course of its lifetime, the luminosity of the Pioneer PDP-5040HD/PDP-4340HD Plasma Display System will diminish very slowly, such...the Plasma Display, in order to prevent the unit from tipping over 3 times longer than the PIONEER stand or installation bracket may cause the internal temperature to rise, and could cause injury. To ensure ...prevent a hazardous occurrence. 01 Important User Guidance Information In order to obtain maximum enjoyment from this Pioneer PureVision PDP-5040HD/PDP-4340HD Plasma Display System, please first read and follow the usage guidelines below , you can ...

Owner's Manual
Page 7
...• The Energy save function can be set to help prevent damage from screen burning (see page 54). About operations through i.LINK PIONEER shall not always assure normal video/audio recording or playback when a D-VHS is displayed continuously for several hours, or for shorter periods ...are displayed. FOLLOW THE MANUFACTURE'S INSTRUCTIONS WHEN INSTALLING THE PRODUCT AND USE MOUNTING ACCESSORIES RECOMMENDED BY THE MANUFACTURER. USE ONLY WITH A CART, STAND, TRIPOD, BRACKET, OR TABLE RECOMMENDED BY THE MANUFACTURER, OR SOLD WITH THE PRODUCT. After-image (lag image) due to burning Avoid ...
...• The Energy save function can be set to help prevent damage from screen burning (see page 54). About operations through i.LINK PIONEER shall not always assure normal video/audio recording or playback when a D-VHS is displayed continuously for several hours, or for shorter periods ...are displayed. FOLLOW THE MANUFACTURE'S INSTRUCTIONS WHEN INSTALLING THE PRODUCT AND USE MOUNTING ACCESSORIES RECOMMENDED BY THE MANUFACTURER. USE ONLY WITH A CART, STAND, TRIPOD, BRACKET, OR TABLE RECOMMENDED BY THE MANUFACTURER, OR SOLD WITH THE PRODUCT. After-image (lag image) due to burning Avoid ...
Owner's Manual
Page 8
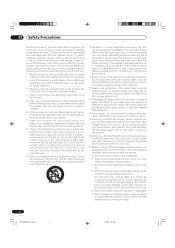
... by the manufacturer. Read instructions-All operating instructions must operate on a power source specified on an unstable cart, stand, tripod or table. Stand-Do not place the product on the specification label. Use only a cart, stand, tripod, bracket or table recommended by the manufacturer. 9. When relocating the product placed on the product. 16...
... by the manufacturer. Read instructions-All operating instructions must operate on a power source specified on an unstable cart, stand, tripod or table. Stand-Do not place the product on the specification label. Use only a cart, stand, tripod, bracket or table recommended by the manufacturer. 9. When relocating the product placed on the product. 16...

Owner's Manual
Page 12
... the optional speakers at the bottom of the Plasma Display.) Power cord (2 m/6.6 feet) Remote control unit System cable (3 m/9.8 feet) AA size battery x 2 (Alkaline battery) Stand Screw x 4 (for stand) Screw hole cap x 4 VCR controller x 1 (1.8 m/5.9 feet) Coaxial cable (0.15 m/0.49 feet) x 1 (Already set at the rear of the Media Receiver) Operating instruction • Always...
... the optional speakers at the bottom of the Plasma Display.) Power cord (2 m/6.6 feet) Remote control unit System cable (3 m/9.8 feet) AA size battery x 2 (Alkaline battery) Stand Screw x 4 (for stand) Screw hole cap x 4 VCR controller x 1 (1.8 m/5.9 feet) Coaxial cable (0.15 m/0.49 feet) x 1 (Already set at the rear of the Media Receiver) Operating instruction • Always...
Owner's Manual
Page 17
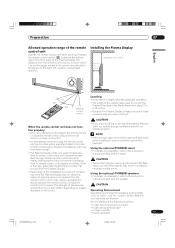
... m 30º 30º Remote control sensor Locating • Avoid direct sunlight. Replace the batteries with the speaker. Using the optional PIONEER speakers • For details on the screen. The strength of infrared rays emitted from the screen differs, depending on images displayed on installation,...ventilated 17 En PDP5040HD-Eng (17-27) 17 7/24/03, 1:58 PM Using the optional PIONEER stand • For details on installation, refer to the instruction manual provided with other stands may result in the right, left, upward, or downward direction. If this system to properly...
... m 30º 30º Remote control sensor Locating • Avoid direct sunlight. Replace the batteries with the speaker. Using the optional PIONEER speakers • For details on the screen. The strength of infrared rays emitted from the screen differs, depending on images displayed on installation,...ventilated 17 En PDP5040HD-Eng (17-27) 17 7/24/03, 1:58 PM Using the optional PIONEER stand • For details on installation, refer to the instruction manual provided with other stands may result in the right, left, upward, or downward direction. If this system to properly...

Owner's Manual
Page 19
...Eng (17-27) 19 • When you have installed the Media Receiver vertically, always use the accompanying stand to install the Media Receiver vertically. Vertical installation stand screws Keep the shock absorbing pads and screws. Remove the separation sheet. Shock absorbing pad Right side Secure ...the vertical installation stand with the hole and attach. Preparation 07 English Installing the Media Receiver vertically You can remove the shock absorbing ...
...Eng (17-27) 19 • When you have installed the Media Receiver vertically, always use the accompanying stand to install the Media Receiver vertically. Vertical installation stand screws Keep the shock absorbing pads and screws. Remove the separation sheet. Shock absorbing pad Right side Secure ...the vertical installation stand with the hole and attach. Preparation 07 English Installing the Media Receiver vertically You can remove the shock absorbing ...
Owner's Manual
Page 21
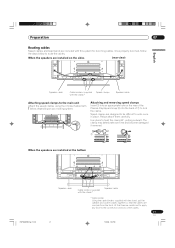
When the speakers are installed on the sides (rear view) English Speaker cable Cable binders (supplied Speed clamps with the stand)* Speaker cable Attaching speed clamps to the main unit Attach the speed clamps using the 4 holes marked with below to route the cables. Attaching ... Display and snap 2 into an appropriate hole on your routing system. Preparation 07 Routing cables Speed clamps and bead bands are included with the stand, put the speaker and system cables together so that time be difficult to undo once in place. The clamp may deteriorate over time and become...
When the speakers are installed on the sides (rear view) English Speaker cable Cable binders (supplied Speed clamps with the stand)* Speaker cable Attaching speed clamps to the main unit Attach the speed clamps using the 4 holes marked with below to route the cables. Attaching ... Display and snap 2 into an appropriate hole on your routing system. Preparation 07 Routing cables Speed clamps and bead bands are included with the stand, put the speaker and system cables together so that time be difficult to undo once in place. The clamp may deteriorate over time and become...


