Owner's Manual
Page 5
...displays Front panel 7 Remote control 8 Display 10 02 Getting started Home theater sound setup 11 Using the Auto MCACC setup for buying this Pioneer product. After you have finished reading the instructions, put them in slow motion 19 Frame advance/frame reverse 19 Playing a JPEG slideshow ... Using Playlists 21 Programming playlists 21 Listening to your model properly. Please read through these operating instructions so that you for optimal surround sound 12 Using the on-screen displays 13 Playing discs 13 Basic playback controls 13 Resume and Last Memory 14 DVD-Video disc...
...displays Front panel 7 Remote control 8 Display 10 02 Getting started Home theater sound setup 11 Using the Auto MCACC setup for buying this Pioneer product. After you have finished reading the instructions, put them in slow motion 19 Frame advance/frame reverse 19 Playing a JPEG slideshow ... Using Playlists 21 Programming playlists 21 Listening to your model properly. Please read through these operating instructions so that you for optimal surround sound 12 Using the on-screen displays 13 Playing discs 13 Basic playback controls 13 Resume and Last Memory 14 DVD-Video disc...
Owner's Manual
Page 6
06 Surround sound settings Using the Setup menu 28 07 Video Adjust menu Video Adjust menu 29 08 Initial Settings menu Using the Initial Settings menu 30 ... using HDMI 35 Switching the HDMI audio setting. . . . . .36 Resetting the HDMI connection 36 About HDMI 36 Using this unit with a Pioneer Flat Panel TV 36 SR+ Setup for Pioneer Flat Panel TVs 37 Switching on the SR+ mode 37 10 Additional information Optional system settings 38 Setting the sleep timer 38...
06 Surround sound settings Using the Setup menu 28 07 Video Adjust menu Video Adjust menu 29 08 Initial Settings menu Using the Initial Settings menu 30 ... using HDMI 35 Switching the HDMI audio setting. . . . . .36 Resetting the HDMI connection 36 About HDMI 36 Using this unit with a Pioneer Flat Panel TV 36 SR+ Setup for Pioneer Flat Panel TVs 37 Switching on the SR+ mode 37 10 Additional information Optional system settings 38 Setting the sleep timer 38...
Owner's Manual
Page 8
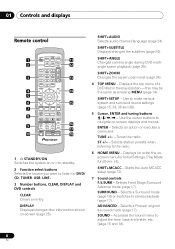
...tuning buttons Use the cursor buttons to stereo playback (page 17). Selects an option or executes a command. Selects Front Stage Surround Advance mode (page 17). SURROUND - ADVANCED - SOUND - SHIFT+ANGLE Changes camera angle during DVD multiangle scene playback (page 25). SHIFT+ZOOM Changes the ...menu of a DVD disc in the play position - SHIFT+SETUP - ENTER - Starts the Auto MCACC setup (page 12). 7 Sound controls F.S.SURR - Selects a Pioneer original surround mode (page 17). 01 Controls and displays Remote control 1 2 3 4 5 6 7 8 9 10 STANDBY TUNER SOUND /ON DVD CD (FM/AM) ...
...tuning buttons Use the cursor buttons to stereo playback (page 17). Selects an option or executes a command. Selects Front Stage Surround Advance mode (page 17). SURROUND - ADVANCED - SOUND - SHIFT+ANGLE Changes camera angle during DVD multiangle scene playback (page 25). SHIFT+ZOOM Changes the ...menu of a DVD disc in the play position - SHIFT+SETUP - ENTER - Starts the Auto MCACC setup (page 12). 7 Sound controls F.S.SURR - Selects a Pioneer original surround mode (page 17). 01 Controls and displays Remote control 1 2 3 4 5 6 7 8 9 10 STANDBY TUNER SOUND /ON DVD CD (FM/AM) ...
Owner's Manual
Page 10
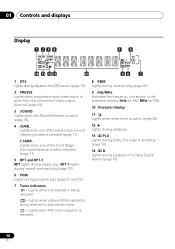
... play (page 21 and 23). 7 Tuner indicators - F.SURR. Lights when a broadcast is active (page 18). 4 SURR. RPT-1 lights during repeat one of the Front Stage Surround Advance mode is selected (page 17). 5 RPT and RPT-1 RPT lights during repeat play (page 22). 9 kHz/MHz Indicates the frequency unit shown in auto... 38). 12 Lights during playback. 13 2 PL II Lights during Dolby Pro Logic II decoding (page 16). 14 2 D Lights during playback of the Advanced surround listening modes is being received. - Lights when one of a Dolby Digital source (page 16). 10 En
... play (page 21 and 23). 7 Tuner indicators - F.SURR. Lights when a broadcast is active (page 18). 4 SURR. RPT-1 lights during repeat one of the Front Stage Surround Advance mode is selected (page 17). 5 RPT and RPT-1 RPT lights during repeat play (page 22). 9 kHz/MHz Indicates the frequency unit shown in auto... 38). 12 Lights during playback. 13 2 PL II Lights during Dolby Pro Logic II decoding (page 16). 14 2 D Lights during playback of the Advanced surround listening modes is being received. - Lights when one of a Dolby Digital source (page 16). 10 En
Owner's Manual
Page 11
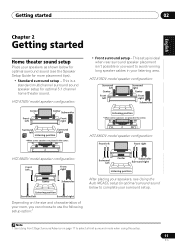
... below to complete your room, you can choose to select a front surround mode when using this setup. 11 En HTZ-575DV model speaker configuration: Surround left Center Front left Surround right Center Front right Subwoofer Center Front left Center Subwoofer Front right Surround left Surround right Listening position *When center speakers are placed in the center. SL...
... below to complete your room, you can choose to select a front surround mode when using this setup. 11 En HTZ-575DV model speaker configuration: Surround left Center Front left Surround right Center Front right Subwoofer Center Front left Center Subwoofer Front right Surround left Surround right Listening position *When center speakers are placed in the center. SL...
Owner's Manual
Page 12
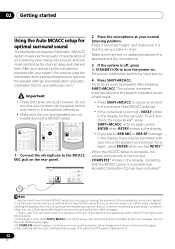
... 4 5 62 ANGLE ZOOM 7 8 93 CLEAR TOP MENU DISPLAY 0 TUNE MENU SETUP ST HOME MENU ENTER SR ST RETURN MCACC TUNE TEST TONE F.S.SURR SURROUND ADVANCED SOUND TV CONTROL SLEEP INPUT CHANNEL VOLUME MUTE SHIFT VOLUME 1 Connect the microphone to normal and COMPLETE4 shows in the display, there may be... the display, indicating that may be a problem with the operation of the mic. 02 Getting started Using the Auto MCACC setup for optimal surround sound The Multichannel Acoustic Calibration (MCACC) system measures the acoustic characteristics of your normal listening position.
... 4 5 62 ANGLE ZOOM 7 8 93 CLEAR TOP MENU DISPLAY 0 TUNE MENU SETUP ST HOME MENU ENTER SR ST RETURN MCACC TUNE TEST TONE F.S.SURR SURROUND ADVANCED SOUND TV CONTROL SLEEP INPUT CHANNEL VOLUME MUTE SHIFT VOLUME 1 Connect the microphone to normal and COMPLETE4 shows in the display, there may be... the display, indicating that may be a problem with the operation of the mic. 02 Getting started Using the Auto MCACC setup for optimal surround sound The Multichannel Acoustic Calibration (MCACC) system measures the acoustic characteristics of your normal listening position.
Owner's Manual
Page 16
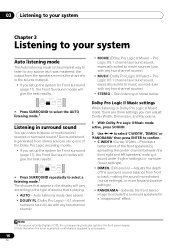
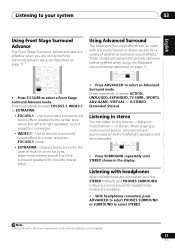
...Dolby Pro Logic II Music settings When listening in the source material. • If you set up the system for Front surround (page 11), the Front Surround modes will give the best results. 03 Listening to your system Chapter 3 Listening to your system Auto listening mode The ... Digital or DTS, the corresponding indicator lights in the front panel display. 2 Note that 's playing. • AUTO - Pro Logic II 5.1 channel surround sound, especially suited to movie sources (use with any two-channel source) • STEREO - Adjusts the depth of the front speakers by spreading the...
...Dolby Pro Logic II Music settings When listening in the source material. • If you set up the system for Front surround (page 11), the Front Surround modes will give the best results. 03 Listening to your system Chapter 3 Listening to your system Auto listening mode The ... Digital or DTS, the corresponding indicator lights in the front panel display. 2 Note that 's playing. • AUTO - Pro Logic II 5.1 channel surround sound, especially suited to movie sources (use with any two-channel source) • STEREO - Adjusts the depth of the front speakers by spreading the...
Owner's Manual
Page 17
...select ACTION, UNPLUGED, EXPANDED, TV SURR., SPORTS, ADV.GAME, VIRTUAL or X-STEREO (Extended Stereo). Press repeatedly to select an Advanced Surround mode. Press repeatedly to a wider area than FOCUS5.1 mode. • EXTRAPWR - When playing a multichannel source, all channels are ...designed to select STEREO. stereo or multichannel - Use to provide a surround sound effect to select FOCUS5.1, WIDE5.1 or EXTRAPWR. • FOCUS5.1 - Using Advanced Surround The Advanced Surround effects can listen to any multichannel or stereo source for a variety of multi-channel...
...select ACTION, UNPLUGED, EXPANDED, TV SURR., SPORTS, ADV.GAME, VIRTUAL or X-STEREO (Extended Stereo). Press repeatedly to select an Advanced Surround mode. Press repeatedly to a wider area than FOCUS5.1 mode. • EXTRAPWR - When playing a multichannel source, all channels are ...designed to select STEREO. stereo or multichannel - Use to provide a surround sound effect to select FOCUS5.1, WIDE5.1 or EXTRAPWR. • FOCUS5.1 - Using Advanced Surround The Advanced Surround effects can listen to any multichannel or stereo source for a variety of multi-channel...
Owner's Manual
Page 18
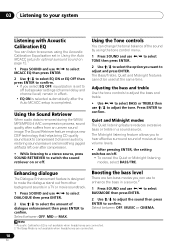
.../ to adjust the sound then press ENTER to confirm. Boosting the bass level There are two bass modes you to hear effective surround sound of dialogue enhancement then press ENTER to confirm. The Sound Retriever feature employs new DSP technology that helps bring CD quality sound back to... compressed 2-channel audio by using the Acoustic Calibration Equalization set in Using the Auto MCACC setup for optimal surround sound on page 12.1 1 Press SOUND and use / to select MCACC EQ then press ENTER. 2 Use / to ...
.../ to adjust the sound then press ENTER to confirm. Boosting the bass level There are two bass modes you to hear effective surround sound of dialogue enhancement then press ENTER to confirm. The Sound Retriever feature employs new DSP technology that helps bring CD quality sound back to... compressed 2-channel audio by using the Acoustic Calibration Equalization set in Using the Auto MCACC setup for optimal surround sound on page 12.1 1 Press SOUND and use / to select MCACC EQ then press ENTER. 2 Use / to ...
Owner's Manual
Page 28
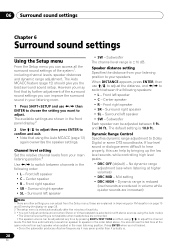
...Dimming the display on page 38. 2 The setup menu is exited automatically after five minutes of inactivity. 3 • You can't adjust center/surround when Stereo or Virtual playback is selected (or with stereo sources using the Auto mode). • The Channel level setting is not available when...up the low level sounds, while controlling high level peaks. • DRC OFF (default) - Press ENTER when you the best surround sound setup. Front right speaker • SR - 06 Surround sound settings Chapter 6 Surround sound settings Using the Setup menu From the Setup menu you can access all the...
...Dimming the display on page 38. 2 The setup menu is exited automatically after five minutes of inactivity. 3 • You can't adjust center/surround when Stereo or Virtual playback is selected (or with stereo sources using the Auto mode). • The Channel level setting is not available when...up the low level sounds, while controlling high level peaks. • DRC OFF (default) - Press ENTER when you the best surround sound setup. Front right speaker • SR - 06 Surround sound settings Chapter 6 Surround sound settings Using the Setup menu From the Setup menu you can access all the...

Owner's Manual
Page 34
... recorders, etc. Connecting for digital audio This system has optical-type digital inputs. To audio output Tape deck, etc. LINE 2 IN L AC IN R AUDIO R FRONT R SURROUND SPEAKE • Connect the LINE 2 AUDIO IN jacks to the analog outputs of the inputs on page 35. Connect using an HDMI cable to connect...
... recorders, etc. Connecting for digital audio This system has optical-type digital inputs. To audio output Tape deck, etc. LINE 2 IN L AC IN R AUDIO R FRONT R SURROUND SPEAKE • Connect the LINE 2 AUDIO IN jacks to the analog outputs of the inputs on page 35. Connect using an HDMI cable to connect...
Owner's Manual
Page 36
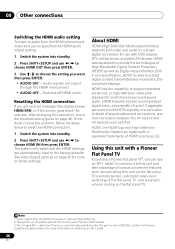
... specification. HDMI, the HDMI logo and High-Definition Multimedia Interface are output through the HDMI interconnect • AUDIO OFF - Contact the Pioneer Customer Support division for more information on the flat panel TV. HDMI features include uncompressed digital video, a bandwidth of up to 2.2 gigabytes..., DTV, set-top boxes, and other AV devices. The system will restart and the HDMI settings are automatically reset to multichannel surround-sound audio. HDMI has the capability to support standard, enhanced, or high-definition video plus standard to the factory defaults. See...
... specification. HDMI, the HDMI logo and High-Definition Multimedia Interface are output through the HDMI interconnect • AUDIO OFF - Contact the Pioneer Customer Support division for more information on the flat panel TV. HDMI features include uncompressed digital video, a bandwidth of up to 2.2 gigabytes..., DTV, set-top boxes, and other AV devices. The system will restart and the HDMI settings are automatically reset to multichannel surround-sound audio. HDMI has the capability to support standard, enhanced, or high-definition video plus standard to the factory defaults. See...
Owner's Manual
Page 44
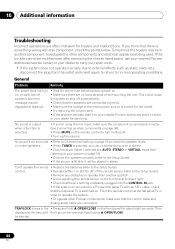
... check the points below , ask your nearest Pioneer authorized service center or your dealer to carry out repair work. • If the system does not operate normally due to external effects such as static electricity, disconnect the plug from surround • Refer to Channel level setting on ...exercising the checks listed below . If you 're using OPEN/CLOSE. Investigate the other Pioneer components, make sure the component is 96 kHz, it to your nearest Pioneer authorized service center or your system on page 28 to normal operating conditions. General Problem Remedy The ...
... check the points below , ask your nearest Pioneer authorized service center or your dealer to carry out repair work. • If the system does not operate normally due to external effects such as static electricity, disconnect the plug from surround • Refer to Channel level setting on ...exercising the checks listed below . If you 're using OPEN/CLOSE. Investigate the other Pioneer components, make sure the component is 96 kHz, it to your nearest Pioneer authorized service center or your system on page 28 to normal operating conditions. General Problem Remedy The ...
Owner's Manual
Page 50
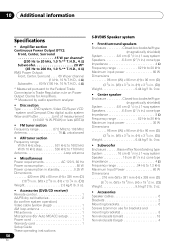
... channel* (200 Hz to 20 kHz, 1.0 %** T.H.D., 4 Ω) Subwoofer 20 W* (45 Hz to 200 Hz, 1.0 %** T.H.D., 4 Ω) RMS Power Output: Front, Center, Surround . . . . 60 W per channel (1 kHz, 10 % T.H.D., 4 Ω) Subwoofer. . . . 60 W (100 Hz, 10 % T.H.D., 4 Ω) * Measured pursuant...1 Microphone (for Auto MCACC setup 1 Power cord 1 Warranty card 1 Setup Guide These operating instructions 50 En S-DV385 Speaker system • Front/surround speakers Enclosure Closed-box bookshelf type (magnetically shielded) System 6.6 cm (2 1/2 in.) 1-way system Speakers 6.6 cm (2 1/2 in.) cone type ...
... channel* (200 Hz to 20 kHz, 1.0 %** T.H.D., 4 Ω) Subwoofer 20 W* (45 Hz to 200 Hz, 1.0 %** T.H.D., 4 Ω) RMS Power Output: Front, Center, Surround . . . . 60 W per channel (1 kHz, 10 % T.H.D., 4 Ω) Subwoofer. . . . 60 W (100 Hz, 10 % T.H.D., 4 Ω) * Measured pursuant...1 Microphone (for Auto MCACC setup 1 Power cord 1 Warranty card 1 Setup Guide These operating instructions 50 En S-DV385 Speaker system • Front/surround speakers Enclosure Closed-box bookshelf type (magnetically shielded) System 6.6 cm (2 1/2 in.) 1-way system Speakers 6.6 cm (2 1/2 in.) cone type ...

Owner's Manual
Page 51
.... 51 En English Deutsch Français Italiano Nederlands Español Additional information 10 S-DV395T Speaker system • Front/surround speakers Enclosure Closed-box floorstanding type (magnetically shielded) System 2-way system Speakers: Woofer 7.7 cm (3 in.) cone type Tweeter... and design subject to possible modification without notice, due to improvements. This product includes FontAvenue® fonts licenced by Pioneer Corporation. DRM (digital rights management) copy protection is protected by Macrovision Corporation and other U.S. FontAvenue is prohibited. and...
.... 51 En English Deutsch Français Italiano Nederlands Español Additional information 10 S-DV395T Speaker system • Front/surround speakers Enclosure Closed-box floorstanding type (magnetically shielded) System 2-way system Speakers: Woofer 7.7 cm (3 in.) cone type Tweeter... and design subject to possible modification without notice, due to improvements. This product includes FontAvenue® fonts licenced by Pioneer Corporation. DRM (digital rights management) copy protection is protected by Macrovision Corporation and other U.S. FontAvenue is prohibited. and...


