Owner's Manual
Page 2
... Name: FRONT SURROUND SYSTEM Model Number: HTP-SB300 Responsible Party Name: PIONEER ELECTRONICS (USA) INC. Phone: 1-800-421-1404 URL: http://www.pioneerelectronics.com D8-10-4*_C1_En Information to User Alterations or modifications carried out without appropriate authorization may invalidate the user's right to which the receiver is connected. - D8-10-3a_A1_En These limits are used in accordance with the instructions, may...
... Name: FRONT SURROUND SYSTEM Model Number: HTP-SB300 Responsible Party Name: PIONEER ELECTRONICS (USA) INC. Phone: 1-800-421-1404 URL: http://www.pioneerelectronics.com D8-10-4*_C1_En Information to User Alterations or modifications carried out without appropriate authorization may invalidate the user's right to which the receiver is connected. - D8-10-3a_A1_En These limits are used in accordance with the instructions, may...

Owner's Manual
Page 3
... the AC plug of the obsolete outlet. 10) Protect the power cord from being walked on the rear panel. WARNING Slots and openings in for your outlet, consult an electrician for the unit, you want to dripping, splashing, rain or moisture. If connected to an AC outlet, the cut-off all power from the apparatus. 11) Only use attachments/accessories...
... the AC plug of the obsolete outlet. 10) Protect the power cord from being walked on the rear panel. WARNING Slots and openings in for your outlet, consult an electrician for the unit, you want to dripping, splashing, rain or moisture. If connected to an AC outlet, the cut-off all power from the apparatus. 11) Only use attachments/accessories...
Owner's Manual
Page 4
... the cord. POWER-CORD CAUTION Handle the power cord by playing it damaged, ask your nearest PIONEER authorized service center or your hands are wet as the unit you can maximize the fun and excitement your hearing. Never make a knot in the European Union. When you listening for batteries) These symbols are not likely to environmental considerations. DTS and DTS Digital Surround...
... the cord. POWER-CORD CAUTION Handle the power cord by playing it damaged, ask your nearest PIONEER authorized service center or your hands are wet as the unit you can maximize the fun and excitement your hearing. Never make a knot in the European Union. When you listening for batteries) These symbols are not likely to environmental considerations. DTS and DTS Digital Surround...
Owner's Manual
Page 5
... remote control settings . . . 28 Controls for TVs 29 Controls for other components 30 Preset Code List 31 06 Additional information Troubleshooting 34 HDMI 35 Important information regarding the HDMI connection 36 Precautions when using HDMI 14 Connecting your component with no HDMI terminal 14 Plugging in the system 15 03 Controls and displays Front panel 16 Display 16 Subwoofer 17 Remote control 18 Putting the batteries in the remote control 20 Using the remote control 20 04 Listening to your model...
... remote control settings . . . 28 Controls for TVs 29 Controls for other components 30 Preset Code List 31 06 Additional information Troubleshooting 34 HDMI 35 Important information regarding the HDMI connection 36 Precautions when using HDMI 14 Connecting your component with no HDMI terminal 14 Plugging in the system 15 03 Controls and displays Front panel 16 Display 16 Subwoofer 17 Remote control 18 Putting the batteries in the remote control 20 Using the remote control 20 04 Listening to your model...

Owner's Manual
Page 8
... a power outlet. 3 Plug the supplied power cord into a power outlet. 4 Press STANDBY/ON on the main unit. INPUT TV CONTROL HDMI1 HDMI2 OPTICAL COAXIAL INPUT CH ENTER 1 After you start Before installing the unit and performing connections with different connectors for the AC adapter is completed. button depressed, simultaneously press the remote control's SHIFT and TV CONTROL CH- 01 Installation Chapter 1 Installation Before you 've finished making the AC adapter and power cord connections...
... a power outlet. 3 Plug the supplied power cord into a power outlet. 4 Press STANDBY/ON on the main unit. INPUT TV CONTROL HDMI1 HDMI2 OPTICAL COAXIAL INPUT CH ENTER 1 After you start Before installing the unit and performing connections with different connectors for the AC adapter is completed. button depressed, simultaneously press the remote control's SHIFT and TV CONTROL CH- 01 Installation Chapter 1 Installation Before you 've finished making the AC adapter and power cord connections...

Owner's Manual
Page 12
number of channel inputs) PCM.1 About HDMI HDMI (High Definition Multimedia Interface) supports both video and audio on your TV or flat panel TV, try adjusting the resolution settings on a single digital connection for limitations), Video CD/Super VCD, CD and 192 kHz/8 ch (Max. HDCP is used to protect digital content transmitted and received by the transformers in one connector (instead of several cables and connectors), and communication between the AV source and...
number of channel inputs) PCM.1 About HDMI HDMI (High Definition Multimedia Interface) supports both video and audio on your TV or flat panel TV, try adjusting the resolution settings on a single digital connection for limitations), Video CD/Super VCD, CD and 192 kHz/8 ch (Max. HDCP is used to protect digital content transmitted and received by the transformers in one connector (instead of several cables and connectors), and communication between the AV source and...

Owner's Manual
Page 13
... be used to connect digital components to this , interruption in the audio may not be connected to this unit. • Connect the optical digital output on your TV to the OPTICAL AUDIO IN on /off the component connected to this system directly to the playback component. 13 En Due to this system.1 Coaxial digital audio cable Connect your TV has a coaxial digital output, you to a playback component through a television set, in tuner. • Televisions without digital audio output connectors...
... be used to connect digital components to this , interruption in the audio may not be connected to this unit. • Connect the optical digital output on your TV to the OPTICAL AUDIO IN on /off the component connected to this system directly to the playback component. 13 En Due to this system.1 Coaxial digital audio cable Connect your TV has a coaxial digital output, you to a playback component through a television set, in tuner. • Televisions without digital audio output connectors...

Owner's Manual
Page 14
... component (Blu-ray disc player, etc.), you can connect it to an HDMI input on your DVD player to the system. Connecting your component with no HDMI terminal to the video input on your TV. HDMI IN HDMI/DVI-compatible TV or flat panel TV TV 2 2 HDMI OUT IN 1 IN 2 1 OPTICAL COAXIAL AUDIO IN OUT 1 Video cable HDMI OUT HDMI/DVI-equipped component 1 Connect the HDMI output on your DVD player to the HDMI IN1 on this system. OPTICAL COAXIAL DIGITAL OUT Select one DVD player, etc. 1 Connect the...
... component (Blu-ray disc player, etc.), you can connect it to an HDMI input on your DVD player to the system. Connecting your component with no HDMI terminal to the video input on your TV. HDMI IN HDMI/DVI-compatible TV or flat panel TV TV 2 2 HDMI OUT IN 1 IN 2 1 OPTICAL COAXIAL AUDIO IN OUT 1 Video cable HDMI OUT HDMI/DVI-equipped component 1 Connect the HDMI output on your DVD player to the HDMI IN1 on this system. OPTICAL COAXIAL DIGITAL OUT Select one DVD player, etc. 1 Connect the...

Owner's Manual
Page 18
... system between Auto surround mode (Auto playback on page 27). 6 TV CONTROL buttons These buttons are dedicated to control the TV assigned to select the TV input signal. Switch the remote control to operate any other components connected to select the input source. INPUT Use to the button. CH +/- Use to adjust the volume on your system on page 21) and Stream Direct playback. 03 Controls and displays Remote control 3 SYSTEM SYSTEM INPUT SOURCE 1 4 2 INPUT TV CONTROL HDMI1 HDMI2 5 OPTICAL COAXIAL INPUT CH 6 STANDARD ADV SURR TV CODE 7 AUTO/ DIRECT STEREO/ A.L.C.
... system between Auto surround mode (Auto playback on page 27). 6 TV CONTROL buttons These buttons are dedicated to control the TV assigned to select the TV input signal. Switch the remote control to operate any other components connected to select the input source. INPUT Use to the button. CH +/- Use to adjust the volume on your system on page 21) and Stream Direct playback. 03 Controls and displays Remote control 3 SYSTEM SYSTEM INPUT SOURCE 1 4 2 INPUT TV CONTROL HDMI1 HDMI2 5 OPTICAL COAXIAL INPUT CH 6 STANDARD ADV SURR TV CODE 7 AUTO/ DIRECT STEREO/ A.L.C.

Owner's Manual
Page 19
... use INPUT SELECT button to select the input for Standard decoding and to control BD/DVD menus/options. 11 MASTER VOLUME +/- These buttons are used to switch between the hard disk, DVD and VCR controls for the desired connected component, then access the following : BD MENU Displays the disc menu of a BD/DVD. Switches between the various surround modes (page 22). 8 DIMMER Dims or brightens the display. HOME MENU Displays the HOME MENU screen. Use to access the Audio options (page 24). HDD*, DVD*, VCR* These buttons switch...
... use INPUT SELECT button to select the input for Standard decoding and to control BD/DVD menus/options. 11 MASTER VOLUME +/- These buttons are used to switch between the hard disk, DVD and VCR controls for the desired connected component, then access the following : BD MENU Displays the disc menu of a BD/DVD. Switches between the various surround modes (page 22). 8 DIMMER Dims or brightens the display. HOME MENU Displays the HOME MENU screen. Use to access the Audio options (page 24). HDD*, DVD*, VCR* These buttons switch...

Owner's Manual
Page 21
... mode. Note 1 Stereo surround (matrix) formats are decoded accordingly using this button, see how the source is the Auto Surround feature. to your system 04 English Français Deutsch Italiano Español Nederlands Pyccкий Chapter 4 Listening to adjust the volume. Press repeatedly until AUTO SURROUND shows briefly in the display to turn on the power of this system. 3 Select the source you 're playing...
... mode. Note 1 Stereo surround (matrix) formats are decoded accordingly using this button, see how the source is the Auto Surround feature. to your system 04 English Français Deutsch Italiano Español Nederlands Pyccкий Chapter 4 Listening to adjust the volume. Press repeatedly until AUTO SURROUND shows briefly in the display to turn on the power of this system. 3 Select the source you 're playing...

Owner's Manual
Page 23
...; In the Auto level control stereo mode (A.L.C.), this unit equalizes playback sound levels if each sound level varies with the music source recorded in a portable audio player. DIMMER VOL LISTENING MODE BD MENU • While listening to a source, press AUTO/ DIRECT to a source, press STEREO/A.L.C. PCM sources are heard without any digital processing.2 Note 1 In the DIRECT mode, Sound Delay, Auto Delay, LFE Attenuate and Center image functions are available. 2 There are heard in stereo above for stereo playback. See Auto playback on this...
...; In the Auto level control stereo mode (A.L.C.), this unit equalizes playback sound levels if each sound level varies with the music source recorded in a portable audio player. DIMMER VOL LISTENING MODE BD MENU • While listening to a source, press AUTO/ DIRECT to a source, press STEREO/A.L.C. PCM sources are heard without any digital processing.2 Note 1 In the DIRECT mode, Sound Delay, Auto Delay, LFE Attenuate and Center image functions are available. 2 There are heard in stereo above for stereo playback. See Auto playback on this...

Owner's Manual
Page 25
... Some Dolby Digital and DTS audio sources include ultra-low bass tones. The LFE is not limited when set to prevent the ultra-low bass tones from distorting the sound from the speakers. The video delay time is output from this system. Channel 2 is heard only CH2 - When OFF is selected, no sound is automatically adjusted according to the audio delay time.c Spreads the center channel between components connected with an HDMI cable. Both channels heard from front speakers Adjusts the level...
... Some Dolby Digital and DTS audio sources include ultra-low bass tones. The LFE is not limited when set to prevent the ultra-low bass tones from distorting the sound from the speakers. The video delay time is output from this system. Channel 2 is heard only CH2 - When OFF is selected, no sound is automatically adjusted according to the audio delay time.c Spreads the center channel between components connected with an HDMI cable. Both channels heard from front speakers Adjusts the level...

Owner's Manual
Page 27
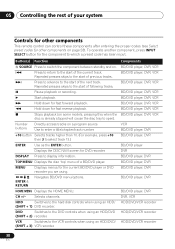
..., the remote automatically exits the operation. You can find the preset codes on directly by pressing . • After one of the or INPUT SELECT buttons using . Select preset codes for TVs SYSTEM SYSTEM INPUT SOURCE ANT MUTE INPUT TV CONTROL HDMI1 HDMI2 DISPLAY OPTICAL COAXIAL INPUT CH CH STANDARD ADV SURR TV CODE CH ENTER AUTO/ STEREO/ VOL 1 While pressing the button, press and hold the '1' button for the manufacturer in the remote. The power of...
..., the remote automatically exits the operation. You can find the preset codes on directly by pressing . • After one of the or INPUT SELECT buttons using . Select preset codes for TVs SYSTEM SYSTEM INPUT SOURCE ANT MUTE INPUT TV CONTROL HDMI1 HDMI2 DISPLAY OPTICAL COAXIAL INPUT CH CH STANDARD ADV SURR TV CODE CH ENTER AUTO/ STEREO/ VOL 1 While pressing the button, press and hold the '1' button for the manufacturer in the remote. The power of...
Owner's Manual
Page 30
... MENU Displays the disc 'top' menu of the current track. HDD Switches to the hard disk controls when using . Use to enter a title/chapter/track number. +10 button Selects tracks higher than 10. (For example, press +10 then 3 to which a preset code has been input. Navigates BD/DVD menu/options. Selects channels. To operate another component, press INPUT SELECT button for the component to select track 13.) ENTER Use as the ENTER button. Button(s) Function SOURCE Press to switch the component between standby...
... MENU Displays the disc 'top' menu of the current track. HDD Switches to the hard disk controls when using . Use to enter a title/chapter/track number. +10 button Selects tracks higher than 10. (For example, press +10 then 3 to which a preset code has been input. Navigates BD/DVD menu/options. Selects channels. To operate another component, press INPUT SELECT button for the component to select track 13.) ENTER Use as the ENTER button. Button(s) Function SOURCE Press to switch the component between standby...
Owner's Manual
Page 34
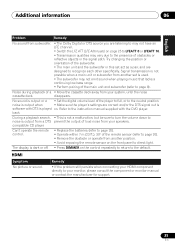
...; Press MUTE on the remote control to Connecting up function is incorrect. on page 12). • Select the correct component (use the INPUT SELECT buttons). • The video input selected on . In such cases, try changing the installation location or conditions. • If signal transmission is selected. The system suddenly switches off . No image is output when a • Make sure the component is connected correctly (refer to turn on the location, resulting in...
...; Press MUTE on the remote control to Connecting up function is incorrect. on page 12). • Select the correct component (use the INPUT SELECT buttons). • The video input selected on . In such cases, try changing the installation location or conditions. • If signal transmission is selected. The system suddenly switches off . No image is output when a • Make sure the component is connected correctly (refer to turn on the location, resulting in...
Owner's Manual
Page 35
... for support. 35 En Refer to the instruction manual supplied with DTS is played on the front panel to direct light. English Français Deutsch Italiano Español Nederlands Pyccкий Additional information 06 Problem Remedy No sound from subwoofer. • The Dolby Digital or DTS source you are listening to may not emit sound when playing music that lacks a continuing low bass range...
... for support. 35 En Refer to the instruction manual supplied with DTS is played on the front panel to direct light. English Français Deutsch Italiano Español Nederlands Pyccкий Additional information 06 Problem Remedy No sound from subwoofer. • The Dolby Digital or DTS source you are listening to may not emit sound when playing music that lacks a continuing low bass range...

Owner's Manual
Page 36
... assigned the analog/digital jack(s) to the corresponding HDMI input for the component. • Check the audio output settings of the source, or connect your source component directly to 2 channels for HDMI compatibility information). Set the display volume to route HDMI signals through this system (from the connected component. • Depending on the connected source component, it's possible that it is recommended) for sending audio to TV using this system (even if it will not work with the DeepColor...
... assigned the analog/digital jack(s) to the corresponding HDMI input for the component. • Check the audio output settings of the source, or connect your source component directly to 2 channels for HDMI compatibility information). Set the display volume to route HDMI signals through this system (from the connected component. • Depending on the connected source component, it's possible that it is recommended) for sending audio to TV using this system (even if it will not work with the DeepColor...

Owner's Manual
Page 39
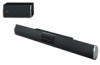
... panel, press and hold the HDMI1 button on remote control for subwoofer 4 Operating instructions (This document) Main unit • Amplifier section Rated power output Front . . . . 50 W per channel (1 kHz, 6 Ω, 10 %) Center 50 W (1 kHz, 6 Ω, 10 %) • Input/Output section HDMI terminal: Input 19-pin x2 Output 19-pin (5 V, 100 mA) Audio input. . . . . .Coaxial x1, Optical x1 (Digital) • Speaker section Front speakers Enclosure Closed-box type (magnetically shielded) System 7.7 cm (3 in.) 1-way system Speakers...
... panel, press and hold the HDMI1 button on remote control for subwoofer 4 Operating instructions (This document) Main unit • Amplifier section Rated power output Front . . . . 50 W per channel (1 kHz, 6 Ω, 10 %) Center 50 W (1 kHz, 6 Ω, 10 %) • Input/Output section HDMI terminal: Input 19-pin x2 Output 19-pin (5 V, 100 mA) Audio input. . . . . .Coaxial x1, Optical x1 (Digital) • Speaker section Front speakers Enclosure Closed-box type (magnetically shielded) System 7.7 cm (3 in.) 1-way system Speakers...
Owner's Manual
Page 82
... OF PARTS OR LABOR WHICH WOULD BE OTHERWISE PROVIDED WITHOUT CHARGE UNDER THIS WARRANTY OBTAINED FROM ANY SOURCE OTHER THAN A PIONEER AUTHORIZED SERVICE COMPANY OR OTHER DESIGNATED LOCATION. ALTERED, DEFACED, OR REMOVED SERIAL NUMBERS VOID THIS ENTIRE WARRANTY NO OTHER WARRANTIES IN THE U.S.A. - and Canada should a dispute arise between you and Pioneer, Pioneer makes available its Complaint Resolution Program to...
... OF PARTS OR LABOR WHICH WOULD BE OTHERWISE PROVIDED WITHOUT CHARGE UNDER THIS WARRANTY OBTAINED FROM ANY SOURCE OTHER THAN A PIONEER AUTHORIZED SERVICE COMPANY OR OTHER DESIGNATED LOCATION. ALTERED, DEFACED, OR REMOVED SERIAL NUMBERS VOID THIS ENTIRE WARRANTY NO OTHER WARRANTIES IN THE U.S.A. - and Canada should a dispute arise between you and Pioneer, Pioneer makes available its Complaint Resolution Program to...


