Owner's Manual
Page 3
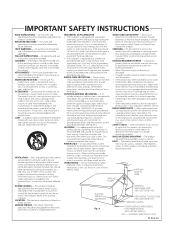
... similar surface. REPLACEMENT PARTS - ANTENNA LEAD IN WIRE GROUND CLAMP ELECTRIC SERVICE EQUIPMENT Fig. The safety and operating instructions should be cleaned only with a three-wire grounding type plug, a plug having one blade wider than the other electric light or power circuits, or where it is operated. The appliance should be read before the product is left un-used replacement parts specified by...
... similar surface. REPLACEMENT PARTS - ANTENNA LEAD IN WIRE GROUND CLAMP ELECTRIC SERVICE EQUIPMENT Fig. The safety and operating instructions should be cleaned only with a three-wire grounding type plug, a plug having one blade wider than the other electric light or power circuits, or where it is operated. The appliance should be read before the product is left un-used replacement parts specified by...
Owner's Manual
Page 6
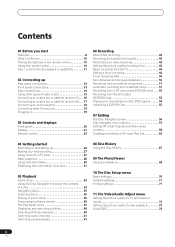
... the batteries in the remote control 10 Using the remote control 10 Disc / content format playback compatibility 11 02 Connecting up Rear panel connections 13 Front panel connections 13 Easy connections 14 Using other types of video output 15 Connecting to a cable box or satellite receiver (1) . . . 16 Connecting to a cable box or satellite receiver (2) . . . 17 Connecting to an AV amplifier 18 Connecting other AV sources 19 Plugging in 19 03 Controls and displays Front panel 20 Display 21 Remote control 22 06 Recording About DVD recording 42 Recording time and picture quality...
... the batteries in the remote control 10 Using the remote control 10 Disc / content format playback compatibility 11 02 Connecting up Rear panel connections 13 Front panel connections 13 Easy connections 14 Using other types of video output 15 Connecting to a cable box or satellite receiver (1) . . . 16 Connecting to a cable box or satellite receiver (2) . . . 17 Connecting to an AV amplifier 18 Connecting other AV sources 19 Plugging in 19 03 Controls and displays Front panel 20 Display 21 Remote control 22 06 Recording About DVD recording 42 Recording time and picture quality...

Owner's Manual
Page 8
... a Dolby Digital and/or DTScompatible amplifier/receiver to miss the first 15 minutes of a disc easy. Every time you load a recordable disc, the Disc History is also where you 're going to enjoy full surround sound effects from the Easy Timer Recording screen. 01 Before you start Chapter 1 Before you start Features • Chase play VR mode Using chase play you want. For example, if you want to make a DVD copy...
... a Dolby Digital and/or DTScompatible amplifier/receiver to miss the first 15 minutes of a disc easy. Every time you load a recordable disc, the Disc History is also where you 're going to enjoy full surround sound effects from the Easy Timer Recording screen. 01 Before you start Chapter 1 Before you start Features • Chase play VR mode Using chase play you want. For example, if you want to make a DVD copy...

Owner's Manual
Page 9
... DVD-Video format. Note: 'Finalization' is not touched. Before you start 01 • Manual recording In addition to the four preset recording quality modes (FINE, SP, LP and EP), the manual recording mode allows you to access 32 different recording quality/time settings, giving you very fine control over the recording. • Record to and from a DV camcorder (DVR-320 only) This recorder has a built-in DV (Digital Video) input/ output jack for connection to DVD...
... DVD-Video format. Note: 'Finalization' is not touched. Before you start 01 • Manual recording In addition to the four preset recording quality modes (FINE, SP, LP and EP), the manual recording mode allows you to access 32 different recording quality/time settings, giving you very fine control over the recording. • Record to and from a DV camcorder (DVR-320 only) This recorder has a built-in DV (Digital Video) input/ output jack for connection to DVD...

Owner's Manual
Page 12
... played. 12 En This process fixes the contents of the disc to make them readable to other players. *2 'DVD-Video format' recording: The use for the recorder to recognize JPEG files - This recorder supports the recording of 'copy-once' broadcast programs using VR mode. Discs recorded in a regular DVD player? CPRM recordings can re-record/erase a DVD-RW disc approximately 1,000 times. 01 Before you edit by making a 'Play List' of what 's actually recorded on players that does not play DVD-R or DVD-RW discs recorded in VR mode...
... played. 12 En This process fixes the contents of the disc to make them readable to other players. *2 'DVD-Video format' recording: The use for the recorder to recognize JPEG files - This recorder supports the recording of 'copy-once' broadcast programs using VR mode. Discs recorded in a regular DVD player? CPRM recordings can re-record/erase a DVD-RW disc approximately 1,000 times. 01 Before you edit by making a 'Play List' of what 's actually recorded on players that does not play DVD-R or DVD-RW discs recorded in VR mode...

Owner's Manual
Page 14
... stereo sound. 5 Connect your VCR to your TV (A/V IN 2 above) using AV cables, as the picture from this recorder, set of audio and video cables. Important • This recorder is a basic configuration that all components are not connecting a VCR in the chain, connect this recorder directly to your TV and skip the next step. 3 Use an RF antenna cable to connect the antenna output on your VCR to the antenna input on your VCR. It...
... stereo sound. 5 Connect your VCR to your TV (A/V IN 2 above) using AV cables, as the picture from this recorder, set of audio and video cables. Important • This recorder is a basic configuration that all components are not connecting a VCR in the chain, connect this recorder directly to your TV and skip the next step. 3 Use an RF antenna cable to connect the antenna output on your VCR to the antenna input on your VCR. It...
Owner's Manual
Page 22
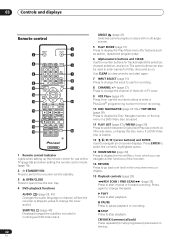
... to switch between Original and Play List content on VR mode discs, or display the disc menu if a DVD-Video disc is stopped, press to change the speed. CM BACK (commercial back) Press repeatedly to skip progressively backward on . PAUSE Press to stop playback. AUDIO (page 28, 40) Changes the audio language or channel. (When the recorder is loaded. channel selection, and so on. DVD RECORDER 1 Remote control indicator Lights when setting up the remote control for use the number buttons to enter a PlusCode® programming number for titles, discs...
... to switch between Original and Play List content on VR mode discs, or display the disc menu if a DVD-Video disc is stopped, press to change the speed. CM BACK (commercial back) Press repeatedly to skip progressively backward on . PAUSE Press to stop playback. AUDIO (page 28, 40) Changes the audio language or channel. (When the recorder is loaded. channel selection, and so on. DVD RECORDER 1 Remote control indicator Lights when setting up the remote control for use the number buttons to enter a PlusCode® programming number for titles, discs...
Owner's Manual
Page 26
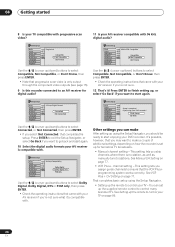
... to select Connected, or Not Connected, then press ENTER. • If you 're not sure what it ! Initial Setup Basic Tuner Video Out Audio In Audio Out Language Recording Playback Clock SAeVt Amp Compatibility On Screen Display Front Panel Display Remote Control Set Dolby Digital Setup Mavigator Dolby Digital, DTS PCM only Use the / (cursor up /down ) buttons to select Dolby Digital, Dolby Digital, DTS or PCM only, then press ENTER. • Check the operating instructions that progressive scan video is no station, as well as manually tune to select Compatible, Not Compatible...
... to select Connected, or Not Connected, then press ENTER. • If you 're not sure what it ! Initial Setup Basic Tuner Video Out Audio In Audio Out Language Recording Playback Clock SAeVt Amp Compatibility On Screen Display Front Panel Display Remote Control Set Dolby Digital Setup Mavigator Dolby Digital, DTS PCM only Use the / (cursor up /down ) buttons to select Dolby Digital, Dolby Digital, DTS or PCM only, then press ENTER. • Check the operating instructions that progressive scan video is no station, as well as manually tune to select Compatible, Not Compatible...

Owner's Manual
Page 27
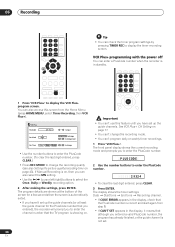
... recording, press STOP. buttons on the remote - buttons on the remote • Number buttons on the front panel if the recorder is stopped. • Antenna channels are numbered 1 through 69. for channel 34, press 3, 4, ENTER; Press STANDBY/ON to switch on. • Make sure that the video input on the DVD disc as a single title with the label face-up, using the disc guide to align the disc. • When you load a new, blank DVD-RW disc, the recorder...
... recording, press STOP. buttons on the remote - buttons on the remote • Number buttons on the front panel if the recorder is stopped. • Antenna channels are numbered 1 through 69. for channel 34, press 3, 4, ENTER; Press STANDBY/ON to switch on. • Make sure that the video input on the DVD disc as a single title with the label face-up, using the disc guide to align the disc. • When you load a new, blank DVD-RW disc, the recorder...

Owner's Manual
Page 42
... recorded; Recording time and picture quality There are compatible with standard DVD players, most of which will be in two channel Dolby Digital format. Use when maximum recording time is most applications, gives about 1 hour of recording time. • SP (Standard Play) - In all except the FINE/MN32 modes, sound is recorded in the chosen recording mode. Note • Note that DVDR discs can only be recorded once, while DVD-RW can initialize a DVD-RW disc for Video...
... recorded; Recording time and picture quality There are compatible with standard DVD players, most of which will be in two channel Dolby Digital format. Use when maximum recording time is most applications, gives about 1 hour of recording time. • SP (Standard Play) - In all except the FINE/MN32 modes, sound is recorded in the chosen recording mode. Note • Note that DVDR discs can only be recorded once, while DVD-RW can initialize a DVD-RW disc for Video...
Owner's Manual
Page 48
... have set . 48 En The display shows the timer settings: Date Start time End time Recording channel. • If CODE ERROR appears in the display, check that the TV program is showing on page 77 • You can't change • Use the number buttons to enter the PlusCode number. (To clear the last digit entered, press CLEAR.) • Press REC MODE to display the VCR Plus+ program screen. 06 Recording VCR Plus+ CLEAR ENTER HOME MENU Tip...
... have set . 48 En The display shows the timer settings: Date Start time End time Recording channel. • If CODE ERROR appears in the display, check that the TV program is showing on page 77 • You can't change • Use the number buttons to enter the PlusCode number. (To clear the last digit entered, press CLEAR.) • Press REC MODE to display the VCR Plus+ program screen. 06 Recording VCR Plus+ CLEAR ENTER HOME MENU Tip...
Owner's Manual
Page 51
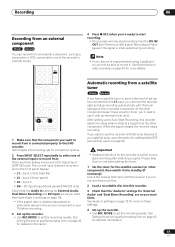
... them . See Setting the picture quality/recording time on -screen and in mind when setting the timer. 1 Set the timer for connection options. 2 Press INPUT SELECT repeatedly to select one of the recorder's external inputs. Note • If your source is interrupted during recording. See Chapter 2 (Connecting up) for the satellite receiver (or other component), then switch it . DV input/output (front panel) (DVR-320 only) Check that the Audio In settings for this recorder to set the recording quality. Important...
... them . See Setting the picture quality/recording time on -screen and in mind when setting the timer. 1 Set the timer for connection options. 2 Press INPUT SELECT repeatedly to select one of the recorder's external inputs. Note • If your source is interrupted during recording. See Chapter 2 (Connecting up) for the satellite receiver (or other component), then switch it . DV input/output (front panel) (DVR-320 only) Check that the Audio In settings for this recorder to set the recording quality. Important...

Owner's Manual
Page 75
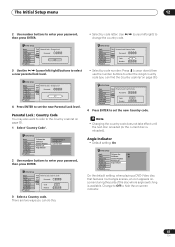
... for sound, picture, language and so on. • Press HOME MENU and select 'Initial Setup'. Initial Setup Basic Tuner Video Out Audio In Audio Out Language Recording Playback Clock SAeuttiongClock Setting On Screen Display Front PaDnaetleDisplay Remote TCimonetrol Set Setup NaCvloigckaStoetr CH 2 Start If the time could not be set automatically if there is a broadcast station transmitting clock signals, or manually. Select Auto to set the clock automatically or Manual to change the value in the highlighted field. Use the / (cursor left/right) buttons to...
... for sound, picture, language and so on. • Press HOME MENU and select 'Initial Setup'. Initial Setup Basic Tuner Video Out Audio In Audio Out Language Recording Playback Clock SAeuttiongClock Setting On Screen Display Front PaDnaetleDisplay Remote TCimonetrol Set Setup NaCvloigckaStoetr CH 2 Start If the time could not be set automatically if there is a broadcast station transmitting clock signals, or manually. Select Auto to set the clock automatically or Manual to change the value in the highlighted field. Use the / (cursor left/right) buttons to...

Owner's Manual
Page 78
... progressive-scan component video, set the recorder's video output back to the 'standard definition' output (Interlace). Initial Setup Basic Tuner Video Out Audio In Audio Out Language Recording Playback External Audio Dual Mono Recording DV Input Input Level (L1) Input Level (L2) Input Level (L3) Stereo1 Stereo2 Mix (Stereo1: 75%) Mix (Stereo1: 50%) Mix (Stereo1: 25%) Some digital camcorders have a camcorder using a TV that the user switch the connection to Interlace. the other is for the highest quality picture...
... progressive-scan component video, set the recorder's video output back to the 'standard definition' output (Interlace). Initial Setup Basic Tuner Video Out Audio In Audio Out Language Recording Playback External Audio Dual Mono Recording DV Input Input Level (L1) Input Level (L2) Input Level (L3) Stereo1 Stereo2 Mix (Stereo1: 75%) Mix (Stereo1: 50%) Mix (Stereo1: 25%) Some digital camcorders have a camcorder using a TV that the user switch the connection to Interlace. the other is for the highest quality picture...

Owner's Manual
Page 81
...although you may not work , the Audio Language and Subtitle Language settings must be shown with some DVD discs. Initial Setup Basic Tuner Video Out Audio In Audio Out Language Recording Playback OSD LanDgVuDagMe enu Language ASuubdtiiotleLaLLnaagnnuggauugaaeggee English Auto LanNguumagber 0 5 1 4 DVD Menu Language Subtitle Display • Select by language name: Use the / (cursor left/ right) buttons to change the language. • Select by code number: Press (cursor down) then use the number buttons to the Subtitle Language and Auto Language settings. Choose Other if you...
...although you may not work , the Audio Language and Subtitle Language settings must be shown with some DVD discs. Initial Setup Basic Tuner Video Out Audio In Audio Out Language Recording Playback OSD LanDgVuDagMe enu Language ASuubdtiiotleLaLLnaagnnuggauugaaeggee English Auto LanNguumagber 0 5 1 4 DVD Menu Language Subtitle Display • Select by language name: Use the / (cursor left/ right) buttons to change the language. • Select by code number: Press (cursor down) then use the number buttons to the Subtitle Language and Auto Language settings. Choose Other if you...
Owner's Manual
Page 85
...; Default setting: On Initial Setup Basic TV Screen Size On Tuner Still Picture Off Video Out Seamless Playback Audio In Parental Lock Audio Out Angle Indicator Language Recording Playback On the default setting, when playing a DVD-Video disc that features multi-angle scenes, an icon appears onscreen during the parts of the disc where angle switching is reloaded). Change to Off to the Country code list on page 93. 1 Select 'Country Code'. Initial Setup Basic Tuner Video Out Audio In Audio Out Language Recording Playback TV ScrePeanreSnizteal Lock : Change Level...
...; Default setting: On Initial Setup Basic TV Screen Size On Tuner Still Picture Off Video Out Seamless Playback Audio In Parental Lock Audio Out Angle Indicator Language Recording Playback On the default setting, when playing a DVD-Video disc that features multi-angle scenes, an icon appears onscreen during the parts of the disc where angle switching is reloaded). Change to Off to the Country code list on page 93. 1 Select 'Country Code'. Initial Setup Basic Tuner Video Out Audio In Audio Out Language Recording Playback TV ScrePeanreSnizteal Lock : Change Level...
Owner's Manual
Page 88
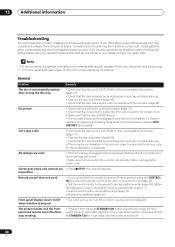
... repair work • If you connected this recorder to another component. inoperative Remote control does not work . 13 Additional information Troubleshooting Incorrect operation is often mistaken for the condensation to evaporate. Screen goes blank and controls are reset • If the recorder is unplugged (or there is a power failure) while the recorder is pressed The picture freezes and the front panel and remote control buttons stop working. • Press the front panel STANDBY/ON button to switch...
... repair work • If you connected this recorder to another component. inoperative Remote control does not work . 13 Additional information Troubleshooting Incorrect operation is often mistaken for the condensation to evaporate. Screen goes blank and controls are reset • If the recorder is unplugged (or there is a power failure) while the recorder is pressed The picture freezes and the front panel and remote control buttons stop working. • Press the front panel STANDBY/ON button to switch...

Owner's Manual
Page 89
... recorded in order to play a disc recorded using this remote control • If there is more than one in turn (page 86) • It is possible that none of your TV. Screen is played via this case, switch the input of the codes listed will not display or distorted correctly. Timer program doesn't record successfully • When setting the recording channel, make of TV, try cleaning the cable plugs. Connect the component directly to your particular model...
... recorded in order to play a disc recorded using this remote control • If there is more than one in turn (page 86) • It is possible that none of your TV. Screen is played via this case, switch the input of the codes listed will not display or distorted correctly. Timer program doesn't record successfully • When setting the recording channel, make of TV, try cleaning the cable plugs. Connect the component directly to your particular model...

Owner's Manual
Page 90
... disc, make sure that you cannot make it playable in another DVD player? See also Simultaneous recording and playback on page 54. • Can I use a 2x speed compatible DVD-RW initialized for recording? Reset the clock and other players. To have the battery replaced, contact your recordings on other DVD players on page 50. • I edit recordings, or erase parts of the recorder and the remote. 90 En See also Playing your dealer or a Pioneer Service...
... disc, make sure that you cannot make it playable in another DVD player? See also Simultaneous recording and playback on page 54. • Can I use a 2x speed compatible DVD-RW initialized for recording? Reset the clock and other players. To have the battery replaced, contact your recordings on other DVD players on page 50. • I edit recordings, or erase parts of the recorder and the remote. 90 En See also Playing your dealer or a Pioneer Service...

Owner's Manual
Page 99
... DVD-VIDEO Recordable discs DVD-RW (DVD Re-recordable disc) DVD-R (DVD Recordable disc) Video recording format Sampling frequency 13.5MHz Compression format MPEG Audio recording format Sampling frequency 48kHz Compression format Dolby Digital or Linear PCM (uncompressed) Recording time Fine (FINE Approx. 1 hour Standard Play (SP Approx. 2 hours Long Play (LP Approx. 4 hours Extended Play (EP Approx. 6 hours Manual Mode (MN Approx. 1-6 hours Tuner Receivable channels VHF 2-13ch UHF 14-69ch CATV C1-C125ch Input/Output VHF/UHF antenna input/output terminal . . . . CD-DA) Power...
... DVD-VIDEO Recordable discs DVD-RW (DVD Re-recordable disc) DVD-R (DVD Recordable disc) Video recording format Sampling frequency 13.5MHz Compression format MPEG Audio recording format Sampling frequency 48kHz Compression format Dolby Digital or Linear PCM (uncompressed) Recording time Fine (FINE Approx. 1 hour Standard Play (SP Approx. 2 hours Long Play (LP Approx. 4 hours Extended Play (EP Approx. 6 hours Manual Mode (MN Approx. 1-6 hours Tuner Receivable channels VHF 2-13ch UHF 14-69ch CATV C1-C125ch Input/Output VHF/UHF antenna input/output terminal . . . . CD-DA) Power...


