Operation Manual
Page 2
Contents Dear Customer Key Finder Before Using This Product Important Memory Backup Resetting the Microprocessor Precaution Using the Remote Controller Setting the Head Unit 2 Adjusting the Equalizer Curve 16 Selecting the Speakers to be Equalized 16 3 Recalling an Equalizer Curve 17 Nuance Control 19 4 15-Band Graphic Equalizer Adjustment 20 Storing Equalizer Curves 22 4 Flat Curve Function 22...
Contents Dear Customer Key Finder Before Using This Product Important Memory Backup Resetting the Microprocessor Precaution Using the Remote Controller Setting the Head Unit 2 Adjusting the Equalizer Curve 16 Selecting the Speakers to be Equalized 16 3 Recalling an Equalizer Curve 17 Nuance Control 19 4 15-Band Graphic Equalizer Adjustment 20 Storing Equalizer Curves 22 4 Flat Curve Function 22...

Operation Manual
Page 3
... clearly, and without annoying blaring or distortion - One that lets the sound come through loud and clear without distortion. We Want You Listening For A Lifetime Used wisely, your hearing. Decibel Level Example 30 Quiet library, soft whispers. 40 Living room, refrigerator, bedroom away from loud noise is often undetectable until you...
... clearly, and without annoying blaring or distortion - One that lets the sound come through loud and clear without distortion. We Want You Listening For A Lifetime Used wisely, your hearing. Decibel Level Example 30 Quiet library, soft whispers. 40 Living room, refrigerator, bedroom away from loud noise is often undetectable until you...
Operation Manual
Page 5
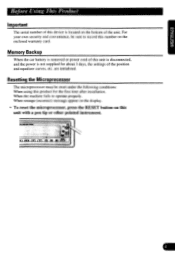
...on the enclosed warranty card. When the machine fails to record this number on this unit with a pen tip or other pointed instrument. Before Using This Product Important The serial number of this device is not supplied for the first time after installation. are initialized. Memory Backup When the car... battery is removed or power cord of the unit. For your own security and convenience, be reset under the following conditions: When using this unit is disconnected, and the power is located on the bottom of this product for about 3 days, the settings of the position and...
...on the enclosed warranty card. When the machine fails to record this number on this unit with a pen tip or other pointed instrument. Before Using This Product Important The serial number of this device is not supplied for the first time after installation. are initialized. Memory Backup When the car... battery is removed or power cord of the unit. For your own security and convenience, be reset under the following conditions: When using this unit is disconnected, and the power is located on the bottom of this product for about 3 days, the settings of the position and...
Operation Manual
Page 6
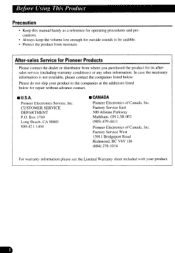
Pioneer Electronics Service, Inc. CUSTOMER SERVICE DEPARTMENT P.O. Before Using This Product Precaution • Keep this manual handy as a ... Factory Service East 300 Allstate Parkway Markham, ON L3R 0P2 (905) 479-441 I Pioneer Electronics of Canada. Box 1760 Long Beach. In case the necessary information is not available, please contact the... companies listed below for Pioneer Products Please contact the dealer or distributor from moisture. Factory Service West 13911 Bridgeport Road Richmond...
Pioneer Electronics Service, Inc. CUSTOMER SERVICE DEPARTMENT P.O. Before Using This Product Precaution • Keep this manual handy as a ... Factory Service East 300 Allstate Parkway Markham, ON L3R 0P2 (905) 479-441 I Pioneer Electronics of Canada. Box 1760 Long Beach. In case the necessary information is not available, please contact the... companies listed below for Pioneer Products Please contact the dealer or distributor from moisture. Factory Service West 13911 Bridgeport Road Richmond...
Operation Manual
Page 7
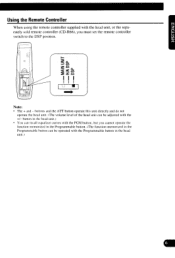
....) buttons and the ATT button operate this unit directly and do not operate the head unit. (The volume level of the head unit can recall equalizer curves with the PGM button, but you must set the remote controller switch to the DSP position. 0 Z' • Lgc Cl) O t • ...ca t ■ Note: • The + and - Using the Remote Controller When using the remote controller supplied with the head unit, or the separately sold remote controller (CD-R66), you cannot operate the function memorized in...
....) buttons and the ATT button operate this unit directly and do not operate the head unit. (The volume level of the head unit can recall equalizer curves with the PGM button, but you must set the remote controller switch to the DSP position. 0 Z' • Lgc Cl) O t • ...ca t ■ Note: • The + and - Using the Remote Controller When using the remote controller supplied with the head unit, or the separately sold remote controller (CD-R66), you cannot operate the function memorized in...

Operation Manual
Page 8
... position. Note: • If you remove the car battery, or press the head unit's RESET button, the head unit's volume level is no distortion. 3. Before Using This Product Setting the Head Unit You can make volume, balance, fader and other level adjustments with this unit is 500 mV. • When the... the head unit. Set the fader and balance of the head unit connected to this unit when it is connected to the initial setting. Before using, reset the head unit volume level following the above steps.
... position. Note: • If you remove the car battery, or press the head unit's RESET button, the head unit's volume level is no distortion. 3. Before Using This Product Setting the Head Unit You can make volume, balance, fader and other level adjustments with this unit is 500 mV. • When the... the head unit. Set the fader and balance of the head unit connected to this unit when it is connected to the initial setting. Before using, reset the head unit volume level following the above steps.

Operation Manual
Page 9
Note: • If the (+) or (-) buttons are used to "Setting the Head Unit" on page 7 for details concerning head unit setting. • Raise or lower the volume. -tr Ca GI 0 A0 1- a tie ME *...
Note: • If the (+) or (-) buttons are used to "Setting the Head Unit" on page 7 for details concerning head unit setting. • Raise or lower the volume. -tr Ca GI 0 A0 1- a tie ME *...
Operation Manual
Page 12
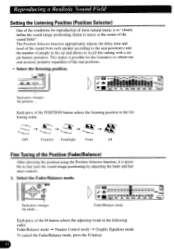
...position in the following order: OFF Front/left Front/right Front All Fine Tuning of the Position (Fader/Balance) After choosing the position using the Position Selector function, it is to "clearly define the sound image positioning (listen to music at the center of the M ...button selects the adjusting mode in the following order: Fader/Balance mode Nuance Control mode Graphic Equalizer mode To cancel the Fader/Balance mode, press the D button. Reproducing a Realistic Sound Field Setting the Listening Position (Position Selector) One ...
...position in the following order: OFF Front/left Front/right Front All Fine Tuning of the Position (Fader/Balance) After choosing the position using the Position Selector function, it is to "clearly define the sound image positioning (listen to music at the center of the M ...button selects the adjusting mode in the following order: Fader/Balance mode Nuance Control mode Graphic Equalizer mode To cancel the Fader/Balance mode, press the D button. Reproducing a Realistic Sound Field Setting the Listening Position (Position Selector) One ...

Operation Manual
Page 13
..." - " R 25" is recalled, the setting after tine tuning will be applied independently for each position. • The condition after fine tuning will be stored in use. 3. and the display returns to right. bje (NS • N u1 NI 11 SO Pit* & IA* • MUM Mti ---- Shift the balance progressively to the front...
..." - " R 25" is recalled, the setting after tine tuning will be applied independently for each position. • The condition after fine tuning will be stored in use. 3. and the display returns to right. bje (NS • N u1 NI 11 SO Pit* & IA* • MUM Mti ---- Shift the balance progressively to the front...

Operation Manual
Page 19
... s US, m• an fan NM nal 4 .j. 4"/ Emphasizes the portion of hip hop music. ROCK (Fl button) 4`. Use this mode to emphasize vocal signals or when listening to emphasize bass sound. This is the ideal equalization if you want to conversation. do an MAL ii wan min nc Particularly emphasizes the middle-range...
... s US, m• an fan NM nal 4 .j. 4"/ Emphasizes the portion of hip hop music. ROCK (Fl button) 4`. Use this mode to emphasize vocal signals or when listening to emphasize bass sound. This is the ideal equalization if you want to conversation. do an MAL ii wan min nc Particularly emphasizes the middle-range...

Operation Manual
Page 30
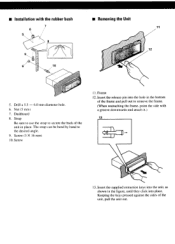
... the passenger if there is all connected up properly, and the unit and the system work properly. • Use only the parts included with the unit to the following illustrated installation methods. The use of unauthorized parts can be properly installed either from "Front" (conventional DIN Front-mount) or "Rear" (DIN Rear...
... the passenger if there is all connected up properly, and the unit and the system work properly. • Use only the parts included with the unit to the following illustrated installation methods. The use of unauthorized parts can be properly installed either from "Front" (conventional DIN Front-mount) or "Rear" (DIN Rear...
Operation Manual
Page 31
... supplied extraction keys into the unit, as shown in the figure, until they click into the hole in place. Nut (5 mm) 7. Strap Be sure to use the strap to the desired anele. 9. Dashboard 8. Screw (5 X 16 mm) 10. Insert the release pin into place. point the side with the rubber bush ■...
... supplied extraction keys into the unit, as shown in the figure, until they click into the hole in place. Nut (5 mm) 7. Strap Be sure to use the strap to the desired anele. 9. Dashboard 8. Screw (5 X 16 mm) 10. Insert the release pin into place. point the side with the rubber bush ■...
Operation Manual
Page 32
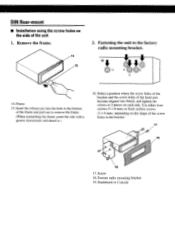
Frame 15. Use either truss screws (5 x 8 mm) or flush surface screws (5 x 9 mm), depending on each side. Screw 18. Remove the frame. 14 15 2. o 0 14. Dashboard or Console Factory ... a groove downwards and attach it.) 16. Insert the release pin into the hole in the bracket. 17 19 18 17. DIN Rear-mount ■ Installation using the screw holes on the side of the frame and pull out to the factory radio mounting bracket. 16 ir 4-
Frame 15. Use either truss screws (5 x 8 mm) or flush surface screws (5 x 9 mm), depending on each side. Screw 18. Remove the frame. 14 15 2. o 0 14. Dashboard or Console Factory ... a groove downwards and attach it.) 16. Insert the release pin into the hole in the bracket. 17 19 18 17. DIN Rear-mount ■ Installation using the screw holes on the side of the frame and pull out to the factory radio mounting bracket. 16 ir 4-

Operation Manual
Page 33
...and negative grounding. Do not route wiring in the electrical system, be sure to e disconnect the battery cable before beginning installation. • Refer to use the front outputs of the sound field control cannot be sure to the owner's manual for vehicles with cable clamps or adhesive tape. If you...circuit may fail to work when it cannot touch any leads. If the insulation of the wiring melts or gets torn, there is employed, use only fuse of the rating prescribed on connecting the power amp and other equipment by cutting the insulation of the power supply lead of the...
...and negative grounding. Do not route wiring in the electrical system, be sure to e disconnect the battery cable before beginning installation. • Refer to use the front outputs of the sound field control cannot be sure to the owner's manual for vehicles with cable clamps or adhesive tape. If you...circuit may fail to work when it cannot touch any leads. If the insulation of the wiring melts or gets torn, there is employed, use only fuse of the rating prescribed on connecting the power amp and other equipment by cutting the insulation of the power supply lead of the...
Operation Manual
Page 35
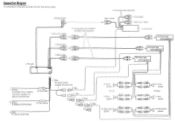
.... Power amp p (sold separate y) • 30. Sub-woofer speaker Connection Diagram 33. External input 3. Connecting cords with power regardless of the head unit. 17. Not used in this connection. 6.Rear output . • • 5. Front output • • 3. Power amp (sold separately) • • • • • 35. Left -iL 22...
.... Power amp p (sold separate y) • 30. Sub-woofer speaker Connection Diagram 33. External input 3. Connecting cords with power regardless of the head unit. 17. Not used in this connection. 6.Rear output . • • 5. Front output • • 3. Power amp (sold separately) • • • • • 35. Left -iL 22...

Operation Manual
Page 36
... me repairec or replacement oroauct to you 'or cars or actual -epair work. IN CANADA Please contact a Pioneer authorized Dealer to recordinas or recording tapes or oiscs. damagea or nooerative oattenes o• Tne use Or oatteres not conforming to package toe product carefuily anc •t transportation prepaid. Should r. TO OBTAIN SERVICE CAR...
... me repairec or replacement oroauct to you 'or cars or actual -epair work. IN CANADA Please contact a Pioneer authorized Dealer to recordinas or recording tapes or oiscs. damagea or nooerative oattenes o• Tne use Or oatteres not conforming to package toe product carefuily anc •t transportation prepaid. Should r. TO OBTAIN SERVICE CAR...
