Operation Manual
Page 5
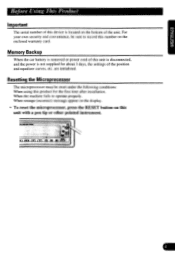
... microprocessor, press the RESET button on this number on the bottom of the position and equalizer curves, etc. Before Using This Product Important The serial number of this device is not supplied for the first time after installation. Memory Backup When the car battery is removed or power cord of this unit...
... microprocessor, press the RESET button on this number on the bottom of the position and equalizer curves, etc. Before Using This Product Important The serial number of this device is not supplied for the first time after installation. Memory Backup When the car battery is removed or power cord of this unit...

Operation Manual
Page 30
... according to the following illustrated installation methods. DIN Front/Rear-mount This unit can cause malfunctions. • Consult with your nearest dealer if installation requires the drilling of holes or other modifications of the vehicle. • Install the unit where it is ...unauthorized parts can be properly installed either from "Front" (conventional DIN Front-mount) or "Rear" (DIN Rear-mount installation, utilizing threaded screw holes at the sides of the dashboard material and bend them. 3. Installation Note: • Before finally installing the unit, connect the wiring...
... according to the following illustrated installation methods. DIN Front/Rear-mount This unit can cause malfunctions. • Consult with your nearest dealer if installation requires the drilling of holes or other modifications of the vehicle. • Install the unit where it is ...unauthorized parts can be properly installed either from "Front" (conventional DIN Front-mount) or "Rear" (DIN Rear-mount installation, utilizing threaded screw holes at the sides of the dashboard material and bend them. 3. Installation Note: • Before finally installing the unit, connect the wiring...
Operation Manual
Page 31
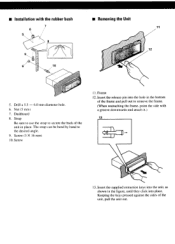
■ Installation with a groove downwards and attach it.) 13 13. Strap Be sure to use the strap to secure the back of the unit, pull the unit ...
■ Installation with a groove downwards and attach it.) 13 13. Strap Be sure to use the strap to secure the back of the unit, pull the unit ...
Operation Manual
Page 32
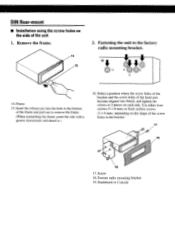
... 18 17. Use either truss screws (5 x 8 mm) or flush surface screws (5 x 9 mm), depending on each side. Remove the frame. 14 15 2. DIN Rear-mount ■ Installation using the screw holes on the side of the head unit become aligned (are fitted), and tighten the screws at 2 places on the shape of...
... 18 17. Use either truss screws (5 x 8 mm) or flush surface screws (5 x 9 mm), depending on each side. Remove the frame. 14 15 2. DIN Rear-mount ■ Installation using the screw holes on the side of the head unit become aligned (are fitted), and tighten the screws at 2 places on the shape of...
Operation Manual
Page 33
Before installing it in a recreational vehicle, truck, or bus, check the battery voltage. • To avoid shorts in places that get hot, such as the gear shift, ... to work when it cannot touch any leads. Do not route wiring in the electrical system, be sure to e disconnect the battery cable before beginning installation. • Refer to the vehicle body. • Don't pass the orange lead through a hole into the lead. If the insulation of the wiring melts or...
Before installing it in a recreational vehicle, truck, or bus, check the battery voltage. • To avoid shorts in places that get hot, such as the gear shift, ... to work when it cannot touch any leads. Do not route wiring in the electrical system, be sure to e disconnect the battery cable before beginning installation. • Refer to the vehicle body. • Don't pass the orange lead through a hole into the lead. If the insulation of the wiring melts or...

Operation Manual
Page 36
...ROAD RICHMOND BC V6V 1,16 6041 278 4245 IN THE U.S.A. Pioneer Eiectrorius (USA) Inc_ (PAL and Pioneer Eiectrorus Of Canada. and by tne use Or oatteres not conforming to a nnuracturing detect when installed ano operated accordino ro the owners instructions P.M.:.0Seri me (product comnnerces...er is required. or any 0'0CJCI wr ,ec PRODUCT ice oJsiness. For additional information on this warranty. Serial No Purchase Date P. PIONEER ELECTRONICS OF CANADA, INC. (PA) (PO0) LIMITED WARRANTY WARRANTY VALID ONLY !N COUNTRY OF PRODUCT PURCHASE WARRANTY PERIOD i me oeroa ...
...ROAD RICHMOND BC V6V 1,16 6041 278 4245 IN THE U.S.A. Pioneer Eiectrorius (USA) Inc_ (PAL and Pioneer Eiectrorus Of Canada. and by tne use Or oatteres not conforming to a nnuracturing detect when installed ano operated accordino ro the owners instructions P.M.:.0Seri me (product comnnerces...er is required. or any 0'0CJCI wr ,ec PRODUCT ice oJsiness. For additional information on this warranty. Serial No Purchase Date P. PIONEER ELECTRONICS OF CANADA, INC. (PA) (PO0) LIMITED WARRANTY WARRANTY VALID ONLY !N COUNTRY OF PRODUCT PURCHASE WARRANTY PERIOD i me oeroa ...
