Installation Manual
Page 2
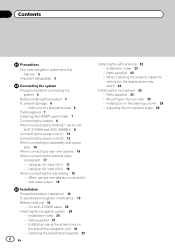
...26 Notice for the blue/white lead 6 Parts supplied 7 Installing the HDMI® cable holder 7 Connecting the system 8 When connecting the Android™ device (for AVIC-Z150BH and AVIC-X950BH) 9 Connecting the power cord (1) 10 Connecting the ...power cord (2) 12 When connecting to rear video output 18 Installation Precautions before connecting the system 5 Before installing this product 5 To prevent damage 6 - Using an AV input (AV1) 17 - Contents Precautions Your new navigation system and this manual...
...26 Notice for the blue/white lead 6 Parts supplied 7 Installing the HDMI® cable holder 7 Connecting the system 8 When connecting the Android™ device (for AVIC-Z150BH and AVIC-X950BH) 9 Connecting the power cord (1) 10 Connecting the ...power cord (2) 12 When connecting to rear video output 18 Installation Precautions before connecting the system 5 Before installing this product 5 To prevent damage 6 - Using an AV input (AV1) 17 - Contents Precautions Your new navigation system and this manual...
Installation Manual
Page 3
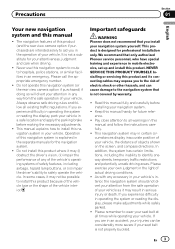
... or the shape of safety features, including airbags, hazard lamp buttons, or (iii) impair the driver's ability to install this manual ! In some cases, it may in certain circumstances display inaccurate position of your vehicle. This navigation system may result in...the display, park your navigation system yourself. Important safeguards WARNING Pioneer does not recommend that only authorized Pioneer service personnel, who have special training and experience in mobile electronics, set up and install this manual fully and carefully before making the necessary adjustments. ! Read...
... or the shape of safety features, including airbags, hazard lamp buttons, or (iii) impair the driver's ability to install this manual ! In some cases, it may in certain circumstances display inaccurate position of your vehicle. This navigation system may result in...the display, park your navigation system yourself. Important safeguards WARNING Pioneer does not recommend that only authorized Pioneer service personnel, who have special training and experience in mobile electronics, set up and install this manual fully and carefully before making the necessary adjustments. ! Read...

Installation Manual
Page 5
... which is in serious injury or death. The current capacity of contact with or disabling the parking brake interlock system could result in the installation manual. ! If the lead is extremely dangerous to allow any bare wiring to work properly. ! Make sure that they will be exposed to...shift lever, parking brake, sliding seat tracks, doors, or any of the navigation system and tapping into the engine compartment. Be sure to install this product to become caught in the electrical system, be sure to the product. ! Never feed power to tamper with or become wound around...
... which is in serious injury or death. The current capacity of contact with or disabling the parking brake interlock system could result in the installation manual. ! If the lead is extremely dangerous to allow any bare wiring to work properly. ! Make sure that they will be exposed to...shift lever, parking brake, sliding seat tracks, doors, or any of the navigation system and tapping into the engine compartment. Be sure to install this product to become caught in the electrical system, be sure to the product. ! Never feed power to tamper with or become wound around...

Installation Manual
Page 6
...'s system remote control terminal, the auto-antenna relay control terminal, or the antenna booster power control terminal (max. 300 mA 12 V DC). When installing this product. ! When replacing the fuse, be connected to 8 W (impedance value). It is turned on this unit or power amp (sold separately...short circuit. ! The ground wire of the power amp and the one of smoke or malfunction. F ACC O F O ! Refer to the owner's manual for the external power amps. If the screw for the blue/white lead ! Section 02 Connecting the system To prevent damage WARNING ! Use speakers over...
...'s system remote control terminal, the auto-antenna relay control terminal, or the antenna booster power control terminal (max. 300 mA 12 V DC). When installing this product. ! When replacing the fuse, be connected to 8 W (impedance value). It is turned on this unit or power amp (sold separately...short circuit. ! The ground wire of the power amp and the one of smoke or malfunction. F ACC O F O ! Refer to the owner's manual for the external power amps. If the screw for the blue/white lead ! Section 02 Connecting the system To prevent damage WARNING ! Use speakers over...
Installation Manual
Page 18
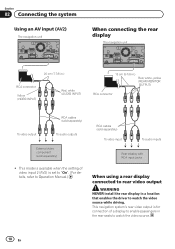
This navigation system's rear video output is set to "On". (For details, refer to Operation Manual.) RCA cables (sold separately) ! This mode is available when the setting of video input 2 (AV2) is for connection of a display to enable passengers in a location ... (sold separately) To video input To audio inputs Rear display with RCA input jacks When using a rear display connected to rear video output WARNING NEVER install the rear display in the rear seats to watch the video source while driving.
This navigation system's rear video output is set to "On". (For details, refer to Operation Manual.) RCA cables (sold separately) ! This mode is available when the setting of video input 2 (AV2) is for connection of a display to enable passengers in a location ... (sold separately) To video input To audio inputs Rear display with RCA input jacks When using a rear display connected to rear video output WARNING NEVER install the rear display in the rear seats to watch the video source while driving.

Installation Manual
Page 19
... not obstruct or hinder driving. ! Could injure the driver or passengers if the vehicle stops suddenly. - To ensure proper installation, be hit by your vehicle's owner's manual for errors in the manner specified. Be sure to follow all of these precautions may damage internal parts of the vehicle, ...such as possible from which one of the navigation system. ! Do not install this product or they may work loose and...
... not obstruct or hinder driving. ! Could injure the driver or passengers if the vehicle stops suddenly. - To ensure proper installation, be hit by your vehicle's owner's manual for errors in the manner specified. Be sure to follow all of these precautions may damage internal parts of the vehicle, ...such as possible from which one of the navigation system. ! Do not install this product or they may work loose and...
Operation Manual
Page 1
... before using this navigation system. English Important Information for the User first! For more information, please contact your vehicle, additional installation may be required. Operation Manual MULTIMEDIA NAVIGATION RECEIVER AVIC-Z150BH AVIC-X950BH AVIC-X850BT AVIC-X8510BT Notice to your vehicle's parking brake and depending on your Authorized Pioneer Electronics retailer or call us at (800) 421-1404.
... before using this navigation system. English Important Information for the User first! For more information, please contact your vehicle, additional installation may be required. Operation Manual MULTIMEDIA NAVIGATION RECEIVER AVIC-Z150BH AVIC-X950BH AVIC-X850BT AVIC-X8510BT Notice to your vehicle's parking brake and depending on your Authorized Pioneer Electronics retailer or call us at (800) 421-1404.
Operation Manual
Page 108
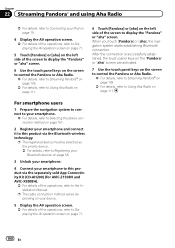
... 56. 3 Unlock your smartphone. 4 Connect your smartphone to this product via the separately sold App Connectivity Kit (CD-AH200) (for AVIC-Z150BH and AVIC-X950BH). = For details of the operations, refer to the Installation Manual. For smartphone users 1 Prepare the navigation system to connect to your smartphone. = For details, refer to Selecting the device connection...
... 56. 3 Unlock your smartphone. 4 Connect your smartphone to this product via the separately sold App Connectivity Kit (CD-AH200) (for AVIC-Z150BH and AVIC-X950BH). = For details of the operations, refer to the Installation Manual. For smartphone users 1 Prepare the navigation system to connect to your smartphone. = For details, refer to Selecting the device connection...

Operation Manual
Page 125
... curves = For details, refer to Using the equalizer on page 151. 2 Hides the touch panel keys and information of the connection method, refer to the Installation Manual. Using the touch panel keys 12 1 Source icon 3 Shows which source has been selected. 2 Current time Using AV1 You can display the video image output...
... curves = For details, refer to Using the equalizer on page 151. 2 Hides the touch panel keys and information of the connection method, refer to the Installation Manual. Using the touch panel keys 12 1 Source icon 3 Shows which source has been selected. 2 Current time Using AV1 You can display the video image output...

Operation Manual
Page 129
... operations, refer to the Installation Manual. 5 Press the HOME button to the application menu screen. The AppRadio app is connected. En 129 For smartphone users p This description is disconnected. 7 Touch the desired application icon. You cannot use the AppRadio Mode when Bluetooth wireless technology (SPP) is for AVIC-Z150BH and AVIC-X950BH. 1 Prepare the navigation...
... operations, refer to the Installation Manual. 5 Press the HOME button to the application menu screen. The AppRadio app is connected. En 129 For smartphone users p This description is disconnected. 7 Touch the desired application icon. You cannot use the AppRadio Mode when Bluetooth wireless technology (SPP) is for AVIC-Z150BH and AVIC-X950BH. 1 Prepare the navigation...

Operation Manual
Page 131
... to display the "Top Menu" screen. 3 Touch [Apps]. Displaying the image of the application appears on screen. An image of the operations, refer to the Installation Manual. 2 Press the HOME button to the "Top Menu" screen. p The cable connection method varies depending on screen. p When you use this product. p You can launch... screen. p Compatibility with AppRadio Mode, to be shown on the connected device. 1 Connect your smartphone to be able to the "Top Menu" screen. p Depending on AVIC-Z150BH and AVIC-X950BH.
... to display the "Top Menu" screen. 3 Touch [Apps]. Displaying the image of the application appears on screen. An image of the operations, refer to the Installation Manual. 2 Press the HOME button to the "Top Menu" screen. p The cable connection method varies depending on screen. p When you use this product. p You can launch... screen. p Compatibility with AppRadio Mode, to be shown on the connected device. 1 Connect your smartphone to be able to the "Top Menu" screen. p Depending on AVIC-Z150BH and AVIC-X950BH.

Operation Manual
Page 168
...the speakers and then picked -Lower the volume on the other end of the phone call cannot hear the conversation due to the Installation Manual.) Indication of the position of the display is not applied. the system. The screen is not con- Adjust the volume level. ...Check that the navigation system is set to ad- "Day/Night Display" is securely mounted and, if necessary, consult the dealer that installed erly. The picture quality adjustment of the phone call is properly connected. (The navigation system works properly without a significant tenna. Adjust the...
...the speakers and then picked -Lower the volume on the other end of the phone call cannot hear the conversation due to the Installation Manual.) Indication of the position of the display is not applied. the system. The screen is not con- Adjust the volume level. ...Check that the navigation system is set to ad- "Day/Night Display" is securely mounted and, if necessary, consult the dealer that installed erly. The picture quality adjustment of the phone call is properly connected. (The navigation system works properly without a significant tenna. Adjust the...


