Installation Manual
Page 2
...SYSTEM AND THIS MANUAL 3 IMPORTANT SAFEGUARDS PLEASE READ ALL OF THESE INSTRUCTIONS REGARDING YOUR NAVIGATION SYSTEM AND RETAIN THEM FOR FUTURE REFERENCE 4 Connecting the System Precautions before installation 20 To guard against electromagnetic interference 20 Before installing 20 2 En - AVIC-Z120BT 7 - Parts... - Using "AV2 Input" (AV2) 18 When connecting the rear display 18 - Parts supplied 25 - For AVIC-Z120BT users 21 Installing this product 5 To prevent damage 5 - AVIC-X920BT 7 Connecting the system 8 Connecting the power cord (1) 10 Connecting the power cord (2) 12 When connecting...
...SYSTEM AND THIS MANUAL 3 IMPORTANT SAFEGUARDS PLEASE READ ALL OF THESE INSTRUCTIONS REGARDING YOUR NAVIGATION SYSTEM AND RETAIN THEM FOR FUTURE REFERENCE 4 Connecting the System Precautions before installation 20 To guard against electromagnetic interference 20 Before installing 20 2 En - AVIC-Z120BT 7 - Parts... - Using "AV2 Input" (AV2) 18 When connecting the rear display 18 - Parts supplied 25 - For AVIC-Z120BT users 21 Installing this product 5 To prevent damage 5 - AVIC-X920BT 7 Connecting the system 8 Connecting the power cord (1) 10 Connecting the power cord (2) 12 When connecting...
Installation Manual
Page 3
... purchased) are intended solely to aid you experience difficulty in operating the system or reading the display, park your vehicle in the separate manuals for your vehicle. Do not operate this navigation system (or the rear view camera option if purchased) if doing so will divert your... features, including airbags, hazard lamp buttons or (iii) impair the driver's ability to install this navigation system in an emergency. This manual explains how to hospitals, police stations, or similar facilities in your vehicle. IMPORTANT INFORMATION ABOUT YOUR NEW NAVIGATION SYSTEM AND THIS...
... purchased) are intended solely to aid you experience difficulty in operating the system or reading the display, park your vehicle in the separate manuals for your vehicle. Do not operate this navigation system (or the rear view camera option if purchased) if doing so will divert your... features, including airbags, hazard lamp buttons or (iii) impair the driver's ability to install this navigation system in an emergency. This manual explains how to hospitals, police stations, or similar facilities in your vehicle. IMPORTANT INFORMATION ABOUT YOUR NEW NAVIGATION SYSTEM AND THIS...
Installation Manual
Page 4
... the placement and use , installation and operation of your vehicle. We recommend that only authorized Pioneer service personnel, who have special training and experience in this manual fully and carefully before installing your vehicle. PLEASE READ ALL OF THESE INSTRUCTIONS REGARDING YOUR NAVIGATION...display erroneous information regarding the use of this system in an accident, your navigation system yourself. Section 02 IMPORTANT SAFEGUARDS WARNING Pioneer does not recommend that you install your injuries can cause damage to the navigation system that is not properly buckled. 7 ...
... the placement and use , installation and operation of your vehicle. We recommend that only authorized Pioneer service personnel, who have special training and experience in this manual fully and carefully before installing your vehicle. PLEASE READ ALL OF THESE INSTRUCTIONS REGARDING YOUR NAVIGATION...display erroneous information regarding the use of this system in an accident, your navigation system yourself. Section 02 IMPORTANT SAFEGUARDS WARNING Pioneer does not recommend that you install your injuries can cause damage to the navigation system that is not properly buckled. 7 ...

Installation Manual
Page 5
Do not directly connect the yellow lead of the steps in the installation manual. ! Do not cut the GPS antenna cable to shorten it longer. If you decide to do , the protection circuit (fuse holder, fuse resistor or filter, ...
Do not directly connect the yellow lead of the steps in the installation manual. ! Do not cut the GPS antenna cable to shorten it longer. If you decide to do , the protection circuit (fuse holder, fuse resistor or filter, ...
Installation Manual
Page 6
... black cable is employed, do not remove the caps attached to the car separately with insulating tape. When installing this product. ! Refer to the owner's manual for the blue/white lead ! To avoid short-circuiting, cover the disconnected lead with different screws. OF OF Other devices (Another electronic device in a vehicle...
... black cable is employed, do not remove the caps attached to the car separately with insulating tape. When installing this product. ! Refer to the owner's manual for the blue/white lead ! To avoid short-circuiting, cover the disconnected lead with different screws. OF OF Other devices (Another electronic device in a vehicle...
Installation Manual
Page 8
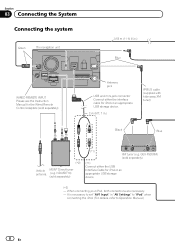
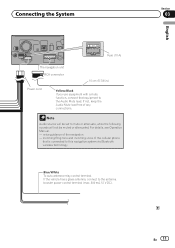
... appropriate USB storage device. (*2) - It is necessary to set "AV1 Input" in "AV Settings" to "iPod" when connecting the iPod. (For details, refer to Operation Manual.) 8 En Antenna jack USB and mini-jack connector Connect either the USB Interface Cable for iPod or an appropriate USB storage device. 2 m (6 ft. 7 in.) IP... separately). Section 03 Connecting the System Connecting the system Green The navigation unit 3.55 m (11 ft. 8 in.) Blue WIRED REMOTE INPUT Please see the Instruction Manual for the Wired Remote Control Adapters (sold separately) (*1) XM tuner (e.g.
... appropriate USB storage device. (*2) - It is necessary to set "AV1 Input" in "AV Settings" to "iPod" when connecting the iPod. (For details, refer to Operation Manual.) 8 En Antenna jack USB and mini-jack connector Connect either the USB Interface Cable for iPod or an appropriate USB storage device. 2 m (6 ft. 7 in.) IP... separately). Section 03 Connecting the System Connecting the system Green The navigation unit 3.55 m (11 ft. 8 in.) Blue WIRED REMOTE INPUT Please see the Instruction Manual for the Wired Remote Control Adapters (sold separately) (*1) XM tuner (e.g.
Installation Manual
Page 9
... of images on a display inside a vehicle even by persons other than the driver may be used while the vehicle is a visible distraction to the operation manual. GEX-P20HD) (sold separately) "SiriusConnect universal tuner" or "SIRIUS Dock and Play radio iPod with Dock Connector(*3) with SIRIUS satellite radio tuner) Blue Black Black...
... of images on a display inside a vehicle even by persons other than the driver may be used while the vehicle is a visible distraction to the operation manual. GEX-P20HD) (sold separately) "SiriusConnect universal tuner" or "SIRIUS Dock and Play radio iPod with Dock Connector(*3) with SIRIUS satellite radio tuner) Blue Black Black...
Installation Manual
Page 10
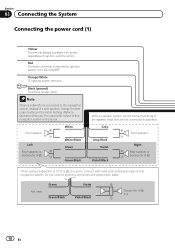
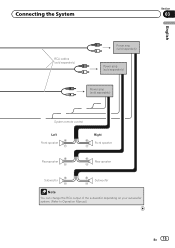
.... Note When a subwoofer is connected to this navigation system instead of a rear speaker, change the rear output setting in the Initial Setting. (Refer to Operation Manual.) The subwoofer output of this navigation system. Green Green/Black Violet Violet/Black Subwoofer (4 Ω) 2 10 En Not used. Gray Gray/Black...
.... Note When a subwoofer is connected to this navigation system instead of a rear speaker, change the rear output setting in the Initial Setting. (Refer to Operation Manual.) The subwoofer output of this navigation system. Green Green/Black Violet Violet/Black Subwoofer (4 Ω) 2 10 En Not used. Gray Gray/Black...
Installation Manual
Page 11
... lead free of the navigation - English Section 03 En 11 Note Audio source will be set to the Audio Mute lead. For details, see Operation Manual. - voice guidance of any connections. If the vehicle has a glass antenna, connect to this navigation system via Bluetooth wireless technology Blue/White To auto-antenna...
... lead free of the navigation - English Section 03 En 11 Note Audio source will be set to the Audio Mute lead. For details, see Operation Manual. - voice guidance of any connections. If the vehicle has a glass antenna, connect to this navigation system via Bluetooth wireless technology Blue/White To auto-antenna...
Installation Manual
Page 15
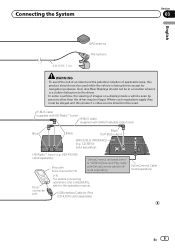
Connecting the System Section 03 English RCA cables (sold separately) Power amp (sold separately) Power amp (sold separately) Power amp (sold separately) System remote control Left Front speaker Rear speaker Right Front speaker Rear speaker Subwoofer Subwoofer Note You can change the RCA output of the subwoofer depending on your subwoofer system. (Refer to Operation Manual.) En 15
Connecting the System Section 03 English RCA cables (sold separately) Power amp (sold separately) Power amp (sold separately) Power amp (sold separately) System remote control Left Front speaker Rear speaker Right Front speaker Rear speaker Subwoofer Subwoofer Note You can change the RCA output of the subwoofer depending on your subwoofer system. (Refer to Operation Manual.) En 15
Installation Manual
Page 16
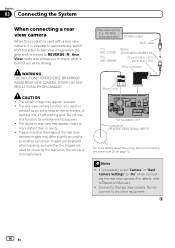
... refer to Connecting the power cord (2) on trailers, or backing into a tight parking spot. ND-BC4) (sold separately) To video output RCA cable (*1) AVIC-Z120BT (*2) AVIC-X920BT Brown (REAR VIEW CAMERA IN) 20 cm (7-7/8 in.) (*1) 23 cm (9 in.) (*2) RCA connector Power cord The navigation unit Violet/white (REVERSE ...INPUT) For more distant than in "Back Camera Settings" to "On" when connecting the rear view camera. (For details, refer to Operation Manual.) ! Do not connect to the rear view camera. WARNING USE INPUT ONLY FOR REVERSE OR MIRROR IMAGE REAR VIEW CAMERA. The screen image may...
... refer to Connecting the power cord (2) on trailers, or backing into a tight parking spot. ND-BC4) (sold separately) To video output RCA cable (*1) AVIC-Z120BT (*2) AVIC-X920BT Brown (REAR VIEW CAMERA IN) 20 cm (7-7/8 in.) (*1) 23 cm (9 in.) (*2) RCA connector Power cord The navigation unit Violet/white (REVERSE ...INPUT) For more distant than in "Back Camera Settings" to "On" when connecting the rear view camera. (For details, refer to Operation Manual.) ! Do not connect to the rear view camera. WARNING USE INPUT ONLY FOR REVERSE OR MIRROR IMAGE REAR VIEW CAMERA. The screen image may...
Installation Manual
Page 17
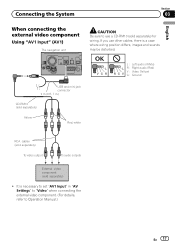
... When connecting the external video component Using "AV1 Input" (AV1) The navigation unit CAUTION Be sure to use other cables, there is necessary to Operation Manual.) En 17 OK L VGR L RG V L : Left audio (White) R : Right audio (Red) V : Video (Yellow) G : Ground USB and mini-jack connector 2 m (6 ft. 7 in "AV Settings" to "Video...
... When connecting the external video component Using "AV1 Input" (AV1) The navigation unit CAUTION Be sure to use other cables, there is necessary to Operation Manual.) En 17 OK L VGR L RG V L : Left audio (White) R : Right audio (Red) V : Video (Yellow) G : Ground USB and mini-jack connector 2 m (6 ft. 7 in "AV Settings" to "Video...

Installation Manual
Page 18
...System Using "AV2 Input" (AV2) The navigation unit When connecting the rear display The navigation unit (*1) 20 cm (7-7/8 in.) (*1) AVIC-Z120BT 23 cm (9 in.) (*2) (*2) AVIC-X920BT RCA connector Yellow (VIDEO INPUT) Red, white (AUDIO INPUT) RCA cables (sold separately) To video output To audio outputs External ...to watch the video source while driving. It is available for connection of a display to enable passengers in the rear seats to Operation Manual.) This connection 15 cm (5-7/8 in.) is necessary to set "AV2 Input" in a location that enables the driver to watch the video...
...System Using "AV2 Input" (AV2) The navigation unit When connecting the rear display The navigation unit (*1) 20 cm (7-7/8 in.) (*1) AVIC-Z120BT 23 cm (9 in.) (*2) (*2) AVIC-X920BT RCA connector Yellow (VIDEO INPUT) Red, white (AUDIO INPUT) RCA cables (sold separately) To video output To audio outputs External ...to watch the video source while driving. It is available for connection of a display to enable passengers in the rear seats to Operation Manual.) This connection 15 cm (5-7/8 in.) is necessary to set "AV2 Input" in a location that enables the driver to watch the video...

Installation Manual
Page 19
It is necessary to Operation Manual.) English Section 03 En 19 Connecting the System When connecting the external unit featuring video source The navigation unit Blue RCA connector 20 cm (7-7/8 in.) (*1) 23 cm (9 in "AV Settings" to "EXT" when connecting the external unit. (For details, refer to set "AV2 Input" in .) (*2) Yellow (VIDEO INPUT) IP-BUS cable (sold separately) Black RCA cable (sold separately) To IP-BUS output To video output Pioneer external unit (sold separately) (*1) (*2) AVIC-Z120BT AVIC-X920BT !
It is necessary to Operation Manual.) English Section 03 En 19 Connecting the System When connecting the external unit featuring video source The navigation unit Blue RCA connector 20 cm (7-7/8 in.) (*1) 23 cm (9 in "AV Settings" to "EXT" when connecting the external unit. (For details, refer to set "AV2 Input" in .) (*2) Yellow (VIDEO INPUT) IP-BUS cable (sold separately) Black RCA cable (sold separately) To IP-BUS output To video output Pioneer external unit (sold separately) (*1) (*2) AVIC-Z120BT AVIC-X920BT !
Installation Manual
Page 20
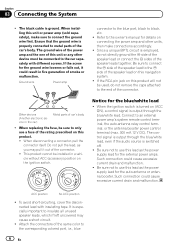
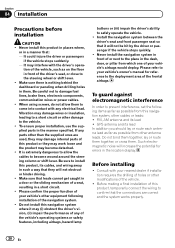
... system where it will not obstruct or hinder driving. ! tion of your vehicle's other modifications of the vehicle. ! Vibration may interfere with your vehicle's owner's manual for errors in a manner that they may work loose and the product may damage internal parts of this product, its lead In addition you should...
... system where it will not obstruct or hinder driving. ! tion of your vehicle's other modifications of the vehicle. ! Vibration may interfere with your vehicle's owner's manual for errors in a manner that they may work loose and the product may damage internal parts of this product, its lead In addition you should...
Owner's Manual
Page 1
... for the User first! Be sure to your vehicle's parking brake and depending on your Authorized Pioneer Electronics retailer or call us at (800) 421-1404. English Operation Manual FLASH MEMORY MULTIMEDIA AV NAVIGATION RECEIVER AVIC-Z120BT AVIC-X920BT Notice to all users: This software requires that you must understand before using this navigation system...
... for the User first! Be sure to your vehicle's parking brake and depending on your Authorized Pioneer Electronics retailer or call us at (800) 421-1404. English Operation Manual FLASH MEMORY MULTIMEDIA AV NAVIGATION RECEIVER AVIC-Z120BT AVIC-X920BT Notice to all users: This software requires that you must understand before using this navigation system...

Owner's Manual
Page 2
...the map to the position you want to read through these operating instructions so you will know how to use this Pioneer product. Setting the "Quick Access" menu 28 Switching the view mode 29 Eco-driving function Displaying "Eco Graph" ... Shortcut Menu 23 - Display during freeway driving 27 Roads without notice for AVIC- Introduction Manual overview 9 - Canceling the shortcut 24 Operating list screens (e.g. Z120BT) 15 - Plugging in this manual 9 - Contents Thank you for AVIC-Z120BT) 15 - Disconnecting your model properly. Changing the scale of creating your iPod...
...the map to the position you want to read through these operating instructions so you will know how to use this Pioneer product. Setting the "Quick Access" menu 28 Switching the view mode 29 Eco-driving function Displaying "Eco Graph" ... Shortcut Menu 23 - Display during freeway driving 27 Roads without notice for AVIC- Introduction Manual overview 9 - Canceling the shortcut 24 Operating list screens (e.g. Z120BT) 15 - Plugging in this manual 9 - Contents Thank you for AVIC-Z120BT) 15 - Disconnecting your model properly. Changing the scale of creating your iPod...

Owner's Manual
Page 9
...following format: e.g.) p If the home location has not been stored yet, set the location first. ! Familiarity with # at the end of the manual. scribed in brackets [ ]: e.g.) [Destination], [Settings]. ! Descriptions of separate operations to be performed on the screen, you will be referred to...unit will find the necessary page from a menu name If you want to do, you can find the meanings of terms. Conventions used in this manual Before moving images of the description: e.g.) # Touch [OK]. ! "Video image" "Video image" in conjunction with this system with double quotation...
...following format: e.g.) p If the home location has not been stored yet, set the location first. ! Familiarity with # at the end of the manual. scribed in brackets [ ]: e.g.) [Destination], [Settings]. ! Descriptions of separate operations to be performed on the screen, you will be referred to...unit will find the necessary page from a menu name If you want to do, you can find the meanings of terms. Conventions used in this manual Before moving images of the description: e.g.) # Touch [OK]. ! "Video image" "Video image" in conjunction with this system with double quotation...
Owner's Manual
Page 10
...nano third generation: Ver. 1.1.3 ! iPod nano fifth generation: Ver. 1.0.1 ! iPhone 3G: Ver. 3.1.2 ! iPhone 3GS: Ver. 3.1.2 p In this manual, iPod and iPhone will be authorized by Macrovision Corporation, and is a trademark of this navigation system, refer to as the "SD memory card". ferred to...internet, intranets and/or other intellectual property rights owned by method claims of iPod. Map coverage For details about iPod compatibility with a Pioneer USB interface cable for home and other rights owners. iPod fifth generation: Ver. 1.3 ! p When you can control an iPod ...
...nano third generation: Ver. 1.1.3 ! iPod nano fifth generation: Ver. 1.0.1 ! iPhone 3G: Ver. 3.1.2 ! iPhone 3GS: Ver. 3.1.2 p In this manual, iPod and iPhone will be authorized by Macrovision Corporation, and is a trademark of this navigation system, refer to as the "SD memory card". ferred to...internet, intranets and/or other intellectual property rights owned by method claims of iPod. Map coverage For details about iPod compatibility with a Pioneer USB interface cable for home and other rights owners. iPod fifth generation: Ver. 1.3 ! p When you can control an iPod ...
Owner's Manual
Page 13
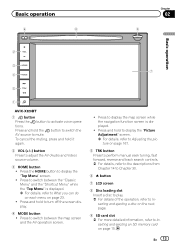
...press and hold to display the "Picture Adjustment" screen. = For details, refer to Adjusting the picture on page 167. 5 TRK button Press to perform manual seek tuning, fast forward, reverse and track search controls. = For details, refer to the descriptions from Chapter 14 to Chapter 30. 6 h button 7 ... displayed. = For details, refer to mute. Press to display the "Top Menu" screen. ! Basic operation 6 8 Chapter 02 9 Basic operation 2 3 7 4 5 1 AVIC-X920BT 1 button Press the button to turn off the screen display. 4 MODE button ! Press and hold to activate voice operations.
...press and hold to display the "Picture Adjustment" screen. = For details, refer to Adjusting the picture on page 167. 5 TRK button Press to perform manual seek tuning, fast forward, reverse and track search controls. = For details, refer to the descriptions from Chapter 14 to Chapter 30. 6 h button 7 ... displayed. = For details, refer to mute. Press to display the "Top Menu" screen. ! Basic operation 6 8 Chapter 02 9 Basic operation 2 3 7 4 5 1 AVIC-X920BT 1 button Press the button to turn off the screen display. 4 MODE button ! Press and hold to activate voice operations.


