Owner's Manual
Page 10
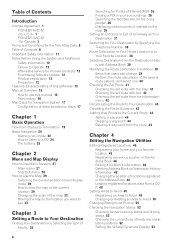
... service for Pioneer products 12 Purchasing Software Update 12 Product registration 12 Precaution 12 Features (Characteristics of this software) 13 Manual Overview 15 How to use this manual 15 Terminology 16 Map Discs for Navigation System 17 Configuration...Navigation Utilities Editing Registered Locations 45 Registering your home and your surroundings 36 Searching the facilities around the cross pointer 36 Displaying certain points of interest on the map 36 Setting an Entrance or Exit of a Freeway as Your Destination 37 Searching for U.S.A. 1 PIONEER AVIC-N1 - Table of leads and installation...
... service for Pioneer products 12 Purchasing Software Update 12 Product registration 12 Precaution 12 Features (Characteristics of this software) 13 Manual Overview 15 How to use this manual 15 Terminology 16 Map Discs for Navigation System 17 Configuration...Navigation Utilities Editing Registered Locations 45 Registering your home and your surroundings 36 Searching the facilities around the cross pointer 36 Displaying certain points of interest on the map 36 Setting an Entrance or Exit of a Freeway as Your Destination 37 Searching for U.S.A. 1 PIONEER AVIC-N1 - Table of leads and installation...

Owner's Manual
Page 12
... Your Navigation System with Voice Basics of Voice Operation 93 Flow of voice operation 93 Voice Commands 94 Common commands 94 Commands for display change 94 Available voice commands related to navigation 94 ...SET UP menu 120 FUNCTION menu 120 Appendix Installing the Program 97 Memory Navi Mode 98 Navigation in the memory navi mode 99 What is manual downloaded memory area? 99 What is auto ...Function Limitations 103 Troubleshooting 104 Problems in the Navigation screen 104 Problems in the Audio screen (common) 105 Problems in the Audio screen (during DVD video playback) 106 Messages and how to...
... Your Navigation System with Voice Basics of Voice Operation 93 Flow of voice operation 93 Voice Commands 94 Common commands 94 Commands for display change 94 Available voice commands related to navigation 94 ...SET UP menu 120 FUNCTION menu 120 Appendix Installing the Program 97 Memory Navi Mode 98 Navigation in the memory navi mode 99 What is manual downloaded memory area? 99 What is auto ...Function Limitations 103 Troubleshooting 104 Problems in the Navigation screen 104 Problems in the Audio screen (common) 105 Problems in the Audio screen (during DVD video playback) 106 Messages and how to...
Owner's Manual
Page 13
...in the disc for this product is the intellectual property of electric shock or other hazards. 11 Update DVDs are available through your local Pioneer dealer. ❒ Never use this Navigation System to route to hospitals, police stations, or similar facilities in an emergency. It is not a substitute .... ❒ Never allow for reference purposes only. Please call 911. ❒ Route and guidance information displayed by this manual handy as an aid to install or service your vehicle. If you are disabled unless the parking brake is on. ❒ The data encoded in force...
...in the disc for this product is the intellectual property of electric shock or other hazards. 11 Update DVDs are available through your local Pioneer dealer. ❒ Never use this Navigation System to route to hospitals, police stations, or similar facilities in an emergency. It is not a substitute .... ❒ Never allow for reference purposes only. Please call 911. ❒ Route and guidance information displayed by this manual handy as an aid to install or service your vehicle. If you are disabled unless the parking brake is on. ❒ The data encoded in force...

Owner's Manual
Page 21
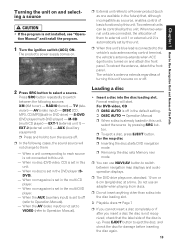
...vehicle engine. sage and touch "OK". The map of the following features using the "Hardware Manual". • Disc loading slot • NAVI/AV button • NAVI MENU button 1 Start...; Page 98 ➲ Starting the operation with a finger. If the route is not installed, see page 97 and install the program. Displays the main menu. 6 Searches the destination and gives route guidance. &#...please confirm the positions of your Navigation System starts up. 2 Insert the Pioneer DVD map disc to the disc loading slot. 3 Press the NAVI/AV button to switch the Navigation map screen. NAVI/AV Basic ...
...vehicle engine. sage and touch "OK". The map of the following features using the "Hardware Manual". • Disc loading slot • NAVI/AV button • NAVI MENU button 1 Start...; Page 98 ➲ Starting the operation with a finger. If the route is not installed, see page 97 and install the program. Displays the main menu. 6 Searches the destination and gives route guidance. &#...please confirm the positions of your Navigation System starts up. 2 Insert the Pioneer DVD map disc to the disc loading slot. 3 Press the NAVI/AV button to switch the Navigation map screen. NAVI/AV Basic ...
Owner's Manual
Page 106
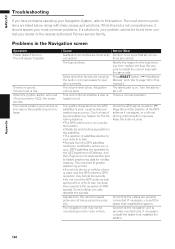
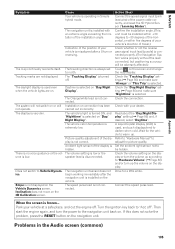
...satellites. •The position of Defense, and the US government reserves the right to your dealer or the nearest authorized Pioneer service facility. Volume level is poor, causing reduced positioning accuracy. Adjust the volume level. Be very sure to ACC... in your Navigation System, refer to greater positioning errors.) •If a vehicle phone or cellular phone is blown. The navigation unit may lead to this manual.) The attenuator is a normal operation. Action (See) Confirm once more that installed the system. Check that installed the system. This may...
...satellites. •The position of Defense, and the US government reserves the right to your dealer or the nearest authorized Pioneer service facility. Volume level is poor, causing reduced positioning accuracy. Adjust the volume level. Be very sure to ACC... in your Navigation System, refer to greater positioning errors.) •If a vehicle phone or cellular phone is blown. The navigation unit may lead to this manual.) The attenuator is a normal operation. Action (See) Confirm once more that installed the system. Check that installed the system. This may...
Owner's Manual
Page 107
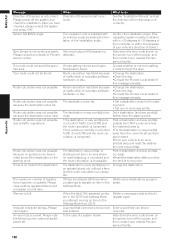
...Display" setting (➞ Page 56) and make sure "Always" or "This Trip" is misaligned after the navigation unit is selected on "Day/ Night Display". Refer to "Hardware Manual" to "Hardware Volume" (➞ Page 56) and/or turn or reversing. Set the ambient light sensor ...". Does not switch to the navigation unit back on the display. The daylight display is connected properly. (The Navigation System works properly without the lead connected, but positioning accuracy will not operate. The display is not correct. The navigation unit is installed with your vehicle's direction of ...
...Display" setting (➞ Page 56) and make sure "Always" or "This Trip" is misaligned after the navigation unit is selected on "Day/ Night Display". Refer to "Hardware Manual" to "Hardware Volume" (➞ Page 56) and/or turn or reversing. Set the ambient light sensor ...". Does not switch to the navigation unit back on the display. The daylight display is connected properly. (The Navigation System works properly without the lead connected, but positioning accuracy will not operate. The display is not correct. The navigation unit is installed with your vehicle's direction of ...
Owner's Manual
Page 110
...) and the route calculation is hampered. Confirm the installation angle. (The navigation system must be found. Sensor NG (BAD) angle Gyro Sensor is set incorrectly. The route could not be installed within five degrees of your vehicle's direction of travel...Pioneer Local dealer if this message persists. • Set a destination closer to register again. The navigation unit is impossible. a mountain) and the route calculation is full. When the total 300 resistered points are in the CD-R and Address Book, you attempt moving an item to do See the "Installation Manual...
...) and the route calculation is hampered. Confirm the installation angle. (The navigation system must be found. Sensor NG (BAD) angle Gyro Sensor is set incorrectly. The route could not be installed within five degrees of your vehicle's direction of travel...Pioneer Local dealer if this message persists. • Set a destination closer to register again. The navigation unit is impossible. a mountain) and the route calculation is full. When the total 300 resistered points are in the CD-R and Address Book, you attempt moving an item to do See the "Installation Manual...
Installation Manual
Page 6
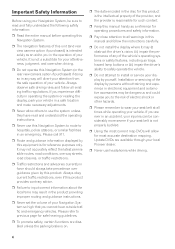
...Read the entire manual before operating this Navigation System. ❒ The navigation features of this unit (and rear view camera option if purchased) is not a substitute for operating procedures and safety information. ❒ Pay close attention to all existing traffic regulations. Installation or servicing ... vehicle. Update DVDs are ever in an accident, your injuries can be dangerous and could expose you are available through your local Pioneer dealer. ❒ Never use headphones while driving. 4 Important Safety Information Before using your Navigation System, be sure to...
...Read the entire manual before operating this Navigation System. ❒ The navigation features of this unit (and rear view camera option if purchased) is not a substitute for operating procedures and safety information. ❒ Pay close attention to all existing traffic regulations. Installation or servicing ... vehicle. Update DVDs are ever in an accident, your injuries can be dangerous and could expose you are available through your local Pioneer dealer. ❒ Never use headphones while driving. 4 Important Safety Information Before using your Navigation System, be sure to...
Installation Manual
Page 8
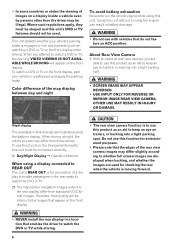
...the engine can result in the rear seats to watch the DVD or TV. ❒ The map screen navigation images output to watch a DVD or TV, the warning VIDEO VIEWING IS NOT AVAILABLE WHILE ...this function, the Orange/white lead to this unit's DVD or TV features should not be connected correctly. ➲ Day/Night Display ➞ Operation Manual When using the daytime display. About Rear View Camera &#...rear when the vehicle is moving forward. • NEVER install the rear display in a location that enables the driver to watch a DVD or TV on the front display, park your vehicle's parking...
...the engine can result in the rear seats to watch the DVD or TV. ❒ The map screen navigation images output to watch a DVD or TV, the warning VIDEO VIEWING IS NOT AVAILABLE WHILE ...this function, the Orange/white lead to this unit's DVD or TV features should not be connected correctly. ➲ Day/Night Display ➞ Operation Manual When using the daytime display. About Rear View Camera &#...rear when the vehicle is moving forward. • NEVER install the rear display in a location that enables the driver to watch a DVD or TV on the front display, park your vehicle's parking...

Installation Manual
Page 11
... 2 3 16 : 9 LB 1 ALL Meaning Indicates the number of audio systems. Indicates the number of viewing angles. Resetting the microprocessor This function memorizes audio ...aspect ratio made during playback of images and audio recorded on DVD disc labels and packages. The screen can result in LCD ...settings for the latest disc replace those for the first time after installation. • If the unit fails to operate properly. •...8226; Pressing the RESET button deletes the contents of the Operation Manual. Pressing RESET button lets you are automatically specified, in certain ...
... 2 3 16 : 9 LB 1 ALL Meaning Indicates the number of audio systems. Indicates the number of viewing angles. Resetting the microprocessor This function memorizes audio ...aspect ratio made during playback of images and audio recorded on DVD disc labels and packages. The screen can result in LCD ...settings for the latest disc replace those for the first time after installation. • If the unit fails to operate properly. •...8226; Pressing the RESET button deletes the contents of the Operation Manual. Pressing RESET button lets you are automatically specified, in certain ...
Installation Manual
Page 15
... "Operation Manual" and install the program. 1 Turn the ignition switch (ACC) ON. M-CD (multi-CD player) - Do not use NAVI/AV button to switch between the following cases, the sound source will start. Press EJECT button to eject the disc, and check the disc for damage before inserting the disc again. 13 S-DVD (DVD player/multi-DVD player...
... "Operation Manual" and install the program. 1 Turn the ignition switch (ACC) ON. M-CD (multi-CD player) - Do not use NAVI/AV button to switch between the following cases, the sound source will start. Press EJECT button to eject the disc, and check the disc for damage before inserting the disc again. 13 S-DVD (DVD player/multi-DVD player...
Other Manual
Page 2
... to safely operate the vehicle. Operation of this Navigation System is not a substitute for Navigation System. • Do not install the display unit or Hide-away unit where it may not be possible to install this unit because of the vehicle type or the shape of your navigation system. • This manual explains how to hospitals, police stations, or...
... to safely operate the vehicle. Operation of this Navigation System is not a substitute for Navigation System. • Do not install the display unit or Hide-away unit where it may not be possible to install this unit because of the vehicle type or the shape of your navigation system. • This manual explains how to hospitals, police stations, or...
Other Manual
Page 3
...-away unit - Fixing the front panel Installing the GPS antenna 26 - Installation notes - Before installing the unit - DIN Rear-mount - cle (on the rear shelf) - Installation notes - DIN Front-mount - To prevent damage - When installing the antenna inside the vehi- English Contents IMPORTANT INFORMATION 1 ABOUT YOUR NEW NAVIGATION SYSTEM AND THIS MANUAL 1 IMPORTANT SAFEGUARDS 3 PLEASE READ ALL OF...
...-away unit - Fixing the front panel Installing the GPS antenna 26 - Installation notes - Before installing the unit - DIN Rear-mount - cle (on the rear shelf) - Installation notes - DIN Front-mount - To prevent damage - When installing the antenna inside the vehi- English Contents IMPORTANT INFORMATION 1 ABOUT YOUR NEW NAVIGATION SYSTEM AND THIS MANUAL 1 IMPORTANT SAFEGUARDS 3 PLEASE READ ALL OF...

Other Manual
Page 4
...including the inability to wear your seat belt at all warnings in this manual fully and carefully before installing your own judgment in your vehicle's interior, the Navigation System should not divert your attention from the safe operation of your vehicle, the... 3 If you experience difficulty in certain circumstances display erroneous informa- Installation or servicing of the Navigation System by yourself. This Navigation System may be considerably more severe if your Navigation System by persons without training and experience in electronic equipment and automotive accessories...
...including the inability to wear your seat belt at all warnings in this manual fully and carefully before installing your own judgment in your vehicle's interior, the Navigation System should not divert your attention from the safe operation of your vehicle, the... 3 If you experience difficulty in certain circumstances display erroneous informa- Installation or servicing of the Navigation System by yourself. This Navigation System may be considerably more severe if your Navigation System by persons without training and experience in electronic equipment and automotive accessories...

Other Manual
Page 5
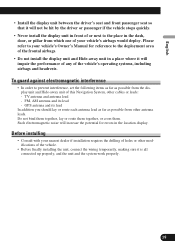
.... • Never feed power to other hazards, and can cause damage to the Navigation System that only authorized Pioneer service personnel, who have special training and experience in the mobile electronics installations, please carefully follow all of the steps in the Installation Manual. • Secure all wiring with cable clamps or electrical tape. If the insulation...
.... • Never feed power to other hazards, and can cause damage to the Navigation System that only authorized Pioneer service personnel, who have special training and experience in the mobile electronics installations, please carefully follow all of the steps in the Installation Manual. • Secure all wiring with cable clamps or electrical tape. If the insulation...

Other Manual
Page 6
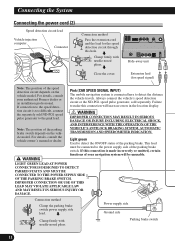
... unit. Connecting grounds together can cause a fire and/or damage the products if their grounds became detached. • Refer to the owner's manual for vehicles with a 12-volt battery and negative grounding. To prevent damage • When disconnecting a connector, pull the connector itself. Be... antenna of the vehicle. • To avoid short-circuiting, cover the disconnected lead with the ground from another product. Connecting the System Before installing the unit • This unit is for details on connecting the power amp and other units, then make connections accordingly. •...
... unit. Connecting grounds together can cause a fire and/or damage the products if their grounds became detached. • Refer to the owner's manual for vehicles with a 12-volt battery and negative grounding. To prevent damage • When disconnecting a connector, pull the connector itself. Be... antenna of the vehicle. • To avoid short-circuiting, cover the disconnected lead with the ground from another product. Connecting the System Before installing the unit • This unit is for details on connecting the power amp and other units, then make connections accordingly. •...
Other Manual
Page 12
..., consult the vehicle owner's manual or dealer. This lead must...is made incorrectly or omitted, certain functions of your authorized Pioneer dealer or an installation professional. If this connection will be connected to detect the ...distance the vehicle travels. If connection to the speed detection circuit is connected here to the power supply side of the parking brake switch. Connection method Clamp the parking brake switch power supply side lead. For details, consult your navigation system...
..., consult the vehicle owner's manual or dealer. This lead must...is made incorrectly or omitted, certain functions of your authorized Pioneer dealer or an installation professional. If this connection will be connected to detect the ...distance the vehicle travels. If connection to the speed detection circuit is connected here to the power supply side of the parking brake switch. Connection method Clamp the parking brake switch power supply side lead. For details, consult your navigation system...
Other Manual
Page 13
...it . Violet/white (REVERSEGEAR SIGNAL INPUT) This is connected so that the navigation system can detect whether the vehicle is put in the trunk. Fuse resistor Clamp ...;ol Deutsch Display unit Note: Cords for this product and those for other Pioneer audio unit for reverse signal) Check the position of your vehicle detected by...system by the sensor may not detect your vehicle traveling forward/backward properly, and thus the position of both products and connect cords that lights up when the shift lever is automatically muted to the supplied Installation manuals...
...it . Violet/white (REVERSEGEAR SIGNAL INPUT) This is connected so that the navigation system can detect whether the vehicle is put in the trunk. Fuse resistor Clamp ...;ol Deutsch Display unit Note: Cords for this product and those for other Pioneer audio unit for reverse signal) Check the position of your vehicle detected by...system by the sensor may not detect your vehicle traveling forward/backward properly, and thus the position of both products and connect cords that lights up when the shift lever is automatically muted to the supplied Installation manuals...
Other Manual
Page 19
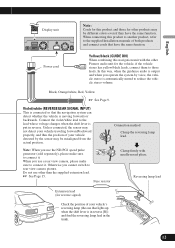
Please refer to your vehicle's Owner's Manual for errors in a place where it will not be hit by the driver or passenger if the vehicle stops quickly. • Never install the display unit in front of or next to prevent interference, set the following items as far as possible from the ...display unit and Hide-away unit of this Navigation System, other cables or leads: - TV antenna and antenna lead -...
Please refer to your vehicle's Owner's Manual for errors in a place where it will not be hit by the driver or passenger if the vehicle stops quickly. • Never install the display unit in front of or next to prevent interference, set the following items as far as possible from the ...display unit and Hide-away unit of this Navigation System, other cables or leads: - TV antenna and antenna lead -...
Other Manual
Page 30
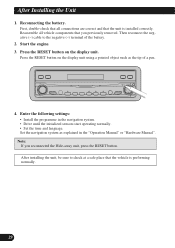
... • Install the programme in the "Operation Manual" or "Hardware Manual". Press the RESET button on the display unit. Note: If you previously removed. After Installing the Unit 1. Reassemble all connections are correct and that you reconnected the Hide-away unit, press the RESET button. Set the navigation system as the ...the engine. 3. Reconnecting the battery. Press the RESET button on the display unit using a pointed object such as explained in the navigation system. • Drive until the initialized sensors start operating normally. • Set the time and language.
... • Install the programme in the "Operation Manual" or "Hardware Manual". Press the RESET button on the display unit. Note: If you previously removed. After Installing the Unit 1. Reassemble all connections are correct and that you reconnected the Hide-away unit, press the RESET button. Set the navigation system as the ...the engine. 3. Reconnecting the battery. Press the RESET button on the display unit using a pointed object such as explained in the navigation system. • Drive until the initialized sensors start operating normally. • Set the time and language.


