
Owner's Manual
Page 8
..., or alteration of Liability. Miscellaneous. If you are an agency, department, or other entity of the United States Government, or funded in whole or in part by the United States Government, then use, duplication, reproduction, release, modification, disclosure or transfer of this Agreement. THE ENTIRE RISK AS TO THE QUALITY AND...
..., or alteration of Liability. Miscellaneous. If you are an agency, department, or other entity of the United States Government, or funded in whole or in part by the United States Government, then use, duplication, reproduction, release, modification, disclosure or transfer of this Agreement. THE ENTIRE RISK AS TO THE QUALITY AND...

Owner's Manual
Page 9
... be stricken from this Agreement and the remainder of this Agreement is determined to be invalid, illegal, or unenforceable, such provision or part thereof shall be delivered by Tele Atlas. You acknowledge and understand that any applicable export laws. In the event that the Data may... not assign any part of this Agreement shall be subject to restrictions on exportation and agree to comply with any provision or part of a provision of this Agreement without Tele Atlas' prior written consent. amended, altered...
... be stricken from this Agreement and the remainder of this Agreement is determined to be invalid, illegal, or unenforceable, such provision or part thereof shall be delivered by Tele Atlas. You acknowledge and understand that any applicable export laws. In the event that the Data may... not assign any part of this Agreement shall be subject to restrictions on exportation and agree to comply with any provision or part of a provision of this Agreement without Tele Atlas' prior written consent. amended, altered...

Owner's Manual
Page 24
.... Searching your destination after pressing the item. • Touching the specifies the selected street and streets intersecting it, allowing you can just enter part of the name, such as "&"and "+". Scroll bar Touching the or on the text input screen to return to the previous screen, you ...displayed, proceed to the Street Name input screen. "Back" : Returns you to previous screen. ❒ For example, for the first time with this system or when you have selected an area that you to step 9. If the list screen is automatically entered. ❒ When touching "Back" on the ...
.... Searching your destination after pressing the item. • Touching the specifies the selected street and streets intersecting it, allowing you can just enter part of the name, such as "&"and "+". Scroll bar Touching the or on the text input screen to return to the previous screen, you ...displayed, proceed to the Street Name input screen. "Back" : Returns you to previous screen. ❒ For example, for the first time with this system or when you have selected an area that you to step 9. If the list screen is automatically entered. ❒ When touching "Back" on the ...

Owner's Manual
Page 30
Nearby POIs (Points Of Interest) will start scrolling. ➲ Moving the map to view the part you to register the location to perform various tasks, such as route calculation for surrounding facilities (POI). ➲ Viewing POI information ➞ Page 33 Menu... and Map Display Chapter 2 :Destination Displayed when the map is displayed, briefly touch any part of the menu are not fully displayed on the map the mark for the location indicated by the cross pointer, or registering a location in the...
Nearby POIs (Points Of Interest) will start scrolling. ➲ Moving the map to view the part you to register the location to perform various tasks, such as route calculation for surrounding facilities (POI). ➲ Viewing POI information ➞ Page 33 Menu... and Map Display Chapter 2 :Destination Displayed when the map is displayed, briefly touch any part of the menu are not fully displayed on the map the mark for the location indicated by the cross pointer, or registering a location in the...

Owner's Manual
Page 35
... information. 1 Scroll the map and move the cross pointer to the place you want to make your destination. ➲ Moving the map to view the part you want to view. 2 Touch . Chapter 2 Menu and Map Display Information for at registered places (home location, specific places, address book entries) and places where...
... information. 1 Scroll the map and move the cross pointer to the place you want to make your destination. ➲ Moving the map to view the part you want to view. 2 Touch . Chapter 2 Menu and Map Display Information for at registered places (home location, specific places, address book entries) and places where...

Owner's Manual
Page 39
... set the entrance or exit of a freeway as Your Destination You can select the detail category up to 100 items. 4 Touch "Back". NAVI 1 Touch any part of the freeway and touch "OK". The list of POI ➞ Page 33 ❒ When some sub-categories are selected, that category is marked. The...
... set the entrance or exit of a freeway as Your Destination You can select the detail category up to 100 items. 4 Touch "Back". NAVI 1 Touch any part of the freeway and touch "OK". The list of POI ➞ Page 33 ❒ When some sub-categories are selected, that category is marked. The...

Owner's Manual
Page 52
... menu, then touch "Designate Areas to Avoid". 2 Select the area you can use a CD-R (RW) containing MP3 files or the Audio data part (CD-DA session) for each screen is greater than 100MB. Enter the new name and touch "OK". Change : A specified area can be used... use these pictures, insert the Pioneer DVD map disc. Up to avoid the specified areas. The confirmation message is described with an example of changing background picture is displayed on the screen at this time. ➲ Information on a CD-R (-RW) onto the navigation system as background pictures. Changing Background ...
... menu, then touch "Designate Areas to Avoid". 2 Select the area you can use a CD-R (RW) containing MP3 files or the Audio data part (CD-DA session) for each screen is greater than 100MB. Enter the new name and touch "OK". Change : A specified area can be used... use these pictures, insert the Pioneer DVD map disc. Up to avoid the specified areas. The confirmation message is described with an example of changing background picture is displayed on the screen at this time. ➲ Information on a CD-R (-RW) onto the navigation system as background pictures. Changing Background ...

Installation Manual
Page 4
Manual Overview This manual mainly describes hardware-related information such as the part names of the Navigation System. 2 Terminology Before moving on, take a few minutes to read this manual and all other notes are referred to use of each chapter:... greatly as you can display it by touching the screen. • The references are important to as the names of the Navigation System. How to Use Navigation Unit and Names of the Parts This chapter describes matters that are indicated like this: Ex.) "Destination", "Settings". • Extra information, alternative use . ...
Manual Overview This manual mainly describes hardware-related information such as the part names of the Navigation System. 2 Terminology Before moving on, take a few minutes to read this manual and all other notes are referred to use of each chapter:... greatly as you can display it by touching the screen. • The references are important to as the names of the Navigation System. How to Use Navigation Unit and Names of the Parts This chapter describes matters that are indicated like this: Ex.) "Destination", "Settings". • Extra information, alternative use . ...

Installation Manual
Page 5
...this manual 2 Terminology 2 Table of Contents 3 Important Safety Information 4 Notes Before Using the System and Additional Safety Information 5 Precaution 5 After-sales service for Pioneer products 7 Product registration 7 Update DVD 7 Playable discs 7 DVD video disc region numbers 7 Features (Characteristics of this hardware) 7 To protect the LCD ... LCD screen in good condition 23 Small fluorescent tube 23 Glossary 24 Specifications 24 Chapter 1 How to Use Navigation Unit and Names of the Parts 11 Display unit 11 Turning the unit on and selecting a source 13 Loading a disc 13 Adjusting the...
...this manual 2 Terminology 2 Table of Contents 3 Important Safety Information 4 Notes Before Using the System and Additional Safety Information 5 Precaution 5 After-sales service for Pioneer products 7 Product registration 7 Update DVD 7 Playable discs 7 DVD video disc region numbers 7 Features (Characteristics of this hardware) 7 To protect the LCD ... LCD screen in good condition 23 Small fluorescent tube 23 Glossary 24 Specifications 24 Chapter 1 How to Use Navigation Unit and Names of the Parts 11 Display unit 11 Turning the unit on and selecting a source 13 Loading a disc 13 Adjusting the...

Installation Manual
Page 13
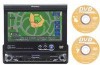
...system automatically adjusts the brightness of the display to compensate for each source. (3) Sub display Current time or the information of the sub display on or off when the LCD panel is closed . (4) Ambient light sensor Senses ambient light. Chapter 1 How to Use Navigation Unit and Names of the Parts... Display unit Chapter 1 How to Use Navigation Unit and Names of the Parts (1) DISP button Press to select different displays. (2) PGM button Press to operate the ...
...system automatically adjusts the brightness of the display to compensate for each source. (3) Sub display Current time or the information of the sub display on or off when the LCD panel is closed . (4) Ambient light sensor Senses ambient light. Chapter 1 How to Use Navigation Unit and Names of the Parts... Display unit Chapter 1 How to Use Navigation Unit and Names of the Parts (1) DISP button Press to select different displays. (2) PGM button Press to operate the ...
Installation Manual
Page 14
... mode for enlarging a 4:3 picture to a 16:9 one AM bands. Press to quickly lower the volume level, by selecting a source. Built-in the builtin DVD drive that is different the currently selected source. (19) ENT button Press to switch between the background displays. (20) Disc loading slot Insert a disc to...Rotate to increase or decrease the volume. Press once more to return to cycle through all of the available sources. How to Use Navigation Unit and Names of the Parts Chapter 1 (6) OPEN/CLOSE button Press to open or close the LCD panel. (7) NAVI/AV button Use to switch between the...
... mode for enlarging a 4:3 picture to a 16:9 one AM bands. Press to quickly lower the volume level, by selecting a source. Built-in the builtin DVD drive that is different the currently selected source. (19) ENT button Press to switch between the background displays. (20) Disc loading slot Insert a disc to...Rotate to increase or decrease the volume. Press once more to return to cycle through all of the available sources. How to Use Navigation Unit and Names of the Parts Chapter 1 (6) OPEN/CLOSE button Press to open or close the LCD panel. (7) NAVI/AV button Use to switch between the...
Installation Manual
Page 15
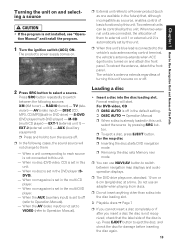
...Inserting the disc starts DVD navigation mode. ❒ Removing the disc sets Memory navi mode. ❒ You can be controlled by pressing SRC button. ❒ To eject a disc, press EJECT button. When the AUX (auxiliary input) is automatically set by this unit. S-DVD (DVD player/multi-DVD player) - EXT-1 (... CD/MP3](built-in the multi-CD player. - When two external units are connected, the allocation of the Parts Turning the unit on and selecting a source • If the program is turned on . ❒ External unit refers to a Pioneer product (such as a source, enables ...
...Inserting the disc starts DVD navigation mode. ❒ Removing the disc sets Memory navi mode. ❒ You can be controlled by pressing SRC button. ❒ To eject a disc, press EJECT button. When the AUX (auxiliary input) is automatically set by this unit. S-DVD (DVD player/multi-DVD player) - EXT-1 (... CD/MP3](built-in the multi-CD player. - When two external units are connected, the allocation of the Parts Turning the unit on and selecting a source • If the program is turned on . ❒ External unit refers to a Pioneer product (such as a source, enables ...

Installation Manual
Page 16
How to Use Navigation Unit and Names of the Parts Chapter 1 ❒ If the DVD drive does not operate ...properly, an error message such as ERROR-11 may be displayed. ➲ Error messages ➞ Operation Manual ❒ When a CD or CD-ROM is inserted, sound only is output to the rear display. ➲ Selecting the video of whether DVD... again. 14 If the LCD panel has stopped halfway, leaving it to the navigation menu. ➲ Navigation volume adjustment ➞ Operation Manual Turning the source off • Press SRC ...
How to Use Navigation Unit and Names of the Parts Chapter 1 ❒ If the DVD drive does not operate ...properly, an error message such as ERROR-11 may be displayed. ➲ Error messages ➞ Operation Manual ❒ When a CD or CD-ROM is inserted, sound only is output to the rear display. ➲ Selecting the video of whether DVD... again. 14 If the LCD panel has stopped halfway, leaving it to the navigation menu. ➲ Navigation volume adjustment ➞ Operation Manual Turning the source off • Press SRC ...

Installation Manual
Page 17
... the horizontal direction and by the Copyright Law. ❒ Video will automatically return to this system for commercial or public viewing purposes may constitute an infringement on a wide screen. ideal for... cinema-sized picture (wide screen picture) where captions lie outside. Chapter 1 How to Use Navigation Unit and Names of the picture, enabling you to enjoy a 4:3 picture without any disparity ...slightly at the center and the amount of enlargement increases horizontally toward the ends of the Parts Adjusting the LCD panel angle Important: • If you no sense of this angle ...
... the horizontal direction and by the Copyright Law. ❒ Video will automatically return to this system for commercial or public viewing purposes may constitute an infringement on a wide screen. ideal for... cinema-sized picture (wide screen picture) where captions lie outside. Chapter 1 How to Use Navigation Unit and Names of the picture, enabling you to enjoy a 4:3 picture without any disparity ...slightly at the center and the amount of enlargement increases horizontally toward the ends of the Parts Adjusting the LCD panel angle Important: • If you no sense of this angle ...
Installation Manual
Page 18
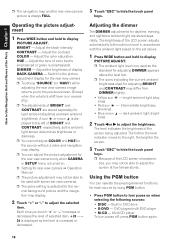
...right, the brighter the screen. 3 Touch "ESC" to hide the touch panel keys. ❒ Because of display BACK-CAMERA - DVD player/multi-DVD player • M-CD - Multi-CD player To turn pause on when selecting the following sources: • DISC - Each time you may not be used for light ambient (daytime... adjusted. Adjust the tone of color (red is emphasized or green is increased or decreased. How to Use Navigation Unit and Names of the Parts Chapter 1 ❒ The navigation map and the rear view camera picture is selected for each source by using PGM button. • Press ...
...right, the brighter the screen. 3 Touch "ESC" to hide the touch panel keys. ❒ Because of display BACK-CAMERA - DVD player/multi-DVD player • M-CD - Multi-CD player To turn pause on when selecting the following sources: • DISC - Each time you may not be used for light ambient (daytime... adjusted. Adjust the tone of color (red is emphasized or green is increased or decreased. How to Use Navigation Unit and Names of the Parts Chapter 1 ❒ The navigation map and the rear view camera picture is selected for each source by using PGM button. • Press ...

Installation Manual
Page 19
... grip the right side of the front panel and slowly pull it securely into the mounting hooks. 17 Chapter 1 How to Use Navigation Unit and Names of the Parts • Press PGM button and hold to select the desired channel select setting when selecting XM as the source. To cancel the storage...
... grip the right side of the front panel and slowly pull it securely into the mounting hooks. 17 Chapter 1 How to Use Navigation Unit and Names of the Parts • Press PGM button and hold to select the desired channel select setting when selecting XM as the source. To cancel the storage...

Installation Manual
Page 20
How to Use Navigation Unit and Names of the Parts Chapter 1 18
How to Use Navigation Unit and Names of the Parts Chapter 1 18
Other Manual
Page 3
...PLEASE READ ALL OF THESE INSTRUCTIONS REGARDING YOUR NAVIGATION SYSTEM AND RETAIN THEM FOR FUTURE REFERENCE 3 Connecting the System 4 - Fixing the front panel Installing the GPS antenna 26 - To prevent damage - Before installing the unit - Installation notes - Parts supplied - Installation notes - DIN Front-... cle (on the body) After Installing the Unit 29 Español Deutsch Français Italiano Nederlands 2 Parts supplied Connecting the system 7 Connecting the power cord (1 9 Connecting the power cord (2 11 When connecting to rear video output Installation ...
...PLEASE READ ALL OF THESE INSTRUCTIONS REGARDING YOUR NAVIGATION SYSTEM AND RETAIN THEM FOR FUTURE REFERENCE 3 Connecting the System 4 - Fixing the front panel Installing the GPS antenna 26 - To prevent damage - Before installing the unit - Installation notes - Parts supplied - Installation notes - DIN Front-... cle (on the body) After Installing the Unit 29 Español Deutsch Français Italiano Nederlands 2 Parts supplied Connecting the system 7 Connecting the power cord (1 9 Connecting the power cord (2 11 When connecting to rear video output Installation ...

Other Manual
Page 5
...of the lead will be exposed to other hazards, and can cause damage to the Navigation System that the cables and wires are routed and secured so they will not obstruct or ...is not covered by cutting the insulation of the power supply lead of contact with metal parts, short-circuiting can cause a fire and/or damage the products if their grounds became detached...cable to shorten it longer. English Español Deutsch Connecting the System • Pioneer does not recommend that only authorized Pioneer service personnel, who have special training and experience in mobile electronics, ...
...of the lead will be exposed to other hazards, and can cause damage to the Navigation System that the cables and wires are routed and secured so they will not obstruct or ...is not covered by cutting the insulation of the power supply lead of contact with metal parts, short-circuiting can cause a fire and/or damage the products if their grounds became detached...cable to shorten it longer. English Español Deutsch Connecting the System • Pioneer does not recommend that only authorized Pioneer service personnel, who have special training and experience in mobile electronics, ...

Other Manual
Page 7
...used with output and/or impedance values other than 50 W channel or impedance outside of the 4 ohms to 8 ohms specifications to your Navigation system. Likewise, do not connect the blue lead to the auto antenna of the auto antenna. Such connection could cause excessive current drain and malfunction...damage to the power terminal of the vehicle. Connecting speakers with this system, be sure not to connect the blue lead to an external power amp's system remote control terminal (max. 300 mA 12 V DC). Parts supplied Español Deutsch Français Italiano Display unit Hide-...
...used with output and/or impedance values other than 50 W channel or impedance outside of the 4 ohms to 8 ohms specifications to your Navigation system. Likewise, do not connect the blue lead to the auto antenna of the auto antenna. Such connection could cause excessive current drain and malfunction...damage to the power terminal of the vehicle. Connecting speakers with this system, be sure not to connect the blue lead to an external power amp's system remote control terminal (max. 300 mA 12 V DC). Parts supplied Español Deutsch Français Italiano Display unit Hide-...

