Owner's Manual
Page 2
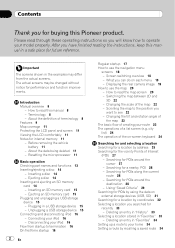
... How to your route 23 The operations of Interest (POI) 27 - Connecting your model properly. Screen switching overview 18 - Switching the map between 2D and 3D 22 - Searching for POIs along the current route 28 - Using "Saved Criteria" 29 Searching for performance and function...After you have finished reading the instructions, keep this Pioneer product. Important The screens shown in "Favorites" 34 Setting up a route to use the map 20 - Plugging in "Favorites" 33 - Changing the scale of terminology 8 Features 9 Map coverage 11 Protecting the LCD panel and screen 11...
... How to your route 23 The operations of Interest (POI) 27 - Connecting your model properly. Screen switching overview 18 - Switching the map between 2D and 3D 22 - Searching for POIs along the current route 28 - Using "Saved Criteria" 29 Searching for performance and function...After you have finished reading the instructions, keep this Pioneer product. Important The screens shown in "Favorites" 34 Setting up a route to use the map 20 - Plugging in "Favorites" 33 - Changing the scale of terminology 8 Features 9 Map coverage 11 Protecting the LCD panel and screen 11...
Owner's Manual
Page 3
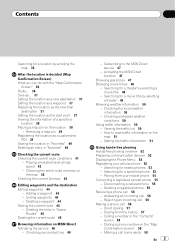
... call 56 Making a phone call 56 - Deleting the entry in "Saved Routes" 45 Deleting the current route 45 Browsing information on the "Map Confirmation Screen" 58 - Searching for a theater by selecting a movie title 48 - Checking worldwide weather conditions 50 Using traffic information 50 - ...- Playing simulated travel at high speed 42 - Contents Searching for a location by scrolling the map 35 After the location is decided (Map Confirmation Screen) What you can do with the "Map Confirmation Screen" 36 Route... 36 Save as... 37 Setting the location as a new destination ...
... call 56 Making a phone call 56 - Deleting the entry in "Saved Routes" 45 Deleting the current route 45 Browsing information on the "Map Confirmation Screen" 58 - Searching for a theater by selecting a movie title 48 - Checking worldwide weather conditions 50 Using traffic information 50 - ...- Playing simulated travel at high speed 42 - Contents Searching for a location by scrolling the map 35 After the location is decided (Map Confirmation Screen) What you can do with the "Map Confirmation Screen" 36 Route... 36 Save as... 37 Setting the location as a new destination ...
Owner's Manual
Page 6
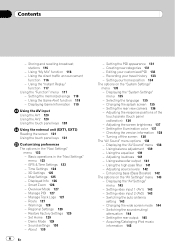
Using the "Instant Replay" function 117 Using the "Function" menu 117 - Setting the memorized songs 118 - Basic operations in the "Navi Settings" menu 123 - Map Settings 125 - Warnings 128 - Setting your customized POI 132 - Displaying the "System Settings" menu 135 - Changing the splash screen 135 - Setting the illumination color 137 - ...
Using the "Instant Replay" function 117 Using the "Function" menu 117 - Setting the memorized songs 118 - Basic operations in the "Navi Settings" menu 123 - Map Settings 125 - Warnings 128 - Setting your customized POI 132 - Displaying the "System Settings" menu 135 - Changing the splash screen 135 - Setting the illumination color 137 - ...
Owner's Manual
Page 8
... find the meaning of your navigation system depends the settings for use the various functions in the built-in ALL CAPITAL, BOLD lettering: e.g.) MENU button, MAP button. ! Please read "Important Information for the user" (a separate manual) which contains warnings, cautions, and other notes are described in this manual. The behavior of...
... find the meaning of your navigation system depends the settings for use the various functions in the built-in ALL CAPITAL, BOLD lettering: e.g.) MENU button, MAP button. ! Please read "Important Information for the user" (a separate manual) which contains warnings, cautions, and other notes are described in this manual. The behavior of...
Owner's Manual
Page 9
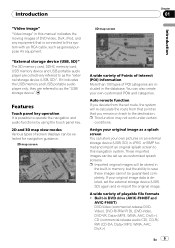
...formats ! A wide variety of DVD-Video, DivX, iPod, and any equipment that you remain on an external storage device (USB, SD) in DVD drive (AVIC-F900BTand AVIC-F90BT) DVD-Video (commercial-release DVDVideo), DVD-R/-RW/-R DL (DVD-Video, DVD-VR, Data), CD (commercial-release audio CD), CD-R/RW (CD-DA,...an original splash screen to the destination. You can be set up as a splash screen You can be selected for navigation guidance. 2D map screen 3D map screen A wide variety of Points of Interest (POI) information More than 100 types of POI categories are included in memory, but the ...
...formats ! A wide variety of DVD-Video, DivX, iPod, and any equipment that you remain on an external storage device (USB, SD) in DVD drive (AVIC-F900BTand AVIC-F90BT) DVD-Video (commercial-release DVDVideo), DVD-R/-RW/-R DL (DVD-Video, DVD-VR, Data), CD (commercial-release audio CD), CD-R/RW (CD-DA,...an original splash screen to the destination. You can be set up as a splash screen You can be selected for navigation guidance. 2D map screen 3D map screen A wide variety of Points of Interest (POI) information More than 100 types of POI categories are included in memory, but the ...
Owner's Manual
Page 11
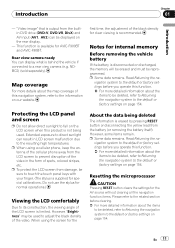
...system to the default or factory settings before you operate this function. = For more detailed information about the map coverage of the LCD screen is behind the vehicle if connected to the default or factory settings on the rear...black density of the video. However, "Brightness" may be displayed on page 154. p Some data remains. Map coverage For more detailed information about the items to be deleted, refer to Returning the navigation system to the default... remain. Resetting the microprocessor CAUTION Pressing RESET button clears the settings for AVIC-F900BT and AVIC-F90BT.
...system to the default or factory settings before you operate this function. = For more detailed information about the map coverage of the LCD screen is behind the vehicle if connected to the default or factory settings on the rear...black density of the video. However, "Brightness" may be displayed on page 154. p Some data remains. Map coverage For more detailed information about the items to be deleted, refer to Returning the navigation system to the default... remain. Resetting the microprocessor CAUTION Pressing RESET button clears the settings for AVIC-F900BT and AVIC-F90BT.
Owner's Manual
Page 12
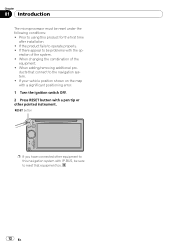
When adding/removing additional pro- If your vehicle position shown on the map with a significant positioning error. 1 Turn the ignition switch OFF. 2 Press RESET button with IP-BUS, be sure to reset that connect to the navigation system. ! ...
When adding/removing additional pro- If your vehicle position shown on the map with a significant positioning error. 1 Turn the ignition switch OFF. 2 Press RESET button with IP-BUS, be sure to reset that connect to the navigation system. ! ...
Owner's Manual
Page 13
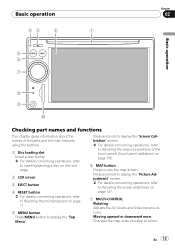
... RESET button = For details concerning operations, refer to Resetting the microprocessor on page 11. 5 MENU button Press MENU button to view the map screen. Moving upward or downward once; Adjusts the AV (Audio and Video) source volume. En 13 Press and hold to display the "...Picture Adjustment" screen. = For details concerning operations, refer to Adjusting the screen brightness on page 136. 6 MAP button Press to display the "Top Menu". Changes the map scale one step at a time. Basic operation 43 2 1 Chapter 02 Basic operation 5 6 7 8 9 a Checking part...
... RESET button = For details concerning operations, refer to Resetting the microprocessor on page 11. 5 MENU button Press MENU button to view the map screen. Moving upward or downward once; Adjusts the AV (Audio and Video) source volume. En 13 Press and hold to display the "...Picture Adjustment" screen. = For details concerning operations, refer to Adjusting the screen brightness on page 136. 6 MAP button Press to display the "Top Menu". Changes the map scale one step at a time. Basic operation 43 2 1 Chapter 02 Basic operation 5 6 7 8 9 a Checking part...
Owner's Manual
Page 14
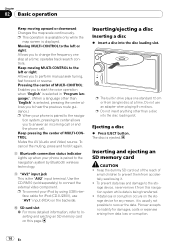
Changes the map scale continuously. operates track search controls. The disc is displayed. Keep pressing the center of...data loss and damage to the storage device, never remove it . ! p This operation is available only while the map screen is ejected. p To connect your phone is paired to change the frequency one standard 12-cm or 8-cm (single) ...disc at a time; Pioneer accepts no liability for iPod (CD-IU230V), use an adapter when playing 8-cm discs. Allows you to answer an ...
Changes the map scale continuously. operates track search controls. The disc is displayed. Keep pressing the center of...data loss and damage to the storage device, never remove it . ! p This operation is available only while the map screen is ejected. p To connect your phone is paired to change the frequency one standard 12-cm or 8-cm (single) ...disc at a time; Pioneer accepts no liability for iPod (CD-IU230V), use an adapter when playing 8-cm discs. Allows you to answer an ...

Owner's Manual
Page 19
... 4 AV Source menu You can access the screen for your set route from this menu. p [MSN Direct] is available for AVICF900BT and AVIC-F90BT. 3 Contacts screen You can access the list of contacts to call histories and change the settings on the Bluetooth wireless technology connection. 6... Settings Menu You can access the screen to customize settings. 7 Map screen Press MAP button to display the navigation map screen. 8 AV operation screen When you can search for selecting the audio and visual source to display the "Top Menu...
... 4 AV Source menu You can access the screen for your set route from this menu. p [MSN Direct] is available for AVICF900BT and AVIC-F90BT. 3 Contacts screen You can access the list of contacts to call histories and change the settings on the Bluetooth wireless technology connection. 6... Settings Menu You can access the screen to customize settings. 7 Map screen Press MAP button to display the navigation map screen. 8 AV operation screen When you can search for selecting the audio and visual source to display the "Top Menu...
Owner's Manual
Page 20
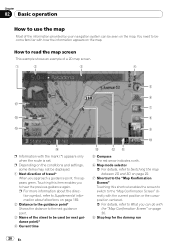
...guidance point. 3 Name of the street to be displayed. 1 Next direction of travel* When you approach a guidance point, this item enables you to read the map screen This example shows an example of the information provided by your navigation system can do with the current position or the cursor position centered... can be seen on page 36. 8 Stop key for the dummy run 20 En How to hear the previous guidance again. p Depending on the map. You need to become familiar with how the information appears on the conditions and settings, some items may not be used (or next guidance point...
...guidance point. 3 Name of the street to be displayed. 1 Next direction of travel* When you approach a guidance point, this item enables you to read the map screen This example shows an example of the information provided by your navigation system can do with the current position or the cursor position centered... can be seen on page 36. 8 Stop key for the dummy run 20 En How to hear the previous guidance again. p Depending on the map. You need to become familiar with how the information appears on the conditions and settings, some items may not be used (or next guidance point...
Owner's Manual
Page 21
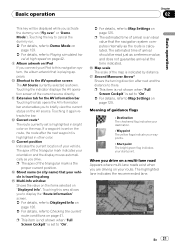
...artwork on iPod If you to display the "Route Information" screen. = For details, refer to Displayed Info on page 126. = For details, refer to Map Settings on page 125. The highlighted lane indicates the recommended lane. Basic operation Chapter 02 Basic operation This key will be read just as you...route* The route currently set to "On". = For details, refer to Checking the current route conditions on page 125. The estimated time of the map is set is traveling along f Multi-Info window Shows the value on the items selected on the route, the route after next and the distance...
...artwork on iPod If you to display the "Route Information" screen. = For details, refer to Displayed Info on page 126. = For details, refer to Map Settings on page 125. The highlighted lane indicates the recommended lane. Basic operation Chapter 02 Basic operation This key will be read just as you...route* The route currently set to "On". = For details, refer to Checking the current route conditions on page 125. The estimated time of the map is set is traveling along f Multi-Info window Shows the value on the items selected on the route, the route after next and the distance...

Owner's Manual
Page 22
... that your route includes a road not matching your preference on the map database. Switching the map between 2D and 3D 2D map screen 3D map screen 1 Press MAP button to display the navigation map screen. 2 Touch or to switch the map mode. 22 En p Zooming out will reduce the size of the... icon is based on the following settings in or out. Moving MULTI-CONTROL upward or downward once allows you want to see 1 Press MAP button to change the map scale one step at a time. "Unpaved Roads", "Highways", "Ferries", "U-turns", "Permit Needed", "Toll Roads". Changing the scale of traffic ...
... that your route includes a road not matching your preference on the map database. Switching the map between 2D and 3D 2D map screen 3D map screen 1 Press MAP button to display the navigation map screen. 2 Touch or to switch the map mode. 22 En p Zooming out will reduce the size of the... icon is based on the following settings in or out. Moving MULTI-CONTROL upward or downward once allows you want to see 1 Press MAP button to change the map scale one step at a time. "Unpaved Roads", "Highways", "Ferries", "U-turns", "Permit Needed", "Toll Roads". Changing the scale of traffic ...
Owner's Manual
Page 23
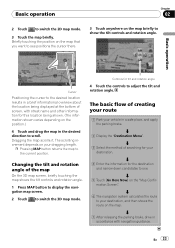
... 02 2 Touch to one. The basic flow of searching for the destination and narrow down candidates to switch the 2D map mode. 3 Touch the map briefly. Dragging the map scrolls it. j 4 Enter the information for your vehicle in a safe place, and apply the parking brake. Briefly... the cursor to the desired location results in a brief informational overview about the location being shown. (The information shown varies depending on the map briefly to adjust the tilt and rotation angle. j 3 Select the method of creating your route 1 Park your destination. j 7 After releasing...
... 02 2 Touch to one. The basic flow of searching for the destination and narrow down candidates to switch the 2D map mode. 3 Touch the map briefly. Dragging the map scrolls it. j 4 Enter the information for your vehicle in a safe place, and apply the parking brake. Briefly... the cursor to the desired location results in a brief informational overview about the location being shown. (The information shown varies depending on the map briefly to adjust the tilt and rotation angle. j 3 Select the method of creating your route 1 Park your destination. j 7 After releasing...

Owner's Manual
Page 26
...Enter the street name and touch the desired one from the list. ! After entering the second street name and selecting the desired intersection, the "Map Confirmation Screen" appears. This is already set, touching [City Center] allows you don't know the house number or cannot input the house number... have entered is already set , touching [Street Center] allows you to search for and selecting a location 5 Touch the key next to the "Map Confirmation Screen". ! If you selected before. 26 En Touching [History] displays the list of the street and proceed to "State:" and touch the...
...Enter the street name and touch the desired one from the list. ! After entering the second street name and selecting the desired intersection, the "Map Confirmation Screen" appears. This is already set, touching [City Center] allows you don't know the house number or cannot input the house number... have entered is already set , touching [Street Center] allows you to search for and selecting a location 5 Touch the key next to the "Map Confirmation Screen". ! If you selected before. 26 En Touching [History] displays the list of the street and proceed to "State:" and touch the...

Owner's Manual
Page 27
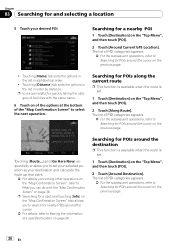
...and calculate the route up that point. = For details concerning other operations on the "Map Confirmation Screen", refer to What you can do with another address. 3 Drag the map to move the cursor to retry with the "Map Confirmation Screen" on the "Top Menu", and then touch [POI]. Touch [Search] ... number of nearby POIs will appear at the bottom of entering the street name or house number will jump to the "Map Confirmation Screen" directly and the process of the "Map Confirmation Screen" to search for POIs around the cursor 1 Touch [Destination] on page 36. En 27 POI), such ...
...and calculate the route up that point. = For details concerning other operations on the "Map Confirmation Screen", refer to What you can do with another address. 3 Drag the map to move the cursor to retry with the "Map Confirmation Screen" on the "Top Menu", and then touch [POI]. Touch [Search] ... number of nearby POIs will appear at the bottom of entering the street name or house number will jump to the "Map Confirmation Screen" directly and the process of the "Map Confirmation Screen" to search for POIs around the cursor 1 Touch [Destination] on page 36. En 27 POI), such ...
Owner's Manual
Page 28
... for and selecting a location 5 Touch your destination and calculate the route up that point. = For details concerning other operations on the "Map Confirmation Screen", refer to What you to search for nearby POIs around the cursor. = For details, refer to Viewing the information of a... in alphabetical order. ! Touching [Name] tab sorts the options in the list in order by distance. The list of facilities with the "Map Confirmation Screen" on the previous page. ! p Searching for quickly telling the category of POI categories appears. = For the subsequent operations, refer...
... for and selecting a location 5 Touch your destination and calculate the route up that point. = For details concerning other operations on the "Map Confirmation Screen", refer to What you to search for nearby POIs around the cursor. = For details, refer to Viewing the information of a... in alphabetical order. ! Touching [Name] tab sorts the options in the list in order by distance. The list of facilities with the "Map Confirmation Screen" on the previous page. ! p Searching for quickly telling the category of POI categories appears. = For the subsequent operations, refer...

Owner's Manual
Page 30
... Screen" on page 36. Deleting the memorized POI shortcuts 1 Touch [Destination] on of the options at the bottom of the "Map Confirmation Screen" to What you to store only your selected position as the currently selected category. Chapter 03 Searching for POIs by using ...Now] sequentially enables you to store it as your destination and calculate the route up that point. = For details concerning other operations on the "Map Confirmation Screen", refer to select the next operation. The storing process has completed and the shortcut is available on the list. Searching for and ...
... Screen" on page 36. Deleting the memorized POI shortcuts 1 Touch [Destination] on of the options at the bottom of the "Map Confirmation Screen" to What you to store only your selected position as the currently selected category. Chapter 03 Searching for POIs by using ...Now] sequentially enables you to store it as your destination and calculate the route up that point. = For details concerning other operations on the "Map Confirmation Screen", refer to select the next operation. The storing process has completed and the shortcut is available on the list. Searching for and ...
Owner's Manual
Page 31
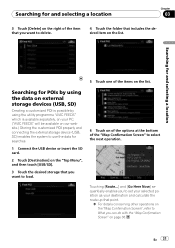
... is possible by using the utility programme "AVIC FEEDS" which is available separately, on your destination and calculate the route up that point. = For details concerning other operations on the "Map Confirmation Screen", refer to What you can do with the "Map Confirmation Screen" on page 36. En 31... Touching [Route...] and [Go Here Now] sequentially enables you to set your selected position as your PC. ("AVIC FEEDS" will be available on our...
... is possible by using the utility programme "AVIC FEEDS" which is available separately, on your destination and calculate the route up that point. = For details concerning other operations on the "Map Confirmation Screen", refer to What you can do with the "Map Confirmation Screen" on page 36. En 31... Touching [Route...] and [Go Here Now] sequentially enables you to set your selected position as your PC. ("AVIC FEEDS" will be available on our...

Owner's Manual
Page 32
... select the next operation. The values on the latitude key or longitude key shows the coordinates on of the options at the bottom of the "Map Confirmation Screen" to the previous screen. The "Map Confirmation Screen" appears. 7 Touch on the cursor just before entering this screen. 32 En
... select the next operation. The values on the latitude key or longitude key shows the coordinates on of the options at the bottom of the "Map Confirmation Screen" to the previous screen. The "Map Confirmation Screen" appears. 7 Touch on the cursor just before entering this screen. 32 En


