Owner's Manual
Page 1
For more information, please contact your vehicle's parking brake. Operation Manual ENGLISH DOUBLE-DIN DVD NAVIGATION SYSTEM AVIC-D1 Notice to all users: This software requires that the navigation unit be required. If not properly connected and depending on your vehicle, additional installation may be properly connected to your Authorized Pioneer Electronics retailer or call us at (800) 421-1404.
For more information, please contact your vehicle's parking brake. Operation Manual ENGLISH DOUBLE-DIN DVD NAVIGATION SYSTEM AVIC-D1 Notice to all users: This software requires that the navigation unit be required. If not properly connected and depending on your vehicle, additional installation may be properly connected to your Authorized Pioneer Electronics retailer or call us at (800) 421-1404.
Owner's Manual
Page 10
... registration 12 Precaution 12 Features (Characteristics of this software) 14 About XM NavTraffic Service and Pioneer Navigation 14 Manual Overview 16 How to use 25 Chapter 2 Menu and Map Display How to Use Menu Screens... Calculation Conditions 44 Items that users can use this manual 16 Terminology 17 DVD Map Discs for Navigation System 18 Configuration of a Freeway as Your Destination 37 Searching for U.S.A. 1 PIONEER AVIC-D1 - for Your Destination by Selecting the Type of ... History Information 49 Changing the position of Contents Introduction License Agreement 1 PIONEER AVIC-D1 -
... registration 12 Precaution 12 Features (Characteristics of this software) 14 About XM NavTraffic Service and Pioneer Navigation 14 Manual Overview 16 How to use 25 Chapter 2 Menu and Map Display How to Use Menu Screens... Calculation Conditions 44 Items that users can use this manual 16 Terminology 17 DVD Map Discs for Navigation System 18 Configuration of a Freeway as Your Destination 37 Searching for U.S.A. 1 PIONEER AVIC-D1 - for Your Destination by Selecting the Type of ... History Information 49 Changing the position of Contents Introduction License Agreement 1 PIONEER AVIC-D1 -
Owner's Manual
Page 12
... Using ITS playlists 93 External Unit 94 Operating the external unit 94 Operate the external unit by using FUNCTION 1 - FUNCTION 4 94 Switching the automatic and manual function 95 AUX 95 Selecting AUX as the source 95 AV Input (AV) 95 Selecting AV as the source 95 Changing the wide screen mode...
... Using ITS playlists 93 External Unit 94 Operating the external unit 94 Operate the external unit by using FUNCTION 1 - FUNCTION 4 94 Switching the automatic and manual function 95 AUX 95 Selecting AUX as the source 95 AV Input (AV) 95 Selecting AV as the source 95 Changing the wide screen mode...
Owner's Manual
Page 13
... vehicle. Upgrade DVDs are available for operating procedures and safety information. ❒ Pay close attention to all warnings in this manual and follow all times while operating your vehicle. If you cannot hear outside traffic and emergency vehicles. ❒ To promote ...navigation features of your Navigation System (and rear view camera option if purchased) are intended solely as a reference for purchase through your local Pioneer dealer. ❒ Never use headphones while driving. ❒ Do not attempt to install or service your attentiveness, judgment, and care ...
... vehicle. Upgrade DVDs are available for operating procedures and safety information. ❒ Pay close attention to all warnings in this manual and follow all times while operating your vehicle. If you cannot hear outside traffic and emergency vehicles. ❒ To promote ...navigation features of your Navigation System (and rear view camera option if purchased) are intended solely as a reference for purchase through your local Pioneer dealer. ❒ Never use headphones while driving. ❒ Do not attempt to install or service your attentiveness, judgment, and care ...

Owner's Manual
Page 14
...panel keys) offered by such factors as loss or theft. 2. Please do not ship your dealer or the nearest authorized Pioneer service facility. Download owner's manuals, order product catalogues, research new products, and much more. 4. To prevent such functions from which you refer to ...suggested that the speed pulse wire be dangerous and/or unlawful if used . 12 nies at the following site: 1. U.S.A CANADA Pioneer Electronics Pioneer Electronics of software upgrades and software updates. Canada, Inc. We will allow for most current map DVDs will keep the brake pedal...
...panel keys) offered by such factors as loss or theft. 2. Please do not ship your dealer or the nearest authorized Pioneer service facility. Download owner's manuals, order product catalogues, research new products, and much more. 4. To prevent such functions from which you refer to ...suggested that the speed pulse wire be dangerous and/or unlawful if used . 12 nies at the following site: 1. U.S.A CANADA Pioneer Electronics Pioneer Electronics of software upgrades and software updates. Canada, Inc. We will allow for most current map DVDs will keep the brake pedal...

Owner's Manual
Page 15
...you are able to use other functions offered by persons other than the driver may differ from the equipments which are illustrated using AVIC-D1, refer to the "Hardware Manual". • When applying the parking brake in this function, the Orange/white lead of visual images on a display inside a ... a safe place, and keep an eye on the screen. The examples in order to view visual image or to the Navigation System with Pioneer DVD Navigation Unit. When using the daytime display. Where such regulations apply, they must be illegal. will appear on trailers, or backing into...
...you are able to use other functions offered by persons other than the driver may differ from the equipments which are illustrated using AVIC-D1, refer to the "Hardware Manual". • When applying the parking brake in this function, the Orange/white lead of visual images on a display inside a ... a safe place, and keep an eye on the screen. The examples in order to view visual image or to the Navigation System with Pioneer DVD Navigation Unit. When using the daytime display. Where such regulations apply, they must be illegal. will appear on trailers, or backing into...

Owner's Manual
Page 18
... to change any of the initial settings (default settings), read the Introduction and Chapter 1 in CD drive or operate the Pioneer audio equipment connected to the navigation unit. How to use this system. The beginning sections outline the Navigation System and describe ...and the radio. 7 Using the AV Source (Pioneer AV Equipment) When Pioneer audio equipment is particularly important that when you have visited. 5 Customizing Your Navigation System The behavior of your new Navigation System. Manual Overview This manual provides the important information you need to make full ...
... to change any of the initial settings (default settings), read the Introduction and Chapter 1 in CD drive or operate the Pioneer audio equipment connected to the navigation unit. How to use this system. The beginning sections outline the Navigation System and describe ...and the radio. 7 Using the AV Source (Pioneer AV Equipment) When Pioneer audio equipment is particularly important that when you have visited. 5 Customizing Your Navigation System The behavior of your new Navigation System. Manual Overview This manual provides the important information you need to make full ...
Owner's Manual
Page 19
... notes are presented like this: e.g.) ❒ Touch keys which are not available at the end of each item on the screen are indicated like this manual for checking the details of this : e.g.) ➲ Setting the Route Options ➞ Page 44 17 Please see "Display Information" at this time are grayed out...
... notes are presented like this: e.g.) ❒ Touch keys which are not available at the end of each item on the screen are indicated like this manual for checking the details of this : e.g.) ➲ Setting the Route Options ➞ Page 44 17 Please see "Display Information" at this time are grayed out...
Owner's Manual
Page 21
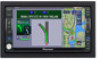
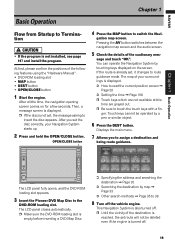
... Press the MAP button to the DVD-ROM loading slot. The LCD panel fully opens, and the DVD-ROM loading slot appears. 3 Insert the Pioneer DVD Map Disc to switch the Navi- After you to touch the touch keys with a fin- sage and touch "OK". ger. This Navigation System... screen. Pressing the AV button switches between the navigation map screen and the audio screen. 5 Check the details of the following features using the "Hardware Manual". • DVD-ROM loading slot • MAP button • DEST button • OPEN/CLOSE button 1 Start the engine. The LCD panel closes automatically....
... Press the MAP button to the DVD-ROM loading slot. The LCD panel fully opens, and the DVD-ROM loading slot appears. 3 Insert the Pioneer DVD Map Disc to switch the Navi- After you to touch the touch keys with a fin- sage and touch "OK". ger. This Navigation System... screen. Pressing the AV button switches between the navigation map screen and the audio screen. 5 Check the details of the following features using the "Hardware Manual". • DVD-ROM loading slot • MAP button • DEST button • OPEN/CLOSE button 1 Start the engine. The LCD panel closes automatically....

Owner's Manual
Page 40
.... 1 Touch "Destination" in the shortcut menu. Places that place will be calculated. 1 Touch "Destination" in the "Address Book". Simply select the place you have registered manually, such as your home, are stored in the Main menu, and then touch "Address Book" or "Destination History". 2 Touch your destination, follow the steps below...
.... 1 Touch "Destination" in the shortcut menu. Places that place will be calculated. 1 Touch "Destination" in the "Address Book". Simply select the place you have registered manually, such as your home, are stored in the Main menu, and then touch "Address Book" or "Destination History". 2 Touch your destination, follow the steps below...

Owner's Manual
Page 43
... : Touch to display a screen listing the way points. This is calculated. Touching or on the right of the list, you can sort the way points manually. 3 Touch "Done". ❒ If you set , the next way point along the route can be skipped. 1 Touch the map screen. Display a point you searched for...
... : Touch to display a screen listing the way points. This is calculated. Touching or on the right of the list, you can sort the way points manually. 3 Touch "Done". ❒ If you set , the next way point along the route can be skipped. 1 Touch the map screen. Display a point you searched for...

Owner's Manual
Page 54
... and travel time between 0.02 mi (25 m) - 1 mi (2 km), red, yellow, or green blinking lines may appear on the screen. When checking traffic congestion information manually Touching on the screen allows you are approaching traffic on the route When receiving information about a traffic conges- If there is a traffic congestion information on...
... and travel time between 0.02 mi (25 m) - 1 mi (2 km), red, yellow, or green blinking lines may appear on the screen. When checking traffic congestion information manually Touching on the screen allows you are approaching traffic on the route When receiving information about a traffic conges- If there is a traffic congestion information on...
Owner's Manual
Page 69
NAVI Chapter 5 Customizing Your Navigation System Restore Factory Settings Reset various settings registered to the Navigation System and restores to the default, please check "Display Information" at the end of this manual. 67 To restore, touch "Yes". ❒ About the item return to the default or factory settings.
NAVI Chapter 5 Customizing Your Navigation System Restore Factory Settings Reset various settings registered to the Navigation System and restores to the default, please check "Display Information" at the end of this manual. 67 To restore, touch "Yes". ❒ About the item return to the default or factory settings.
Owner's Manual
Page 74
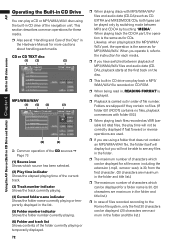
... as CDEXTRA and MIXEDMODE CDs, both types can be displayed. (20 characters are using the built-in CD drive of the Disc" in the Hardware Manual for more cautions about handling each media. ❒ If you will not be able to see at the first track on the disc. ❒ This...
... as CDEXTRA and MIXEDMODE CDs, both types can be displayed. (20 characters are using the built-in CD drive of the Disc" in the Hardware Manual for more cautions about handling each media. ❒ If you will not be able to see at the first track on the disc. ❒ This...

Owner's Manual
Page 78
... the FUNCTION menu ➞ Page 71 76 If you keep touching or for FM or AM. 3 To perform manual tuning, touch or briefly. You can cancel seek tuning by mov- You can also perform manual tuning by touching either or briefly. Advanced radio operation (1) (1) Function display Shows the function names. ➲ How...
... the FUNCTION menu ➞ Page 71 76 If you keep touching or for FM or AM. 3 To perform manual tuning, touch or briefly. You can cancel seek tuning by mov- You can also perform manual tuning by touching either or briefly. Advanced radio operation (1) (1) Function display Shows the function names. ➲ How...
Owner's Manual
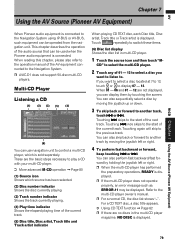
Page 81
... time indicator Shows the elapsed playing time of the audio source that can be used when the Pioneer audio equipment is connected to the Navigation System using IP-BUS or AV-BUS, such equipment can... perform fast backward or forward, keep touching or . Touching skips to the Navigation System. ❒ AVIC-D1 does not support 50-disc multi-CD players. You can also sequentially select a disc by touching the..., NO DISC is displayed. When reading this chapter, please also refer to the operation manual of the AV equipment connected to the start of the next track. Touching once skips to...
... time indicator Shows the elapsed playing time of the audio source that can be used when the Pioneer audio equipment is connected to the Navigation System using IP-BUS or AV-BUS, such equipment can... perform fast backward or forward, keep touching or . Touching skips to the Navigation System. ❒ AVIC-D1 does not support 50-disc multi-CD players. You can also sequentially select a disc by touching the..., NO DISC is displayed. When reading this chapter, please also refer to the operation manual of the AV equipment connected to the start of the next track. Touching once skips to...
Owner's Manual
Page 84
...playback time and are erased from your playlist and ALL CLEAR is sold separately. For details concerning operation, refer to the XM tuner's operation manuals. These discs may contain such information as follows: Disc Title - Substitute icon (1) Source icon Shows which source has been selected. (2) XM... these functions only with navigation unit which XM channel number the tuner is not contained in the disc cannot be displayed. Using the AV Source (Pioneer AV Equipment) Chapter 7 XM (GEX-P10XMT) AV Erasing a CD from your ITS playlist When you want to delete. ➲ How to ...
...playback time and are erased from your playlist and ALL CLEAR is sold separately. For details concerning operation, refer to the XM tuner's operation manuals. These discs may contain such information as follows: Disc Title - Substitute icon (1) Source icon Shows which source has been selected. (2) XM... these functions only with navigation unit which XM channel number the tuner is not contained in the disc cannot be displayed. Using the AV Source (Pioneer AV Equipment) Chapter 7 XM (GEX-P10XMT) AV Erasing a CD from your ITS playlist When you want to delete. ➲ How to ...

Owner's Manual
Page 85
.... 1 Touch "MODE" to select the desired channel select mode. Each touch of the preset tuning keys P1 - You can also perform manual tuning by step. Touch "MODE" repeatedly to select a XM band. ALL CH mode) Storing and recalling broadcast stations If you touch any...when you operate. Switching between the two modes. Detail information display (e.g. uously. AV XM (GEX-P10XMT) Chapter 7 Using the AV Source (Pioneer AV Equipment) (7) Detail information or preset list display Shows the detail information of the broadcast channel currently being received or the preset list. (8)...
.... 1 Touch "MODE" to select the desired channel select mode. Each touch of the preset tuning keys P1 - You can also perform manual tuning by step. Touch "MODE" repeatedly to select a XM band. ALL CH mode) Storing and recalling broadcast stations If you touch any...when you operate. Switching between the two modes. Detail information display (e.g. uously. AV XM (GEX-P10XMT) Chapter 7 Using the AV Source (Pioneer AV Equipment) (7) Detail information or preset list display Shows the detail information of the broadcast channel currently being received or the preset list. (8)...

Owner's Manual
Page 88
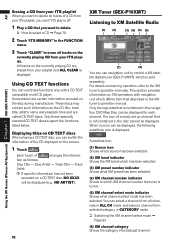
...more. firm the deletion. AV Advanced XM tuner operation XM Tuner (GEX-P910XM) Listening to XM Satellite Radio (1) (2)(6) (3) (4) (5) Using the AV Source (Pioneer AV Equipment) Chapter 7 XM (GEX-P910XM) (1) (1) Function display Shows the function names. ➲ How to display the FUNCTION menu ➞ Page 71 ... you can delete each track. 1 Touch "MEMO" in the FUNCTION menu. You can use navigation unit to the XM tuner's operation manuals. GEX-P910XM), which XM channel number the tuner is tuned. (5) XM channel select mode indicator Shows what channel select mode has been selected...
...more. firm the deletion. AV Advanced XM tuner operation XM Tuner (GEX-P910XM) Listening to XM Satellite Radio (1) (2)(6) (3) (4) (5) Using the AV Source (Pioneer AV Equipment) Chapter 7 XM (GEX-P910XM) (1) (1) Function display Shows the function names. ➲ How to display the FUNCTION menu ➞ Page 71 ... you can delete each track. 1 Touch "MEMO" in the FUNCTION menu. You can use navigation unit to the XM tuner's operation manuals. GEX-P910XM), which XM channel number the tuner is tuned. (5) XM channel select mode indicator Shows what channel select mode has been selected...

Owner's Manual
Page 89
You can also perform manual tuning by using the joystick. P6 you can also perform steps 2 and 3 by mov- P6 until the desired XM band is selected. P6 the station ... the source icon and then touch "XM" to select the XM. 2 Touch "BAND" to page 85 87 XM (GEX-P910XM) Chapter 7 Using the AV Source (Pioneer AV Equipment) AV Channels that you have touched will flash in memory keep touching or , you select a channel. 1 Touch "MODE" to select the desired channel...
You can also perform manual tuning by using the joystick. P6 you can also perform steps 2 and 3 by mov- P6 until the desired XM band is selected. P6 the station ... the source icon and then touch "XM" to select the XM. 2 Touch "BAND" to page 85 87 XM (GEX-P910XM) Chapter 7 Using the AV Source (Pioneer AV Equipment) AV Channels that you have touched will flash in memory keep touching or , you select a channel. 1 Touch "MODE" to select the desired channel...


