
Owner's Manual
Page 14
... playback, playback will start from this product. = For details, refer to the next track (chapter). Press to stop playback completely. 8 FOLDER/P.CH ! Remote control 8100NEX 6100NEX 1 23 9 a 4 5 b 6 7 c 8 1 VOLUME (+/-) 2 REAR SRC ! g Press to select the next or previous disc or folder..... Press to Inserting and ejecting an SD memory card on page 17. Press to connect a microphone for acoustical measurement (sold separately). Chapter 02 Basic operation a Auto EQ microphone input jack Use to cycle through all the available rear sources. ! b Disc-loading slot Insert...
... playback, playback will start from this product. = For details, refer to the next track (chapter). Press to stop playback completely. 8 FOLDER/P.CH ! Remote control 8100NEX 6100NEX 1 23 9 a 4 5 b 6 7 c 8 1 VOLUME (+/-) 2 REAR SRC ! g Press to select the next or previous disc or folder..... Press to Inserting and ejecting an SD memory card on page 17. Press to connect a microphone for acoustical measurement (sold separately). Chapter 02 Basic operation a Auto EQ microphone input jack Use to cycle through all the available rear sources. ! b Disc-loading slot Insert...

Owner's Manual
Page 204
... LPF of an active subwoofer to a high pass filter setting. Sounds other than the speaker's maximum input power capability. ! Using another microphone may take a long time, resulting in the specified location. Rear speakers (left /right) - p Previous settings for acoustical measurement (sold...connected to open or close the panel when you are using the microphone for acoustical measurement (sold separately). The reflected sound within the vehicle is canceled. Front speakers (left /right) - p For AVIC-8100NEX and AVIC-7100NEX users Do not press the h button to a power ...
... LPF of an active subwoofer to a high pass filter setting. Sounds other than the speaker's maximum input power capability. ! Using another microphone may take a long time, resulting in the specified location. Rear speakers (left /right) - p Previous settings for acoustical measurement (sold...connected to open or close the panel when you are using the microphone for acoustical measurement (sold separately). The reflected sound within the vehicle is canceled. Front speakers (left /right) - p For AVIC-8100NEX and AVIC-7100NEX users Do not press the h button to a power ...
Owner's Manual
Page 205
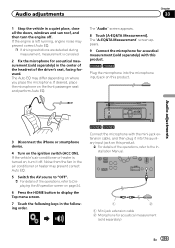
... button to display the Top menu screen. 7 Touch the following keys in the following order. 6100NEX 5100NEX Connect the microphone with this product. 8100NEX 7100NEX Plug the microphone into the auxiliary input jack on this product. = For details of the operations, refer to the Installation Manual. ...1 2 1 Mini-jack extension cable 2 Microphone for acoustical measurement (sold separately) in the center of the headrest of...
... button to display the Top menu screen. 7 Touch the following keys in the following order. 6100NEX 5100NEX Connect the microphone with this product. 8100NEX 7100NEX Plug the microphone into the auxiliary input jack on this product. = For details of the operations, refer to the Installation Manual. ...1 2 1 Mini-jack extension cable 2 Microphone for acoustical measurement (sold separately) in the center of the headrest of...
Owner's Manual
Page 206
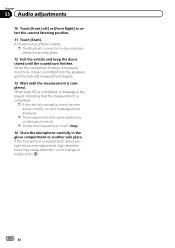
... is subjected to select the current listening position. 11 Touch [Start]. p To stop the measurement, touch [Stop]. 14 Store the microphone carefully in the glove compartment or another safe place. A 10-second countdown starts. p The Bluetooth connection is disconnected before the process ...the countdown finishes, a measurement tone (noise) is completed. p The measurement time varies depending on the type of vehicle. If the microphone is completed. Chapter 33 Audio adjustments 10 Touch [Front Left] or [Front Right] to direct sunlight for an extended period, high temperatures...
... is subjected to select the current listening position. 11 Touch [Start]. p To stop the measurement, touch [Stop]. 14 Store the microphone carefully in the glove compartment or another safe place. A 10-second countdown starts. p The Bluetooth connection is disconnected before the process ...the countdown finishes, a measurement tone (noise) is completed. p The measurement time varies depending on the type of vehicle. If the microphone is completed. Chapter 33 Audio adjustments 10 Touch [Front Left] or [Front Right] to direct sunlight for an extended period, high temperatures...

Installation Manual
Page 2
Using AV input 23 2 En - For AVIC-8100NEX and AVIC-7100NEX users 27 Installing this product 34 Parts supplied 30 - Contents Precautions Your new product and this manual 3 Important safeguards 3 Connection Precautions before installation...installing the antenna inside the vehicle (on the sun visor 32 - Parts supplied 28 - Mounting on the dashboard or rear shelf) 31 Installing the microphone 32 - Adjusting the microphone angle 33 After installation After installing this product 27 - Installation on the side of this product 5 To prevent damage 6 - Installation using a ...
Using AV input 23 2 En - For AVIC-8100NEX and AVIC-7100NEX users 27 Installing this product 34 Parts supplied 30 - Contents Precautions Your new product and this manual 3 Important safeguards 3 Connection Precautions before installation...installing the antenna inside the vehicle (on the sun visor 32 - Parts supplied 28 - Mounting on the dashboard or rear shelf) 31 Installing the microphone 32 - Adjusting the microphone angle 33 After installation After installing this product 27 - Installation on the side of this product 5 To prevent damage 6 - Installation using a ...

Installation Manual
Page 7
Connection Parts supplied Parts marked (*) are supplied with AVIC8100NEX, AVIC-7100NEX and AVIC-6100NEX. This product Power cord GPS antenna Microphone Mini-jack extension cable USB cable Lock tie* Section 02 En 7 English
Connection Parts supplied Parts marked (*) are supplied with AVIC8100NEX, AVIC-7100NEX and AVIC-6100NEX. This product Power cord GPS antenna Microphone Mini-jack extension cable USB cable Lock tie* Section 02 En 7 English

Installation Manual
Page 12
And, also rear displays should not be in .) GPS antenna Microphone WARNING · To avoid the risk of accident and the potential violation of images on a display inside a vehicle even by persons other than the driver ...
And, also rear displays should not be in .) GPS antenna Microphone WARNING · To avoid the risk of accident and the potential violation of images on a display inside a vehicle even by persons other than the driver ...

Installation Manual
Page 13
the label on this product - the "Firmware Information" screen 8100NEX 7100NEX ! You can find the device number that is required for the activation on the packaging of this product - the label on the followings (refer to connect the microphone supplied with the appropriate vehicle and head unit firmware. link Maestro adapter, you will need to first flash the Maestro module with this product when using and/or connecting the iData- Make sure to Operation Manual.): - English Section 02 En 13 Connection Notes ! * Before using Android Auto.
the label on this product - the "Firmware Information" screen 8100NEX 7100NEX ! You can find the device number that is required for the activation on the packaging of this product - the label on the followings (refer to connect the microphone supplied with the appropriate vehicle and head unit firmware. link Maestro adapter, you will need to first flash the Maestro module with this product when using and/or connecting the iData- Make sure to Operation Manual.): - English Section 02 En 13 Connection Notes ! * Before using Android Auto.

Installation Manual
Page 32
... separately sold clamps to pick up position. Be sure to turn off (ACC OFF) the product before connecting the microphone. 2 Attach the microphone clip to the sun visor. 1 Parts supplied Microphone Double-sided tape Mounting on the sun visor when it is in a place where its direction and distance from the... driver make it easiest to secure the lead where necessary inside the vehicle. Install the microphone in the down position. 32 En It cannot recognize the driver's voice if the sun visor is in the up the driver's voice. ! ...
... separately sold clamps to pick up position. Be sure to turn off (ACC OFF) the product before connecting the microphone. 2 Attach the microphone clip to the sun visor. 1 Parts supplied Microphone Double-sided tape Mounting on the sun visor when it is in a place where its direction and distance from the... driver make it easiest to secure the lead where necessary inside the vehicle. Install the microphone in the down position. 32 En It cannot recognize the driver's voice if the sun visor is in the up the driver's voice. ! ...

Installation Manual
Page 33
Installation Section 03 English Installation on the steering column 1 Detach the microphone base from the steering wheel. 1 2 En 33 Install the microphone on the steering column. Adjusting the microphone angle The microphone angle can be adjusted. 4 3 1 Microphone 2 Tab 3 Microphone base 4 Microphone clip 2 Mount the microphone on the steering column, keeping it away from the microphone clip by sliding the microphone base while pressing the tab. 1 2 1 Double-sided tape 2 Clamps Use separately sold clamps to secure the lead where necessary inside the vehicle.
Installation Section 03 English Installation on the steering column 1 Detach the microphone base from the steering wheel. 1 2 En 33 Install the microphone on the steering column. Adjusting the microphone angle The microphone angle can be adjusted. 4 3 1 Microphone 2 Tab 3 Microphone base 4 Microphone clip 2 Mount the microphone on the steering column, keeping it away from the microphone clip by sliding the microphone base while pressing the tab. 1 2 1 Double-sided tape 2 Clamps Use separately sold clamps to secure the lead where necessary inside the vehicle.


