Owner's Manual
Page 1
English Operation Manual MULTIMEDIA NAVIGATION RECEIVER AVIC-8100NEX AVIC-7100NEX AVIC-6100NEX AVIC-5100NEX Notice to your vehicle's parking brake and depending on your Authorized Pioneer Electronics retailer or call us at (800) 421-1404. Be sure to read Important Information for the User includes the important information that the product ...: This software requires that you must understand before using this product. Important Information for the User first! For more information, please contact your vehicle, additional installation may be required.
English Operation Manual MULTIMEDIA NAVIGATION RECEIVER AVIC-8100NEX AVIC-7100NEX AVIC-6100NEX AVIC-5100NEX Notice to your vehicle's parking brake and depending on your Authorized Pioneer Electronics retailer or call us at (800) 421-1404. Be sure to read Important Information for the User includes the important information that the product ...: This software requires that you must understand before using this product. Important Information for the User first! For more information, please contact your vehicle, additional installation may be required.
Owner's Manual
Page 2
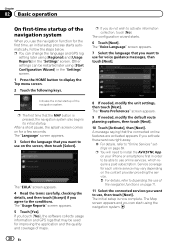
... 12 Basic operation Checking part names and functions 13 Remote control 14 Use and care of source keys 26 Using the touch panel 26 - Installing the battery 15 - Using the remote control 15 Protecting your model properly. Removing the detachable faceplate 16 - Attaching the detachable faceplate 16 Notes...the display order of the remote control 15 - When the Application screen is not available 20 How to use the map How to use this Pioneer product. Switching screens using the touch panel keys 22 - Selecting a rear source 25 Turning off the display 20 - Using the common touch ...
... 12 Basic operation Checking part names and functions 13 Remote control 14 Use and care of source keys 26 Using the touch panel 26 - Installing the battery 15 - Using the remote control 15 Protecting your model properly. Removing the detachable faceplate 16 - Attaching the detachable faceplate 16 Notes...the display order of the remote control 15 - When the Application screen is not available 20 How to use the map How to use this Pioneer product. Switching screens using the touch panel keys 22 - Selecting a rear source 25 Turning off the display 20 - Using the common touch ...

Owner's Manual
Page 12
The microprocessor must be repro- Prior to this product for the first time after installation. ! If your vehicle position is shown on internal memory Before removing the vehicle battery If the battery is connected to using this product. tents will... battery (or removing the battery itself). p Some of the settings and recorded contents will not be reset. 6100NEX 5100NEX Data subject to the factory settings. 8100NEX 7100NEX Notes on the map with a significant positioning error. 1 Turn the ignition switch OFF. 2 Press the RESET button with the op- Settings and recorded ...
The microprocessor must be repro- Prior to this product for the first time after installation. ! If your vehicle position is shown on internal memory Before removing the vehicle battery If the battery is connected to using this product. tents will... battery (or removing the battery itself). p Some of the settings and recorded contents will not be reset. 6100NEX 5100NEX Data subject to the factory settings. 8100NEX 7100NEX Notes on the map with a significant positioning error. 1 Turn the ignition switch OFF. 2 Press the RESET button with the op- Settings and recorded ...

Owner's Manual
Page 15
... handle the battery with the plus (+) and minus (-) poles aligned properly. ! If the battery leaks, wipe the remote control completely clean and install a new battery. ! Press to recall radio station frequencies assigned to preset channel keys. 9 MUTE Press to unmute. Press again to mute. ...There is selected as sunshine, fire or the like. Do not store the remote control in direct sunlight. Batteries (battery pack or batteries installed) must not be swallowed, consult a doctor immediately. ! Using the remote control Point the remote control in your country/area. SUBTITLE ...
... handle the battery with the plus (+) and minus (-) poles aligned properly. ! If the battery leaks, wipe the remote control completely clean and install a new battery. ! Press to recall radio station frequencies assigned to preset channel keys. 9 MUTE Press to unmute. Press again to mute. ...There is selected as sunshine, fire or the like. Do not store the remote control in direct sunlight. Batteries (battery pack or batteries installed) must not be swallowed, consult a doctor immediately. ! Using the remote control Point the remote control in your country/area. SUBTITLE ...
Owner's Manual
Page 19
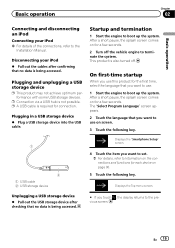
... with some USB storage devices. This product is required for a few seconds. 2 Turn off . p A USB cable is also turned off the vehicle engine to the Installation Manual. Disconnecting your iPod = For details of the connections, refer to terminate the system. Plugging in a USB storage device % Plug a USB storage device into the...
... with some USB storage devices. This product is required for a few seconds. 2 Turn off . p A USB cable is also turned off the vehicle engine to the Installation Manual. Disconnecting your iPod = For details of the connections, refer to terminate the system. Plugging in a USB storage device % Plug a USB storage device into the...
Owner's Manual
Page 28
... later using the navigation system. 28 En A message saying that may be able to use online services, which require a paid subscription. p You will need to install the AVICSYNC App on page 69. The "Usage Reports" screen appears. 5 Touch [Yes]. The Map screen appears and you want to "Online Services" settings on...
... later using the navigation system. 28 En A message saying that may be able to use online services, which require a paid subscription. p You will need to install the AVICSYNC App on page 69. The "Usage Reports" screen appears. 5 Touch [Yes]. The Map screen appears and you want to "Online Services" settings on...

Owner's Manual
Page 55
... can be displayed on the Map screen. 3 Touch [Traffic]. Viewing the traffic list Traffic information is equipped with traffic information that has the AVICSYNC App installed. = Be sure read Expanding the use of the list. Displays the navigation menu on the list.
... can be displayed on the Map screen. 3 Touch [Traffic]. Viewing the traffic list Traffic information is equipped with traffic information that has the AVICSYNC App installed. = Be sure read Expanding the use of the list. Displays the navigation menu on the list.
Owner's Manual
Page 57
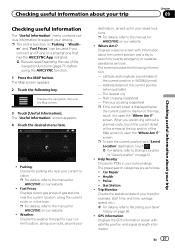
... MAP button. screen. Next crossing road/street - The screen provides the following key. When you connect an iPhone or a smartphone that has the AVICSYNC App installed. = Be sure read Expanding the use of gas stations near your current location. The "Useful Information" screen appears. 4 Touch the desired menu item. ! er" and...
... MAP button. screen. Next crossing road/street - The screen provides the following key. When you connect an iPhone or a smartphone that has the AVICSYNC App installed. = Be sure read Expanding the use of gas stations near your current location. The "Useful Information" screen appears. 4 Touch the desired menu item. ! er" and...
Owner's Manual
Page 66
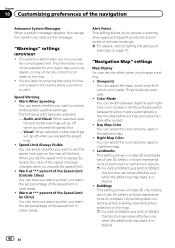
...Warn at *** percent of the Speed Limit (in Cities) You can select the color scheme used in nighttime map. ! p For AVIC-6100NEX and AVIC-5100NEX, this function becomes effective only when the additional map data is legal in rural areas. ! The following alert types are available....exceed the speed limit. ! Warn at *** percent of the Speed Limit (Outside Cities) You can read out the message. This system is installed. ! Audio and Visual: When selected, audi- Chapter 10 Customizing preferences of the navigation Announce System Messages When a system message appears, this ...
...Warn at *** percent of the Speed Limit (in Cities) You can select the color scheme used in nighttime map. ! p For AVIC-6100NEX and AVIC-5100NEX, this function becomes effective only when the additional map data is legal in rural areas. ! The following alert types are available....exceed the speed limit. ! Warn at *** percent of the Speed Limit (Outside Cities) You can read out the message. This system is installed. ! Audio and Visual: When selected, audi- Chapter 10 Customizing preferences of the navigation Announce System Messages When a system message appears, this ...

Owner's Manual
Page 71
Please be aware that has the AVICSYNC App installed. Consult the connected content service provider for more details. ! changes to the region. In order to draw your carrier may be affected by your cellular ...
Please be aware that has the AVICSYNC App installed. Consult the connected content service provider for more details. ! changes to the region. In order to draw your carrier may be affected by your cellular ...

Owner's Manual
Page 72
... desired destination. For Canada http://www.pioneerelectronics.ca/AVICSYNC Compatibility and connectivity You need to reach your iPhone or smartphone to your Pioneer indash navigation experience, AVICSYNC App also works as a standalone navigation app. iPhone 5c: iOS 7.0.x, 7.1.x, 8.0.x, 8.1 ! The...Android 4.1.1 ! Chapter 10 Customizing preferences of the App providers. Pioneer is a dynamic companion app that you'll always have all the information you need to install the free AVICSYNC App to a compatible Pioneer navigation system. What is available for the AVICSYNC App. -...
... desired destination. For Canada http://www.pioneerelectronics.ca/AVICSYNC Compatibility and connectivity You need to reach your iPhone or smartphone to your Pioneer indash navigation experience, AVICSYNC App also works as a standalone navigation app. iPhone 5c: iOS 7.0.x, 7.1.x, 8.0.x, 8.1 ! The...Android 4.1.1 ! Chapter 10 Customizing preferences of the App providers. Pioneer is a dynamic companion app that you'll always have all the information you need to install the free AVICSYNC App to a compatible Pioneer navigation system. What is available for the AVICSYNC App. -...

Owner's Manual
Page 73
...memory storage by using "SyncTool" on your iPhone or smartphone (Android). Once the association is established, your iPhone or smartphone (Android) is installed. To update the content, download the update on this product. The Map screen appears. 5 Touch the following URL and refer to "HOW... navigation menu. 9 Accept the association on your iPhone or smartphone (Android). 3 Connect your iPhone or smartphone (Android). http://pioneer.naviextras.com Customizing preferences of the USB connections, refer to associate with the navigation system and then touch [Associate].
...memory storage by using "SyncTool" on your iPhone or smartphone (Android). Once the association is established, your iPhone or smartphone (Android) is installed. To update the content, download the update on this product. The Map screen appears. 5 Touch the following URL and refer to "HOW... navigation menu. 9 Accept the association on your iPhone or smartphone (Android). 3 Connect your iPhone or smartphone (Android). http://pioneer.naviextras.com Customizing preferences of the USB connections, refer to associate with the navigation system and then touch [Associate].
Owner's Manual
Page 88
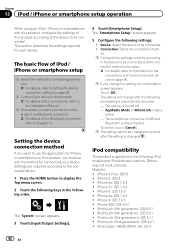
... Setting the device connection method on page 88. 2 Connect your device to this product via Bluetooth connection. = For details of the connections, refer to the Installation Manual. 3 If necessary, connect your device. iPhone 4s: iOS 7.0.3 ! AppRadio Mode or MirrorLink mode is changed for a while after the following order. Setting the device...
... Setting the device connection method on page 88. 2 Connect your device to this product via Bluetooth connection. = For details of the connections, refer to the Installation Manual. 3 If necessary, connect your device. iPhone 4s: iOS 7.0.3 ! AppRadio Mode or MirrorLink mode is changed for a while after the following order. Setting the device...

Owner's Manual
Page 91
... more information. Connect to USB port 1 for using AppRadio Mode, install the CarMediaPlayer app on your iPod. = For details about the CarMediaPlayer, refer to the information on an iPod. and AVIC- 6100NEX. (*1) Use AppRadio Mode to VGA Adapter iPhone/iPod iPhone/... requirement - gital AV Adapter ! CD-IU52 ! nection is not required. quired. available on AVIC- AVIC8100NEX, tings are ! CD-IH202 ! CD-IV202AV ! This connec- Bluetooth con- - quired. AVIC- 7100NEX 5100NEX. En 91 iPod / iPhone or smartphone setup operation Chapter 13 iPod / iPhone or...
... more information. Connect to USB port 1 for using AppRadio Mode, install the CarMediaPlayer app on your iPod. = For details about the CarMediaPlayer, refer to the information on an iPod. and AVIC- 6100NEX. (*1) Use AppRadio Mode to VGA Adapter iPhone/iPod iPhone/... requirement - gital AV Adapter ! CD-IU52 ! nection is not required. quired. available on AVIC- AVIC8100NEX, tings are ! CD-IH202 ! CD-IV202AV ! This connec- Bluetooth con- - quired. AVIC- 7100NEX 5100NEX. En 91 iPod / iPhone or smartphone setup operation Chapter 13 iPod / iPhone or...
Owner's Manual
Page 122
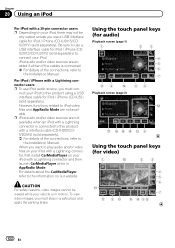
.../ iPhone (CD-IU52) (sold separately). nect your iPod to play audio and/or video files on your iPod with a Lightning connector, first install CarMediaPlayer on your iPod with a Lightning connector and then launch CarMediaPlayer while in AppRadio Mode. For iPod / iPhone with a Lightning connector users p ...you want to this product with a interface cable (CD-IH202/CDIV202AV) (sold separately). For details about the CarMediaPlayer, refer to the Installation Manual. CAUTION For safety reasons, video images cannot be any output unless you must con- Chapter 20 Using an iPod For iPod with ...
.../ iPhone (CD-IU52) (sold separately). nect your iPod to play audio and/or video files on your iPod with a Lightning connector, first install CarMediaPlayer on your iPod with a Lightning connector and then launch CarMediaPlayer while in AppRadio Mode. For iPod / iPhone with a Lightning connector users p ...you want to this product with a interface cable (CD-IH202/CDIV202AV) (sold separately). For details about the CarMediaPlayer, refer to the Installation Manual. CAUTION For safety reasons, video images cannot be any output unless you must con- Chapter 20 Using an iPod For iPod with ...

Owner's Manual
Page 133
... vary depending on page 251. ! To use AppRadio Mode, install the AppRadio app on the iPhone or smartphone beforehand to enable ... 25. 2 Displays the launcher application screen. 3 Displays the previous screen. PIONEER IS NOT RESPONSIBLE AND DISCLAIMS LIABILITY FOR THIRD PARTY (NON-PIONEER) APPS AND CONTENT, INCLUDING WITHOUT LIMITATION ANY INACCURACIES OR INCOMPLETE INFORMATION. p ...referred to as to AppRadio Mode Compatibility on the application, you perform this product. p For AVIC-5100NEX users AppRadio Mode is limited while driving, with AppRadio Mode is started, depending on page...
... vary depending on page 251. ! To use AppRadio Mode, install the AppRadio app on the iPhone or smartphone beforehand to enable ... 25. 2 Displays the launcher application screen. 3 Displays the previous screen. PIONEER IS NOT RESPONSIBLE AND DISCLAIMS LIABILITY FOR THIRD PARTY (NON-PIONEER) APPS AND CONTENT, INCLUDING WITHOUT LIMITATION ANY INACCURACIES OR INCOMPLETE INFORMATION. p ...referred to as to AppRadio Mode Compatibility on the application, you perform this product. p For AVIC-5100NEX users AppRadio Mode is limited while driving, with AppRadio Mode is started, depending on page...
Owner's Manual
Page 134
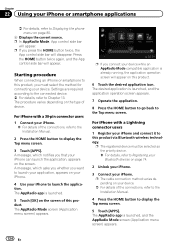
...the phone menu on the screen. For iPhone with a Lightning connector users 1 Register your device. = For details of the connections, refer to the Installation Manual. 2 Press the HOME button to this product. 6 Touch the desired application icon. p If you want to launch your application, appears on page...go back to this product. For iPhone with a 30-pin connector users 1 Connect your iPhone. = For details of the connections, refer to the Installation Manual. 4 Press the HOME button to display the Top menu screen. 5 Touch [APPS]. The desired application is launched. 5 Touch [OK] on...
...the phone menu on the screen. For iPhone with a Lightning connector users 1 Register your device. = For details of the connections, refer to the Installation Manual. 2 Press the HOME button to this product. 6 Touch the desired application icon. p If you want to launch your application, appears on page...go back to this product. For iPhone with a 30-pin connector users 1 Connect your iPhone. = For details of the connections, refer to the Installation Manual. 4 Press the HOME button to display the Top menu screen. 5 Touch [APPS]. The desired application is launched. 5 Touch [OK] on...
Owner's Manual
Page 135
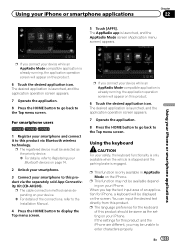
...product and the iPhone are different, you tap the text input area of an application for the keyboard of the connections, refer to the Installation Manual. 4 Press the HOME button to this product via the separately sold App Connectivity Kit (CD-AH200). p If you connect your... your device. = For details of this product should be displayed on your smartphone and connect it to the Top menu screen. For smartphone users 8100NEX 7100NEX 6100NEX 1 Register your iPhone. The desired application is launched, and the application operation screen appears. 7 Operate the application. 8 Press the...
...product and the iPhone are different, you tap the text input area of an application for the keyboard of the connections, refer to the Installation Manual. 4 Press the HOME button to this product via the separately sold App Connectivity Kit (CD-AH200). p If you connect your... your device. = For details of this product should be displayed on your smartphone and connect it to the Top menu screen. For smartphone users 8100NEX 7100NEX 6100NEX 1 Register your iPhone. The desired application is launched, and the application operation screen appears. 7 Operate the application. 8 Press the...
Owner's Manual
Page 137
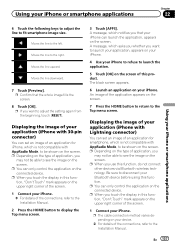
... compatible with AppRadio Mode, to be able to launch the application. 5 Touch [OK] on the screen. 7 Press the HOME button to return to the Installation Manual. p When you touch the display in this function, "Don't Touch" mark appears on the upper right corner of the screen. 1 Connect your application... the upper right corner of an application for iPhone, which notifies you may not be shown on the type of the connections, refer to the Installation Manual. 2 Press the HOME button to the right. p You can set an image of the screen. 1 Connect your iPhone to refuse to ...
... compatible with AppRadio Mode, to be able to launch the application. 5 Touch [OK] on the screen. 7 Press the HOME button to return to the Installation Manual. p When you touch the display in this function, "Don't Touch" mark appears on the upper right corner of the screen. 1 Connect your application... the upper right corner of an application for iPhone, which notifies you may not be shown on the type of the connections, refer to the Installation Manual. 2 Press the HOME button to the right. p You can set an image of the screen. 1 Connect your iPhone to refuse to ...

Owner's Manual
Page 138
... may not be shown on your iPhone. An image of the connections, refer to the Installation Manual. 2 Press the HOME button to be available in your country or region. Using Android Auto 8100NEX 7100NEX You can operate applications with AppRadio Mode, to display the Top menu screen. 3 Touch... [APPS]. Displaying the image of your application (smartphone) 8100NEX 7100NEX 6100NEX You can only control the application on the application for the Android Auto-compatible device only. p The compatible finger gestures...
... may not be shown on your iPhone. An image of the connections, refer to the Installation Manual. 2 Press the HOME button to be available in your country or region. Using Android Auto 8100NEX 7100NEX You can operate applications with AppRadio Mode, to display the Top menu screen. 3 Touch... [APPS]. Displaying the image of your application (smartphone) 8100NEX 7100NEX 6100NEX You can only control the application on the application for the Android Auto-compatible device only. p The compatible finger gestures...


