Owner's Manual
Page 1
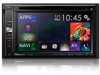
... important information that the product is properly connected to all users: This software requires that you must understand before using this product. Operation Manual MULTIMEDIA NAVIGATION RECEIVER AVIC-8000NEX AVIC-7000NEX AVIC-6000NEX AVIC-5000NEX AVIC-X8610BS Notice to your vehicle's parking brake and depending on your Authorized Pioneer Electronics retailer or call us at (800) 421-1404.
... important information that the product is properly connected to all users: This software requires that you must understand before using this product. Operation Manual MULTIMEDIA NAVIGATION RECEIVER AVIC-8000NEX AVIC-7000NEX AVIC-6000NEX AVIC-5000NEX AVIC-X8610BS Notice to your vehicle's parking brake and depending on your Authorized Pioneer Electronics retailer or call us at (800) 421-1404.
Owner's Manual
Page 2
... of source keys 22 Using the touch panel 22 - Changing the view angle of the map 29 - Important The screens shown in this manual 10 Notes on using the LCD panel 14 Adjusting the LCD panel angle 14 Inserting/ejecting/connecting media 14 - Removing the detachable faceplate 13...the display 17 2 En How to use the screens 18 - Operating list screens 22 - How to use this Pioneer product. Using the common touch panel keys 22 - Introduction Manual overview 10 - Resetting the microprocessor 11 Basic operation Checking part names and functions 12 Protecting your model properly. Terms used...
... of source keys 22 Using the touch panel 22 - Changing the view angle of the map 29 - Important The screens shown in this manual 10 Notes on using the LCD panel 14 Adjusting the LCD panel angle 14 Inserting/ejecting/connecting media 14 - Removing the detachable faceplate 13...the display 17 2 En How to use the screens 18 - Operating list screens 22 - How to use this Pioneer product. Using the common touch panel keys 22 - Introduction Manual overview 10 - Resetting the microprocessor 11 Basic operation Checking part names and functions 12 Protecting your model properly. Terms used...
Owner's Manual
Page 4
... Radio™ reception HD Radio stations 78 Using the touch panel keys 78 Reading the screen 79 Starting procedure 80 Selecting a band 80 Manual tuning 80 Seek tuning 80 Calling a number in the phone book 66 - Answering a call 62 - Deleting a registered device 57 Connecting a registered... for each device 71 Using the radio Using the touch panel keys 74 Reading the screen 74 Starting procedure 75 Selecting a band 75 Manual tuning 75 Seek tuning 75 Selecting a preset channel from the preset channel list 76 Storing broadcast frequencies 76 Storing the strongest broadcast frequencies ...
... Radio™ reception HD Radio stations 78 Using the touch panel keys 78 Reading the screen 79 Starting procedure 80 Selecting a band 80 Manual tuning 80 Seek tuning 80 Calling a number in the phone book 66 - Answering a call 62 - Deleting a registered device 57 Connecting a registered... for each device 71 Using the radio Using the touch panel keys 74 Reading the screen 74 Starting procedure 75 Selecting a band 75 Manual tuning 75 Seek tuning 75 Selecting a preset channel from the preset channel list 76 Storing broadcast frequencies 76 Storing the strongest broadcast frequencies ...
Owner's Manual
Page 7
Subscribing to the SiriusXM Satellite Radio service 130 Using the touch panel keys 130 Reading the screen 131 Starting procedure 132 Manual tuning 133 Selecting a preset channel from the preset channel list 133 Storing broadcast channels 133 Selecting a SiriusXM channel directly 133 Selecting a channel from a list of ...
Subscribing to the SiriusXM Satellite Radio service 130 Using the touch panel keys 130 Reading the screen 131 Starting procedure 132 Manual tuning 133 Selecting a preset channel from the preset channel list 133 Storing broadcast channels 133 Selecting a SiriusXM channel directly 133 Selecting a channel from a list of ...

Owner's Manual
Page 10
...the necessary page from the Display information at the beginning of this product, be referred to use your new equipment. ! Buttons on this manual. References are described in this system with an RCA cable, such as the "Front display". Any additional screen that is attached to ...other keys on the same screen are available on , take a few minutes to read Important Information for AVIC-8000NEX. e.g.) 8000NEX 7000NEX Terms used in this product are indicated like this manual Finding the operation procedure for the models indicated by the icons. How to as you want to the ...
...the necessary page from the Display information at the beginning of this product, be referred to use your new equipment. ! Buttons on this manual. References are described in this system with an RCA cable, such as the "Front display". Any additional screen that is attached to ...other keys on the same screen are available on , take a few minutes to read Important Information for AVIC-8000NEX. e.g.) 8000NEX 7000NEX Terms used in this product are indicated like this manual Finding the operation procedure for the models indicated by the icons. How to as you want to the ...
Owner's Manual
Page 11
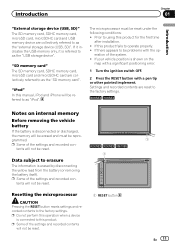
... 1 En 11 Data subject to the factory settings. tents will not be reset under the following conditions: ! "iPod" In this manual, iPod and iPhone will be erased and must be reset. 6000NEX 5000NEX X8610BS 1 Resetting the microprocessor CAUTION Pressing the RESET button resets settings and recorded contents to erasure The information is...
... 1 En 11 Data subject to the factory settings. tents will not be reset under the following conditions: ! "iPod" In this manual, iPod and iPhone will be erased and must be reset. 6000NEX 5000NEX X8610BS 1 Resetting the microprocessor CAUTION Pressing the RESET button resets settings and recorded contents to erasure The information is...
Owner's Manual
Page 12
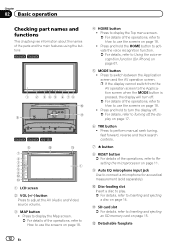
... slot Insert a disc to play. = For details, refer to Inserting and ejecting an SD memory card on page 14. Press to perform manual seek tuning, fast forward, reverse and track search controls. 7 h button 8 RESET button = For details of the parts and the main ...features using the buttons. 8000NEX 7000NEX 1 2 3 4 5 6 78 a b 9 6000NEX 5000NEX X8610BS 8 a 7 2 3 4 5 6 c d b 1 1 LCD screen 2 VOL (+/-) button Press to adjust the AV (Audio and Video) source volume. 3 MAP button ! c ...
... slot Insert a disc to play. = For details, refer to Inserting and ejecting an SD memory card on page 14. Press to perform manual seek tuning, fast forward, reverse and track search controls. 7 h button 8 RESET button = For details of the parts and the main ...features using the buttons. 8000NEX 7000NEX 1 2 3 4 5 6 78 a b 9 6000NEX 5000NEX X8610BS 8 a 7 2 3 4 5 6 c d b 1 1 LCD screen 2 VOL (+/-) button Press to adjust the AV (Audio and Video) source volume. 3 MAP button ! c ...

Owner's Manual
Page 14
... memory card by force. The disc is not fully inserted. Keep hands and fingers clear of this product. This may damage the card. ! If this manual. ! Adjusting the LCD panel angle 8000NEX 7000NEX 1 Press the h button. Doing so may cause a malfunction. ! The following keys to that angle for safety. ! Do not...
... memory card by force. The disc is not fully inserted. Keep hands and fingers clear of this product. This may damage the card. ! If this manual. ! Adjusting the LCD panel angle 8000NEX 7000NEX 1 Press the h button. Doing so may cause a malfunction. ! The following keys to that angle for safety. ! Do not...
Owner's Manual
Page 16
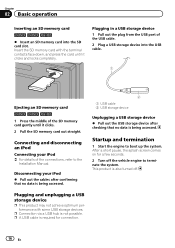
Disconnecting your iPod = For details of the connections, refer to the Installation Manual. p A USB cable is being accessed. 2 1 USB cable 2 USB storage device Unplugging a USB storage device % Pull out the USB storage device after checking that no data ... seconds. 2 Turn off . This product is not possible. Chapter 02 Basic operation Inserting an SD memory card 6000NEX 5000NEX X8610BS % Insert an SD memory card into the USB cable. 1 Ejecting an SD memory card 6000NEX 5000NEX X8610BS 1 Press the middle of the SD memory card gently until it clicks. 2 Pull the SD...
Disconnecting your iPod = For details of the connections, refer to the Installation Manual. p A USB cable is being accessed. 2 1 USB cable 2 USB storage device Unplugging a USB storage device % Pull out the USB storage device after checking that no data ... seconds. 2 Turn off . This product is not possible. Chapter 02 Basic operation Inserting an SD memory card 6000NEX 5000NEX X8610BS % Insert an SD memory card into the USB cable. 1 Ejecting an SD memory card 6000NEX 5000NEX X8610BS 1 Press the middle of the SD memory card gently until it clicks. 2 Pull the SD...
Owner's Manual
Page 53
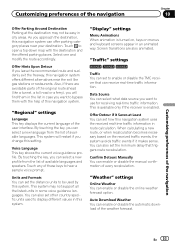
...a ferry), you will restart if you want to bypass them in the list in some voice guidance languages. "Traffic" settings 8000NEX 7000NEX 6000NEX Traffic You can set the minimum delay that can receive real-time traffic information. En 53 Customizing preferences of the navigation Chapter 10 Customizing... route recalculation. Offer Detour if it makes sense. Offer Hints Upon Detour If you can enable or disable the manual confirmation of available languages. By touching the key, you leave the recommended route and suddenly exit the freeway, this setting. Confirm ...
...a ferry), you will restart if you want to bypass them in the list in some voice guidance languages. "Traffic" settings 8000NEX 7000NEX 6000NEX Traffic You can set the minimum delay that can receive real-time traffic information. En 53 Customizing preferences of the navigation Chapter 10 Customizing... route recalculation. Offer Detour if it makes sense. Offer Hints Upon Detour If you can enable or disable the manual confirmation of available languages. By touching the key, you leave the recommended route and suddenly exit the freeway, this setting. Confirm ...

Owner's Manual
Page 55
... device (except when the connection is inactive. 1 Activate the Bluetooth wireless technology on our website. A total of three devices can be connected to the instruction manual of your devices. In such cases, delete a paired device first. = For details, refer to reconnect the previously-connected device. file) ! Two registration methods are already...
... device (except when the connection is inactive. 1 Activate the Bluetooth wireless technology on our website. A total of three devices can be connected to the instruction manual of your devices. In such cases, delete a paired device first. = For details, refer to reconnect the previously-connected device. file) ! Two registration methods are already...

Owner's Manual
Page 57
.... 2 Touch the following keys in the following screen appears. CAUTION Never turn automatic connection off, touch [Auto Connect] again. For details, refer to the instruction manual of the registered devices. If your devices. p If registration fails, repeat the procedure from the beginning. p If a PIN code input is required, enter a PIN code...
.... 2 Touch the following keys in the following screen appears. CAUTION Never turn automatic connection off, touch [Auto Connect] again. For details, refer to the instruction manual of the registered devices. If your devices. p If registration fails, repeat the procedure from the beginning. p If a PIN code input is required, enter a PIN code...
Owner's Manual
Page 58
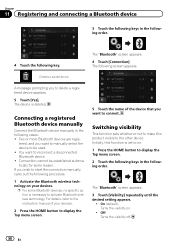
..."Bluetooth" screen appears. 3 Touch [Visibility] repeatedly until the desired setting appears. ! The device is necessary to start the connection manually, carry out the following procedure. 1 Activate the Bluetooth wireless technology on your devices. 2 Press the HOME button to display the Top...You want to on . ! Initially, this product visible to reconnect a disconnected Bluetooth device. ! For details, refer to the instruction manual of your devices. Deletes a paired device. A message prompting you wish to activate Bluetooth wireless technology. On (default): Turns the ...
..."Bluetooth" screen appears. 3 Touch [Visibility] repeatedly until the desired setting appears. ! The device is necessary to start the connection manually, carry out the following procedure. 1 Activate the Bluetooth wireless technology on your devices. 2 Press the HOME button to display the Top...You want to on . ! Initially, this product visible to reconnect a disconnected Bluetooth device. ! For details, refer to the instruction manual of your devices. Deletes a paired device. A message prompting you wish to activate Bluetooth wireless technology. On (default): Turns the ...
Owner's Manual
Page 65
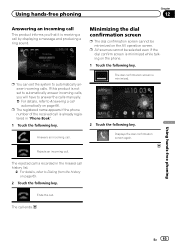
... a message and producing a ring sound. Using hands-free phoning Chapter 12 Answering an incoming call This product informs you will have to answer the calls manually. = For details, refer to Answering a call automatically on page 66.
... a message and producing a ring sound. Using hands-free phoning Chapter 12 Answering an incoming call This product informs you will have to answer the calls manually. = For details, refer to Answering a call automatically on page 66.

Owner's Manual
Page 68
... phone, not all items in , hands-free phoning may be possible to transfer all entries may not work even though your phone to the instruction manual that case, disconnect your phone, and then perform pairing again from the cellular phone.) ! tions: - This may not be performed. ! The registered name appears if...
... phone, not all items in , hands-free phoning may be possible to transfer all entries may not work even though your phone to the instruction manual that case, disconnect your phone, and then perform pairing again from the cellular phone.) ! tions: - This may not be performed. ! The registered name appears if...
Owner's Manual
Page 69
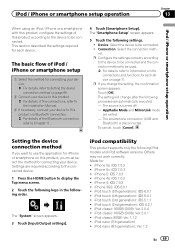
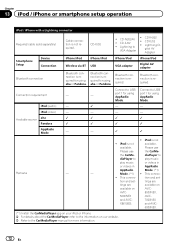
... Setting the device connection method on the connections and functions for ! Others may not work correctly. iPhone 5: iOS 7.0.3 ! Device: Select the device to the Installation Manual. 3 If necessary, connect your device. AppRadio Mode and MirrorLink mode are exited. - The "System" screen appears. 3 Touch [Input/Output settings]. iPod classic 160GB (2009): Ver...
... Setting the device connection method on the connections and functions for ! Others may not work correctly. iPhone 5: iOS 7.0.3 ! Device: Select the device to the Installation Manual. 3 If necessary, connect your device. AppRadio Mode and MirrorLink mode are exited. - The "System" screen appears. 3 Touch [Input/Output settings]. iPod classic 160GB (2009): Ver...

Owner's Manual
Page 70
... be compatible with this product, refer to the following iPod models. iPod nano (3rd generation): Ver. 1.1.3 p You can connect and control an iPod com- This manual applies to the information on our website. iPod touch 2nd generation ! iPod nano 5th generation ! MirrorLink device compatibility p This product is not guaranteed. patible with...
... be compatible with this product, refer to the following iPod models. iPod nano (3rd generation): Ver. 1.1.3 p You can connect and control an iPod com- This manual applies to the information on our website. iPod touch 2nd generation ! iPod nano 5th generation ! MirrorLink device compatibility p This product is not guaranteed. patible with...
Owner's Manual
Page 72
...tings are available on available on our website. = Refer to the CarMediaPlayer manual for using AppRadio Mode. AVIC- 8000NEX, 5000NEX AVIC- CD-IV202AV ! Bluetooth connection is not required. This connec- ! ...Remarks ! This connec- Bluetooth connection is not ! diaPlayer to diaPlayer to USB - - AppRadio Mode. (*1) Mode. (*1) ! tion and set - available. and AVIC- 6000NEX. (*1) Install the CarMediaPlayer app on your iPod or iPhone. = For details about the CarMediaPlayer, refer to VGA Adapter ! the CarMe- Bluetooth connection is not ...
...tings are available on available on our website. = Refer to the CarMediaPlayer manual for using AppRadio Mode. AVIC- 8000NEX, 5000NEX AVIC- CD-IV202AV ! Bluetooth connection is not required. This connec- ! ...Remarks ! This connec- Bluetooth connection is not ! diaPlayer to diaPlayer to USB - - AppRadio Mode. (*1) Mode. (*1) ! tion and set - available. and AVIC- 6000NEX. (*1) Install the CarMediaPlayer app on your iPod or iPhone. = For details about the CarMediaPlayer, refer to VGA Adapter ! the CarMe- Bluetooth connection is not ...
Owner's Manual
Page 74
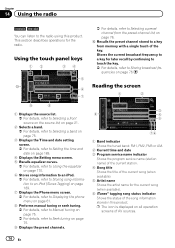
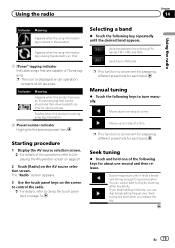
... Tagging) on page 189. 7 Displays the Phone menu screen. = For details, refer to Displaying the phone menu on page 61. 8 Performs manual tuning or seek tuning. = For details, refer to Manual tuning on page 75. = For details, refer to Storing broadcast frequencies on page 75. 9 Displays the preset channels. 3 8 4 5 76 1 Band indicator...
... Tagging) on page 189. 7 Displays the Phone menu screen. = For details, refer to Displaying the phone menu on page 61. 8 Performs manual tuning or seek tuning. = For details, refer to Manual tuning on page 75. = For details, refer to Storing broadcast frequencies on page 75. 9 Displays the preset channels. 3 8 4 5 76 1 Band indicator...
Owner's Manual
Page 75
...page 20. 2 Touch [Radio] on page 74. Switches between the following key repeatedly until it finds a broadcast strong enough for each band. Manual tuning % Touch the following keys to an iPod. 7 iTunes® tagging indicator Indicates songs that can be stored and then downloaded to AM band.... p This function is being transferred to tune manually. Scans frequencies until the desired band appears. If you keep holding either key, you release the key. Flashes when this product is displayed...
...page 20. 2 Touch [Radio] on page 74. Switches between the following key repeatedly until it finds a broadcast strong enough for each band. Manual tuning % Touch the following keys to an iPod. 7 iTunes® tagging indicator Indicates songs that can be stored and then downloaded to AM band.... p This function is being transferred to tune manually. Scans frequencies until the desired band appears. If you keep holding either key, you release the key. Flashes when this product is displayed...


