Owner's Manual
Page 7
Subscribing to the navigation screen 149 Activating the Bluetooth audio source 149 Setting the ever scroll 150 Setting AV input 150 Setting the rear view camera 150 - Locking the channel 137 Using the content alerts function (such as Song Alerts, Artist Alerts and Game Alerts) 138 - Setting the ...139 Restoring the SiriusXM settings to the default 139 Storing song information to an iPod (iTunes Tagging) 140 Operating with the application for camera) 145 Setting the video signal 145 Using MIXTRAX MIXTRAX operation 147 Touch panel keys 147 Selecting an item to play songs 147 Selecting ...
Subscribing to the navigation screen 149 Activating the Bluetooth audio source 149 Setting the ever scroll 150 Setting AV input 150 Setting the rear view camera 150 - Locking the channel 137 Using the content alerts function (such as Song Alerts, Artist Alerts and Game Alerts) 138 - Setting the ...139 Restoring the SiriusXM settings to the default 139 Storing song information to an iPod (iTunes Tagging) 140 Operating with the application for camera) 145 Setting the video signal 145 Using MIXTRAX MIXTRAX operation 147 Touch panel keys 147 Selecting an item to play songs 147 Selecting ...
Owner's Manual
Page 8
... sensor learning status and driving status 159 Clearing the status 159 Checking the connections of DVDs 185 Setting the video signal for the rear view camera 186 Language code chart for DVDs 187 Favorite menu Selecting a shortcut 188 Removing a shortcut 188 Common operations Setting the time and date 189 Storing song...
... sensor learning status and driving status 159 Clearing the status 159 Checking the connections of DVDs 185 Setting the video signal for the rear view camera 186 Language code chart for DVDs 187 Favorite menu Selecting a shortcut 188 Removing a shortcut 188 Common operations Setting the time and date 189 Storing song...
Owner's Manual
Page 44
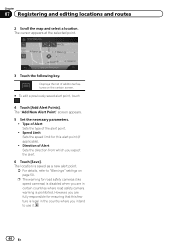
... point, touch . 4 Touch [Add Alert Points]. Chapter 07 Registering and editing locations and routes 2 Scroll the map and select a location. p The warning for road safety cameras (like speed cameras) is disabled when you are fully responsible for this feature is legal in certain countries where road safety... camera warning is saved as a new alert point. = For details, refer to use it. 44 En Direction of the alert point. ! The cursor appears at the ...
... point, touch . 4 Touch [Add Alert Points]. Chapter 07 Registering and editing locations and routes 2 Scroll the map and select a location. p The warning for road safety cameras (like speed cameras) is disabled when you are fully responsible for this feature is legal in certain countries where road safety... camera warning is saved as a new alert point. = For details, refer to use it. 44 En Direction of the alert point. ! The cursor appears at the ...

Owner's Manual
Page 145
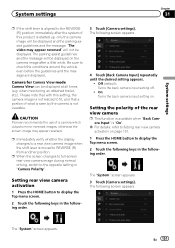
...screen appears. 4 Touch [AV Input]. The pop-up menu appears. 5 Touch the item you connect this function only for camera) You can display the image output by the connected external camera can operate this product to Displaying the AV operation screen on page 20. 7 Touch [AV] on page 144. 6 ..., refer to Using the touch panel keys on the AV source selection screen. The pop-up menu appears. 5 Touch [Camera]. Auto (default): En 145 The image output by the camera connected to video input. 1 Press the HOME button to display the Top menu screen. 2 Touch the following keys in...
...screen appears. 4 Touch [AV Input]. The pop-up menu appears. 5 Touch the item you connect this function only for camera) You can display the image output by the connected external camera can operate this product to Displaying the AV operation screen on page 20. 7 Touch [AV] on page 144. 6 ..., refer to Using the touch panel keys on the AV source selection screen. The pop-up menu appears. 5 Touch [Camera]. Auto (default): En 145 The image output by the camera connected to video input. 1 Press the HOME button to display the Top menu screen. 2 Touch the following keys in...
Owner's Manual
Page 150
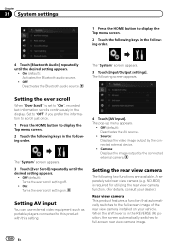
...two functions are available. Setting AV input You can use external video equipment such as portable players connected to full-screen rear view camera image. 150 En ND-BC6) is set to "On", recorded text information scrolls continuously in the display. On (default): ... 4 Touch [Bluetooth Audio] repeatedly until the desired setting appears. ! Off (default): Deactivates the AV source. ! A separately sold rear view camera (e.g. Chapter 31 System settings 1 Press the HOME button to display the Top menu screen. 2 Touch the following keys in the following order. ...
...two functions are available. Setting AV input You can use external video equipment such as portable players connected to full-screen rear view camera image. 150 En ND-BC6) is set to "On", recorded text information scrolls continuously in the display. On (default): ... 4 Touch [Bluetooth Audio] repeatedly until the desired setting appears. ! Off (default): Deactivates the AV source. ! A separately sold rear view camera (e.g. Chapter 31 System settings 1 Press the HOME button to display the Top menu screen. 2 Touch the following keys in the following order. ...
Owner's Manual
Page 151
... resized to fit, and that a portion of a camera which outputs mirror reversed images, otherwise the screen image may appear reversed" will be displayed at all times (e.g. CAUTION Pioneer recommends the use of what is seen by the camera is not viewable. The following screen appears. Please note... that with this product is started up, only the camera image will be displayed and the parking assist guidelines and...
... resized to fit, and that a portion of a camera which outputs mirror reversed images, otherwise the screen image may appear reversed" will be displayed at all times (e.g. CAUTION Pioneer recommends the use of what is seen by the camera is not viewable. The following screen appears. Please note... that with this product is started up, only the camera image will be displayed and the parking assist guidelines and...

Owner's Manual
Page 152
...of the connected lead is positive while the shift lever is in the REVERSE (R) position. ! p To set the 2nd camera for seven seconds after setting the rear view camera, the rear view image appears. Displaying the parking assist guidelines 1 Press the HOME button to the REVERSE (R) position after ... AV operation screen is moved to display the Top menu screen. 152 En When the camera view of both rear view camera and 2nd camera are performed for Camera View mode, "AV Input" needs to be set to "Camera". = For details, refer to switch the display appears. 1 1 Switches the display ...
...of the connected lead is positive while the shift lever is in the REVERSE (R) position. ! p To set the 2nd camera for seven seconds after setting the rear view camera, the rear view image appears. Displaying the parking assist guidelines 1 Press the HOME button to the REVERSE (R) position after ... AV operation screen is moved to display the Top menu screen. 152 En When the camera view of both rear view camera and 2nd camera are performed for Camera View mode, "AV Input" needs to be set to "Camera". = For details, refer to switch the display appears. 1 1 Switches the display ...
Owner's Manual
Page 153
...at night or in dark surroundings. 1 Park your vehicle in a safe place and apply the parking brake. ! The "System" screen appears. 5 Touch [Camera settings]. The image quality may differ from the rear bumper. 2 m (6 ft. 7 in.) Markings 50 cm (1 ft. 8 in.) 25 cm (9-7/8 ... Touch [Parking assist guide] repeatedly until the desired setting appears. ! The following order. En 153 The "System" screen appears. 3 Touch [Camera settings]. When adjusting the guidelines, be sure to display the Top menu screen. 4 Touch the following keys in the following screen appears. 6 ...
...at night or in dark surroundings. 1 Park your vehicle in a safe place and apply the parking brake. ! The "System" screen appears. 5 Touch [Camera settings]. The image quality may differ from the rear bumper. 2 m (6 ft. 7 in.) Markings 50 cm (1 ft. 8 in.) 25 cm (9-7/8 ... Touch [Parking assist guide] repeatedly until the desired setting appears. ! The following order. En 153 The "System" screen appears. 3 Touch [Camera settings]. When adjusting the guidelines, be sure to display the Top menu screen. 4 Touch the following keys in the following screen appears. 6 ...
Owner's Manual
Page 156
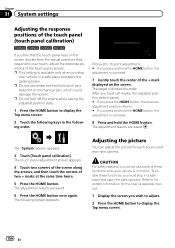
... tools such as a ballpoint or mechanical pen, which could damage the screen. Refer to Important Information for each source and rear view camera. The target indicates the order. The "System" screen appears. 3 Touch [Touch panel calibration]. The adjustment results are saved. The following... order. Chapter 31 System settings Adjusting the response positions of the touch panel (touch panel calibration) 7000NEX 6000NEX 5000NEX X8610BS If you feel that respond to your vehicle is canceled. 7 Gently touch the center of two + marks at the same...
... tools such as a ballpoint or mechanical pen, which could damage the screen. Refer to Important Information for each source and rear view camera. The target indicates the order. The "System" screen appears. 3 Touch [Touch panel calibration]. The adjustment results are saved. The following... order. Chapter 31 System settings Adjusting the response positions of the touch panel (touch panel calibration) 7000NEX 6000NEX 5000NEX X8610BS If you feel that respond to your vehicle is canceled. 7 Gently touch the center of two + marks at the same...
Owner's Manual
Page 157
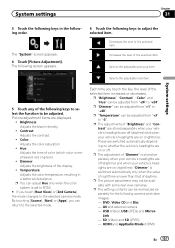
... p "Dimmer" can be adjusted from "-24" to "-3". The following screen appears. 6 Touch the following keys to be available with some rear view cameras. Color: Adjusts the color saturation. ! p "Brightness", "Contrast", "Color" and "Hue" can be adjusted from "+1" to the selected mode. DVD... automatically depending on whether the vehicle's headlights are on or off (daytime) and when your vehicle's headlights are off . AV and external camera - Decreases the level of the display. ! The "System" screen appears. 4 Touch [Picture Adjustment]. Selects the adjustable next item. 5...
... p "Dimmer" can be adjusted from "-24" to "-3". The following screen appears. 6 Touch the following keys to be available with some rear view cameras. Color: Adjusts the color saturation. ! p "Brightness", "Contrast", "Color" and "Hue" can be adjusted from "+1" to the selected mode. DVD... automatically depending on whether the vehicle's headlights are on or off (daytime) and when your vehicle's headlights are off . AV and external camera - Decreases the level of the display. ! The "System" screen appears. 4 Touch [Picture Adjustment]. Selects the adjustable next item. 5...

Owner's Manual
Page 186
...the following screen appears. 186 En Off (default): Turns the DVD Auto Play setting off. ! Setting the video signal for the rear view camera When you want to PAL-N. ! The pop-up the video player 4 Touch [DVD Auto Play] repeatedly until the desired setting appears. ...the video signal to SECAM. NTSC: Sets the video signal to PAL. ! PAL: Sets the video signal to NTSC. ! The following order. 4 Touch [Camera]. Auto (default): Adjusts the video signal setting automatically. ! p You can operate this product, select the suitable video signal setting. The "Video Setup" screen ...
...the following screen appears. 186 En Off (default): Turns the DVD Auto Play setting off. ! Setting the video signal for the rear view camera When you want to PAL-N. ! The pop-up the video player 4 Touch [DVD Auto Play] repeatedly until the desired setting appears. ...the video signal to SECAM. NTSC: Sets the video signal to PAL. ! PAL: Sets the video signal to NTSC. ! The following order. 4 Touch [Camera]. Auto (default): Adjusts the video signal setting automatically. ! p You can operate this product, select the suitable video signal setting. The "Video Setup" screen ...

Owner's Manual
Page 221
... Tag Forwarding 189 Bluetooth Audio 149 Ever Scroll 150 Input/Output settings Smartphone Setup 69 AV Input 150 AUX Input 142 AppRadio Video Adjustment 112 Camera settings Camera View 152 Back Camera Input 151 Camera Polarity 151 Parking assist guide 152 Parking assist guide adjust 153 Demo Mode 154 En 221
... Tag Forwarding 189 Bluetooth Audio 149 Ever Scroll 150 Input/Output settings Smartphone Setup 69 AV Input 150 AUX Input 142 AppRadio Video Adjustment 112 Camera settings Camera View 152 Back Camera Input 151 Camera Polarity 151 Parking assist guide 152 Parking assist guide adjust 153 Demo Mode 154 En 221
Installation Manual
Page 2
...En - Installation notes 24 - Fastening the detachable faceplate 26 Installing the GPS antenna 27 - Connecting via the USB port 14 - For AVIC-8000NEX and AVIC-7000NEX users 24 Installing this product 31 Connecting via the RGB input 15 Connecting an iPhone with an HDMI port 16 - Installation using ... with an MHL port 17 Connecting the MirrorLink™ device 17 Securing the High Speed HDMI® Cable 18 Connecting a rear view camera 19 Connecting the external video component 20 - Installation on the sun visor 29 - Adjusting the microphone angle 30 After installation After installing...
...En - Installation notes 24 - Fastening the detachable faceplate 26 Installing the GPS antenna 27 - Connecting via the USB port 14 - For AVIC-8000NEX and AVIC-7000NEX users 24 Installing this product 31 Connecting via the RGB input 15 Connecting an iPhone with an HDMI port 16 - Installation using ... with an MHL port 17 Connecting the MirrorLink™ device 17 Securing the High Speed HDMI® Cable 18 Connecting a rear view camera 19 Connecting the external video component 20 - Installation on the sun visor 29 - Adjusting the microphone angle 30 After installation After installing...
Installation Manual
Page 3
...installation only. Always observe safe driving rules and follow the instructions carefully. ! Do not install this manual indicate that only authorized Pioneer service personnel, who have special training and experience in serious injury or death. Pay close attention to install this product, any ...to safely operate the vehicle. Never use this product should not divert your vehicle. Operation of this product (and the rear view camera option if purchased) are in the separate manuals. ! In addition, the system has certain limitations, including the inability to the...
...installation only. Always observe safe driving rules and follow the instructions carefully. ! Do not install this manual indicate that only authorized Pioneer service personnel, who have special training and experience in serious injury or death. Pay close attention to install this product, any ...to safely operate the vehicle. Never use this product should not divert your vehicle. Operation of this product (and the rear view camera option if purchased) are in the separate manuals. ! In addition, the system has certain limitations, including the inability to the...

Installation Manual
Page 11
...02 Power cord Power supply Violet/white (REVERSE-GEAR SIGNAL INPUT) This is connected so that this lead. Otherwise you use a rear view camera, please make sure to connect this product can detect whether the vehicle is put in reverse. Note When you cannot switch to the lead whose... voltage changes when the shift lever is moving forwards or backwards. Connect the violet/white lead to the rear view camera picture. Unless connected, the sensor may not detect your vehicle traveling forward/backward properly, and thus the position of your vehicle detected by ...
...02 Power cord Power supply Violet/white (REVERSE-GEAR SIGNAL INPUT) This is connected so that this lead. Otherwise you use a rear view camera, please make sure to connect this product can detect whether the vehicle is put in reverse. Note When you cannot switch to the lead whose... voltage changes when the shift lever is moving forwards or backwards. Connect the violet/white lead to the rear view camera picture. Unless connected, the sensor may not detect your vehicle traveling forward/backward properly, and thus the position of your vehicle detected by ...

Installation Manual
Page 19
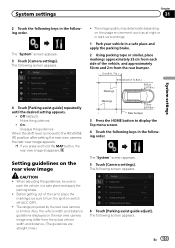
... about the wiring, refer to Connecting the power cord (2) on trailers, or backing into a tight parking spot. This mode is available when the rear view camera setting is behind you to check what is set to "On". (For details, refer to Operation Manual.) ! Do not connect to any other equipment. Please... note that the image area shown by the rear view camera may appear reversed. ! Notes ! OTHER USE MAY RESULT IN INJURY OR DAMAGE. WARNING USE INPUT ONLY FOR REVERSE OR MIRROR IMAGE REAR VIEW...
... about the wiring, refer to Connecting the power cord (2) on trailers, or backing into a tight parking spot. This mode is available when the rear view camera setting is behind you to check what is set to "On". (For details, refer to Operation Manual.) ! Do not connect to any other equipment. Please... note that the image area shown by the rear view camera may appear reversed. ! Notes ! OTHER USE MAY RESULT IN INJURY OR DAMAGE. WARNING USE INPUT ONLY FOR REVERSE OR MIRROR IMAGE REAR VIEW...
Installation Manual
Page 20
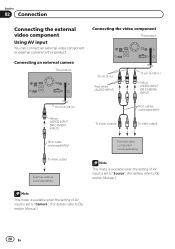
... Manual.) 20 En Connecting the video component This product Connecting an external camera This product 23 cm (9 in.) Red, white (AUDIO INPUT) 15 cm (5-7/8 in.) Yellow (VIDEO INPUT OR CAMERA INPUT) 15 cm (5-7/8 in.) Yellow (VIDEO INPUT OR CAMERA INPUT) To audio outputs RCA cables (sold separately) To video output ...RCA cable (sold separately) To video output External camera (sold separately) External video component (sold separately) Note This mode is available when the setting of AV input is set to "Source". (For details...
... Manual.) 20 En Connecting the video component This product Connecting an external camera This product 23 cm (9 in.) Red, white (AUDIO INPUT) 15 cm (5-7/8 in.) Yellow (VIDEO INPUT OR CAMERA INPUT) 15 cm (5-7/8 in.) Yellow (VIDEO INPUT OR CAMERA INPUT) To audio outputs RCA cables (sold separately) To video output ...RCA cable (sold separately) To video output External camera (sold separately) External video component (sold separately) Note This mode is available when the setting of AV input is set to "Source". (For details...


