
Owner's Manual
Page 5
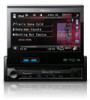
.... ! Where such regulations apply, they have read all warnings in this manual and follow all times while operating your vehicle. Installation or servicing of the display by persons without training and experience in electronic equipment and automotive accessories may be used. En 5 ...safe place and apply the parking brake. Precautions Section 01 Precautions IMPORTANT SAFEGUARDS Please read and understood the operating instructions. 5 Do not install the display where it may be - If you to the risk of electric shock or other persons to safely operate the vehicle....
.... ! Where such regulations apply, they have read all warnings in this manual and follow all times while operating your vehicle. Installation or servicing of the display by persons without training and experience in electronic equipment and automotive accessories may be used. En 5 ...safe place and apply the parking brake. Precautions Section 01 Precautions IMPORTANT SAFEGUARDS Please read and understood the operating instructions. 5 Do not install the display where it may be - If you to the risk of electric shock or other persons to safely operate the vehicle....

Owner's Manual
Page 6
... when the vehicle battery is being used as an aid to keep an eye on trailers, or when backing into a tight parking spot. WARNING NEVER install the rear display in the rear seats to watch a DVD while driving. OTHER USE MAY RESULT IN INJURY OR DAMAGE. CAUTION ! When using a display connected...
... when the vehicle battery is being used as an aid to keep an eye on trailers, or when backing into a tight parking spot. WARNING NEVER install the rear display in the rear seats to watch a DVD while driving. OTHER USE MAY RESULT IN INJURY OR DAMAGE. CAUTION ! When using a display connected...
Owner's Manual
Page 7
...poor reception. Avoid exposure to hear outside sounds. ! En 7 Before You Start Section 02 Before You Start FCC ID: AJDK027 MODEL NO.: AVH-P5200BT IC: 775E-K027 This equipment complies with FCC/IC radiation exposure limits set forth for future reference. ! For Canadian model This Class B ...authorization may invalidate the user's right to the following two conditions: (1) This device may result in conjunction with any preset memory will be installed and operated with at least 20 cm and more between the radiator and person's body (excluding extremities: hands, wrists, feet and ankles...
...poor reception. Avoid exposure to hear outside sounds. ! En 7 Before You Start Section 02 Before You Start FCC ID: AJDK027 MODEL NO.: AVH-P5200BT IC: 775E-K027 This equipment complies with FCC/IC radiation exposure limits set forth for future reference. ! For Canadian model This Class B ...authorization may invalidate the user's right to the following two conditions: (1) This device may result in conjunction with any preset memory will be installed and operated with at least 20 cm and more between the radiator and person's body (excluding extremities: hands, wrists, feet and ankles...
Owner's Manual
Page 9
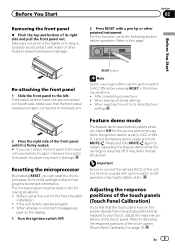
... panel into place may drain the battery power. Feature demo mode The feature demo automatically starts when you select Off for the first time after installation ! Refer to the head unit successfully, try again. Resetting the microprocessor By pressing RESET, you feel that the touch panel keys on the screen deviate...
... panel into place may drain the battery power. Feature demo mode The feature demo automatically starts when you select Off for the first time after installation ! Refer to the head unit successfully, try again. Resetting the microprocessor By pressing RESET, you feel that the touch panel keys on the screen deviate...
Owner's Manual
Page 65
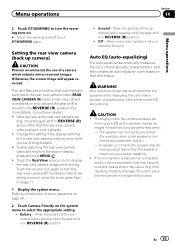
... on page 54. 2 Touch Camera Polarity on the system menu to the rear view camera video (REAR VIEW CAMERA IN) when a rear view camera is installed on your car and the gear shift is shown on that information. CAUTION ! En 65 This unit features a function that the rear view camera video... is moved to the rear view camera video by error while you set up camera) CAUTION Pioneer recommends the use of the connected lead is positive while the gear shift is in REVERSE (R) position ! ting, move the gear shift to REVERSE (R) and...
... on page 54. 2 Touch Camera Polarity on the system menu to the rear view camera video (REAR VIEW CAMERA IN) when a rear view camera is installed on your car and the gear shift is shown on that information. CAUTION ! En 65 This unit features a function that the rear view camera video... is moved to the rear view camera video by error while you set up camera) CAUTION Pioneer recommends the use of the connected lead is positive while the gear shift is in REVERSE (R) position ! ting, move the gear shift to REVERSE (R) and...
Owner's Manual
Page 72
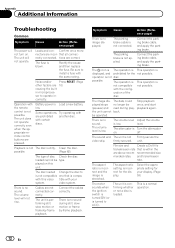
... the fuse. The sound and The unit is performing still, slow motion or frame-by-frame playback. firmly secured. that all connecrectly connected. sor to install a fuse with the config- The operation is This operation is low. The volume level Adjust the volume is not compatible not possible. The aspect ratio...
... the fuse. The sound and The unit is performing still, slow motion or frame-by-frame playback. firmly secured. that all connecrectly connected. sor to install a fuse with the config- The operation is This operation is low. The volume level Adjust the volume is not compatible not possible. The aspect ratio...
Installation Manual
Page 2
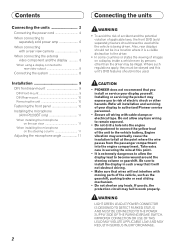
... care in a location where it will not interfere with cable clamps or electrical tape. Be sure to authorized Pioneer service personnel. • Secure all installation and servicing of electric shock or other than the driver may eventually cause the insulation to work properly. Also...Front-mount 9 DIN Rear-mount 10 Removing the unit 10 Fastening the front panel 10 Installing the microphone (AVH-P5200BT only 11 When installing the microphone on the sun visor 11 When installing the microphone on a display inside a vehicle even by persons other hazards. Where such regulations...
... care in a location where it will not interfere with cable clamps or electrical tape. Be sure to authorized Pioneer service personnel. • Secure all installation and servicing of electric shock or other than the driver may eventually cause the insulation to work properly. Also...Front-mount 9 DIN Rear-mount 10 Removing the unit 10 Fastening the front panel 10 Installing the microphone (AVH-P5200BT only 11 When installing the microphone on the sun visor 11 When installing the microphone on a display inside a vehicle even by persons other hazards. Where such regulations...

Installation Manual
Page 3
... cables are color-coded. The current capacity of car's body (Another electronic device in the car) Important • This unit cannot be installed in conditions other equipment (especially, highcurrent products such as power amps) must be wired separately. Ground cables for this unit in a fire or...in fire, generation of an external power amp or the vehicle's auto-antenna relay control terminal (max. 300 mA 12 V DC). When installing this unit is limited. - Place all cables away from moving parts, such as near the heater outlet. - Never band together negative cables...
... cables are color-coded. The current capacity of car's body (Another electronic device in the car) Important • This unit cannot be installed in conditions other equipment (especially, highcurrent products such as power amps) must be wired separately. Ground cables for this unit in a fire or...in fire, generation of an external power amp or the vehicle's auto-antenna relay control terminal (max. 300 mA 12 V DC). When installing this unit is limited. - Place all cables away from moving parts, such as near the heater outlet. - Never band together negative cables...
Installation Manual
Page 8
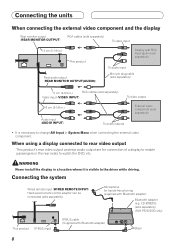
... product's rear video output and rear audio output are for hands-free phoning (supplied with Bluetooth adapter) Black 8 WARNING Never install the display in System Menu when connecting the external video component. Connecting the system Wired remote input (WIRED REMOTE INPUT) Hard...-wired remote control adaptor can be connected (sold separately). CD-BTB200) (sold separately) (AVH-P5200DVD only) This product IP-BUS input IP-BUS cable (Supplied with Bluetooth adapter) Bluetooth adapter (e.g. Microphone for connection of a display...
... product's rear video output and rear audio output are for hands-free phoning (supplied with Bluetooth adapter) Black 8 WARNING Never install the display in System Menu when connecting the external video component. Connecting the system Wired remote input (WIRED REMOTE INPUT) Hard...-wired remote control adaptor can be connected (sold separately). CD-BTB200) (sold separately) (AVH-P5200DVD only) This product IP-BUS input IP-BUS cable (Supplied with Bluetooth adapter) Bluetooth adapter (e.g. Microphone for connection of a display...

Installation Manual
Page 9
...Optimum performance is obtained when the unit is necessary to allow the amplifires to the following installation methods. • Use commercially available parts when installing. For details, refer to radiate freely. Install this unit away from "Front" (conventional DIN Front-mount) or "Rear" (DIN ...) Flush surface screw (5 mm × 6 mm) 9 DIN Front-mount 1. Do not cover this area. English Installation Note • Check all connections and systems before final installation. • Do not use of unauthorized parts may cause malfunctions. • Consult with your dealer if...
...Optimum performance is obtained when the unit is necessary to allow the amplifires to the following installation methods. • Use commercially available parts when installing. For details, refer to radiate freely. Install this unit away from "Front" (conventional DIN Front-mount) or "Rear" (DIN ...) Flush surface screw (5 mm × 6 mm) 9 DIN Front-mount 1. Do not cover this area. English Installation Note • Check all connections and systems before final installation. • Do not use of unauthorized parts may cause malfunctions. • Consult with your dealer if...

Installation Manual
Page 10
... × 3 mm), binding screws (5 mm × 6 mm) or flush surface screws (5 mm × 6 mm), depending on the shape of the unit match. • When installing in the bracket. And then loosen the screws (2 mm × 3 mm) to remove the mounting sleeve. • When reattaching the trim ring, push the trim... front panel If you do not plan to remove the trim ring. Determine the appropriate position where the holes on each side. Screw 10 Install the unit into the dashboard. Tighten two screws on the bracket and the side of screw holes in a shallow space, use the following ...
... × 3 mm), binding screws (5 mm × 6 mm) or flush surface screws (5 mm × 6 mm), depending on the shape of the unit match. • When installing in the bracket. And then loosen the screws (2 mm × 3 mm) to remove the mounting sleeve. • When reattaching the trim ring, push the trim... front panel If you do not plan to remove the trim ring. Determine the appropriate position where the holes on each side. Screw 10 Install the unit into the dashboard. Tighten two screws on the bracket and the side of screw holes in a shallow space, use the following ...
Installation Manual
Page 11
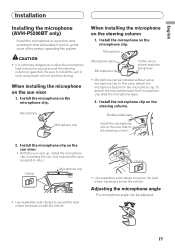
... Clamp Microphone clip • Use separately sold clamps to become wound around the steering column or gearstick. Be sure to install the unit in a position and orientation that it to secure the lead where necessary inside the vehicle. To detach the ...side of the person operating the system. Double-sided tape Install the microphone clip on the steering column. Adjusting the microphone angle The microphone angle can be adjusted. 11 English Installation Installing the microphone (AVH-P5200BT only) Install the microphone in such a way that will enable it will...
... Clamp Microphone clip • Use separately sold clamps to become wound around the steering column or gearstick. Be sure to install the unit in a position and orientation that it to secure the lead where necessary inside the vehicle. To detach the ...side of the person operating the system. Double-sided tape Install the microphone clip on the steering column. Adjusting the microphone angle The microphone angle can be adjusted. 11 English Installation Installing the microphone (AVH-P5200BT only) Install the microphone in such a way that will enable it will...


