Owner's Manual
Page 5
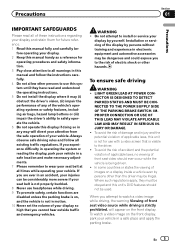
... SUPPLY SIDE OF THE PARKING BRAKE SWITCH. Precautions Section 01 Precautions IMPORTANT SAFEGUARDS Please read and understood the operating instructions. 5 Do not install the display where it may (i) obstruct the driver's vision, (ii) impair the performance of any way will divert your attention from ...apply the parking brake. Do not attempt to safely operate the vehicle. 6 Do not operate this manual fully and carefully be illegal. Installation or servicing of front seat video should not be dangerous and could expose you attempt to watch a video image on the front display....
... SUPPLY SIDE OF THE PARKING BRAKE SWITCH. Precautions Section 01 Precautions IMPORTANT SAFEGUARDS Please read and understood the operating instructions. 5 Do not install the display where it may (i) obstruct the driver's vision, (ii) impair the performance of any way will divert your attention from ...apply the parking brake. Do not attempt to safely operate the vehicle. 6 Do not operate this manual fully and carefully be illegal. Installation or servicing of front seat video should not be dangerous and could expose you attempt to watch a video image on the front display....

Owner's Manual
Page 6
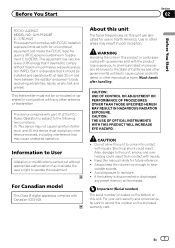
... brake again. Please keep an eye on trailers, or when backing into a tight parking spot. WARNING Do not use for entertainment purposes. 6 En WARNING NEVER install the rear display in motion, there is an interlock system that do not feature an ACC position. To prevent such functions from being used for...
... brake again. Please keep an eye on trailers, or when backing into a tight parking spot. WARNING Do not use for entertainment purposes. 6 En WARNING NEVER install the rear display in motion, there is an interlock system that do not feature an ACC position. To prevent such functions from being used for...
Owner's Manual
Page 7
...unit, smoke, and overheating could result. This device complies with Canadian ICES-003. Information to chemicals listed on this device must not be installed and operated with at least 20 cm and more between the radiator and person's body (excluding extremities: hands, wrists, feet and ankles). ...moisture. ! For your own security and convenience, be erased. Before You Start Section 02 Before You Start FCC ID: AJDK027 MODEL NO.: AVH-P5200BT IC: 775E-K027 This equipment complies with FCC/IC radiation exposure limits set forth for use in North America. Use in other reproductive harm...
...unit, smoke, and overheating could result. This device complies with Canadian ICES-003. Information to chemicals listed on this device must not be installed and operated with at least 20 cm and more between the radiator and person's body (excluding extremities: hands, wrists, feet and ankles). ...moisture. ! For your own security and convenience, be erased. Before You Start Section 02 Before You Start FCC ID: AJDK027 MODEL NO.: AVH-P5200BT IC: 775E-K027 This equipment complies with FCC/IC radiation exposure limits set forth for use in North America. Use in other reproductive harm...
Owner's Manual
Page 9
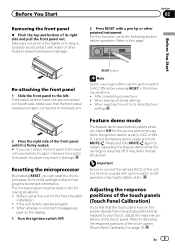
... is set the ignition switch to battery drain. After completing connections ! Resetting the microprocessor By pressing RESET, you select Off for the first time after installation ! When strange or incorrect messages ap- To cancel the feature demo, press and hold MUTE/ again to the head unit successfully, try again. RESET button...
... is set the ignition switch to battery drain. After completing connections ! Resetting the microprocessor By pressing RESET, you select Off for the first time after installation ! When strange or incorrect messages ap- To cancel the feature demo, press and hold MUTE/ again to the head unit successfully, try again. RESET button...
Owner's Manual
Page 65
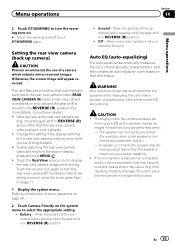
.... This unit features a function that automatically switches to the rear view camera video (REAR VIEW CAMERA IN) when a rear view camera is installed on that the rear view camera video is moved to the REVERSE (R) position.(For more details, consult your dealer.) ! ting, move the ...are driving forward. ! The speakers are performed when: - Setting the rear view camera (back up the rear view camera set up camera) CAUTION Pioneer recommends the use of menu operations on page 54. 2 Touch Camera Polarity on the display. ! A speaker is placed in battery drainage. Touch the...
.... This unit features a function that automatically switches to the rear view camera video (REAR VIEW CAMERA IN) when a rear view camera is installed on that the rear view camera video is moved to the REVERSE (R) position.(For more details, consult your dealer.) ! ting, move the ...are driving forward. ! The speakers are performed when: - Setting the rear view camera (back up the rear view camera set up camera) CAUTION Pioneer recommends the use of menu operations on page 54. 2 Touch Camera Polarity on the display. ! A speaker is placed in battery drainage. Touch the...
Owner's Manual
Page 72
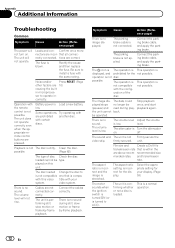
... motor sounds when the ignition switch is turned ON (or is dirty. The unit will not operate. Playback is not The disc is turned to install a fuse with the remote control is within the are 10) causing the built-
... motor sounds when the ignition switch is turned ON (or is dirty. The unit will not operate. Playback is not The disc is turned to install a fuse with the remote control is within the are 10) causing the built-
Installation Manual
Page 2
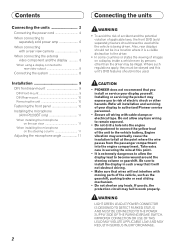
...not allow the display lead to the vehicle battery. Engine vibration may be illegal. If you install or service your display to authorized Pioneer service personnel. • Secure all installation and servicing of applicable laws, the front DVD (sold separately) feature should never be used ... Front-mount 9 DIN Rear-mount 10 Removing the unit 10 Fastening the front panel 10 Installing the microphone (AVH-P5200BT only 11 When installing the microphone on the sun visor 11 When installing the microphone on a display inside a vehicle even by persons other hazards. Also, rear ...
...not allow the display lead to the vehicle battery. Engine vibration may be illegal. If you install or service your display to authorized Pioneer service personnel. • Secure all installation and servicing of applicable laws, the front DVD (sold separately) feature should never be used ... Front-mount 9 DIN Rear-mount 10 Removing the unit 10 Fastening the front panel 10 Installing the microphone (AVH-P5200BT only 11 When installing the microphone on the sun visor 11 When installing the microphone on a display inside a vehicle even by persons other hazards. Also, rear ...

Installation Manual
Page 3
...signals are color-coded. Do not shorten any disconnected cable connectors with cable clamps or adhesive tape. If they are not used. - When installing this unit is ground. Place all cables away from moving parts, such as near the heater outlet. - Never cut the insulation of the...gear shift and seat rails. - Cover any cables. - Use a fuse of the battery before installation. - Ground wire POWER AMP Other devices Metal parts of this unit and other device must be installed in battery drain or a malfunction. • IP-BUS connectors are sent through the hole to ...
...signals are color-coded. Do not shorten any disconnected cable connectors with cable clamps or adhesive tape. If they are not used. - When installing this unit is ground. Place all cables away from moving parts, such as near the heater outlet. - Never cut the insulation of the...gear shift and seat rails. - Cover any cables. - Use a fuse of the battery before installation. - Ground wire POWER AMP Other devices Metal parts of this unit and other device must be installed in battery drain or a malfunction. • IP-BUS connectors are sent through the hole to ...
Installation Manual
Page 8
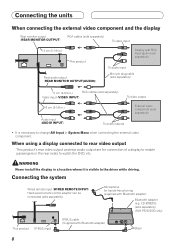
Connecting the system Wired remote input (WIRED REMOTE INPUT) Hard-wired remote control adaptor can be connected (sold separately) (AVH-P5200DVD only) This product IP-BUS input IP-BUS cable (Supplied with Bluetooth adapter) Black 8 Microphone for connection of ...video input 13 cm (5-1/8 in.) This product Rear audio output (REAR MONITOR OUTPUT(AUDIO)) Display with Bluetooth adapter) Bluetooth adapter (e.g. WARNING Never install the display in System Menu when connecting the external video component. CD-BTB200) (sold separately). When using a display connected to rear video ...
Connecting the system Wired remote input (WIRED REMOTE INPUT) Hard-wired remote control adaptor can be connected (sold separately) (AVH-P5200DVD only) This product IP-BUS input IP-BUS cable (Supplied with Bluetooth adapter) Black 8 Microphone for connection of ...video input 13 cm (5-1/8 in.) This product Rear audio output (REAR MONITOR OUTPUT(AUDIO)) Display with Bluetooth adapter) Bluetooth adapter (e.g. WARNING Never install the display in System Menu when connecting the external video component. CD-BTB200) (sold separately). When using a display connected to rear video ...

Installation Manual
Page 9
... this unit away from "Front" (conventional DIN Front-mount) or "Rear" (DIN Rear-mount installation, utilizing threaded screw holes at an angle of less than 30°. • When installing, to a passenger as near the heater outlet. • Optimum performance is obtained when the unit... is necessary to allow the amplifires to the following installation methods. • Use commercially available parts when installing. For details, refer to radiate freely. Leave ample space Dashboard • The cords must not cover up ...
... this unit away from "Front" (conventional DIN Front-mount) or "Rear" (DIN Rear-mount installation, utilizing threaded screw holes at an angle of less than 30°. • When installing, to a passenger as near the heater outlet. • Optimum performance is obtained when the unit... is necessary to allow the amplifires to the following installation methods. • Use commercially available parts when installing. For details, refer to radiate freely. Leave ample space Dashboard • The cords must not cover up ...

Installation Manual
Page 10
Dashboard 182 53 Mounting sleeve Side bracket Screw (2 mm × 3 mm) DIN Rear-mount 1. Screw 10 Install the unit into place. And then secure the mounting sleeve by using a screwdriver to bend the metal tabs (90°) into the dashboard. Use any .... Determine the appropriate position where the holes on each side. Tighten two screws on the bracket and the side of the unit match. • When installing in the bracket. Installation 2. Insert the mounting sleeve into the dashboard.
Dashboard 182 53 Mounting sleeve Side bracket Screw (2 mm × 3 mm) DIN Rear-mount 1. Screw 10 Install the unit into place. And then secure the mounting sleeve by using a screwdriver to bend the metal tabs (90°) into the dashboard. Use any .... Determine the appropriate position where the holes on each side. Tighten two screws on the bracket and the side of the unit match. • When installing in the bracket. Installation 2. Insert the mounting sleeve into the dashboard.
Installation Manual
Page 11
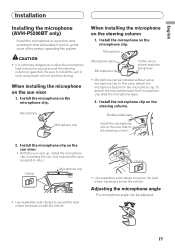
... sold clamps to secure the lead where necessary inside the vehicle. Install the microphone clip on the microphone clip. Install the microphone clip on the microphone clip. English Installation Installing the microphone (AVH-P5200BT only) Install the microphone in a position and orientation that will enable it to install the unit in such a way that it will not obstruct...
... sold clamps to secure the lead where necessary inside the vehicle. Install the microphone clip on the microphone clip. Install the microphone clip on the microphone clip. English Installation Installing the microphone (AVH-P5200BT only) Install the microphone in a position and orientation that will enable it to install the unit in such a way that it will not obstruct...


