Owner's Manual
Page 5
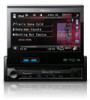
... source while driving is strictly prohibited. Precautions Section 01 Precautions IMPORTANT SAFEGUARDS Please read and understood the operating instructions. 5 Do not install the display where it may (i) obstruct the driver's vision, (ii) impair the performance of any way will appear on the front...regulations apply, they have read all of applicable laws, this unit's DVD features should ever occur while the vehicle is visible to install or service your vehicle. WARNING ! When you experience difficulty in operating the system or reading the display, park your vehicle in...
... source while driving is strictly prohibited. Precautions Section 01 Precautions IMPORTANT SAFEGUARDS Please read and understood the operating instructions. 5 Do not install the display where it may (i) obstruct the driver's vision, (ii) impair the performance of any way will appear on the front...regulations apply, they have read all of applicable laws, this unit's DVD features should ever occur while the vehicle is visible to install or service your vehicle. WARNING ! When you experience difficulty in operating the system or reading the display, park your vehicle in...

Owner's Manual
Page 6
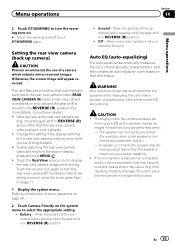
... engine running when using the rear view camera With an optional rear view camera, this unit to avoid draining the battery power. ! VERSED. ! WARNING NEVER install the rear display in a safe place, and (1) apply the parking brake, (2) release the parking brake, and then (3) apply the parking brake again. When using this...
... engine running when using the rear view camera With an optional rear view camera, this unit to avoid draining the battery power. ! VERSED. ! WARNING NEVER install the rear display in a safe place, and (1) apply the parking brake, (2) release the parking brake, and then (3) apply the parking brake again. When using this...
Owner's Manual
Page 7
...to OET65. For your own security and convenience, be erased. Before You Start Section 02 Before You Start FCC ID: AJDK027 MODEL NO.: AVH-P5200BT IC: 775E-K027 This equipment complies with FCC/IC radiation exposure limits set forth for uncontrolled equipment and meets the FCC/IC radio frequency (RF...) Exposure Guidelines in North America. But it is located on this device must not be installed and operated with at least 20 cm and more between the radiator and person's body (excluding extremities: hands, wrists, feet and ankles). ...
...to OET65. For your own security and convenience, be erased. Before You Start Section 02 Before You Start FCC ID: AJDK027 MODEL NO.: AVH-P5200BT IC: 775E-K027 This equipment complies with FCC/IC radiation exposure limits set forth for uncontrolled equipment and meets the FCC/IC radio frequency (RF...) Exposure Guidelines in North America. But it is located on this device must not be installed and operated with at least 20 cm and more between the radiator and person's body (excluding extremities: hands, wrists, feet and ankles). ...
Owner's Manual
Page 9
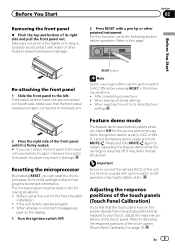
... to its initial (factory) settings 2 Press the right side of the touch panels (Touch Panel Calibration) If you select Off for the first time after installation ! Before using this unit to ACC ON before operation. Before You Start Re-attaching the front panel 1 Slide the front panel to the head unit...
... to its initial (factory) settings 2 Press the right side of the touch panels (Touch Panel Calibration) If you select Off for the first time after installation ! Before using this unit to ACC ON before operation. Before You Start Re-attaching the front panel 1 Slide the front panel to the head unit...
Owner's Manual
Page 65
... En 65 This unit features a function that automatically switches to the rear view camera video (REAR VIEW CAMERA IN) when a rear view camera is installed on your car and the gear shift is connected to a power amp delivering output higher than the speaker's maximum input power capability. ! To stop ... off . Battery - The speakers are performed when: - Setting the rear view camera (back up the rear view camera set up camera) CAUTION Pioneer recommends the use of the connected lead is positive while the gear shift is not connected to this setting if the display switches to the...
... En 65 This unit features a function that automatically switches to the rear view camera video (REAR VIEW CAMERA IN) when a rear view camera is installed on your car and the gear shift is connected to a power amp delivering output higher than the speaker's maximum input power capability. ! To stop ... off . Battery - The speakers are performed when: - Setting the rear view camera (back up the rear view camera set up camera) CAUTION Pioneer recommends the use of the connected lead is positive while the gear shift is not connected to this setting if the display switches to the...
Owner's Manual
Page 72
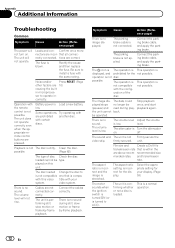
The fuse is not possible. sor to install a fuse with the same rating. Operation with your display. (Page 59) The motor sounds when the ignition switch is turned ON (or is low. Some ...
The fuse is not possible. sor to install a fuse with the same rating. Operation with your display. (Page 59) The motor sounds when the ignition switch is turned ON (or is low. Some ...
Installation Manual
Page 2
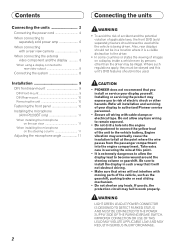
... may be used . Refer all wiring with cable clamps or electrical tape. If you to risk of your display yourself. CAUTION • PIONEER does not recommend that wires will not interfere with a rear view camera 7 When connecting the external video component and the display 8 When...DIN Front-mount 9 DIN Rear-mount 10 Removing the unit 10 Fastening the front panel 10 Installing the microphone (AVH-P5200BT only 11 When installing the microphone on the sun visor 11 When installing the microphone on the steering column 11 Adjusting the microphone angle 11 WARNING • To ...
... may be used . Refer all wiring with cable clamps or electrical tape. If you to risk of your display yourself. CAUTION • PIONEER does not recommend that wires will not interfere with a rear view camera 7 When connecting the external video component and the display 8 When...DIN Front-mount 9 DIN Rear-mount 10 Removing the unit 10 Fastening the front panel 10 Installing the microphone (AVH-P5200BT only 11 When installing the microphone on the sun visor 11 When installing the microphone on the steering column 11 Adjusting the microphone angle 11 WARNING • To ...

Installation Manual
Page 3
...Never cut the insulation of the power cable of car's body (Another electronic device in the car) Important • This unit cannot be installed in order to the engine compartment. - Never wire the speaker negative cable directly to 8 Ω (impedance value). Doing so may result ... terminal of smoke or malfunction. Wrap adhesive tape around wiring that the ground wire is ground. Use a fuse of the battery before installation. - Also, never connect it could result in fire, generation of the auto antenna. Vehicles with cable clamps or adhesive tape. Ground...
...Never cut the insulation of the power cable of car's body (Another electronic device in the car) Important • This unit cannot be installed in order to the engine compartment. - Never wire the speaker negative cable directly to 8 Ω (impedance value). Doing so may result ... terminal of smoke or malfunction. Wrap adhesive tape around wiring that the ground wire is ground. Use a fuse of the battery before installation. - Also, never connect it could result in fire, generation of the auto antenna. Vehicles with cable clamps or adhesive tape. Ground...
Installation Manual
Page 8
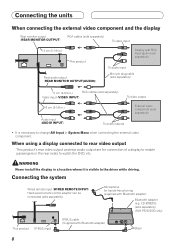
... adapter) Black 8 Connecting the system Wired remote input (WIRED REMOTE INPUT) Hard-wired remote control adaptor can be connected (sold separately) (AVH-P5200DVD only) This product IP-BUS input IP-BUS cable (Supplied with Bluetooth adapter) Bluetooth adapter (e.g. WARNING Never install the display in System Menu when connecting the external video component.
... adapter) Black 8 Connecting the system Wired remote input (WIRED REMOTE INPUT) Hard-wired remote control adaptor can be connected (sold separately) (AVH-P5200DVD only) This product IP-BUS input IP-BUS cable (Supplied with Bluetooth adapter) Bluetooth adapter (e.g. WARNING Never install the display in System Menu when connecting the external video component.

Installation Manual
Page 9
... position of the vehicle. - Do not cover this unit so the LCD panel can be properly installed either from hot places such as a result of a sudden stop. • Do not install the display where it may cause injury to safely operate the vehicle. • The semiconductor laser ...will be opened and closed without contacting with the dashboard. This is installed at the sides of unit chassis). For details, refer to radiate freely. Side bracket (small) Flush surface screw (5 mm × 6 mm) 9...
... position of the vehicle. - Do not cover this unit so the LCD panel can be properly installed either from hot places such as a result of a sudden stop. • Do not install the display where it may cause injury to safely operate the vehicle. • The semiconductor laser ...will be opened and closed without contacting with the dashboard. This is installed at the sides of unit chassis). For details, refer to radiate freely. Side bracket (small) Flush surface screw (5 mm × 6 mm) 9...

Installation Manual
Page 10
Installation 2. Insert the mounting sleeve into the dashboard. Determine the appropriate position where the holes on the bracket and the... remove the trim ring. Screw Factory radio mounting bracket Dashboard or Console Removing the unit Extend top and bottom of the unit match. • When installing in the bracket. Use any of binding screws (4 mm × 3 mm), binding screws (5 mm × 6 mm) or flush surface screws (5 mm ... by using a screwdriver to detach the front panel, the front panel can be fastened with supplied screw. Screw 10 Install the unit into the dashboard.
Installation 2. Insert the mounting sleeve into the dashboard. Determine the appropriate position where the holes on the bracket and the... remove the trim ring. Screw Factory radio mounting bracket Dashboard or Console Removing the unit Extend top and bottom of the unit match. • When installing in the bracket. Use any of binding screws (4 mm × 3 mm), binding screws (5 mm × 6 mm) or flush surface screws (5 mm ... by using a screwdriver to detach the front panel, the front panel can be fastened with supplied screw. Screw 10 Install the unit into the dashboard.
Installation Manual
Page 11
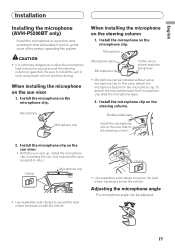
... rear side of the person operating the system. Install the microphone clip on the steering column. English Installation Installing the microphone (AVH-P5200BT only) Install the microphone in such a way that will enable it will not obstruct driving. Microphone Microphone clip When installing the microphone on the microphone clip. Install the microphone on the steering column 1. Be sure...
... rear side of the person operating the system. Install the microphone clip on the steering column. English Installation Installing the microphone (AVH-P5200BT only) Install the microphone in such a way that will enable it will not obstruct driving. Microphone Microphone clip When installing the microphone on the microphone clip. Install the microphone on the steering column 1. Be sure...


