Owner's Manual
Page 11
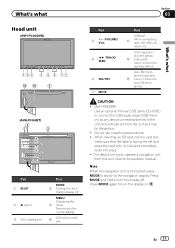
.../OFF 7 MUTE Part USB port b When connecting, open the USB connector lid. En 11 mation display off . CAUTION ! (AVH-P3300BT) Use an optional Pioneer USB cable (CD-U50E) to connect the USB audio player/USB memory as any device connected directly to the unit will protrude out... display off . Returning to connect an auto EQ microphone. Auto EQ microphone input jack d Use to the normal display. AUX input jack (3.5 mm stereo/ c video jack) Use to the navigation display. What's what Section 03 What's what Head unit (AVH-P4300DVD) da 3 (AVH-P3300BT) 2 1 3 4 5 7 6 c8ad9b Part...
.../OFF 7 MUTE Part USB port b When connecting, open the USB connector lid. En 11 mation display off . CAUTION ! (AVH-P3300BT) Use an optional Pioneer USB cable (CD-U50E) to connect the USB audio player/USB memory as any device connected directly to the unit will protrude out... display off . Returning to connect an auto EQ microphone. Auto EQ microphone input jack d Use to the normal display. AUX input jack (3.5 mm stereo/ c video jack) Use to the navigation display. What's what Section 03 What's what Head unit (AVH-P4300DVD) da 3 (AVH-P3300BT) 2 1 3 4 5 7 6 c8ad9b Part...
Owner's Manual
Page 59
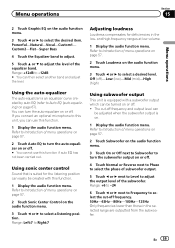
... can be adjusted when the subwoofer output is suited for deficiencies in the selected range are outputted from the subwoofer. If you connect an optional microphone to this unit, you can turn the subwoofer output on the audio function menu. 3 Touch c or d to select the desired item. The cut -off frequency...
... can be adjusted when the subwoofer output is suited for deficiencies in the selected range are outputted from the subwoofer. If you connect an optional microphone to this unit, you can turn the subwoofer output on the audio function menu. 3 Touch c or d to select the desired item. The cut -off frequency...
Owner's Manual
Page 68
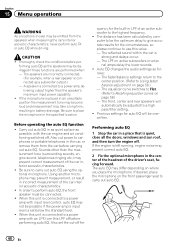
... interior acoustic characteristics. ! The speakers are performed when: - Also cut -off . In order to carry out auto EQ using the optional microphone. nal amps delay the lower sounds. ! The fader/balance settings return to the center position. (Refer to Using fader/ balance adjustment on...rear speaker is set the cut power to use this value. - Previous settings for auto EQ will automatically be connected. ! If desired, place the microphone on page 58.) - CAUTION ! Be sure to a high pass filter setting. ! Sounds other than the speaker's maximum input power capability. ! Be...
... interior acoustic characteristics. ! The speakers are performed when: - Also cut -off . In order to carry out auto EQ using the optional microphone. nal amps delay the lower sounds. ! The fader/balance settings return to the center position. (Refer to Using fader/ balance adjustment on...rear speaker is set the cut power to use this value. - Previous settings for auto EQ will automatically be connected. ! If desired, place the microphone on page 58.) - CAUTION ! Be sure to a high pass filter setting. ! Sounds other than the speaker's maximum input power capability. ! Be...
Owner's Manual
Page 69
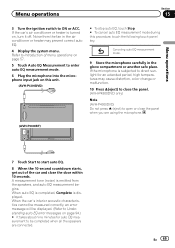
...cause distortion, color change or malfunction. 10 Press h(eject) to close the panel. (AVH-P4300DVD only) Note (AVH-P4300DVD) Do not press h (eject) to enter auto EQ measurement mode. 6 Plug the microphone into the microphone input jack on , turn it off. A measurement tone (noise) is displayed. When ...the car's interior acoustic characteristics cannot be measured correctly, an error message will be completed when all the speakers are using the microphone. (AVH-P3300BT) 7 Touch Start to start auto EQ. 8 When the 10-second countdown starts, get out of menu operations on page 57. 5...
...cause distortion, color change or malfunction. 10 Press h(eject) to close the panel. (AVH-P4300DVD only) Note (AVH-P4300DVD) Do not press h (eject) to enter auto EQ measurement mode. 6 Plug the microphone into the microphone input jack on , turn it off. A measurement tone (noise) is displayed. When ...the car's interior acoustic characteristics cannot be measured correctly, an error message will be completed when all the speakers are using the microphone. (AVH-P3300BT) 7 Touch Start to start auto EQ. 8 When the 10-second countdown starts, get out of menu operations on page 57. 5...
Owner's Manual
Page 75
...In some countries or states the viewing of your display unit yourself. Refer all wiring with cable clamps or electrical tape. Do not allow the microphone lead to metal parts of the vehicle, such as the gearshift, parking brake or seat sliding mechanism. ! It is properly connected to become ... over 50 W (output value) and between 4 W to the car separately with moving parts of the car's body. The black cable is being driven. PIONEER does not recommend that cables will not obstruct driving. ! Engine vibration may fail to remain exposed. ! Do not use 1 W to authorized...
...In some countries or states the viewing of your display unit yourself. Refer all wiring with cable clamps or electrical tape. Do not allow the microphone lead to metal parts of the vehicle, such as the gearshift, parking brake or seat sliding mechanism. ! It is properly connected to become ... over 50 W (output value) and between 4 W to the car separately with moving parts of the car's body. The black cable is being driven. PIONEER does not recommend that cables will not obstruct driving. ! Engine vibration may fail to remain exposed. ! Do not use 1 W to authorized...
Owner's Manual
Page 78
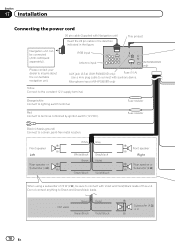
.../black Violet Violet/black Subwoofer (4 Ω) × 2 78 En RGB input Antenna input AUX jack (3.5 ø) (AVH-P4300DVD only) Fuse (10 A) Use a mini plug cable to connect with Navigation unit) Insert the 26 pin cable in the direction indicated in ... Rear speaker or Subwoofer (4 Ω) When using a subwoofer of 70 W (2 Ω), be connected (AVIC-U220(sold separately)). Microphone input (AVH-P3300BT only) (AVH-P4300DVD only) Yellow Connect to Green and Green/black leads. Do not connect anything to the constant 12 V supply terminal.
.../black Violet Violet/black Subwoofer (4 Ω) × 2 78 En RGB input Antenna input AUX jack (3.5 ø) (AVH-P4300DVD only) Fuse (10 A) Use a mini plug cable to connect with Navigation unit) Insert the 26 pin cable in the direction indicated in ... Rear speaker or Subwoofer (4 Ω) When using a subwoofer of 70 W (2 Ω), be connected (AVIC-U220(sold separately)). Microphone input (AVH-P3300BT only) (AVH-P4300DVD only) Yellow Connect to Green and Green/black leads. Do not connect anything to the constant 12 V supply terminal.
Owner's Manual
Page 79
... supply side Ground side Blue/white Connect to the back lamp, connect the one in which the voltage changes when the gear shift is in .) Microphone (AVH-P3300BT only) Wired remote input Hard-wired remote control adaptor can be connected to the Audio Mute lead on the vehicle model. Note: · Change the...
... supply side Ground side Blue/white Connect to the back lamp, connect the one in which the voltage changes when the gear shift is in .) Microphone (AVH-P3300BT only) Wired remote input Hard-wired remote control adaptor can be connected to the Audio Mute lead on the vehicle model. Note: · Change the...
Owner's Manual
Page 81
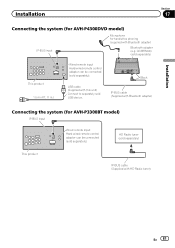
.... USB cable (Supplied with HD Radio tuner) En 81 Installation Section 17 Connecting the system (for AVH-P4300DVD model) IP-BUS input Microphone for hands-free phoning (supplied with Bluetooth adapter) Installation Connecting the system (for AVH-P3300BT model) IP-BUS input Wired remote input Hard-wired remote control adaptor can be connected (sold...
.... USB cable (Supplied with HD Radio tuner) En 81 Installation Section 17 Connecting the system (for AVH-P4300DVD model) IP-BUS input Microphone for hands-free phoning (supplied with Bluetooth adapter) Installation Connecting the system (for AVH-P3300BT model) IP-BUS input Wired remote input Hard-wired remote control adaptor can be connected (sold...
Owner's Manual
Page 82
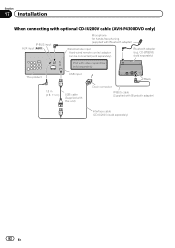
CD-BTB200) (sold separately) iPod with video capabilities (sold separately) This product USB input Black 1.5 m (4 ft. 11 in.) USB cable (Supplied with this unit) Dock connector IP-BUS cable (Supplied with Bluetooth adapter) Wired remote input Hard-wired remote control adaptor can be connected (sold separately) 82 En Section 17 Installation When connecting with optional CD-IU200V cable (AVH-P4300DVD only) IP-BUS input AUX input (AUX) Microphone for hands-free phoning (supplied with Bluetooth adapter) Interface cable (CD-IU200V) (sold separately). Bluetooth adapter (e.g.
CD-BTB200) (sold separately) iPod with video capabilities (sold separately) This product USB input Black 1.5 m (4 ft. 11 in.) USB cable (Supplied with this unit) Dock connector IP-BUS cable (Supplied with Bluetooth adapter) Wired remote input Hard-wired remote control adaptor can be connected (sold separately) 82 En Section 17 Installation When connecting with optional CD-IU200V cable (AVH-P4300DVD only) IP-BUS input AUX input (AUX) Microphone for hands-free phoning (supplied with Bluetooth adapter) Interface cable (CD-IU200V) (sold separately). Bluetooth adapter (e.g.
Owner's Manual
Page 86
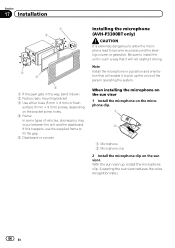
...unit and the dashboard. If this happens, use the supplied frame to fill the gap. 5 Dashboard or console Installing the microphone (AVH-P3300BT only) CAUTION It is extremely dangerous to allow the microphone lead to install the unit in such a way that will not obstruct driving. Note Install the... microphone in a position and orientation that it will enable it to pick up , install the microphone clip. (Lowering the sun visor reduces the voice recognition rate.) 86 En Section 17 Installation 1 2 3 4 5 ...
...unit and the dashboard. If this happens, use the supplied frame to fill the gap. 5 Dashboard or console Installing the microphone (AVH-P3300BT only) CAUTION It is extremely dangerous to allow the microphone lead to install the unit in such a way that will not obstruct driving. Note Install the... microphone in a position and orientation that it will enable it to pick up , install the microphone clip. (Lowering the sun visor reduces the voice recognition rate.) 86 En Section 17 Installation 1 2 3 4 5 ...

Owner's Manual
Page 87
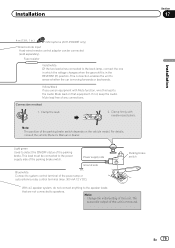
... can be adjusted. To detach the microphone base from the microphone clip. Installation 1 Section 17 2 Install the microphone clip on the microphone clip. 1 2 3 4 1 Microphone 2 Microphone base 3 Microphone clip 4 Fit the microphone lead into the groove. # Microphone can be installed without using microphone clip. In this case, detach the microphone base from the microphone clip, slide the microphone base. 2 1 Double-sided tape 2 Clamp Use...
... can be adjusted. To detach the microphone base from the microphone clip. Installation 1 Section 17 2 Install the microphone clip on the microphone clip. 1 2 3 4 1 Microphone 2 Microphone base 3 Microphone clip 4 Fit the microphone lead into the groove. # Microphone can be installed without using microphone clip. In this case, detach the microphone base from the microphone clip, slide the microphone base. 2 1 Double-sided tape 2 Clamp Use...
Owner's Manual
Page 94
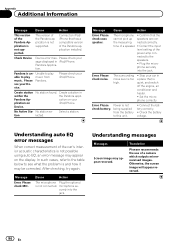
... compatible version of the Pandora application installed. curely into the jack. Create station No station found. No Active Sta- Plug the microphone securely into the jack. Understanding auto EQ error messages When correct measurement of the power amp connected to this unit. ! Message Error...interior acoustic characteristics is not possible using auto EQ, an error message may appear on iPod/iPhone. Please check battery. Translation Pioneer recommends the use of the Pandora application is and how it may appear reversed. This version of a camera which outputs ...
... compatible version of the Pandora application installed. curely into the jack. Create station No station found. No Active Sta- Plug the microphone securely into the jack. Understanding auto EQ error messages When correct measurement of the power amp connected to this unit. ! Message Error...interior acoustic characteristics is not possible using auto EQ, an error message may appear on iPod/iPhone. Please check battery. Translation Pioneer recommends the use of the Pandora application is and how it may appear reversed. This version of a camera which outputs ...


