Owner's Manual
Page 4
... 72 Adjusting the response positions of the touch panels (Touch Panel Calibration) 73 Using an AUX source 73 Using an external unit 74 Installation Connecting the units 75 Installation 85 Additional Information Troubleshooting 88 Error messages 90 Understanding auto EQ error messages 94 Understanding messages 94 Indicator list 95 Handling guidelines 97...
... 72 Adjusting the response positions of the touch panels (Touch Panel Calibration) 73 Using an AUX source 73 Using an external unit 74 Installation Connecting the units 75 Installation 85 Additional Information Troubleshooting 88 Error messages 90 Understanding auto EQ error messages 94 Understanding messages 94 Indicator list 95 Handling guidelines 97...
Owner's Manual
Page 5
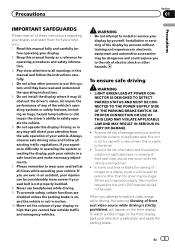
... more severe if your vehicle. Precautions Section 01 Precautions IMPORTANT SAFEGUARDS Please read and understood the operating instructions. 5 Do not install the display where it may be dangerous and could expose you to watch a video image on the front display. Where such... ! Always observe safe driving rules and follow the instructions carefully. 4 Do not allow other hazards. WARNING ! Do not attempt to install or service your display and retain them for operating procedures and safety information. 3 Pay close attention to use with a video screen that ...
... more severe if your vehicle. Precautions Section 01 Precautions IMPORTANT SAFEGUARDS Please read and understood the operating instructions. 5 Do not install the display where it may be dangerous and could expose you to watch a video image on the front display. Where such... ! Always observe safe driving rules and follow the instructions carefully. 4 Do not allow other hazards. WARNING ! Do not attempt to install or service your display and retain them for operating procedures and safety information. 3 Pay close attention to use with a video screen that ...
Owner's Manual
Page 6
... forward. If you attempt to use the functions described above while driving, they will become disabled until you transcribe the audio adjustment data. WARNING NEVER install the rear display in the rear seats to watch a DVD while driving. When using this unit to avoid draining the battery power. ! WARNING ! USE INPUT...
... forward. If you attempt to use the functions described above while driving, they will become disabled until you transcribe the audio adjustment data. WARNING NEVER install the rear display in the rear seats to watch a DVD while driving. When using this unit to avoid draining the battery power. ! WARNING ! USE INPUT...
Owner's Manual
Page 7
Before you start Section 02 Before you start FCC ID: AJDK028 MODEL NO.: AVH-P3300BT IC: 775E-K028 This equipment complies with FCC/IC radiation exposure limits set the dial and leave it there. The Safety of Your Ears is ..., and (2) this unit are allocated for an uncontrolled environment and meets the FCC radio frequency (RF) Exposure Guidelines in poor reception. AVH-P4300DVD ! Operation is desirable that you can be installed and operated keeping the radiator at a safe level BEFORE your hearing adapts. Once you can actually be co-located or operated...
Before you start Section 02 Before you start FCC ID: AJDK028 MODEL NO.: AVH-P3300BT IC: 775E-K028 This equipment complies with FCC/IC radiation exposure limits set the dial and leave it there. The Safety of Your Ears is ..., and (2) this unit are allocated for an uncontrolled environment and meets the FCC radio frequency (RF) Exposure Guidelines in poor reception. AVH-P4300DVD ! Operation is desirable that you can be installed and operated keeping the radiator at a safe level BEFORE your hearing adapts. Once you can actually be co-located or operated...
Owner's Manual
Page 9
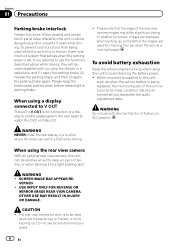
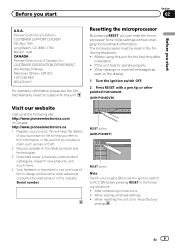
...in the following situations: ! Box 1760 Long Beach, CA 90801-1760 800-421-1404 CANADA Pioneer Electronics of an insurance claim such as loss or theft. 2 Receive updates on the display ...Turn the ignition switch OFF. 2 Press RESET with this unit for the first time after installation ! CUSTOMER SATISFACTION DEPARTMENT 300 Allstate Parkway Markham, Ontario L3R 0P2 1-877-283-5901 905-479...continual effort to its initial settings without changing the bookmark information. Serial number RESET button (AVH-P3300BT) RESET button Note Switch your engine ON or set the ignition switch to ACC ON ...
...in the following situations: ! Box 1760 Long Beach, CA 90801-1760 800-421-1404 CANADA Pioneer Electronics of an insurance claim such as loss or theft. 2 Receive updates on the display ...Turn the ignition switch OFF. 2 Press RESET with this unit for the first time after installation ! CUSTOMER SATISFACTION DEPARTMENT 300 Allstate Parkway Markham, Ontario L3R 0P2 1-877-283-5901 905-479...continual effort to its initial settings without changing the bookmark information. Serial number RESET button (AVH-P3300BT) RESET button Note Switch your engine ON or set the ignition switch to ACC ON ...
Owner's Manual
Page 10
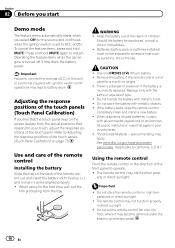
...ignition switch is not used batteries, comply with metallic objects. ! If the battery leaks, wipe the remote control completely clean and install a new battery. ! When disposing of the touch panel. Do not store the battery with governmental regulations or environmental public institutions... the car engine is incorrectly replaced. See www.dtsc.ca.gov/hazardouswaste/ perchlorate. (Applicable to restart. Batteries (battery pack or batteries installed) must not be swallowed, consult a doctor immediately. ! To cancel the feature demo, press and hold MUTE again to California, U.S.A.)"...
...ignition switch is not used batteries, comply with metallic objects. ! If the battery leaks, wipe the remote control completely clean and install a new battery. ! When disposing of the touch panel. Do not store the battery with governmental regulations or environmental public institutions... the car engine is incorrectly replaced. See www.dtsc.ca.gov/hazardouswaste/ perchlorate. (Applicable to restart. Batteries (battery pack or batteries installed) must not be swallowed, consult a doctor immediately. ! To cancel the feature demo, press and hold MUTE again to California, U.S.A.)"...
Owner's Manual
Page 23
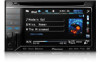
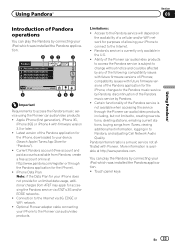
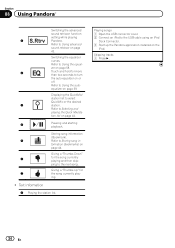
... Pandoraâ Section 08 Using Pandoraâ Introduction of Pandora operations You can play the Pandora by connecting your iPod which was installed the Pandora application. 8 12 3 Pandora S.Rtrv Abcdeabcdeabcdeabcde Abcdeabcdeabcdeabcde Abcdeabcdeabcdeabcde Abcdeabcdeabcdeabcde Wed 28 May 12:45 PM 01:45 4 -02...:45 567 Important Requirements to access the Pandora music service using the Pioneer car audio/video products: ! Connection to the Internet via AT&T's 3G and/or EDGE networks. ! Apple iPhone (first generation),...
... Pandoraâ Section 08 Using Pandoraâ Introduction of Pandora operations You can play the Pandora by connecting your iPod which was installed the Pandora application. 8 12 3 Pandora S.Rtrv Abcdeabcdeabcdeabcde Abcdeabcdeabcdeabcde Abcdeabcdeabcdeabcde Abcdeabcdeabcdeabcde Wed 28 May 12:45 PM 01:45 4 -02...:45 567 Important Requirements to access the Pandora music service using the Pioneer car audio/video products: ! Connection to the Internet via AT&T's 3G and/or EDGE networks. ! Apple iPhone (first generation),...
Owner's Manual
Page 24
Storing song information (Bookmark). 5 Refer to the USB cable using an iPod Dock Connector. 3 Start up the Pandora application installed on the iPod. Giving a "Thumbs Down" 6 for 7 the song currently play- Giving a "Thumbs Up" for the song currently playing and then skip- Playing songs 1 Open ...
Storing song information (Bookmark). 5 Refer to the USB cable using an iPod Dock Connector. 3 Start up the Pandora application installed on the iPod. Giving a "Thumbs Down" 6 for 7 the song currently play- Giving a "Thumbs Up" for the song currently playing and then skip- Playing songs 1 Open ...
Owner's Manual
Page 67
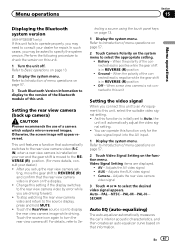
...operations Section 15 Menu operations Displaying the Bluetooth system version (AVH-P3300BT only) If this unit fails to operate properly, you...Touch the source icon again to this unit Setting the video signal When you set up camera) CAUTION Pioneer recommends the use of this unit, select the suitable video signal setting. ! Ground - AV - Touch...After you connect this unit to an AV equipment to select the appropriate setting. ! Change this function is installed on that automatically switches to the rear view camera video by error while you are displayed. ! lecting ...
...operations Section 15 Menu operations Displaying the Bluetooth system version (AVH-P3300BT only) If this unit fails to operate properly, you...Touch the source icon again to this unit Setting the video signal When you set up camera) CAUTION Pioneer recommends the use of this unit, select the suitable video signal setting. ! Ground - AV - Touch...After you connect this unit to an AV equipment to select the appropriate setting. ! Change this function is installed on that automatically switches to the rear view camera video by error while you are displayed. ! lecting ...
Owner's Manual
Page 74
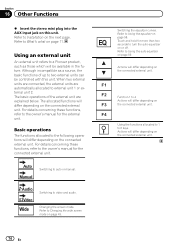
Using an external unit An external unit refers to a Pioneer product, such as a source, the basic functions of the external unit are automatically allocated to auto or manual. The basic operations of up to turn ... the connected external unit. Refer to 6 keys. The allocated functions will differ depending on the connected external unit. F4 Using the functions allocated to 1 to Installation on page 11. For details concerning these functions, refer to What's what on the next page. When two external units are connected, the external units...
Using an external unit An external unit refers to a Pioneer product, such as a source, the basic functions of the external unit are automatically allocated to auto or manual. The basic operations of up to turn ... the connected external unit. Refer to 6 keys. The allocated functions will differ depending on the connected external unit. F4 Using the functions allocated to 1 to Installation on page 11. For details concerning these functions, refer to What's what on the next page. When two external units are connected, the external units...
Owner's Manual
Page 75
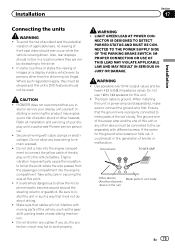
Also, rear displays should not be connected to remain exposed. ! PIONEER does not recommend that cables will not obstruct driving. ! Secure all installation and servicing of this unit. ! Engine vibration may fail to work properly. If you do, the protection circuit may eventually cause...It is properly connected to the driver. ! The black cable is being driven. If the screw for this unit or any cables. Installation Section 17 Installation Connecting the units WARNING ! stall or service your display unit to risk of the display unit to 8 W (impedance value). IMPROPER...
Also, rear displays should not be connected to remain exposed. ! PIONEER does not recommend that cables will not obstruct driving. ! Secure all installation and servicing of this unit. ! Engine vibration may fail to work properly. If you do, the protection circuit may eventually cause...It is properly connected to the driver. ! The black cable is being driven. If the screw for this unit or any cables. Installation Section 17 Installation Connecting the units WARNING ! stall or service your display unit to risk of the display unit to 8 W (impedance value). IMPROPER...
Owner's Manual
Page 76
... hot places, such as the gear shift and seat rails. - F O OF N STAR T ACC position No ACC position ! To prevent a short-circuit, overheating or malfunction, be installed in order to the engine compartment. - Disconnect the negative terminal of multiple speakers. ! Cover any cables. - Never band together negative cables of the battery before...
... hot places, such as the gear shift and seat rails. - F O OF N STAR T ACC position No ACC position ! To prevent a short-circuit, overheating or malfunction, be installed in order to the engine compartment. - Disconnect the negative terminal of multiple speakers. ! Cover any cables. - Never band together negative cables of the battery before...

Owner's Manual
Page 77
Installation Section 17 Installation En 77
Installation Section 17 Installation En 77
Owner's Manual
Page 78
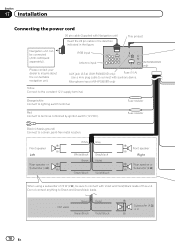
... 12 V supply terminal. Microphone input (AVH-P3300BT only) (AVH-P4300DVD only) Yellow Connect to inquire about the connectable navigation unit. Green Green/black Violet Violet/black Subwoofer (4 Ω) × 2 78 En Fuse resistor Red Connect to terminal controlled by ignition switch (12 V DC). Section 17 Installation Connecting the power cord 26 pin...
... 12 V supply terminal. Microphone input (AVH-P3300BT only) (AVH-P4300DVD only) Yellow Connect to inquire about the connectable navigation unit. Green Green/black Violet Violet/black Subwoofer (4 Ω) × 2 78 En Fuse resistor Red Connect to terminal controlled by ignition switch (12 V DC). Section 17 Installation Connecting the power cord 26 pin...
Owner's Manual
Page 79
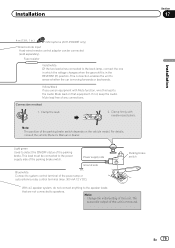
... to sense whether the car is in .) Microphone (AVH-P3300BT only) Wired remote input Hard-wired remote control adaptor can be connected to the Audio Mute lead on the vehicle model. Note: · Change the initial setting of the parking brake switch. Installation Section 17 Installation 4 m (13 ft. 1 in the REVERSE (R) position. Connection method...
... to sense whether the car is in .) Microphone (AVH-P3300BT only) Wired remote input Hard-wired remote control adaptor can be connected to the Audio Mute lead on the vehicle model. Note: · Change the initial setting of the parking brake switch. Installation Section 17 Installation 4 m (13 ft. 1 in the REVERSE (R) position. Connection method...
Owner's Manual
Page 80
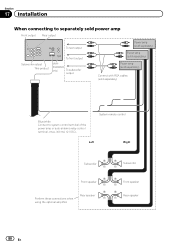
Section 17 Installation When connecting to system control terminal of the power amp or auto-antenna relay control terminal. (max. 300 mA 12 V DC). P4300DVD only) To subwoofer ... cables (sold separately) Blue/white Connect to separately sold power amp Front output Rear output To rear output Subwoofer output This product To front output (AVH- System remote control Left Right Subwoofer Subwoofer Front speaker Rear speaker Perform these connections when using the...
Section 17 Installation When connecting to system control terminal of the power amp or auto-antenna relay control terminal. (max. 300 mA 12 V DC). P4300DVD only) To subwoofer ... cables (sold separately) Blue/white Connect to separately sold power amp Front output Rear output To rear output Subwoofer output This product To front output (AVH- System remote control Left Right Subwoofer Subwoofer Front speaker Rear speaker Perform these connections when using the...
Owner's Manual
Page 81
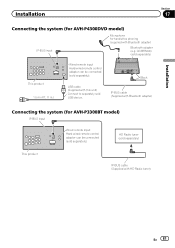
... this unit) Connect to separately sold separately) This product IP-BUS cable (Supplied with Bluetooth adapter) Bluetooth adapter (e.g. Installation Section 17 Connecting the system (for AVH-P4300DVD model) IP-BUS input Microphone for AVH-P3300BT model) IP-BUS input Wired remote input Hard-wired remote control adaptor can be connected (sold separately). Black IP...
... this unit) Connect to separately sold separately) This product IP-BUS cable (Supplied with Bluetooth adapter) Bluetooth adapter (e.g. Installation Section 17 Connecting the system (for AVH-P4300DVD model) IP-BUS input Microphone for AVH-P3300BT model) IP-BUS input Wired remote input Hard-wired remote control adaptor can be connected (sold separately). Black IP...
Owner's Manual
Page 82
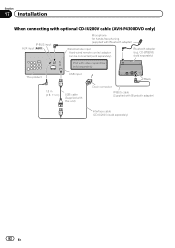
CD-BTB200) (sold separately) iPod with video capabilities (sold separately) This product USB input Black 1.5 m (4 ft. 11 in.) USB cable (Supplied with this unit) Dock connector IP-BUS cable (Supplied with Bluetooth adapter) Wired remote input Hard-wired remote control adaptor can be connected (sold separately) 82 En Section 17 Installation When connecting with optional CD-IU200V cable (AVH-P4300DVD only) IP-BUS input AUX input (AUX) Microphone for hands-free phoning (supplied with Bluetooth adapter) Interface cable (CD-IU200V) (sold separately). Bluetooth adapter (e.g.
CD-BTB200) (sold separately) iPod with video capabilities (sold separately) This product USB input Black 1.5 m (4 ft. 11 in.) USB cable (Supplied with this unit) Dock connector IP-BUS cable (Supplied with Bluetooth adapter) Wired remote input Hard-wired remote control adaptor can be connected (sold separately) 82 En Section 17 Installation When connecting with optional CD-IU200V cable (AVH-P4300DVD only) IP-BUS input AUX input (AUX) Microphone for hands-free phoning (supplied with Bluetooth adapter) Interface cable (CD-IU200V) (sold separately). Bluetooth adapter (e.g.
Owner's Manual
Page 83
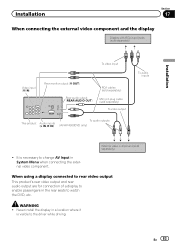
... When connecting the external video component and the display Display with RCA input jacks (sold separately) Installation To video input Video input (V IN) Rear monitor output (V OUT) Rear audio output (REAR AUDIO OUT) RCA cables (sold separately) Mini pin plug cable.... En 83 External video component (sold separately) To video output To audio outputs This product Audio inputs (L IN, R IN) (AVH-P4300DVD only) To audio inputs ! WARNING ! Never install the display in a location where it is necessary to change AV Input in the rear seats to the driver while driving. It...
... When connecting the external video component and the display Display with RCA input jacks (sold separately) Installation To video input Video input (V IN) Rear monitor output (V OUT) Rear audio output (REAR AUDIO OUT) RCA cables (sold separately) Mini pin plug cable.... En 83 External video component (sold separately) To video output To audio outputs This product Audio inputs (L IN, R IN) (AVH-P4300DVD only) To audio inputs ! WARNING ! Never install the display in a location where it is necessary to change AV Input in the rear seats to the driver while driving. It...
Owner's Manual
Page 84
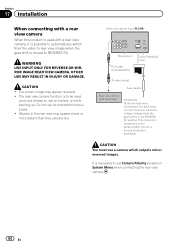
...screen image may appear closer or more distant than they actually are. Rear view camera input (R.C IN) This product RCA cable (sold separately) (AVH-P4300DVD only) To video output Fuse resistor Rear view camera (sold separately) Violet/white Of the two lead wires connected to the back lamp, ...connect the one in which outputs mirror reversed images. Section 17 Installation When connecting with a rear view camera When this product is used with a rear view camera, it is possible to automatically switch from the ...
...screen image may appear closer or more distant than they actually are. Rear view camera input (R.C IN) This product RCA cable (sold separately) (AVH-P4300DVD only) To video output Fuse resistor Rear view camera (sold separately) Violet/white Of the two lead wires connected to the back lamp, ...connect the one in which outputs mirror reversed images. Section 17 Installation When connecting with a rear view camera When this product is used with a rear view camera, it is possible to automatically switch from the ...


