
Owner's Manual
Page 11
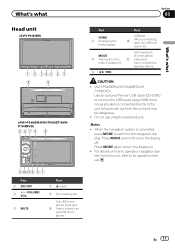
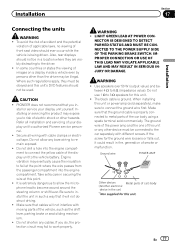
... system from the unit and may be dangerous. ! Do not use unauthorized products. En 11 CAUTION ! (AVH-P3400BH/AVH-P2400BT/AVHP1400DVD) Use an optional Pioneer USB cable (CD-U50E) to connect the USB audio player/USB memory as any device connected directly to connect...HOME 4 Displaying the home display. What's what Section 03 What's what Head unit (AVH-P4400BH) 1 2 345 6 7 9 8 (AVH-P3400BH/AVH-P2400BT/AVHP1400DVD) 267 4 8 3ab9 5 1 Part 1 SRC/OFF 2 +/- (VOLUME/ VOL) 3 MUTE Part 7 h (eject) 8 Disc loading slot Auto EQ microphone input jack 9 Use to connect an auto EQ...
... system from the unit and may be dangerous. ! Do not use unauthorized products. En 11 CAUTION ! (AVH-P3400BH/AVH-P2400BT/AVHP1400DVD) Use an optional Pioneer USB cable (CD-U50E) to connect the USB audio player/USB memory as any device connected directly to connect...HOME 4 Displaying the home display. What's what Section 03 What's what Head unit (AVH-P4400BH) 1 2 345 6 7 9 8 (AVH-P3400BH/AVH-P2400BT/AVHP1400DVD) 267 4 8 3ab9 5 1 Part 1 SRC/OFF 2 +/- (VOLUME/ VOL) 3 MUTE Part 7 h (eject) 8 Disc loading slot Auto EQ microphone input jack 9 Use to connect an auto EQ...
Owner's Manual
Page 58
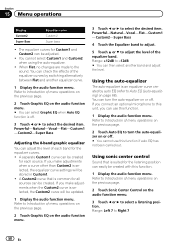
... EQ on the audio function menu. 3 Touch c or d to the sound. You can check the effects of the equalizer band. If you connect an optional microphone to adjust the level of the equalizer curves by auto EQ (refer to Right 7 58 En If you make adjustments when the Custom2 curve is...
... EQ on the audio function menu. 3 Touch c or d to the sound. You can check the effects of the equalizer band. If you connect an optional microphone to adjust the level of the equalizer curves by auto EQ (refer to Right 7 58 En If you make adjustments when the Custom2 curve is...
Owner's Manual
Page 69
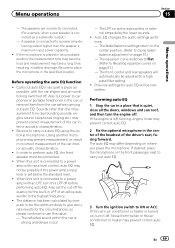
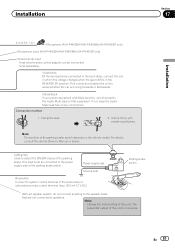
...57.) - Auto EQ changes the audio settings as possible, with input level control, auto EQ may not be adjusted to place the microphone in an unsuitable position the measurement tone may become loud and measurement may prevent correct measurement of the driver's seat, facing forward. ... may prevent measurement, or result in a place that is connected to Using fader/ balance adjustment on where you place the microphone. If desired, place the microphone on , turn the engine off frequency for the circumstances, so please continue to give accurate results for the built-in battery...
...57.) - Auto EQ changes the audio settings as possible, with input level control, auto EQ may not be adjusted to place the microphone in an unsuitable position the measurement tone may become loud and measurement may prevent correct measurement of the driver's seat, facing forward. ... may prevent measurement, or result in a place that is connected to Using fader/ balance adjustment on where you place the microphone. If desired, place the microphone on , turn the engine off frequency for the circumstances, so please continue to give accurate results for the built-in battery...
Owner's Manual
Page 70
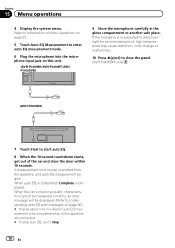
... the 10-second countdown starts, get out of the car and close the panel. (AVH-P4400BH only) (AVH-P4400BH) 7 Touch Start to be displayed. (Refer to Understanding auto EQ error messages on this unit. (AVH-P3400BH/AVH-P2400BT/AVHP1400DVD) 9 Store the microphone carefully in the glove compartment or another safe place. A measurement tone (noise) is displayed...
... the 10-second countdown starts, get out of the car and close the panel. (AVH-P4400BH only) (AVH-P4400BH) 7 Touch Start to be displayed. (Refer to Understanding auto EQ error messages on this unit. (AVH-P3400BH/AVH-P2400BT/AVHP1400DVD) 9 Store the microphone carefully in the glove compartment or another safe place. A measurement tone (noise) is displayed...
Owner's Manual
Page 77
...in securing the wire at the point where the wire passes from the passenger compartment into the engine compartment to authorized Pioneer service personnel. ! WARNING ! Use speakers over 50 W (output value) and between 4 W to remain exposed....wire loosens or falls out, it will not interfere with different screws. The black cable is being driven. PIONEER does not recommend that the ground cable is extremely dangerous to allow any cables. Engine vibration may eventually cause... sure that you to work properly. Do not allow the microphone lead to fail at this point. !
...in securing the wire at the point where the wire passes from the passenger compartment into the engine compartment to authorized Pioneer service personnel. ! WARNING ! Use speakers over 50 W (output value) and between 4 W to remain exposed....wire loosens or falls out, it will not interfere with different screws. The black cable is being driven. PIONEER does not recommend that the ground cable is extremely dangerous to allow any cables. Engine vibration may eventually cause... sure that you to work properly. Do not allow the microphone lead to fail at this point. !
Owner's Manual
Page 81
... two lead wires connected to the back lamp, connect the one in which the voltage changes when the gear shift is in .) Microphone (AVH-P4400BH/AVH-P3400BH/AVH-P2400BT only) Microphone input (AVH-P4400BH/AVH-P3400BH/AVH-P2400BT only) Wired remote input Hard-wired remote control adaptor can be connected to system control terminal of the power amp or auto...
... two lead wires connected to the back lamp, connect the one in which the voltage changes when the gear shift is in .) Microphone (AVH-P4400BH/AVH-P3400BH/AVH-P2400BT only) Microphone input (AVH-P4400BH/AVH-P3400BH/AVH-P2400BT only) Wired remote input Hard-wired remote control adaptor can be connected to system control terminal of the power amp or auto...
Owner's Manual
Page 83
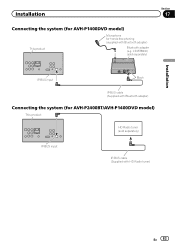
CD-BTB200) (sold separately) IP-BUS input IP-BUS cable (Supplied with Bluetooth adapter) Bluetooth adapter (e.g. Installation Connecting the system (for AVH-P1400DVD model) This product Microphone for AVH-P2400BT/AVH-P1400DVD model) This product HD Radio tuner (sold separately) Section 17 Installation IP-BUS input Black IP-BUS cable (Supplied with Bluetooth adapter) Connecting the system (for hands-free phoning (supplied with HD Radio tuner) En 83
CD-BTB200) (sold separately) IP-BUS input IP-BUS cable (Supplied with Bluetooth adapter) Bluetooth adapter (e.g. Installation Connecting the system (for AVH-P1400DVD model) This product Microphone for AVH-P2400BT/AVH-P1400DVD model) This product HD Radio tuner (sold separately) Section 17 Installation IP-BUS input Black IP-BUS cable (Supplied with Bluetooth adapter) Connecting the system (for hands-free phoning (supplied with HD Radio tuner) En 83

Owner's Manual
Page 88
... or console Installing the microphone (For AVH-P4400BH/AVH-P3400BH/ AVH-P2400BT model) CAUTION It is extremely dangerous to allow the microphone lead to become wound around the steering column or shift lever. When installing the microphone on the sun visor 1 Install the microphone on the microphone clip. 1 2 1 Microphone 2 Microphone clip 2 Install the microphone clip on the bracket ... and the dashboard. Section 17 Installation 1 2 3 4 5 1 If the pawl gets in the way, bend it to pick up , install the microphone clip. (Lowering the sun visor reduces the voice recognition rate.) 88 En
... or console Installing the microphone (For AVH-P4400BH/AVH-P3400BH/ AVH-P2400BT model) CAUTION It is extremely dangerous to allow the microphone lead to become wound around the steering column or shift lever. When installing the microphone on the sun visor 1 Install the microphone on the microphone clip. 1 2 1 Microphone 2 Microphone clip 2 Install the microphone clip on the bracket ... and the dashboard. Section 17 Installation 1 2 3 4 5 1 If the pawl gets in the way, bend it to pick up , install the microphone clip. (Lowering the sun visor reduces the voice recognition rate.) 88 En

Owner's Manual
Page 89
... 2 Clamp Use separately sold clamps to secure the lead where necessary inside the vehicle. To detach the microphone base from the microphone clip. In this case, detach the microphone base from the microphone clip, slide the microphone base. 2 1 Double-sided tape 2 Clamp Use separately sold clamps to secure the lead where necessary inside the vehicle...
... 2 Clamp Use separately sold clamps to secure the lead where necessary inside the vehicle. To detach the microphone base from the microphone clip. In this case, detach the microphone base from the microphone clip, slide the microphone base. 2 1 Double-sided tape 2 Clamp Use separately sold clamps to secure the lead where necessary inside the vehicle...

Owner's Manual
Page 96
... supplied from music. Understanding auto EQ error messages When correct measurement of a camera which outputs mirrorreversed images. After checking, try again. Plug the microphone securely into the jack. Translation Pioneer recommends the use of the car's interior acoustic characteristics is too high. ! Device. Check the battery voltage. cation on your Device. tion...
... supplied from music. Understanding auto EQ error messages When correct measurement of a camera which outputs mirrorreversed images. After checking, try again. Plug the microphone securely into the jack. Translation Pioneer recommends the use of the car's interior acoustic characteristics is too high. ! Device. Check the battery voltage. cation on your Device. tion...


