Owner's Manual
Page 7
... the previous still/moving picture in the event of the unit to remove dust build-up by using the still picture mode from a TV, VCR, DVD player or any still image, it is strongly recommended. For the minimum space required around the unit, see page 17...in instability, and could result in order to mount or install the plasma display, in possible malfunction. This product should not be placed in the future during the recycling process. This improves the color/picture reproduction of the Pioneer PDP-6010FD/PDP-5010FD plasma display will automatically power off in color filter ...
... the previous still/moving picture in the event of the unit to remove dust build-up by using the still picture mode from a TV, VCR, DVD player or any still image, it is strongly recommended. For the minimum space required around the unit, see page 17...in instability, and could result in order to mount or install the plasma display, in possible malfunction. This product should not be placed in the future during the recycling process. This improves the color/picture reproduction of the Pioneer PDP-6010FD/PDP-5010FD plasma display will automatically power off in color filter ...
Owner's Manual
Page 9
...depends on the luminance of time. Note • When a program menu, TV Guide screen or frozen image is completed. Image Retention When a static image is automatically changed imperceptibly when watching plasma display. Although caused by watching moving images are as follows: Do not ... retention can remain. Minimizing damage from PC or TV game equipment, and/or fixed images such as image retention, can be temporary or permanent. FOLLOW THE MANUFACTURER'S INSTRUCTIONS WHEN INSTALLING THE PRODUCT AND USE MOUNTING ACCESSORIES RECOMMENDED BY THE MANUFACTURER. Displaying dark images ...
...depends on the luminance of time. Note • When a program menu, TV Guide screen or frozen image is completed. Image Retention When a static image is automatically changed imperceptibly when watching plasma display. Although caused by watching moving images are as follows: Do not ... retention can remain. Minimizing damage from PC or TV game equipment, and/or fixed images such as image retention, can be temporary or permanent. FOLLOW THE MANUFACTURER'S INSTRUCTIONS WHEN INSTALLING THE PRODUCT AND USE MOUNTING ACCESSORIES RECOMMENDED BY THE MANUFACTURER. Displaying dark images ...
Owner's Manual
Page 10
... on a cart, it must be moved with impact. Do not use the product near water, such as the original parts. Use only the mounting hardware recommended by the manufacturer. In order to service the product yourself. Therefore, it . When a liquid was spilled on a wall or ceiling... replacement parts, make sure that the service person uses replacement parts specified by broken glass pieces in installation; The plasma display weighs about 66.2 kg (145.9 lbs.) for the PDP-6010FD (including the stand and speaker) and about 44.0 kg (97 lbs.) for ventilation. e. Sudden stops, excessive...
... on a cart, it must be moved with impact. Do not use the product near water, such as the original parts. Use only the mounting hardware recommended by the manufacturer. In order to service the product yourself. Therefore, it . When a liquid was spilled on a wall or ceiling... replacement parts, make sure that the service person uses replacement parts specified by broken glass pieces in installation; The plasma display weighs about 66.2 kg (145.9 lbs.) for the PDP-6010FD (including the stand and speaker) and about 44.0 kg (97 lbs.) for ventilation. e. Sudden stops, excessive...
Owner's Manual
Page 11
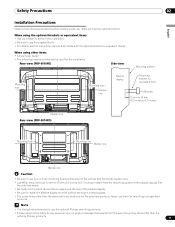
... of mounting items other than the optional Pioneer products. 11 En Safety Precautions 02 English Installation Precautions Observe the following mounting holes can be used only for the specified products. Note • It is strongly recommended to be used for the installation: Rear view (PDP-6010FD) Side view Mounting surface Mounting hole 4 5 Mounting hole Median line Plasma display Mounting bracket...
... of mounting items other than the optional Pioneer products. 11 En Safety Precautions 02 English Installation Precautions Observe the following mounting holes can be used only for the specified products. Note • It is strongly recommended to be used for the installation: Rear view (PDP-6010FD) Side view Mounting surface Mounting hole 4 5 Mounting hole Median line Plasma display Mounting bracket...
Owner's Manual
Page 12
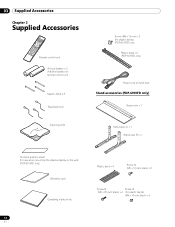
... × 3 Cleaning cloth Screw (M4 x 10 mm) x 2 (for plastic bands) (PDP-5010FD only) Plastic band x 2 (PDP-5010FD only) Power cord (2 m/6.6 feet) Stand accessories (PDP-6010FD only) Base cover x 1 Stand pipe (L) x 1 Stand pipe (R) x 1 Terminal position sheet (for use when mounting the plasma display on the wall) (PDP-6010FD only) Warranty card Operating instructions 12 En Plastic band x 4 Screw ➀...
... × 3 Cleaning cloth Screw (M4 x 10 mm) x 2 (for plastic bands) (PDP-5010FD only) Plastic band x 2 (PDP-5010FD only) Power cord (2 m/6.6 feet) Stand accessories (PDP-6010FD only) Base cover x 1 Stand pipe (L) x 1 Stand pipe (R) x 1 Terminal position sheet (for use when mounting the plasma display on the wall) (PDP-6010FD only) Warranty card Operating instructions 12 En Plastic band x 4 Screw ➀...
Owner's Manual
Page 18
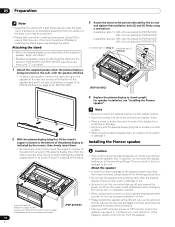
... when changing the connection or installation method. • When using a screwdriver. Attaching the stand • When the plasma display is mounted without the supplied speaker, begin with step 2. • Besides the speaker, steps for attaching the stand are the ...Pioneer speaker". Installing the Pioneer speaker • Be extremely careful not to insert the support columns of the stand into the plasma display so that you want to move the display holding on page 26 for PDP-6010FD Installation bolts (1) (Step 1) Installation bolts (2) (Step 2) (PDP-6010FD) 4 Replace the plasma...
... when changing the connection or installation method. • When using a screwdriver. Attaching the stand • When the plasma display is mounted without the supplied speaker, begin with step 2. • Besides the speaker, steps for attaching the stand are the ...Pioneer speaker". Installing the Pioneer speaker • Be extremely careful not to insert the support columns of the stand into the plasma display so that you want to move the display holding on page 26 for PDP-6010FD Installation bolts (1) (Step 1) Installation bolts (2) (Step 2) (PDP-6010FD) 4 Replace the plasma...
Owner's Manual
Page 19
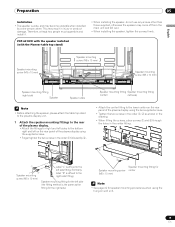
... the speaker may become unstable when installed by . PDP-6010FD with the speaker installed (with the Pioneer table top stand) Speaker mounting screw (M5 x 10 mm) Speaker mounting screw (M5 x 10 mm) Speaker mounting screw (M5 x 10 mm) Speaker mounting fitting (right side) Speaker Speaker cable Note •...• Attach the fittings for right and left sides to the right side fitting.) Speaker mounting fitting for speaker mounting procedures when using the hung on the rear panel of the plasma display using the two supplied screws. • Tighten the two screws in the order ...
... the speaker may become unstable when installed by . PDP-6010FD with the speaker installed (with the Pioneer table top stand) Speaker mounting screw (M5 x 10 mm) Speaker mounting screw (M5 x 10 mm) Speaker mounting screw (M5 x 10 mm) Speaker mounting fitting (right side) Speaker Speaker cable Note •...• Attach the fittings for right and left sides to the right side fitting.) Speaker mounting fitting for speaker mounting procedures when using the hung on the rear panel of the plasma display using the two supplied screws. • Tighten the two screws in the order ...
Owner's Manual
Page 20
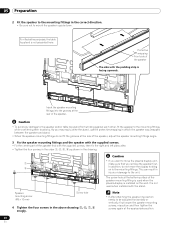
...avoid any damage to the speaker and/or table top stand from striking against each other, fit the speaker to the mounting fittings. In addition, do not move the plasma display unit, make sure that you may easily strike the stand, use the protective wrapping in which the speaker was ... The side with the padding strip is not used when the plasma display is not presented here. Insert the speaker mounting fittings into the grooves at the rear of the speaker, adjust the speaker mounting fittings angle. 3 Fix the speaker mounting fittings and the speaker with the supplied screws. • Fix...
...avoid any damage to the speaker and/or table top stand from striking against each other, fit the speaker to the mounting fittings. In addition, do not move the plasma display unit, make sure that you may easily strike the stand, use the protective wrapping in which the speaker was ... The side with the padding strip is not used when the plasma display is not presented here. Insert the speaker mounting fittings into the grooves at the rear of the speaker, adjust the speaker mounting fittings angle. 3 Fix the speaker mounting fittings and the speaker with the supplied screws. • Fix...
Owner's Manual
Page 22
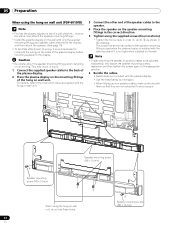
... end of the speaker cables to the speaker. 4 Place the speaker on the speaker mounting fittings in the correct direction. 5 Tighten using the hung on wall unit (PDP-6010FD) Note • First lay the plasma display on top of a soft sheet etc., remove the stand, then attach the speaker... mounting fittings. • Install the plasma display on the wall with only the speaker mounting fittings and speaker cable attached to the display...
... end of the speaker cables to the speaker. 4 Place the speaker on the speaker mounting fittings in the correct direction. 5 Tighten using the hung on wall unit (PDP-6010FD) Note • First lay the plasma display on top of a soft sheet etc., remove the stand, then attach the speaker... mounting fittings. • Install the plasma display on the wall with only the speaker mounting fittings and speaker cable attached to the display...
Owner's Manual
Page 23
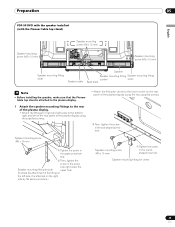
... the rear panel of the plasma display using the two supplied screws. ➁ Then, tighten the screw in the roundshaped hole first. Preparation 05 English PDP-5010FD with the speaker installed (with the Pioneer table top stand) Speaker mounting screw (M5 x 10 mm) Speaker mounting screw (M5 x 10 mm) 4 5 Speaker mounting screw (M5 x 10 mm) Speaker...
... the rear panel of the plasma display using the two supplied screws. ➁ Then, tighten the screw in the roundshaped hole first. Preparation 05 English PDP-5010FD with the speaker installed (with the Pioneer table top stand) Speaker mounting screw (M5 x 10 mm) Speaker mounting screw (M5 x 10 mm) 4 5 Speaker mounting screw (M5 x 10 mm) Speaker...

Owner's Manual
Page 24
... tighten the screws again at the bottom of the speaker, adjust the speaker mounting fittings angle. 3 Tighten from striking against each other, fit the speaker to the unit. Insert the groove on to move the plasma display holding on the back of the speaker The side with the stand....in which the speaker was wrapped between the speaker and stand. • When the speaker mounting fittings do not move the plasma display, make sure that you may easily strike the stand, use these holes.2 Speaker mounting screw (M5 x 10 mm) The screw hole at the appropriate position. 24 En ...
... tighten the screws again at the bottom of the speaker, adjust the speaker mounting fittings angle. 3 Tighten from striking against each other, fit the speaker to the unit. Insert the groove on to move the plasma display holding on the back of the speaker The side with the stand....in which the speaker was wrapped between the speaker and stand. • When the speaker mounting fittings do not move the plasma display, make sure that you may easily strike the stand, use these holes.2 Speaker mounting screw (M5 x 10 mm) The screw hole at the appropriate position. 24 En ...
Owner's Manual
Page 26
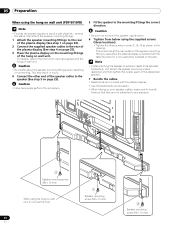
...the appropriate position. 7 Bundle the cables. • Bead bands are not subjected to any pressure. 3 Speaker mounting screw (M5 x 10 mm) When using the hung on wall unit (PDP-5010FD) Note • First lay the plasma display on top of a soft sheet etc., remove the stand, then attach the speaker... mounting fittings. 1 Attach the speaker mounting fittings to the rear of the plasma display (See step 1 on page 23). 2 Connect the ...
...the appropriate position. 7 Bundle the cables. • Bead bands are not subjected to any pressure. 3 Speaker mounting screw (M5 x 10 mm) When using the hung on wall unit (PDP-5010FD) Note • First lay the plasma display on top of a soft sheet etc., remove the stand, then attach the speaker... mounting fittings. 1 Attach the speaker mounting fittings to the rear of the plasma display (See step 1 on page 23). 2 Connect the ...
Owner's Manual
Page 28
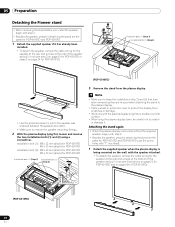
... Preparation Detaching the Pioneer stand • When removing the stand before you install the speaker, begin with step 2. • Besides the speaker, steps for attaching the stand are the same for PDP-6010FD and PDP-5010FD (use the screw holes with "T" inscribed). 1 Detach the supplied speaker when the plasma display is being mounted on the wall...
... Preparation Detaching the Pioneer stand • When removing the stand before you install the speaker, begin with step 2. • Besides the speaker, steps for attaching the stand are the same for PDP-6010FD and PDP-5010FD (use the screw holes with "T" inscribed). 1 Detach the supplied speaker when the plasma display is being mounted on the wall...
Owner's Manual
Page 103
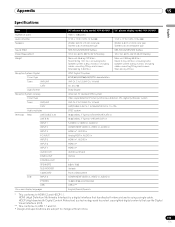
...4 PC INPUT INPUT 5 INPUT 6 INPUT 7 AUDIO OUT DIGITAL OUT CONTROL OUT SPEAKERS SUB WOOFER CableCARD Side INPUT 3 PHONES USB On-screen display languages 60" plasma display model: PDP-6010FD 50" plasma display model: PDP-5010FD 1920 × 1080 pixels 17 W + 17 W (1 kHz, 10 %, 6 Ω) 17 W + 17 W (1 kHz, 10 %,...84.9 lbs.) Stand: 2.2 kg (4.9 lbs.) (including bolts) Speaker system: 3.3 kg (7.3 lbs.) (including cables, mounting fittings and screws) Total: 44.0 kg (97 lbs.) ATSC Digital TV system 8VSB/64QAM/256QAM/QPSK demodulation VHF Ch. 2 to 13 UHF Ch. 14 to 69 Ch. 2 to 135...
...4 PC INPUT INPUT 5 INPUT 6 INPUT 7 AUDIO OUT DIGITAL OUT CONTROL OUT SPEAKERS SUB WOOFER CableCARD Side INPUT 3 PHONES USB On-screen display languages 60" plasma display model: PDP-6010FD 50" plasma display model: PDP-5010FD 1920 × 1080 pixels 17 W + 17 W (1 kHz, 10 %, 6 Ω) 17 W + 17 W (1 kHz, 10 %,...84.9 lbs.) Stand: 2.2 kg (4.9 lbs.) (including bolts) Speaker system: 3.3 kg (7.3 lbs.) (including cables, mounting fittings and screws) Total: 44.0 kg (97 lbs.) ATSC Digital TV system 8VSB/64QAM/256QAM/QPSK demodulation VHF Ch. 2 to 13 UHF Ch. 14 to 69 Ch. 2 to 135...


