
User manual
Page 2
... serves as the owner of your household, please do not remove product covering. Model No Serial No t This "bolt of lightning" indicates uninsulated material within 10 days confirms your right to maximum protection under the terms and conditions of your Philips warranty. which is registered, you're eligible to receive all the privileges of owning a Philips product. • So...
... serves as the owner of your household, please do not remove product covering. Model No Serial No t This "bolt of lightning" indicates uninsulated material within 10 days confirms your right to maximum protection under the terms and conditions of your Philips warranty. which is registered, you're eligible to receive all the privileges of owning a Philips product. • So...
User manual
Page 6
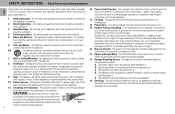
... Instructions - Retain Instructions - All operating and use Periods - Quick stops, excessive force, and uneven surfaces may cause the appliance and cart combination to rain; Power Sources - Cleaning - An outdoor antenna should be particularly aware of this (polarized) plug with an extension cord, receptacle or other appliances (including amplifiers) that its proper ventilation. If an outside antenna is connected to the receiver, be sure the antenna system...
... Instructions - Retain Instructions - All operating and use Periods - Quick stops, excessive force, and uneven surfaces may cause the appliance and cart combination to rain; Power Sources - Cleaning - An outdoor antenna should be particularly aware of this (polarized) plug with an extension cord, receptacle or other appliances (including amplifiers) that its proper ventilation. If an outside antenna is connected to the receiver, be sure the antenna system...

User manual
Page 7
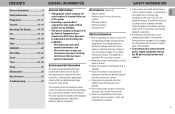
... grounding and, in Wire Electric Service Equipment 92/11 Antenna Discharge Unit (NEC Section 810-20) Grounding Conductors (NEC Section 810-21) Ground Clamps Power Service Grounding Electrode System (NEC Art. 250, Part H) EL 4562-1 7 Example of cable entry as per NEC - English SAFETY INSTRUCTIONS Note to the Cable TV system installer This reminder is provided to call the Cable TV system installer's attention to...
... grounding and, in Wire Electric Service Equipment 92/11 Antenna Discharge Unit (NEC Section 810-20) Grounding Conductors (NEC Section 810-21) Ground Clamps Power Service Grounding Electrode System (NEC Art. 250, Part H) EL 4562-1 7 Example of cable entry as per NEC - English SAFETY INSTRUCTIONS Note to the Cable TV system installer This reminder is provided to call the Cable TV system installer's attention to...

User manual
Page 8
.... Please record the model and serial numbers found on the product below. TO GET WARRANTY SERVICE IN MODEL # SERIAL # installation or repair of warranty may last, this owner's manual and keep the original box and packing material in any direct, indirect, special, incidental or consequential damages, howsoever incurred, even if notified of the possibility of misuse, Take the product to a Philips factory service center (see accident, unauthorized...
.... Please record the model and serial numbers found on the product below. TO GET WARRANTY SERVICE IN MODEL # SERIAL # installation or repair of warranty may last, this owner's manual and keep the original box and packing material in any direct, indirect, special, incidental or consequential damages, howsoever incurred, even if notified of the possibility of misuse, Take the product to a Philips factory service center (see accident, unauthorized...
User manual
Page 9
... consult your local power supply. AM loop antenna - Should this will not operate normally. This device may cause undesired operation. CONTENTS General Information 9 Safety Information 9 Preparation 10 - 11 Controls 12 - 14 Operating The System 14 - 16 CD 16 - 18 Tuner 19 - 20 Tape 20 - 21 CDR/AUX 22 Recording 22 - 23 Clock 24 Timer 24 - 25 Sleep 25 Maintenance 25 Specifications 26 Troubleshooting 27 GENERAL INFORMATION SAFETY...
... consult your local power supply. AM loop antenna - Should this will not operate normally. This device may cause undesired operation. CONTENTS General Information 9 Safety Information 9 Preparation 10 - 11 Controls 12 - 14 Operating The System 14 - 16 CD 16 - 18 Tuner 19 - 20 Tape 20 - 21 CDR/AUX 22 Recording 22 - 23 Clock 24 Timer 24 - 25 Sleep 25 Maintenance 25 Specifications 26 Troubleshooting 27 GENERAL INFORMATION SAFETY...

User manual
Page 11
... active subwoofer to the audio equipment with the active speakers. You can connect the audio left and right OUT terminals of the system. Adjust the position of spaceships, etc.). Place the active speakers at the rear of a TV, VCR, Laser Disc player, DVD player or CD-Recorder to a optional CD Recorder ANALOGUE IN terminals. PREPARATION English A AM Loop Antenna Connection Connect the supplied loop antenna to Analog Converter and Digital Signal Processor). B FM Wire Antenna Connection Connect the supplied...
... active subwoofer to the audio equipment with the active speakers. You can connect the audio left and right OUT terminals of the system. Adjust the position of spaceships, etc.). Place the active speakers at the rear of a TV, VCR, Laser Disc player, DVD player or CD-Recorder to a optional CD Recorder ANALOGUE IN terminals. PREPARATION English A AM Loop Antenna Connection Connect the supplied loop antenna to Analog Converter and Digital Signal Processor). B FM Wire Antenna Connection Connect the supplied...
User manual
Page 12
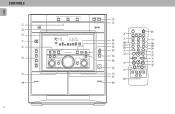
...INCREDIBLE SURROUND LOUDNESS FLAT SOUND 60Hz 250Hz 500Hz 1KHz 2KHz 4KHz 8KHz VOLUME v PRESET v SEARCH/TUNE A•B PLAY / DIGITAL STEREO HIFI SYSTEM DIGITAL CONTROL DIM PROG/A.REV REC/CD SYN PRESET STOP FLAT BASS INCREDIBLE SURROUND LOUDNESS TREBLE CLOCK/ TIMER DUBBING NORMAL•FAST DOLBY B NR 8 9 0 ! @ # $ % ^ 2 & * 3 7 ) ¡ ™ 4 & 4 2 £ CD 2 TUNER TAPE 1/2 AUX CDR 1 REPEAT CD DIRECT 2 SHUFFLE 3 PROGRAM SLEEP TIMER DISPLAY SIDE PAUSE MUTE Å VOLUME É í ë Ç à á INC. FLAT LOUDNESS BASS -+ TREBLE...
...INCREDIBLE SURROUND LOUDNESS FLAT SOUND 60Hz 250Hz 500Hz 1KHz 2KHz 4KHz 8KHz VOLUME v PRESET v SEARCH/TUNE A•B PLAY / DIGITAL STEREO HIFI SYSTEM DIGITAL CONTROL DIM PROG/A.REV REC/CD SYN PRESET STOP FLAT BASS INCREDIBLE SURROUND LOUDNESS TREBLE CLOCK/ TIMER DUBBING NORMAL•FAST DOLBY B NR 8 9 0 ! @ # $ % ^ 2 & * 3 7 ) ¡ ™ 4 & 4 2 £ CD 2 TUNER TAPE 1/2 AUX CDR 1 REPEAT CD DIRECT 2 SHUFFLE 3 PROGRAM SLEEP TIMER DISPLAY SIDE PAUSE MUTE Å VOLUME É í ë Ç à á INC. FLAT LOUDNESS BASS -+ TREBLE...

User manual
Page 13
... surround sound effect. REV (PROGRAM / AUTO REVERSE) for CD to stop demonstration mode. 5 DISPLAY SCREEN - to switch on the system only) to start playback SIDE : when playing in random order. ™ SLEEP - to repeat a CD track, a disc, or all the available discs and their tracks in Tape 2 mode, to change CD(s). 0 DIM - TV, VCR, Laser Disc player, STOP Ç for CD to program CD tracks. to switch on tape deck 2. # CLOCK/TIMER - TUNER - to program preset radio stations. DVD player or CD Recorder). for TAPE ....... for TUNER ..... (if PRESET mode...
... surround sound effect. REV (PROGRAM / AUTO REVERSE) for CD to stop demonstration mode. 5 DISPLAY SCREEN - to switch on the system only) to start playback SIDE : when playing in random order. ™ SLEEP - to repeat a CD track, a disc, or all the available discs and their tracks in Tape 2 mode, to change CD(s). 0 DIM - TV, VCR, Laser Disc player, STOP Ç for CD to program CD tracks. to switch on tape deck 2. # CLOCK/TIMER - TUNER - to program preset radio stations. DVD player or CD Recorder). for TAPE ....... for TUNER ..... (if PRESET mode...
User manual
Page 14
... timer. § DISPLAY (not functional for remote control: - When the system is switched on again. To start the demonstration mode • Press and hold STOP (on the remote control (e.g. Then select the desired function etc.). 14 OPERATING THE SYSTEM 3 CDC TUNER TAPE CDR/AUX CD CHANGER FRONT BACK REC HSD TRACK PRESET REPEAT AM LW MW FM STEREO PROGRAM TIMER SHUFFLE NEWS DIM T.A. Notes: - to standby mode. Note: - Notes for this model) ≥B - Demonstration mode...
... timer. § DISPLAY (not functional for remote control: - When the system is switched on again. To start the demonstration mode • Press and hold STOP (on the remote control (e.g. Then select the desired function etc.). 14 OPERATING THE SYSTEM 3 CDC TUNER TAPE CDR/AUX CD CHANGER FRONT BACK REC HSD TRACK PRESET REPEAT AM LW MW FM STEREO PROGRAM TIMER SHUFFLE NEWS DIM T.A. Notes: - to standby mode. Note: - Notes for this model) ≥B - Demonstration mode...

User manual
Page 15
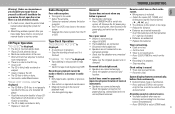
... of music. Volume Adjustment Adjust VOLUME to the n socket at the front of the system. Easy Set EASY SET allows you require a moment of silence. • Press MUTE on the remote control to switch off the sound. ™ "MUTE" will show "LEFT X", "BALANCED" or "RIGHT X". Notes: - When EASY SET is determined by pressing any one of the CD DIRECT PLAY buttons. Note: - INCREDIBLE SURROUND Normal stereo sound is used, all available radio stations...
... of music. Volume Adjustment Adjust VOLUME to the n socket at the front of the system. Easy Set EASY SET allows you require a moment of silence. • Press MUTE on the remote control to switch off the sound. ™ "MUTE" will show "LEFT X", "BALANCED" or "RIGHT X". Notes: - When EASY SET is determined by pressing any one of the CD DIRECT PLAY buttons. Note: - INCREDIBLE SURROUND Normal stereo sound is used, all available radio stations...

User manual
Page 16
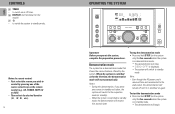
... RDS DISC 1 DISC 2 DISC 3 DISC CHANGE OPEN•CLOSE 3CD C H A N G E R 3 CDC TUNER TAPE CDR/AUX CD CHANGER FRONT BACK REC HSD TRACK PRESET REPEAT AM LW MW FM STEREO PROGRAM TIMER SHUFFLE NEWS DIM T.A. SLEEP INCREDIBLE SURROUND LOUDNESS FLAT SOUND 60Hz 250Hz 500Hz 1KHz 2KHz 4KHz 8KHz VOLUME v PRESET v SEARCH/TUNE A•B PLAY / DIGITAL STEREO HIFI SYSTEM DIGITAL CONTROL PRESET STOP DIM PROG/A.REV REC/CD SYN FLAT BASS INCREDIBLE SURROUND LOUDNESS TREBLE CLOCK/ TIMER DUBBING NORMAL•FAST DOLBY B NR Warning! 1) This system is...
... RDS DISC 1 DISC 2 DISC 3 DISC CHANGE OPEN•CLOSE 3CD C H A N G E R 3 CDC TUNER TAPE CDR/AUX CD CHANGER FRONT BACK REC HSD TRACK PRESET REPEAT AM LW MW FM STEREO PROGRAM TIMER SHUFFLE NEWS DIM T.A. SLEEP INCREDIBLE SURROUND LOUDNESS FLAT SOUND 60Hz 250Hz 500Hz 1KHz 2KHz 4KHz 8KHz VOLUME v PRESET v SEARCH/TUNE A•B PLAY / DIGITAL STEREO HIFI SYSTEM DIGITAL CONTROL PRESET STOP DIM PROG/A.REV REC/CD SYN FLAT BASS INCREDIBLE SURROUND LOUDNESS TREBLE CLOCK/ TIMER DUBBING NORMAL•FAST DOLBY B NR Warning! 1) This system is...

User manual
Page 17
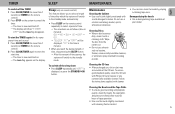
... selected disc. - CD English Loading the CD Changer 1 Press 3 CDC to select CD mode. 2 Press OPEN•CLOSE. ™ The CD carousel slides out. 3 Load a CD with the printed side up in the right tray. • You can play a CD directly by pressing the DISC 1, DISC 2 or DISC 3 button. To ensure good system performance, wait until the desired track appears on the display. ™ The selected track number and elapsed playing time...
... selected disc. - CD English Loading the CD Changer 1 Press 3 CDC to select CD mode. 2 Press OPEN•CLOSE. ™ The CD carousel slides out. 3 Load a CD with the printed side up in the right tray. • You can play a CD directly by pressing the DISC 1, DISC 2 or DISC 3 button. To ensure good system performance, wait until the desired track appears on the display. ™ The selected track number and elapsed playing time...

User manual
Page 19
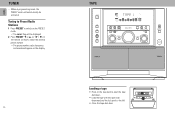
... VOLUME v PRESET v A•B SEARCH/TUNE PLAY / PRESET STOP DIGITAL STEREO HIFI SYSTEM DIGITAL CONTROL DIM PROG/A.REV REC/CD SYN FLAT BASS INCREDIBLE SURROUND LOUDNESS TREBLE CLOCK/ TIMER DUBBING NORMAL•FAST DOLBY B NR Note: - Storing Preset Stations You can cancel manual programming by pressing PROGRAM or STOP (on the remote control) to tune to the desired frequency. • If you want to page 15. Before activate TUNING function on the system, make sure that the PRESET mode is selected, the preset number...
... VOLUME v PRESET v A•B SEARCH/TUNE PLAY / PRESET STOP DIGITAL STEREO HIFI SYSTEM DIGITAL CONTROL DIM PROG/A.REV REC/CD SYN FLAT BASS INCREDIBLE SURROUND LOUDNESS TREBLE CLOCK/ TIMER DUBBING NORMAL•FAST DOLBY B NR Note: - Storing Preset Stations You can cancel manual programming by pressing PROGRAM or STOP (on the remote control) to tune to the desired frequency. • If you want to page 15. Before activate TUNING function on the system, make sure that the PRESET mode is selected, the preset number...
User manual
Page 20
... VOLUME v PRESET v A•B SEARCH/TUNE PLAY / PRESET STOP DIGITAL STEREO HIFI SYSTEM DIGITAL CONTROL DIM PROG/A.REV REC/CD SYN FLAT BASS INCREDIBLE SURROUND LOUDNESS TREBLE CLOCK/ TIMER DUBBING NORMAL•FAST DOLBY B NR Loading a tape • Press on the PRESET mode. ™ The PRESET flag will automatically be displayed. 2 Press PRESET 4 or 3 (or í / ë on the remote control) to the left. • Close the tape deck door. Tuning to Preset Radio Stations 1 Press PRESET to switch on the tape deck to open...
... VOLUME v PRESET v A•B SEARCH/TUNE PLAY / PRESET STOP DIGITAL STEREO HIFI SYSTEM DIGITAL CONTROL DIM PROG/A.REV REC/CD SYN FLAT BASS INCREDIBLE SURROUND LOUDNESS TREBLE CLOCK/ TIMER DUBBING NORMAL•FAST DOLBY B NR Loading a tape • Press on the PRESET mode. ™ The PRESET flag will automatically be displayed. 2 Press PRESET 4 or 3 (or í / ë on the remote control) to the left. • Close the tape deck door. Tuning to Preset Radio Stations 1 Press PRESET to switch on the tape deck to open...
User manual
Page 21
... will stop rewinding or fast forwarding. Auto Reverse Playback (only on both sides of tape or changing tape play direction on TAPE 2. During playback • Press and hold S or T (or à / á on the remote control) until the desired passage is located. ™ During searching, the sound is pressed. ™ The tape will automatically set to zero after detecting end of the...
... will stop rewinding or fast forwarding. Auto Reverse Playback (only on both sides of tape or changing tape play direction on TAPE 2. During playback • Press and hold S or T (or à / á on the remote control) until the desired passage is located. ™ During searching, the sound is pressed. ™ The tape will automatically set to zero after detecting end of the...
User manual
Page 22
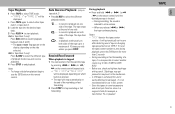
... not be displayed. There are available for selection. 22 English CDR/AUX RECORDING 3 CDC TUNER TAPE CDR/AUX CD CHANGER FRONT BACK REC HSD TRACK PRESET REPEAT AM LW MW FM STEREO PROGRAM TIMER SHUFFLE NEWS DIM T.A. SLEEP INCREDIBLE SURROUND LOUDNESS FLAT SOUND 60Hz 250Hz 500Hz 1KHz 2KHz 4KHz 8KHz VOLUME v PRESET v SEARCH/TUNE A•B PLAY / DIGITAL STEREO HIFI SYSTEM DIGITAL CONTROL DIM PROG/A.REV REC/CD SYN PRESET STOP FLAT BASS INCREDIBLE SURROUND LOUDNESS TREBLE CLOCK/ TIMER DUBBING...
... not be displayed. There are available for selection. 22 English CDR/AUX RECORDING 3 CDC TUNER TAPE CDR/AUX CD CHANGER FRONT BACK REC HSD TRACK PRESET REPEAT AM LW MW FM STEREO PROGRAM TIMER SHUFFLE NEWS DIM T.A. SLEEP INCREDIBLE SURROUND LOUDNESS FLAT SOUND 60Hz 250Hz 500Hz 1KHz 2KHz 4KHz 8KHz VOLUME v PRESET v SEARCH/TUNE A•B PLAY / DIGITAL STEREO HIFI SYSTEM DIGITAL CONTROL DIM PROG/A.REV REC/CD SYN PRESET STOP FLAT BASS INCREDIBLE SURROUND LOUDNESS TREBLE CLOCK/ TIMER DUBBING...
User manual
Page 23
... source (3 CDC, TUNER or CDR/AUX) will start recording. ™ The REC flag starts flashing. 6 Press STOP to the left shoulder of the CD Recorder, digital audio equipment, etc. 23 English REV to select the playback mode ( å or ç ). 4 Press 3 CDC. • You can listen to select the recording side. For recording, use tapes of Volume, Incredible Surround or Bass/Treble. - Notes: - You can program...
... source (3 CDC, TUNER or CDR/AUX) will start recording. ™ The REC flag starts flashing. 6 Press STOP to the left shoulder of the CD Recorder, digital audio equipment, etc. 23 English REV to select the playback mode ( å or ç ). 4 Press 3 CDC. • You can listen to select the recording side. For recording, use tapes of Volume, Incredible Surround or Bass/Treble. - Notes: - You can program...

User manual
Page 24
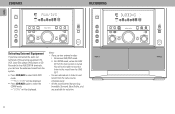
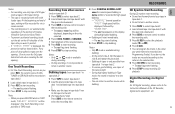
.... - CLOCK TIMER English 3 CDC TUNER TAPE CDR/AUX CD CHANGER FRONT BACK REC HSD TRACK PRESET REPEAT AM LW MW FM STEREO PROGRAM TIMER SHUFFLE NEWS DIM T.A. If the source selected is set . • The volume of the last selected disc. During timer setting, if no button is pressed within 90 seconds, the system will start time. ™ The timer is not set the minute (PRESET mode ON). 4 Press CLOCK/TIMER again to CD, TUNER, or TAPE 2 mode automatically at a preset time. It...
.... - CLOCK TIMER English 3 CDC TUNER TAPE CDR/AUX CD CHANGER FRONT BACK REC HSD TRACK PRESET REPEAT AM LW MW FM STEREO PROGRAM TIMER SHUFFLE NEWS DIM T.A. If the source selected is set . • The volume of the last selected disc. During timer setting, if no button is pressed within 90 seconds, the system will start time. ™ The timer is not set the minute (PRESET mode ON). 4 Press CLOCK/TIMER again to CD, TUNER, or TAPE 2 mode automatically at a preset time. It...
User manual
Page 25
... displayed, or press the STANDBY•ON button. Demagnetizing the heads • Use a demagnetizing tape available at the CD lens. Follow the instructions supplied with cleaner. • You can also clean the heads by playing a cleaning tape once. To switch off . ™ The display will be displayed. To start time. ™ The timer is now switched on. ™ The TIMER flag appears on the remote control). 2 Press CLOCK/TIMER again to the standby mode...
... displayed, or press the STANDBY•ON button. Demagnetizing the heads • Use a demagnetizing tape available at the CD lens. Follow the instructions supplied with cleaner. • You can also clean the heads by playing a cleaning tape once. To switch off . ™ The display will be displayed. To start time. ™ The timer is now switched on. ™ The TIMER flag appears on the remote control). 2 Press CLOCK/TIMER again to the standby mode...
User manual
Page 27
... the stereo system. ™ Separate the stereo system from the wall outlet, then reconnect the power plug and switch on how to tape mode by pressing TAPE. yourself as indicated. • Volume is clamped. Reversed left and right sound. • Speakers are exhausted. Clock setting is selected. guarantee. Lack of your nearest dealer or service center. • The signal is too weak. ™ Adjust the antenna. ™ Connect an external antenna...
... the stereo system. ™ Separate the stereo system from the wall outlet, then reconnect the power plug and switch on how to tape mode by pressing TAPE. yourself as indicated. • Volume is clamped. Reversed left and right sound. • Speakers are exhausted. Clock setting is selected. guarantee. Lack of your nearest dealer or service center. • The signal is too weak. ™ Adjust the antenna. ™ Connect an external antenna...


