Leaflet
Page 3
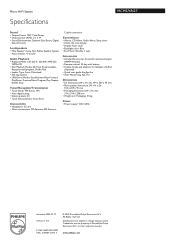
... 000 24979 UPC: 6 09585 12117 1 © 2009 Koninklijke Philips Electronics N.V. Specifications are the property of Koninklijke Philips Electronics N.V. or their respective owners. All Rights reserved. Micro Hi-Fi System Specifications MCM276R/37 Sound • Output Power: 10W Total Power • ...8226; Remote control: 24-key with battery • Cradle: Cradle and adaptors for GoGear and iPod (Optional) • Quick start guide: Eng,Spa,Fre • User Manual: Eng, Spa, Fre Dimensions • Set dimensions (W x H x D): 194 x 269 x 90 mm • Main speaker dimensions (W x H x D): 160...
... 000 24979 UPC: 6 09585 12117 1 © 2009 Koninklijke Philips Electronics N.V. Specifications are the property of Koninklijke Philips Electronics N.V. or their respective owners. All Rights reserved. Micro Hi-Fi System Specifications MCM276R/37 Sound • Output Power: 10W Total Power • ...8226; Remote control: 24-key with battery • Cradle: Cradle and adaptors for GoGear and iPod (Optional) • Quick start guide: Eng,Spa,Fre • User Manual: Eng, Spa, Fre Dimensions • Set dimensions (W x H x D): 194 x 269 x 90 mm • Main speaker dimensions (W x H x D): 160...

Quick start guide
Page 1
Stand FM antenna 140mm (5.51") Quick Start Guide Mounting kit (1x template, 2 x screws) Quick start guide Step A Install Step B Prepare Step C Enjoy / AM antenna User Manual Remote control with 1 x CR2025 battery User manual MCM 276R Quick Start Guide What's in the Box? You should find these items upon opening the box.
Stand FM antenna 140mm (5.51") Quick Start Guide Mounting kit (1x template, 2 x screws) Quick start guide Step A Install Step B Prepare Step C Enjoy / AM antenna User Manual Remote control with 1 x CR2025 battery User manual MCM 276R Quick Start Guide What's in the Box? You should find these items upon opening the box.
Quick start guide
Page 2
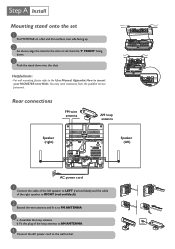
Assemble the loop antenna b. PRESS FRONT PRESS FRONT Install Mounting stand onto the set 1 Put MCM276R on a flat and firm surface, rear side facing up 2 As shown, align the stand to mount your MCM276R onto Walls. You may need assistance from the qualified service personnel. Fit the plug of the right speaker... of the loop antenna to AM ANTENNA AM ANTENNA 4 Connect the AC power cord to FM ANTENNA 3 a. For wall mounting, please refer to the User Manual, Appendix: How to the slots at set's bottom, 4 FRONT facing down 3 Push the stand down into the slots Helpful hints: -
Assemble the loop antenna b. PRESS FRONT PRESS FRONT Install Mounting stand onto the set 1 Put MCM276R on a flat and firm surface, rear side facing up 2 As shown, align the stand to mount your MCM276R onto Walls. You may need assistance from the qualified service personnel. Fit the plug of the right speaker... of the loop antenna to AM ANTENNA AM ANTENNA 4 Connect the AC power cord to FM ANTENNA 3 a. For wall mounting, please refer to the User Manual, Appendix: How to the slots at set's bottom, 4 FRONT facing down 3 Push the stand down into the slots Helpful hints: -
Quick start guide
Page 4
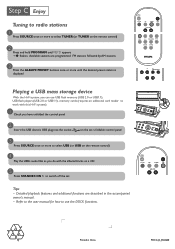
Printed in the accompanied owner's manual. - Detailed playback features and additional functions are programmed: FM stations followed by AM stations 3 Press the ALBUM/ PRESET buttons once or more to select TUNER (... device's USB plug into the socket on the remote control) 4 / Play the USB's audio files as you can use the DOCK functions. Refer to the user manual for how to use USB flash memory (USB 2.0 or USB1.1), USB flash players (USB 2.0 or USB1.1), memory cards (requires an additional card reader to work...
Printed in the accompanied owner's manual. - Detailed playback features and additional functions are programmed: FM stations followed by AM stations 3 Press the ALBUM/ PRESET buttons once or more to select TUNER (... device's USB plug into the socket on the remote control) 4 / Play the USB's audio files as you can use the DOCK functions. Refer to the user manual for how to use USB flash memory (USB 2.0 or USB1.1), USB flash players (USB 2.0 or USB1.1), memory cards (requires an additional card reader to work...


