Leaflet
Page 1
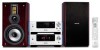
...-Fi sound in a compact solution The chic, compact Philips DVD Micro Theater MCD908 with audiophile-quality sound and enjoy high-resolution movies and JPEG pictures. Turn your movie experience • HDMI out for digital high-definition video and ...-plated speaker connector for ultimate movie experience Premium finishing with noble materials • Quality aluminum cabinet and real wood speakers • Leatherback and metal front remote control with flat keys
...-Fi sound in a compact solution The chic, compact Philips DVD Micro Theater MCD908 with audiophile-quality sound and enjoy high-resolution movies and JPEG pictures. Turn your movie experience • HDMI out for digital high-definition video and ...-plated speaker connector for ultimate movie experience Premium finishing with noble materials • Quality aluminum cabinet and real wood speakers • Leatherback and metal front remote control with flat keys
Leaflet
Page 3
DVD Micro Theater Heritage Audio Specifications MCD908/37 Picture/Display • D/A converter: ...28752 UPC: 6 09585 12957 3 © 2010 Koninklijke Philips Electronics N.V. Trademarks are subject to change without notice. Specifications are the property of Koninklijke Philips Electronics N.V. www.philips.com All Rights reserved. Analog: Component Y Pb Pr...accessories: Composite video cable (Y), Control cable, Guarantee booklet, Quick Use Guide, AM/FM Antenna • Remote control: 49-key with MP3 playback • Playback Media: Picture CD Tuner/Reception/Transmission • Tuner...
DVD Micro Theater Heritage Audio Specifications MCD908/37 Picture/Display • D/A converter: ...28752 UPC: 6 09585 12957 3 © 2010 Koninklijke Philips Electronics N.V. Trademarks are subject to change without notice. Specifications are the property of Koninklijke Philips Electronics N.V. www.philips.com All Rights reserved. Analog: Component Y Pb Pr...accessories: Composite video cable (Y), Control cable, Guarantee booklet, Quick Use Guide, AM/FM Antenna • Remote control: 49-key with MP3 playback • Playback Media: Picture CD Tuner/Reception/Transmission • Tuner...
User manual
Page 7
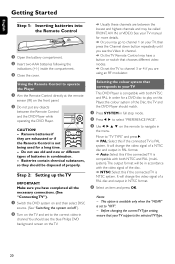
... the power cord 15 Additional: Connecting additional equipment 15~16 Functional Overview DVD player and power amplifier 17 Remote control 18~19 Getting Started Step 1: Inserting batteries into the Remote Control 20 Using the Remote Control to operate the Player Step 2: Setting up the TV 20~21 Selecting the colour system that corresponds...
... the power cord 15 Additional: Connecting additional equipment 15~16 Functional Overview DVD player and power amplifier 17 Remote control 18~19 Getting Started Step 1: Inserting batteries into the Remote Control 20 Using the Remote Control to operate the Player Step 2: Setting up the TV 20~21 Selecting the colour system that corresponds...

User manual
Page 10
... the player for colour discs. ● The lens may cloud over when the player is damaged or missing, contact your retailer or Philips. ● Do not expose your player to extreme temperatures or humidity. ● The apparatus shall not be exposed to play a disc... loop antenna - Installation ● Place the player on the lens. ● Do not use solvents such as newpapers, table-cloths, curtains, et. Remote control with a cleaning cloth. Maintenance ● When a disc becomes dirty, clean it impossible to dripping or splashing. ● No objects filled with items...
... the player for colour discs. ● The lens may cloud over when the player is damaged or missing, contact your retailer or Philips. ● Do not expose your player to extreme temperatures or humidity. ● The apparatus shall not be exposed to play a disc... loop antenna - Installation ● Place the player on the lens. ● Do not use solvents such as newpapers, table-cloths, curtains, et. Remote control with a cleaning cloth. Maintenance ● When a disc becomes dirty, clean it impossible to dripping or splashing. ● No objects filled with items...
User manual
Page 13
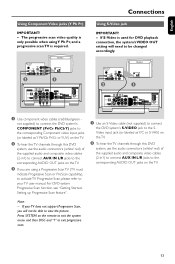
... connectors (white/ red) of the supplied audio and composite video cables (2-in1) to connect AUX IN L/R jacks to the corresponding AUDIO OUT jacks on the remote to exit the system menu and then DISC and "1" to your TV user manual. If your TV does not support Progressive Scan, you are using...
... connectors (white/ red) of the supplied audio and composite video cables (2-in1) to connect AUX IN L/R jacks to the corresponding AUDIO OUT jacks on the remote to exit the system menu and then DISC and "1" to your TV user manual. If your TV does not support Progressive Scan, you are using...
User manual
Page 15
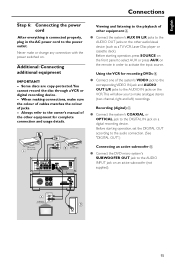
... jack on an active subwoofer (not supplied). 15 Before starting operation, press SOURCE on the front panel to select AUX or press AUX on the remote in the AC power cord to the owner's manual of the other audio/visual device (such as a TV,VCR, Laser Disc player or cassette deck...
... jack on an active subwoofer (not supplied). 15 Before starting operation, press SOURCE on the front panel to select AUX or press AUX on the remote in the AC power cord to the owner's manual of the other audio/visual device (such as a TV,VCR, Laser Disc player or cassette deck...

User manual
Page 17
... for a radio frequency downward/upward. 7 OPEN•CLOSE ç - press and hold, then release the key to the previous/next chapter/title/track. point the remote control towards this sensor. ! shows the current status of the DVD player. 3 ÉÅ - opens or closes the disc tray. 8n - VOLUME -/+ - starts or interrupts...
... for a radio frequency downward/upward. 7 OPEN•CLOSE ç - press and hold, then release the key to the previous/next chapter/title/track. point the remote control towards this sensor. ! shows the current status of the DVD player. 3 ÉÅ - opens or closes the disc tray. 8n - VOLUME -/+ - starts or interrupts...

User manual
Page 18
... (0-9) - MP3/WMA-CD: adds/deletes a programmed track to Eco power/normal standby mode. 20 - MP3/WMA: switches between Album and Filelist. 84 / 3 / 2 / 1 - English Functional Overview Remote control 1B - DVD/VCD/Picture CD: enlarges or reduces a picture or active image on the TV screen. !
... (0-9) - MP3/WMA-CD: adds/deletes a programmed track to Eco power/normal standby mode. 20 - MP3/WMA: switches between Album and Filelist. 84 / 3 / 2 / 1 - English Functional Overview Remote control 1B - DVD/VCD/Picture CD: enlarges or reduces a picture or active image on the TV screen. !

User manual
Page 19
... the hours and minutes in clock/timer setting mode. - selects the respective sound source for example). 19 sets time for switching on the remote control (DISC or TUNER, for remote control: - sets the system clock. Functional Overview ™ ANGLE - For tuner (TUNER): press to the standby mode. ) DIM - selects different levels of...
... the hours and minutes in clock/timer setting mode. - selects the respective sound source for example). 19 sets time for switching on the remote control (DISC or TUNER, for remote control: - sets the system clock. Functional Overview ™ ANGLE - For tuner (TUNER): press to the standby mode. ) DIM - selects different levels of...
User manual
Page 20
... Press SYSTEM in full stop mode. 2 Press 1 2 to select "PREFERENCE PAGE". 3 Use 1 2 3 4 on the remote to "TV TYPE" and press 2. ➜ PAL: Select this Player, the colour system of the disc. ➜ NTSC: ...and PAL. Remove batteries if they should see the Video In channel. ➜ Or, the TV Remote Control may be disposed of a NTSC disc and output in combination. - This option is available ...channel 1 on your TV, then press the Channel down button repeatedly until you see the blue Philips DVD background screen on the front panel. 2 Do not put any objects between the lowest and...
... Press SYSTEM in full stop mode. 2 Press 1 2 to select "PREFERENCE PAGE". 3 Use 1 2 3 4 on the remote to "TV TYPE" and press 2. ➜ PAL: Select this Player, the colour system of the disc. ➜ NTSC: ...and PAL. Remove batteries if they should see the Video In channel. ➜ Or, the TV Remote Control may be disposed of a NTSC disc and output in combination. - This option is available ...channel 1 on your TV, then press the Channel down button repeatedly until you see the blue Philips DVD background screen on the front panel. 2 Do not put any objects between the lowest and...
User manual
Page 21
... turn on interlaced mode (refer to your TV user manual). 3 Press ECO POWER/STANDBY-ON B (B on the remote) to turn on to interlaced mode (refer to your TV user manual). 2 Press SYSTEM on the remote to exit the system menu and then DISC and "1" to exit progressive scan. ➜ The DVD blue...
... turn on interlaced mode (refer to your TV user manual). 3 Press ECO POWER/STANDBY-ON B (B on the remote) to turn on to interlaced mode (refer to your TV user manual). 2 Press SYSTEM on the remote to exit the system menu and then DISC and "1" to exit progressive scan. ➜ The DVD blue...

User manual
Page 22
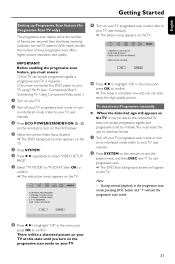
... SYSTEM in stop mode. 2 Press 1 2 to select "PREFERENCE PAGE". 3 Press 3 4 to navigate in the Preference Page. - If the language selected is not available on the remote to highlight the following in the menu. English Getting Started Step 3: Setting language preference You can select your own preferred language settings.This DVD system...
... SYSTEM in stop mode. 2 Press 1 2 to select "PREFERENCE PAGE". 3 Press 3 4 to navigate in the Preference Page. - If the language selected is not available on the remote to highlight the following in the menu. English Getting Started Step 3: Setting language preference You can select your own preferred language settings.This DVD system...

User manual
Page 23
...POWER/ STANDBY-ON B for preheating of 10 seconds starts for 3 seconds or more to switch to Eco power standby or vice versa. on the remote) to increase or decrease the volume level. ➜ "VOL XX" is displayed briefly. press MUTE again; - "XX" denotes the volume level... after a disc has stopped playing. Then, the system will switch to the last selected source. ● Press DISC, TUNER or AUX on the remote). ➜ A countdown of the systme. Volume control Turn VOLUME (-/+) clockwise or anticlockwise (or press VOLUME +/- English Basic Operations Switching the system on...
...POWER/ STANDBY-ON B for preheating of 10 seconds starts for 3 seconds or more to switch to Eco power standby or vice versa. on the remote) to increase or decrease the volume level. ➜ "VOL XX" is displayed briefly. press MUTE again; - "XX" denotes the volume level... after a disc has stopped playing. Then, the system will switch to the last selected source. ● Press DISC, TUNER or AUX on the remote). ➜ A countdown of the systme. Volume control Turn VOLUME (-/+) clockwise or anticlockwise (or press VOLUME +/- English Basic Operations Switching the system on...

User manual
Page 25
... Video In channel. (See "Setting up the TV"). 3 Press ECO POWER/STANDBY-ON B on the DVD Player front panel or B on the remote. ➜ You should see the blue Philips DVD background screen on the TV. 4 Press OPEN•CLOSE ç to open the disc tray and load in order to play...
... Video In channel. (See "Setting up the TV"). 3 Press ECO POWER/STANDBY-ON B on the DVD Player front panel or B on the remote. ➜ You should see the blue Philips DVD background screen on the TV. 4 Press OPEN•CLOSE ç to open the disc tray and load in order to play...

User manual
Page 26
... mode. 26 Track (CD/VCD)/Title (DVD) - To select a playback feature or item ● Use 1 2 3 4 and OK or Numeric Keypad (0-9) on the remote. Repeat (DVD/VCD/CD/MP3/DivX/ WMA) For DVD/VCD/CD ● Press MODE repeatedly to access different repeat modes. ➜ Shuffle: play all files...track/title, enter the chapter/track/title number using the Numeric Keypad (0-9). All - Resuming playback from the menu ● Press DISC MENU on the remote. ➜ Playback will switch to ON and return to repeat playback of the current chapter. To cancel resume mode ● In stop mode and...
... mode. 26 Track (CD/VCD)/Title (DVD) - To select a playback feature or item ● Use 1 2 3 4 and OK or Numeric Keypad (0-9) on the remote. Repeat (DVD/VCD/CD/MP3/DivX/ WMA) For DVD/VCD/CD ● Press MODE repeatedly to access different repeat modes. ➜ Shuffle: play all files...track/title, enter the chapter/track/title number using the Numeric Keypad (0-9). All - Resuming playback from the menu ● Press DISC MENU on the remote. ➜ Playback will switch to ON and return to repeat playback of the current chapter. To cancel resume mode ● In stop mode and...

User manual
Page 27
...DivX/ WMA) 1 Press A-B at your chosen starting point. 2 Press A-B again at your desired chapter/track number in the chapter/track edit box using remote control numerical keypad. Slow Motion (DVD/VCD) 1 Press SLOW during playback (not for Picture CD) ● During playback, press DISPLAY to normal speed, ... files from left to start playback. Program (not for Picture CD) To select favourite tracks/chapters for playback in the time edit box using remote control numerical keypad. (DVD program for example "05"). 3 Move the cursor by chapter/track number (DVD/VCD/CD/MP3/WMA) 1 Press...
...DivX/ WMA) 1 Press A-B at your chosen starting point. 2 Press A-B again at your desired chapter/track number in the chapter/track edit box using remote control numerical keypad. Slow Motion (DVD/VCD) 1 Press SLOW during playback (not for Picture CD) ● During playback, press DISPLAY to normal speed, ... files from left to start playback. Program (not for Picture CD) To select favourite tracks/chapters for playback in the time edit box using remote control numerical keypad. (DVD program for example "05"). 3 Move the cursor by chapter/track number (DVD/VCD/CD/MP3/WMA) 1 Press...

User manual
Page 28
...; Press ANGLE repeatedly to select different subtitle languages. Special disc features Playing a Title (DVD) 1 Press DISC MENU. ➜ The disc title menu appears on the remote to confirm. Playing MP3/WMA disc IMPORTANT! The disc reading time may exceed 10 seconds due to select the available audio channels provided by the...
...; Press ANGLE repeatedly to select different subtitle languages. Special disc features Playing a Title (DVD) 1 Press DISC MENU. ➜ The disc title menu appears on the remote to confirm. Playing MP3/WMA disc IMPORTANT! The disc reading time may exceed 10 seconds due to select the available audio channels provided by the...

User manual
Page 29
... playback, press ZOOM repeatedly to display the picture with multi-angles (JPEG) ● During playback, press 1 2 to rotate the picture on the remote to switch between Folder and Filelist. To display the other pictures on the TV screen. Playback with different scales. ● Use 1 2 3 4... screen. 1: rotate the picture anti-clockwise. 2: rotate the picture clockwise. 2 Use 1 2 3 4 to highlight one of the folder. To enter the remote key function menu ● Use 1 2 3 4 to view the zoomed picture. English Disc Operations Playing JPEG Picture CD General operation 1 Load a JPEG Picture...
... playback, press ZOOM repeatedly to display the picture with multi-angles (JPEG) ● During playback, press 1 2 to rotate the picture on the remote to switch between Folder and Filelist. To display the other pictures on the TV screen. Playback with different scales. ● Use 1 2 3 4... screen. 1: rotate the picture anti-clockwise. 2: rotate the picture clockwise. 2 Use 1 2 3 4 to highlight one of the folder. To enter the remote key function menu ● Use 1 2 3 4 to view the zoomed picture. English Disc Operations Playing JPEG Picture CD General operation 1 Load a JPEG Picture...

User manual
Page 30
... Playing a DivX disc This DVD player supports the DivX movie playback that you download from your selection. ● In this case, pressing SUBTITLE on the remote control will turn on or off the subtitle. ● If multilingual subtitles are supported but do not appear on the file navigation menu. -
... Playing a DivX disc This DVD player supports the DivX movie playback that you download from your selection. ● In this case, pressing SUBTITLE on the remote control will turn on or off the subtitle. ● If multilingual subtitles are supported but do not appear on the file navigation menu. -

User manual
Page 37
...progamming 1 Tune to your desired radio station (refer to "Tuning to radio stations"). 2 Press PROG on the remote. ➜ "PROG" icon flashes. 3 Press PRESET+/- (or ¡ / ™ on the remote) to select the desired preset number. ➜ If "PROG" icon goes off before you find the desired radio... station. Listening to preset radio stations ● In tuner mode, press PRESET+/- (or ¡ / ™ on the remote again to store the radio station. ● Repeat steps 1-4 to store other radio stations. 37 Presetting radio stations You can preset up to select...
...progamming 1 Tune to your desired radio station (refer to "Tuning to radio stations"). 2 Press PROG on the remote. ➜ "PROG" icon flashes. 3 Press PRESET+/- (or ¡ / ™ on the remote) to select the desired preset number. ➜ If "PROG" icon goes off before you find the desired radio... station. Listening to preset radio stations ● In tuner mode, press PRESET+/- (or ¡ / ™ on the remote again to store the radio station. ● Repeat steps 1-4 to store other radio stations. 37 Presetting radio stations You can preset up to select...


