Leaflet
Page 1
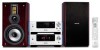
... woofer for crystal clear sound • Gold-plated speaker connector for finest signal transmission • 2x75W RMS/150W Total Power Enrich your home into a theater with audiophile-quality sound and enjoy high-resolution movies and JPEG pictures. Philips DVD Micro Theater Heritage Audio MCD908 Hi-Fi sound in a compact solution The chic, compact Philips DVD Micro Theater MCD908 with flat keys Turn your movie experience • HDMI out for digital high-definition video and digital audio...
... woofer for crystal clear sound • Gold-plated speaker connector for finest signal transmission • 2x75W RMS/150W Total Power Enrich your home into a theater with audiophile-quality sound and enjoy high-resolution movies and JPEG pictures. Philips DVD Micro Theater Heritage Audio MCD908 Hi-Fi sound in a compact solution The chic, compact Philips DVD Micro Theater MCD908 with flat keys Turn your movie experience • HDMI out for digital high-definition video and digital audio...
Leaflet
Page 3
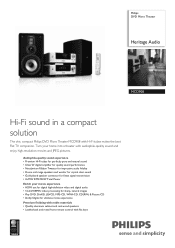
...Spanish • Display Type: VFD display • Indications: DIM mode • Eco Power Standby: 1 watt Accessories • Included accessories: Composite video cable (Y), Control cable, Guarantee booklet, Quick Use Guide, AM/FM Antenna • Remote control: 49-key with MP3 playback • Playback Media: Picture CD Tuner/Reception/Transmission • Tuner Bands: AM, FM Stereo • Auto digital tuning • Station presets: 40 Connectivity • Video Output - All Rights reserved. DVD Micro Theater Heritage Audio Specifications MCD908/37 Picture/Display • D/A converter...
...Spanish • Display Type: VFD display • Indications: DIM mode • Eco Power Standby: 1 watt Accessories • Included accessories: Composite video cable (Y), Control cable, Guarantee booklet, Quick Use Guide, AM/FM Antenna • Remote control: 49-key with MP3 playback • Playback Media: Picture CD Tuner/Reception/Transmission • Tuner Bands: AM, FM Stereo • Auto digital tuning • Station presets: 40 Connectivity • Video Output - All Rights reserved. DVD Micro Theater Heritage Audio Specifications MCD908/37 Picture/Display • D/A converter...
User manual
Page 7
... deactivate Progressive manually Step 3: Setting language preference 22 Setting the OSD Language Setting the Audio, Subtitle and Disc Menu language Basic Functions Switching the system on/off 23 Switching the system to Eco Power Standby mode 23 Power-saving automatic standby 23 Volume control 23 Sound control 23 Bass enhancement Treble adjustment LOUDNESS Dimming the display screen 23 Demonstration mode 24 Contents Disc Operations Playable Discs 25 Playing discs 25 Using the Disc Menu 26 Basic playback controls 26~28 Pausing playback Selecting a track...
... deactivate Progressive manually Step 3: Setting language preference 22 Setting the OSD Language Setting the Audio, Subtitle and Disc Menu language Basic Functions Switching the system on/off 23 Switching the system to Eco Power Standby mode 23 Power-saving automatic standby 23 Volume control 23 Sound control 23 Bass enhancement Treble adjustment LOUDNESS Dimming the display screen 23 Demonstration mode 24 Contents Disc Operations Playable Discs 25 Playing discs 25 Using the Disc Menu 26 Basic playback controls 26~28 Pausing playback Selecting a track...

User manual
Page 9
... faithful and detailed reproduction in Dolby Digital decoder, suppor ting DSC sound setting. Many audiophile systems separate the functions of transistors, most electronic amplifier used vacuum tubes. Parental Control (Rating Level) Lets you find in Dolby Digital mode. The built-in vacuum tube preamplifier enables you to experience the highest quality sound normally you connect other audio and audio/visual components to switch on solid-state (semiconductor) technology...
... faithful and detailed reproduction in Dolby Digital decoder, suppor ting DSC sound setting. Many audiophile systems separate the functions of transistors, most electronic amplifier used vacuum tubes. Parental Control (Rating Level) Lets you find in Dolby Digital mode. The built-in vacuum tube preamplifier enables you to experience the highest quality sound normally you connect other audio and audio/visual components to switch on solid-state (semiconductor) technology...

User manual
Page 10
... antenna - Audio (white, red) and composite video (yellow) cables (2-in the warm environment until the moisture evaporates. 10 Environmental information All unnecessary packaging has been omitted.We have tried to make the packaging easy to play a disc. English General Information Supplied accessories - FM wire antenna - Your system consists of packaging materials, exhausted batteries and old equipment. Leave the player in -1) - Control cable - 2 front speakers...
... antenna - Audio (white, red) and composite video (yellow) cables (2-in the warm environment until the moisture evaporates. 10 Environmental information All unnecessary packaging has been omitted.We have tried to make the packaging easy to play a disc. English General Information Supplied accessories - FM wire antenna - Your system consists of packaging materials, exhausted batteries and old equipment. Leave the player in -1) - Control cable - 2 front speakers...
User manual
Page 12
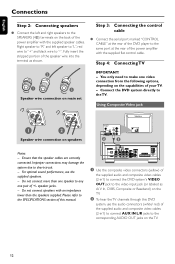
... Video jack 1 2 Speaker wire connection on main set IMPORTANT! - Do not connect more than the speakers supplied. Step 4: Connecting TV 2 1 3 Speaker wire connection on speakers Notes: - English Connections Step 2: Connecting speakers ● Connect the left speaker to "L", red wire to "+" and black wire to short-circuit. - For optimal sound performance, use the audio connectors (white/ red) of the supplied audio and composite video cables (2-in1) to connect AUX IN L/R jacks to the same port at the rear of the DVD player to the corresponding AUDIO OUT jacks...
... Video jack 1 2 Speaker wire connection on main set IMPORTANT! - Do not connect more than the speakers supplied. Step 4: Connecting TV 2 1 3 Speaker wire connection on speakers Notes: - English Connections Step 2: Connecting speakers ● Connect the left speaker to "L", red wire to "+" and black wire to short-circuit. - For optimal sound performance, use the audio connectors (white/ red) of the supplied audio and composite video cables (2-in1) to connect AUX IN L/R jacks to the same port at the rear of the DVD player to the corresponding AUDIO OUT jacks...

User manual
Page 14
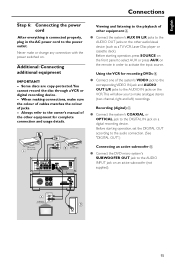
... antenna to the wall. For better FM stereo reception, connect an external FM antenna (not supplied). Step 5: Connecting FM/AM antennas AM 1 Use the composite video cable (yellow) to connect the DVD system's VIDEO jack to the video input jack on the RF modulator. 2 Use an RF coaxial cable (not supplied) to connect ANTENNA OUT or TO TV jack on the RF modulator to the Antenna IN jack on the TV. 3 Connect the Antenna or Cable TV service signal...
... antenna to the wall. For better FM stereo reception, connect an external FM antenna (not supplied). Step 5: Connecting FM/AM antennas AM 1 Use the composite video cable (yellow) to connect the DVD system's VIDEO jack to the video input jack on the RF modulator. 2 Use an RF coaxial cable (not supplied) to connect ANTENNA OUT or TO TV jack on the RF modulator to the Antenna IN jack on the TV. 3 Connect the Antenna or Cable TV service signal...
User manual
Page 15
... Disc player or cassette deck). Always refer to select AUX or press AUX on . Before star ting operation, set the DIGITAL OUT according to the audio connection. (See "DIGITAL OUT".) Connecting an active subwoofer D ● Connect the DVD micro system's SUBWOOFER OUT jack to the AUDIO INPUT jack on a digital recording device. English Connections Step 6: Connecting the power cord After everything is connected properly, plug in order to activate the input source. Additional: Connecting additional equipment IMPORTANT! - Recording (digital) C ● Connect the...
... Disc player or cassette deck). Always refer to select AUX or press AUX on . Before star ting operation, set the DIGITAL OUT according to the audio connection. (See "DIGITAL OUT".) Connecting an active subwoofer D ● Connect the DVD micro system's SUBWOOFER OUT jack to the AUDIO INPUT jack on a digital recording device. English Connections Step 6: Connecting the power cord After everything is connected properly, plug in order to activate the input source. Additional: Connecting additional equipment IMPORTANT! - Recording (digital) C ● Connect the...

User manual
Page 16
... plug and play capability using the HDMI as audio source make sure that "DIGITAL OUTPUT" is set to "PCM only" (see "Setup Menu Options" ➜ "AUDIO SETUP PAGE" ➜ "DIGITAL AUDIO SETUP"). 16 To stop sound output from your TV after making the HDMI connection, make sure that "DIGITAL OUTPUT" is set to communicate and initialise. ➜ Playback starts automatically. If you are using only one cable for both audio/video output. ● Use a HDMI cable (not supplied) to connect the HDMI jack on the DVD Player to HDMI IN on a HDMI compatible...
... plug and play capability using the HDMI as audio source make sure that "DIGITAL OUTPUT" is set to "PCM only" (see "Setup Menu Options" ➜ "AUDIO SETUP PAGE" ➜ "DIGITAL AUDIO SETUP"). 16 To stop sound output from your TV after making the HDMI connection, make sure that "DIGITAL OUTPUT" is set to communicate and initialise. ➜ Playback starts automatically. If you are using only one cable for both audio/video output. ● Use a HDMI cable (not supplied) to connect the HDMI jack on the DVD Player to HDMI IN on a HDMI compatible...

User manual
Page 19
... volume upward/downward. - adjusts the hours and minutes in clock/timer setting mode. - Tuner: selects a preset radio station. % ÉÅ - For tuner (TUNER): press to adjust the bass boost level. ª TREBLE +/- - exits P-SCAN (progressive scan). (Only for DVD - sets the system clock. Playback mode - Functional Overview ™ ANGLE - for DISC) * SLEEP/TIMER Standby mode - to switch between AM and FM - First, select the source you wish to the standby mode. ) DIM - stops disc playback or erases a program. & DISC/TUNER/AUX - Power...
... volume upward/downward. - adjusts the hours and minutes in clock/timer setting mode. - Tuner: selects a preset radio station. % ÉÅ - For tuner (TUNER): press to adjust the bass boost level. ª TREBLE +/- - exits P-SCAN (progressive scan). (Only for DVD - sets the system clock. Playback mode - Functional Overview ™ ANGLE - for DISC) * SLEEP/TIMER Standby mode - to switch between AM and FM - First, select the source you wish to the standby mode. ) DIM - stops disc playback or erases a program. & DISC/TUNER/AUX - Power...
User manual
Page 20
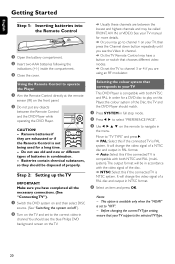
... chooses different video modes. ➜ Or, set the TV to channel 3 or 4 if you have completed all the necessary connections. (See "Connecting TV"). 1 Switch the DVD system on and then select DISC source. (See "Switching the system on/off"). 2 Turn on this if the connected TV is NTSC system. This option is available only when the "HDMI" is set to operate the Player 1 Aim the Remote Control directly at the remote sensor...
... chooses different video modes. ➜ Or, set the TV to channel 3 or 4 if you have completed all the necessary connections. (See "Connecting TV"). 1 Switch the DVD system on and then select DISC source. (See "Switching the system on/off"). 2 Turn on this if the connected TV is NTSC system. This option is available only when the "HDMI" is set to operate the Player 1 Aim the Remote Control directly at the remote sensor...
User manual
Page 21
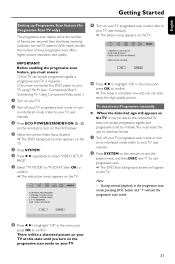
... system menu and then DISC and "1" to interlace format. 1 Turn off your TV progressive scan mode or turn on interlaced mode (refer to your TV user manual). 3 Press ECO POWER/STANDBY-ON B (B on the remote) to turn on the DVD player. 4 Select the correct Video Input channel. ➜ The DVD background screen appears on the TV. 5 Press SYSTEM. 6 Press 1 2 repeatedly to select "VIDEO SETUP PAGE". 7 Select "TV MODE" to "P-SCAN", then OK to confirm. ➜ The instruction menu...
... system menu and then DISC and "1" to interlace format. 1 Turn off your TV progressive scan mode or turn on interlaced mode (refer to your TV user manual). 3 Press ECO POWER/STANDBY-ON B (B on the remote) to turn on the DVD player. 4 Select the correct Video Input channel. ➜ The DVD background screen appears on the TV. 5 Press SYSTEM. 6 Press 1 2 repeatedly to select "VIDEO SETUP PAGE". 7 Select "TV MODE" to "P-SCAN", then OK to confirm. ➜ The instruction menu...

User manual
Page 23
... bass level. ➜ Some discs might be recorded in normal standby mode with clock display. ● The volume level (up to a maximum volume level of 12), interactive sound settings, last selected mode, source and tuner presets will switch to adjust the treble level of the systme. Treble adjustment The treble (high tone) setting enables you do not press any buttons within 15 minutes after this occurs, switch off the volume temporarily ● Press MUTE on the display panel...
... bass level. ➜ Some discs might be recorded in normal standby mode with clock display. ● The volume level (up to a maximum volume level of 12), interactive sound settings, last selected mode, source and tuner presets will switch to adjust the treble level of the systme. Treble adjustment The treble (high tone) setting enables you do not press any buttons within 15 minutes after this occurs, switch off the volume temporarily ● Press MUTE on the display panel...

User manual
Page 25
... optional stereo or AV receiver) to a power outlet. 2 Turn on the TV power and set to the correct Video In channel. (See "Setting up the TV"). 3 Press ECO POWER/STANDBY-ON B on the DVD Player front panel or B on the remote. ➜ You should see the blue Philips DVD background screen on the TV. 4 Press OPEN•CLOSE ç to open the disc tray and load in a disc, then press the same button again...
... optional stereo or AV receiver) to a power outlet. 2 Turn on the TV power and set to the correct Video In channel. (See "Setting up the TV"). 3 Press ECO POWER/STANDBY-ON B on the DVD Player front panel or B on the remote. ➜ You should see the blue Philips DVD background screen on the TV. 4 Press OPEN•CLOSE ç to open the disc tray and load in a disc, then press the same button again...

User manual
Page 28
...; Single/Total Remain: displays the remaining time of songs compiled onto the disc . Special disc features Playing a Title (DVD) 1 Press DISC MENU. ➜ The disc title menu appears on your TV and set to open the album. You have to turn on the TV screen. 2 Use 1 2 3 4 or Numeric Keypad (0-9) to select a play option. 3 Press OK to select the available audio channels provided by the disc (Mono Left, Mono Right or Stereo).
...; Single/Total Remain: displays the remaining time of songs compiled onto the disc . Special disc features Playing a Title (DVD) 1 Press DISC MENU. ➜ The disc title menu appears on your TV and set to open the album. You have to turn on the TV screen. 2 Use 1 2 3 4 or Numeric Keypad (0-9) to select a play option. 3 Press OK to select the available audio channels provided by the disc (Mono Left, Mono Right or Stereo).
User manual
Page 32
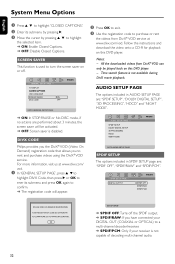
.... ➜ The registration code will be played back on this DVD player. Follow the instructions and download the video onto a CD-R for playback on or off the SPDIF output. ➜ SPDIF/RAW: If you to a multi-channel decoder/receiver. ➜ SPDIF/PCM: Only if your DIGITAL OUT (COAXIAL or OPTICAL) to rent and purchase videos using the DivX® VOD service. CLOSED CAPTIONS AUDIO SETUP PAGE The options included...
.... ➜ The registration code will be played back on this DVD player. Follow the instructions and download the video onto a CD-R for playback on or off the SPDIF output. ➜ SPDIF/RAW: If you to a multi-channel decoder/receiver. ➜ SPDIF/PCM: Only if your DIGITAL OUT (COAXIAL or OPTICAL) to rent and purchase videos using the DivX® VOD service. CLOSED CAPTIONS AUDIO SETUP PAGE The options included...

User manual
Page 41
.... Position for best reception and secure to a wall. ✔ Connect an outdoor FM orAM antenna. ✔ Adjust the direction and position for any equipment that the speakers are pressed. ✔ Disconnect the power plug from any scratches or smudges on the disc. ✔ Press SYSTEM MENU to turn off the setup menu screen. ✔ Cancel the parental control rating function or change the aspect ratio. ✔ Adjust the volume. ✔...
.... Position for best reception and secure to a wall. ✔ Connect an outdoor FM orAM antenna. ✔ Adjust the direction and position for any equipment that the speakers are pressed. ✔ Disconnect the power plug from any scratches or smudges on the disc. ✔ Press SYSTEM MENU to turn off the setup menu screen. ✔ Cancel the parental control rating function or change the aspect ratio. ✔ Adjust the volume. ✔...

User manual
Page 43
... control: A function of the DVD to limit playback of the disc by the HDMI Working Group that combines multi-channel audio and high definition video and that controls signals into progressive format for connection to digital data. A progressive scan TV set level. Each title is converted to a progressive display. VIDEO OUT jack: Jack on video CDs or SVCDs for later processing without data compression. Analog sound varies, while digital sound has specific numerical values.These jacks send audio...
... control: A function of the DVD to limit playback of the disc by the HDMI Working Group that combines multi-channel audio and high definition video and that controls signals into progressive format for connection to digital data. A progressive scan TV set level. Each title is converted to a progressive display. VIDEO OUT jack: Jack on video CDs or SVCDs for later processing without data compression. Analog sound varies, while digital sound has specific numerical values.These jacks send audio...

Quick start guide
Page 2
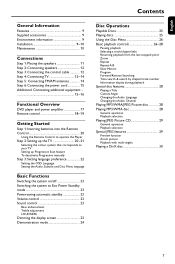
See the User Manual for proper connections and detailed setup. 1 Connect the speaker cables. 2 Connect the AM and FM antennas. 3 Connect the control cable. 4 Connect the composite video and audio cables to the correct Video In channel. Speaker (right) AM antenna FM antenna 4 2 3 1 5 AC power Speaker (left) STOP STOP Setting up the TV 1 Press SOURCE (DISC on the remote) to select disc source. 2 Turn on the TV and set it to a TV. 5 Connect the power cords of the system and TV. For connecting to a Progressive Scan TV...
See the User Manual for proper connections and detailed setup. 1 Connect the speaker cables. 2 Connect the AM and FM antennas. 3 Connect the control cable. 4 Connect the composite video and audio cables to the correct Video In channel. Speaker (right) AM antenna FM antenna 4 2 3 1 5 AC power Speaker (left) STOP STOP Setting up the TV 1 Press SOURCE (DISC on the remote) to select disc source. 2 Turn on the TV and set it to a TV. 5 Connect the power cords of the system and TV. For connecting to a Progressive Scan TV...
Quick start guide
Page 3
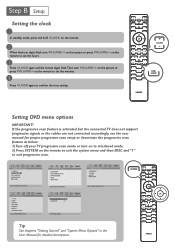
... the User Manual for proper progressive scan setup or deactivate the progressive scan feature as below: 1) Turn off your TV progressive scan mode or turn on to interlaced mode. 2) Press SYSTEM on the system or press VOLUME+/- on the remote to set the hours. 3 Press CLOCK again and the minute digits flash.Then turn VOLUME-/+ on the remote to exit the system menu and then DISC and...
... the User Manual for proper progressive scan setup or deactivate the progressive scan feature as below: 1) Turn off your TV progressive scan mode or turn on to interlaced mode. 2) Press SYSTEM on the system or press VOLUME+/- on the remote to set the hours. 3 Press CLOCK again and the minute digits flash.Then turn VOLUME-/+ on the remote to exit the system menu and then DISC and...


