Leaflet
Page 2
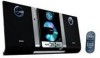
... type: LCD display Accessories • Remote control: 23-key with lithium battery • User Manual: English, French, Spanish • Others: AM/FM antenna, screws for different musical styles. www.philips.com All Rights reserved. Each mode uses... 6 09585 13302 0 © 2011 Koninklijke Philips Electronics N.V. or their respective owners. Micro Hi-Fi System CD playback wall-mountable Specifications MC235B/37 Highlights Sound • Output power: 10 W total power, 2 x 5 W RMS • Sound enhancement: digital sound control 4 modes, Dynamic Bass Boost Loudspeakers •...
... type: LCD display Accessories • Remote control: 23-key with lithium battery • User Manual: English, French, Spanish • Others: AM/FM antenna, screws for different musical styles. www.philips.com All Rights reserved. Each mode uses... 6 09585 13302 0 © 2011 Koninklijke Philips Electronics N.V. or their respective owners. Micro Hi-Fi System CD playback wall-mountable Specifications MC235B/37 Highlights Sound • Output power: 10 W total power, 2 x 5 W RMS • Sound enhancement: digital sound control 4 modes, Dynamic Bass Boost Loudspeakers •...
User manual
Page 7
... ● Listen at reasonable volumes for reasonable periods of time. ● Be careful not to adjust the volume as your volume control at a low setting. ● Slowly increase the sound until you . ● You should use caution or temporarily discontinue use ...clearly, without distortion. Be sure to observe the following guidelines when using the remote control 10 Replacing battery (lithium CR2025) into the remote control 10 Controls Controls on the system and remote control 11 Basic Functions Switching the system on 12 Adjusting volume and sound 12 CD Operation Playing a disc 13 ...
... ● Listen at reasonable volumes for reasonable periods of time. ● Be careful not to adjust the volume as your volume control at a low setting. ● Slowly increase the sound until you . ● You should use caution or temporarily discontinue use ...clearly, without distortion. Be sure to observe the following guidelines when using the remote control 10 Replacing battery (lithium CR2025) into the remote control 10 Controls Controls on the system and remote control 11 Basic Functions Switching the system on 12 Adjusting volume and sound 12 CD Operation Playing a disc 13 ...
User manual
Page 8
... helps prevent potentially negative consequences on the environment and human health. Perchlorate Material - special handling may not cause harmful interference, and - remote control (with 21 CFR 1040. 10. FM wire antenna - Leave the power on for additional information on a recycling center in your local...with liquids, such as newspapers, table-cloths, cur tains, etc. ● Do not expose the system, batteries or discs to the following two conditions: - Please visit www.recycle.philips.com for about one hour with no disc in a very damp room, moisture may cause undesired ...
... helps prevent potentially negative consequences on the environment and human health. Perchlorate Material - special handling may not cause harmful interference, and - remote control (with 21 CFR 1040. 10. FM wire antenna - Leave the power on for additional information on a recycling center in your local...with liquids, such as newspapers, table-cloths, cur tains, etc. ● Do not expose the system, batteries or discs to the following two conditions: - Please visit www.recycle.philips.com for about one hour with no disc in a very damp room, moisture may cause undesired ...
User manual
Page 10
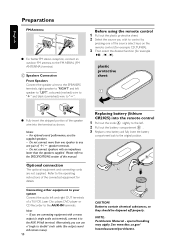
...are not supplied. For optimal sound performance, use a "single to the SPECIFICATIONS section of the speaker wire into the remote control 1 Pull out the knob A slightly to the left speaker to "LEFT", coloured (marked) wire to "+" and...system Connect the audio left terminal. C Speakers Connection Front Speakers Connect the speaker wires to the SPEAKERS terminals, right speaker to "RIGHT" and left . 2 Pull out the battery compartment B . 3 Replace a new battery and fully insert the battery compartment back to control by pressing one pair of the source select keys on the remote control...
...are not supplied. For optimal sound performance, use a "single to the SPECIFICATIONS section of the speaker wire into the remote control 1 Pull out the knob A slightly to the left speaker to "LEFT", coloured (marked) wire to "+" and...system Connect the audio left terminal. C Speakers Connection Front Speakers Connect the speaker wires to the SPEAKERS terminals, right speaker to "RIGHT" and left . 2 Pull out the battery compartment B . 3 Replace a new battery and fully insert the battery compartment back to control by pressing one pair of the source select keys on the remote control...
User manual
Page 11
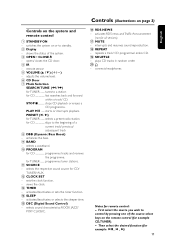
...SLEEP - connects headphones Notes for CD programmes tracks and reviews the programme. shows the status of the source select keys on the remote control (for CD fast searches back and forward within a track/ CD. enhances the bass. 9 BAND - interrupts and resumes sound ... Boost) - Then select the desired function (for TUNER ........ activates/deactivates or selects the sleeper time. % DSC (Digital Sound Control) - switches the system on the system and remote control 1 STANDBY-ON - adjusts the volume level. 6 CD Door 7 Mode Selection SEARCH/TUNE (à / á) for example...
...SLEEP - connects headphones Notes for CD programmes tracks and reviews the programme. shows the status of the source select keys on the remote control (for CD fast searches back and forward within a track/ CD. enhances the bass. 9 BAND - interrupts and resumes sound ... Boost) - Then select the desired function (for TUNER ........ activates/deactivates or selects the sleeper time. % DSC (Digital Sound Control) - switches the system on the system and remote control 1 STANDBY-ON - adjusts the volume level. 6 CD Door 7 Mode Selection SEARCH/TUNE (à / á) for example...
User manual
Page 12
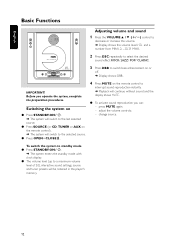
... MUTE on or off. ➜ Display shows: DBB. adjust the volume controls; - Switching the system on ● Press STANDBY-ON / 2. ➜ The system will switch to the last selected source. ● Press SOURCE (or CD, TUNER or AUX on the remote control). ➜ The system will switch to a maximum volume level of 20), interactive sound settings...
... MUTE on or off. ➜ Display shows: DBB. adjust the volume controls; - Switching the system on ● Press STANDBY-ON / 2. ➜ The system will switch to the last selected source. ● Press SOURCE (or CD, TUNER or AUX on the remote control). ➜ The system will switch to a maximum volume level of 20), interactive sound settings...
User manual
Page 15
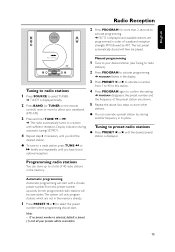
... to a weak station, press TUNE à or á briefly and repeatedly until the desired preset station is displayed briefly. 2 Press BAND (or TUNER on the remote control) once or more than 2 seconds to activate programming. ➜ AUTO is preset (1) and all your presets will be overridden. 15 Tuning to preset radio stations... TUNE à or á. ➜ The radio automatically tunes to a station with a chosen preset number. The last preset automatically stored will then be overridden.The system will start .
... to a weak station, press TUNE à or á briefly and repeatedly until the desired preset station is displayed briefly. 2 Press BAND (or TUNER on the remote control) once or more than 2 seconds to activate programming. ➜ AUTO is preset (1) and all your presets will be overridden. 15 Tuning to preset radio stations... TUNE à or á. ➜ The radio automatically tunes to a station with a chosen preset number. The last preset automatically stored will then be overridden.The system will start .
User manual
Page 16
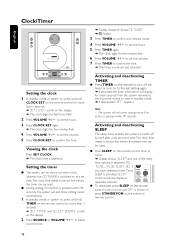
.... ● During setting, if no button is displayed. to set and activated. Setting the clock 1 In standby mode or system on, press and hold TIMER on the remote control for more than 3 seconds. ➜ SET TIMER and SELECT SOURCE scrolls on the display. 2 Press SOURCE or VOLUME +/- ...CLOCK SET again. ➜ The clock digits for the hours flash. 2 Press VOLUME +/- The system will display for more than 3 seconds. ➜ SET CLOCK scrolls on the remote control for a few seconds, then the system resumes to the last active source or stays in sequence: 90, 75, 60,..., 45,30,...
.... ● During setting, if no button is displayed. to set and activated. Setting the clock 1 In standby mode or system on, press and hold TIMER on the remote control for more than 3 seconds. ➜ SET TIMER and SELECT SOURCE scrolls on the display. 2 Press SOURCE or VOLUME +/- ...CLOCK SET again. ➜ The clock digits for the hours flash. 2 Press VOLUME +/- The system will display for more than 3 seconds. ➜ SET CLOCK scrolls on the remote control for a few seconds, then the system resumes to the last active source or stays in sequence: 90, 75, 60,..., 45,30,...
User manual
Page 18
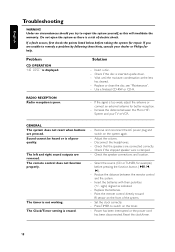
... on the timer. - Check that the speakers are connected correctly. - Reduce the distance between the Micro HiFi System and your dealer or Philips for repair. Insert the batteries with their polarities (+/- Increase the distance between the remote control and the system. - Replace or clean the disc, see "Maintenance". - Use a finalised CD-RW or CD-R. Do not...
... on the timer. - Check that the speakers are connected correctly. - Reduce the distance between the Micro HiFi System and your dealer or Philips for repair. Insert the batteries with their polarities (+/- Increase the distance between the remote control and the system. - Replace or clean the disc, see "Maintenance". - Use a finalised CD-RW or CD-R. Do not...


