Leaflet
Page 2
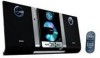
... on main display, sleep timer • Display type: LCD display Accessories • Remote control: 23-key with lithium battery • User Manual: English, French, Spanish •... UPC: 6 09585 13302 0 © 2011 Koninklijke Philips Electronics N.V. Trademarks are subject to change without notice. www.philips.com Bottomend bass frequencies usually get the most important sound... the volume. Micro Hi-Fi System CD playback wall-mountable Specifications MC235B/37 Highlights Sound • Output power: 10 W total power, 2 x 5 W RMS • Sound enhancement: digital sound control 4 modes,...
... on main display, sleep timer • Display type: LCD display Accessories • Remote control: 23-key with lithium battery • User Manual: English, French, Spanish •... UPC: 6 09585 13302 0 © 2011 Koninklijke Philips Electronics N.V. Trademarks are subject to change without notice. www.philips.com Bottomend bass frequencies usually get the most important sound... the volume. Micro Hi-Fi System CD playback wall-mountable Specifications MC235B/37 Highlights Sound • Output power: 10 W total power, 2 x 5 W RMS • Sound enhancement: digital sound control 4 modes,...
User manual
Page 7
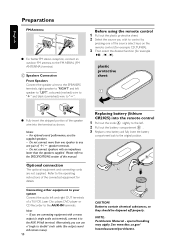
...many areas. 7 Be sure to observe the following guidelines when using the remote control 10 Replacing battery (lithium CR2025) into the remote control 10 Controls Controls on the system and remote control 11 Basic Functions Switching the system on 12 Adjusting volume and sound 12 CD Operation Playing a disc 13 ...exposure less than a minute. This product can impair your hearing. To establish a safe volume level: ● Set your volume control at a high volume can produce sounds in decibel ranges that may create a traffic hazard and is illegal in potentially hazardous situations....
...many areas. 7 Be sure to observe the following guidelines when using the remote control 10 Replacing battery (lithium CR2025) into the remote control 10 Controls Controls on the system and remote control 11 Basic Functions Switching the system on 12 Adjusting volume and sound 12 CD Operation Playing a disc 13 ...exposure less than a minute. This product can impair your hearing. To establish a safe volume level: ● Set your volume control at a high volume can produce sounds in decibel ranges that may create a traffic hazard and is illegal in potentially hazardous situations....
User manual
Page 8
... please consult your area. Leave the power on for additional information on a flat, hard and stable surface. ● Place the system in the system until normal playback is subject to separate into three materials: cardboard (box), polystyrene foam (buffer) and polyethylene (bags, protective foam sheet... the typeplate (or the voltage indication beside the voltage selector) of your local power supply. Perchlorate Material - remote control (with 21 CFR 1040. 10. Allow at www.philips.com/welcome. stand - To fully benefit from the wall socket. 8 FM wire antenna -
... please consult your area. Leave the power on for additional information on a flat, hard and stable surface. ● Place the system in the system until normal playback is subject to separate into three materials: cardboard (box), polystyrene foam (buffer) and polyethylene (bags, protective foam sheet... the typeplate (or the voltage indication beside the voltage selector) of your local power supply. Perchlorate Material - remote control (with 21 CFR 1040. 10. Allow at www.philips.com/welcome. stand - To fully benefit from the wall socket. 8 FM wire antenna -
User manual
Page 10
...Laser Disc player, DVD player or CD Recorder to "-". speaker terminals. - Note: - NOTE : Perchlorate Material - Connecting other equipment to your system Connect the audio left speaker to "LEFT", coloured (marked) wire to "+" and black (unmarked) wire to the AUX-IN terminals. special ...connecting equipment with an impedance lower than one of the source select keys on the remote control (for example CD,TUNER). 3 Then select the desired function (for details. Before using the remote control 1 Pull out the plastic protective sheet. 2 Select the source you can use the...
...Laser Disc player, DVD player or CD Recorder to "-". speaker terminals. - Note: - NOTE : Perchlorate Material - Connecting other equipment to your system Connect the audio left speaker to "LEFT", coloured (marked) wire to "+" and black (unmarked) wire to the AUX-IN terminals. special ...connecting equipment with an impedance lower than one of the source select keys on the remote control (for example CD,TUNER). 3 Then select the desired function (for details. Before using the remote control 1 Pull out the plastic protective sheet. 2 Select the source you can use the...
User manual
Page 11
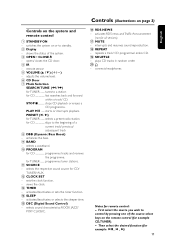
.... 2 Display - starts or interrupts playback. enhances the bass. 9 BAND - shows the status of the source select keys on the system and remote control 1 STANDBY-ON - PRESET (¡ / ™) for TUNER ........ programmes tuner stations. ! views the clock. # TIMER - connects...CD programmes tracks and reviews the programme. selects a waveband. 0 PROGRAM for remote control: - activates RDS news and Traffic Announcement (not for example 11 Controls (illustrations on page 3) English Controls on the remote control (for CD fast searches back and forward within a track/ CD. Then ...
.... 2 Display - starts or interrupts playback. enhances the bass. 9 BAND - shows the status of the source select keys on the system and remote control 1 STANDBY-ON - PRESET (¡ / ™) for TUNER ........ programmes tuner stations. ! views the clock. # TIMER - connects...CD programmes tracks and reviews the programme. selects a waveband. 0 PROGRAM for remote control: - activates RDS news and Traffic Announcement (not for example 11 Controls (illustrations on page 3) English Controls on the remote control (for CD fast searches back and forward within a track/ CD. Then ...
User manual
Page 12
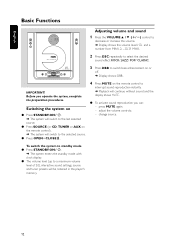
...; Press SOURCE (or CD, TUNER or AUX on the remote control). ➜ The system will switch to the selected source. ● Press OPEN • CLOSEç. 4 Press MUTE on or off. ➜ Display shows: DBB. adjust the volume controls; - press MUTE again; - To switch the system to standby mode ● Press STANDBY-ON / 2. ➜ The...
...; Press SOURCE (or CD, TUNER or AUX on the remote control). ➜ The system will switch to the selected source. ● Press OPEN • CLOSEç. 4 Press MUTE on or off. ➜ Display shows: DBB. adjust the volume controls; - press MUTE again; - To switch the system to standby mode ● Press STANDBY-ON / 2. ➜ The...
User manual
Page 15
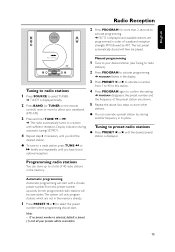
... preset number. Tuning to radio stations 1 Press SOURCE to select TUNER. ➜ TUNER is displayed briefly. 2 Press BAND (or TUNER on the remote control) once or more than 2 seconds to activate programming. ➜ AUTO is preset (1) and all your desired station (see Tuning to radio stations). ...¡ or ™ to allocate a number from 1 to 40 to this preset number upwards, former programmed radio stations will be overridden.The system will be played. Display indication during automatic tuning: SEARCH. 4 Repeat step 3 if necessary until you find the desired station. ● To ...
... preset number. Tuning to radio stations 1 Press SOURCE to select TUNER. ➜ TUNER is displayed briefly. 2 Press BAND (or TUNER on the remote control) once or more than 2 seconds to activate programming. ➜ AUTO is preset (1) and all your desired station (see Tuning to radio stations). ...¡ or ™ to allocate a number from 1 to 40 to this preset number upwards, former programmed radio stations will be overridden.The system will be played. Display indication during automatic tuning: SEARCH. 4 Repeat step 3 if necessary until you find the desired station. ● To ...
User manual
Page 16
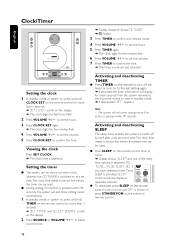
...hours. 3 Press CLOCK SET again. ➜ The clock digits for more than 3 seconds. ➜ SET TIMER and SELECT SOURCE scrolls on the system or remote control. 16 Viewing the clock Press SET CLOCK. ➜ The clock time is shown, or press STANDBY-ON on the display. 2 Press SOURCE or...clock, whereby the CD,TUNER is switched on at repeated intervals. ● To deactivate, press SLEEP on the remote control once or more until OFF is displayed. Setting the timer ● The system can be set the minutes. 7 Press TIMER to confirm your desired mode. 4 Press VOLUME +/- if you...
...hours. 3 Press CLOCK SET again. ➜ The clock digits for more than 3 seconds. ➜ SET TIMER and SELECT SOURCE scrolls on the system or remote control. 16 Viewing the clock Press SET CLOCK. ➜ The clock time is shown, or press STANDBY-ON on the display. 2 Press SOURCE or...clock, whereby the CD,TUNER is switched on at repeated intervals. ● To deactivate, press SLEEP on the remote control once or more until OFF is displayed. Setting the timer ● The system can be set the minutes. 7 Press TIMER to confirm your desired mode. 4 Press VOLUME +/- if you...
User manual
Page 18
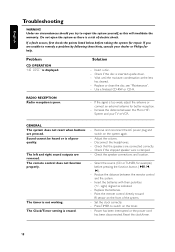
... the warranty. Check if the disc is not working. Increase the distance between the remote control and the system. - Adjust the volume. - Check if the stripped speaker wire is displayed. Reduce the distance between the Micro HiFi System and your dealer or Philips for help. Insert the batteries with their polarities (+/- Set the clock correctly. - Problem...
... the warranty. Check if the disc is not working. Increase the distance between the remote control and the system. - Adjust the volume. - Check if the stripped speaker wire is displayed. Reduce the distance between the Micro HiFi System and your dealer or Philips for help. Insert the batteries with their polarities (+/- Set the clock correctly. - Problem...


