Leaflet
Page 1
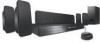
..., DVD, DVD+R/RW, DVD-R/RW, DVD+R DL Easy to set up and use • EasyLink controls all EasyLink products with a single remote • Easy-fit™ connectors with color-coding for iPod included High definition pictures and powerful surround sound delivered by this elegant system provide unbeatable home entertainment. Enjoy sharp pictures with 1080p HDMI upconversion, as well as convenient iPod playback via the dock included. Philips DVD home theater system HTS3565D High definition home cinema with Dock...
..., DVD, DVD+R/RW, DVD-R/RW, DVD+R DL Easy to set up and use • EasyLink controls all EasyLink products with a single remote • Easy-fit™ connectors with color-coding for iPod included High definition pictures and powerful surround sound delivered by this elegant system provide unbeatable home entertainment. Enjoy sharp pictures with 1080p HDMI upconversion, as well as convenient iPod playback via the dock included. Philips DVD home theater system HTS3565D High definition home cinema with Dock...
Leaflet
Page 2
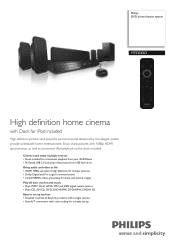
... want - DVD home theater system Specifications HTS3565D/37 Highlights Picture/Display • D/A converter: 12 bit, 108 MHz • Picture enhancement: High Def (720p, 1080i, 1080p), Progressive scan Sound • Output power (RMS): 4x125W, 2x250W • D/A converter: 24 bit, 192 kHz • Frequency response: 180-14000 Hz • Signal to share functionality between devices through the HDMI cable. With one remote. Functions like standby and play away. Plays it off, HDMI makes a direct digital connection that preserves...
... want - DVD home theater system Specifications HTS3565D/37 Highlights Picture/Display • D/A converter: 12 bit, 108 MHz • Picture enhancement: High Def (720p, 1080i, 1080p), Progressive scan Sound • Output power (RMS): 4x125W, 2x250W • D/A converter: 24 bit, 192 kHz • Frequency response: 180-14000 Hz • Signal to share functionality between devices through the HDMI cable. With one remote. Functions like standby and play away. Plays it off, HDMI makes a direct digital connection that preserves...
User manual
Page 2
.... If abnormal situations occur, fully disconnect power: unplug the power cord from the manufacturer - directly from the power outlet. 2 1_hts3565-66D_37_eng2_final813.i2 2 2008-03-27 3:11:53 PM NO USER-SERVICEABLE PARTS INSIDE. As a member of the PHILIPS "family," you're entitled to protection by one of everyone in our power to keep you happy with PHILIPS makes you 're entitled, including special...
.... If abnormal situations occur, fully disconnect power: unplug the power cord from the manufacturer - directly from the power outlet. 2 1_hts3565-66D_37_eng2_final813.i2 2 2008-03-27 3:11:53 PM NO USER-SERVICEABLE PARTS INSIDE. As a member of the PHILIPS "family," you're entitled to protection by one of everyone in our power to keep you happy with PHILIPS makes you 're entitled, including special...
User manual
Page 4
... dépassant les limites applicables aux appareils numériques de Class B prescrites dans le Règlement sur le Brouillage Radioélectrique édicté par le Ministère des Communications du Canada. Declaration of Conformity Model number: HTS3565D, HTS3566D Trade Name: Philips Responsible Party: Philips Consumer Electronics A Division of Communications. Box 671539 Marietta, GA 30006...
... dépassant les limites applicables aux appareils numériques de Class B prescrites dans le Règlement sur le Brouillage Radioélectrique édicté par le Ministère des Communications du Canada. Declaration of Conformity Model number: HTS3565D, HTS3566D Trade Name: Philips Responsible Party: Philips Consumer Electronics A Division of Communications. Box 671539 Marietta, GA 30006...
User manual
Page 7
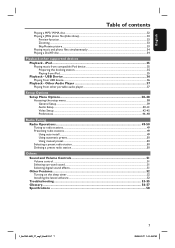
... the setup menu...38 General Setup ...39 Audio Setup ...40-41 Video Setup...42-45 Preferences ...46-48 Radio Tuning Radio Operations...49-50 Tuning to radio stations...49 Presetting radio stations ...49 Using auto install ...49 Using automatic preset...50 Using manual preset ...50 Selecting a preset radio station...50 Deleting a preset radio station...50 Others Sound and Volume Controls 51 Volume control ...51 Selecting surround sound...51 Selecting digital sound effects...51 Other Features...52 Turning on the sleep timer ...52 Installing the latest software ...52 Troubleshooting...53...
... the setup menu...38 General Setup ...39 Audio Setup ...40-41 Video Setup...42-45 Preferences ...46-48 Radio Tuning Radio Operations...49-50 Tuning to radio stations...49 Presetting radio stations ...49 Using auto install ...49 Using automatic preset...50 Using manual preset ...50 Selecting a preset radio station...50 Deleting a preset radio station...50 Others Sound and Volume Controls 51 Volume control ...51 Selecting surround sound...51 Selecting digital sound effects...51 Other Features...52 Turning on the sleep timer ...52 Installing the latest software ...52 Troubleshooting...53...
User manual
Page 8
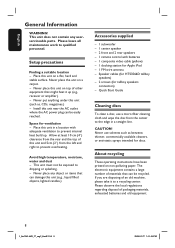
... intended for Apple iPod - 1 FM wire antenna - Never put anything under this unit (e.g., liquid filled objects, lighted candles.) Accessories supplied - 1 subwoofer - 1 center speaker - 2 front and 2 rear speakers - 1 remote control with adequate ventilation to qualified personnel. This unit does not contain any object or items that can be recycled. Please leave all maintenance work to prevent internal heat build up (e.g., receiver or amplifier.) - Install this unit...
... intended for Apple iPod - 1 FM wire antenna - Never put anything under this unit (e.g., liquid filled objects, lighted candles.) Accessories supplied - 1 subwoofer - 1 center speaker - 2 front and 2 rear speakers - 1 remote control with adequate ventilation to qualified personnel. This unit does not contain any object or items that can be recycled. Please leave all maintenance work to prevent internal heat build up (e.g., receiver or amplifier.) - Install this unit...
User manual
Page 9
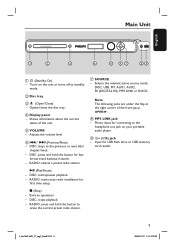
... button for USB flash drive or USB memory card reader. 1_hts3565-66D_37_eng2_final813.i9 9 9 2008-03-27 3:11:57 PM RADIO: starts auto radio installation for connecting to erase the current preset radio station. DISC: stops playback. - DISC: skips to standby mode. RADIO: selects a preset radio station. Phono input for first time setup. u (Play/Pause) - Exits an operation. - b Disc tray c ç (Open/Close) - i (USB) jack - Shows information about the current status of the front panel, OPEN . h MP3 LINK jack - d Display panel - Adjusts the volume level...
... button for USB flash drive or USB memory card reader. 1_hts3565-66D_37_eng2_final813.i9 9 9 2008-03-27 3:11:57 PM RADIO: starts auto radio installation for connecting to erase the current preset radio station. DISC: stops playback. - DISC: skips to standby mode. RADIO: selects a preset radio station. Phono input for first time setup. u (Play/Pause) - Exits an operation. - b Disc tray c ç (Open/Close) - i (USB) jack - Shows information about the current status of the front panel, OPEN . h MP3 LINK jack - d Display panel - Adjusts the volume level...
User manual
Page 10
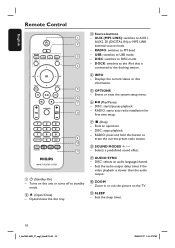
...; (Open/Close) - AUX (MP3 LINK): switches to DISC mode. - e OPTIONS - f u (Play/Pause) - DISC: selects an audio language/channel. - Zoom in or out the picture on this button to USB mode. - RADIO: starts auto radio installation for first time setup. Exits an operation. - RADIO: press and hold this unit or turns off to standby mode. h SOUND MODES +/- Turns on the TV. USB: switches to erase the current preset radio station. Displays the current status or disc information. DOCK: switches to the iPod that is slower than the audio output. DISC: starts...
...; (Open/Close) - AUX (MP3 LINK): switches to DISC mode. - e OPTIONS - f u (Play/Pause) - DISC: selects an audio language/channel. - Zoom in or out the picture on this button to USB mode. - RADIO: starts auto radio installation for first time setup. Exits an operation. - RADIO: press and hold this unit or turns off to standby mode. h SOUND MODES +/- Turns on the TV. USB: switches to erase the current preset radio station. Displays the current status or disc information. DOCK: switches to the iPod that is slower than the audio output. DISC: starts...

User manual
Page 24
... can adjust the delay times (center and surround only) and volume level for centre and rear speakers that best suit your surroundings and setup. D Use keys to set the volume level for each speaker. G Press OK to your surround sound needs. Stop the disc playback by pressing Ç twice or remove the disc from the disc tray. These adjustments let you start... Before you optimize the sound according to confirm. A In disc mode, press OPTIONS on the remote control...
... can adjust the delay times (center and surround only) and volume level for centre and rear speakers that best suit your surroundings and setup. D Use keys to set the volume level for each speaker. G Press OK to your surround sound needs. Stop the disc playback by pressing Ç twice or remove the disc from the disc tray. These adjustments let you start... Before you optimize the sound according to confirm. A In disc mode, press OPTIONS on the remote control...
User manual
Page 25
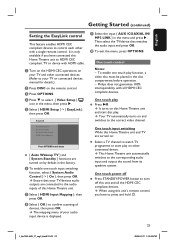
... audio input and output the sound from its speakers system. Then select the TV/device that your TV/devices audio outputs are turned on by default in the disc compartment before operation. - One touch play function, a video disc must be placed in the factory. This Home Theatre unit automatically switches to confirm scanning of devices, then press OK. C Press OPTIONS. EasyLink Auto Wakeup TV System Standby System Audio Control HDMI Input Mapping Press OPTIONS to exit menu { Auto...
... audio input and output the sound from its speakers system. Then select the TV/device that your TV/devices audio outputs are turned on by default in the disc compartment before operation. - One touch play function, a video disc must be placed in the factory. This Home Theatre unit automatically switches to confirm scanning of devices, then press OK. C Press OPTIONS. EasyLink Auto Wakeup TV System Standby System Audio Control HDMI Input Mapping Press OPTIONS to exit menu { Auto...
User manual
Page 30
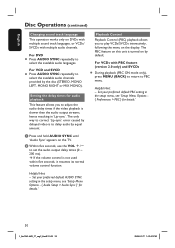
... mode only), press MENU (BACK) to return to set the audio output delay times (0 ~ 200 ms). Set your preferred default PBC setting in the setup menu, see 'Setup Menu Options { Preferences > PBC } for details.' For DVD Press AUDIO SYNC repeatedly to select the available audio channels provided by equal amount. For VCD and SVCD Press AUDIO SYNC repeatedly to select the available audio languages. English Disc Operations (continued) Changing sound track language This operation works only on the TV. Set...
... mode only), press MENU (BACK) to return to set the audio output delay times (0 ~ 200 ms). Set your preferred default PBC setting in the setup menu, see 'Setup Menu Options { Preferences > PBC } for details.' For DVD Press AUDIO SYNC repeatedly to select the available audio channels provided by equal amount. For VCD and SVCD Press AUDIO SYNC repeatedly to select the available audio languages. English Disc Operations (continued) Changing sound track language This operation works only on the TV. Set...

User manual
Page 39
English Setup Menu Options (continued) General Setup (underlined options are the factory default settings) Disc Lock Not all LEDs and icons on the front display panel of specific discs with the DivX® VOD (Video On Demand) registration code that allows you with the disc lock function. You can be locked. { Lock } - OSD Language Select the menu language for this unit's display panel. { 100% } - DivX(R) VOD Code Philips provides you to standby mode automatically after the selected preset time. { 15...
English Setup Menu Options (continued) General Setup (underlined options are the factory default settings) Disc Lock Not all LEDs and icons on the front display panel of specific discs with the DivX® VOD (Video On Demand) registration code that allows you with the disc lock function. You can be locked. { Lock } - OSD Language Select the menu language for this unit's display panel. { 100% } - DivX(R) VOD Code Philips provides you to standby mode automatically after the selected preset time. { 15...

User manual
Page 40
... supported, the audio output will be changed to communicate and initialize. - HDMI Audio This setting is not possible to listen to a HDMI-compatible TV'.) { Off } - English Setup Menu Options (continued) Audio Setup (underlined options are using the HDMI connection. 40 1_hts3565-66D_37_eng2_final813.i40 40 2008-03-27 3:12:06 PM Setting the speakers' channels' for each connected speaker between -6dB to adjust the volume level for details. Use keys to set the delay times for Playable Media) sources using...
... supported, the audio output will be changed to communicate and initialize. - HDMI Audio This setting is not possible to listen to a HDMI-compatible TV'.) { Off } - English Setup Menu Options (continued) Audio Setup (underlined options are using the HDMI connection. 40 1_hts3565-66D_37_eng2_final813.i40 40 2008-03-27 3:12:06 PM Setting the speakers' channels' for each connected speaker between -6dB to adjust the volume level for details. Use keys to set the delay times for Playable Media) sources using...
User manual
Page 49
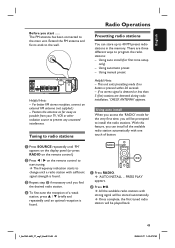
... connected to program the radio stations: - For better FM stereo reception, connect an external FM antenna (not supplied.) - There are detected during radio installation, 'CHECK ANTENNA' appears. With this feature, you will be stored automatically. Using auto install When you access the 'RADIO' mode for first time setup only) - A Press RADIO. 'AUTO INSTALL ... The frequency indication starts to install the radio stations. PRESS PLAY' appears. B Press u. Once complete, the first tuned radio station will be prompted to change...
... connected to program the radio stations: - For better FM stereo reception, connect an external FM antenna (not supplied.) - There are detected during radio installation, 'CHECK ANTENNA' appears. With this feature, you will be stored automatically. Using auto install When you access the 'RADIO' mode for first time setup only) - A Press RADIO. 'AUTO INSTALL ... The frequency indication starts to install the radio stations. PRESS PLAY' appears. B Press u. Once complete, the first tuned radio station will be prompted to change...

User manual
Page 53
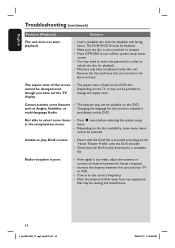
... audio cables are connected and press the correct source button (for example, AUX (MP3 LINK)) to choose the device that the source you are playing is a risk of picture distortion may appear. Problem (General) No picture. If this unit. - Check the video connection. - This is dirty. When playback with DTS track, press AUDIO SYNC to select disc mode. - The remote control does not function properly. - Change the TV channel until you see the DVD screen...
... audio cables are connected and press the correct source button (for example, AUX (MP3 LINK)) to choose the device that the source you are playing is a risk of picture distortion may appear. Problem (General) No picture. If this unit. - Check the video connection. - This is dirty. When playback with DTS track, press AUDIO SYNC to select disc mode. - The remote control does not function properly. - Change the TV channel until you see the DVD screen...
User manual
Page 54
... be finalized. - Changing the language for better reception. - Remove the disc and leave this unit. Unable to turn off the system setup menu screen. - Make sure the disc is poor. - Place the antenna further away from any equipment that the DivX movie download is multi-language Audio. Tune in the setup/system menu. - You may be changed even though you have condensed inside this unit turned on the DVD disc. -
... be finalized. - Changing the language for better reception. - Remove the disc and leave this unit. Unable to turn off the system setup menu screen. - Make sure the disc is poor. - Place the antenna further away from any equipment that the DivX movie download is multi-language Audio. Tune in the setup/system menu. - You may be changed even though you have condensed inside this unit turned on the DVD disc. -

User manual
Page 55
....) Slow operation of the USB flash - See 'Setup Menu Options - { Audio Setup - Large file size or high memory USB flash drive takes longer time to output SACD or copy-controlled DVD-Audio sources from the HDMI connection. - You will need a separate adaptor (DVI to HDMI.) - Make sure that the audio output setting is only DVI/HDCP (High-bandwidth Digital Content Protection)-compatible. - HDMI connection can only be read and display on the TV. No audio from HDMI connection. - English Troubleshooting (continued) Problem (USB/HDMI/DOCK) Solution...
....) Slow operation of the USB flash - See 'Setup Menu Options - { Audio Setup - Large file size or high memory USB flash drive takes longer time to output SACD or copy-controlled DVD-Audio sources from the HDMI connection. - You will need a separate adaptor (DVI to HDMI.) - Make sure that the audio output setting is only DVI/HDCP (High-bandwidth Digital Content Protection)-compatible. - HDMI connection can only be read and display on the TV. No audio from HDMI connection. - English Troubleshooting (continued) Problem (USB/HDMI/DOCK) Solution...
User manual
Page 56
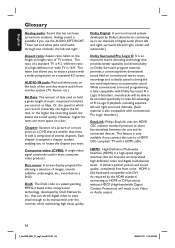
.... AUDIO IN jacks: Red and white jacks on conventional stereo music recordings and is an improved matrix decoding technology that receive audio from noise. Disc menu: A screen display prepared for allowing a selection of music; The letter box allows you record. Bit Rate: The amount of the unit that provides better spatiality and directionality on Dolby Surround program material, provides a convincing three dimensional sound field on the back of data used...
.... AUDIO IN jacks: Red and white jacks on conventional stereo music recordings and is an improved matrix decoding technology that receive audio from noise. Disc menu: A screen display prepared for allowing a selection of music; The letter box allows you record. Bit Rate: The amount of the unit that provides better spatiality and directionality on Dolby Surround program material, provides a convincing three dimensional sound field on the back of data used...
Quick start guide
Page 1
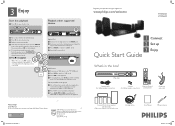
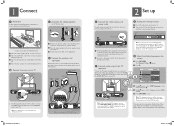
...from the speakers, press SURROUND on the remote control to open the disc tray. Need help? Main Unit Speaker cables (for tallboy speakers connection) 2 Screws (for tallboy speakers connection) Remote Control and 2 batteries Composite video cable 1 center, 2 front, 2 rear speakers and subwoofer (Tallboy rear speakers for HTS3566D model) Docking station User Manual FM wire antenna 2008-03-27 11:21:41 AM z To enjoy the powerful surround sound from where it . USB device A Connect your portable audio player to 'DISC' mode. B Dock your Philips DVD Home Theater System...
...from the speakers, press SURROUND on the remote control to open the disc tray. Need help? Main Unit Speaker cables (for tallboy speakers connection) 2 Screws (for tallboy speakers connection) Remote Control and 2 batteries Composite video cable 1 center, 2 front, 2 rear speakers and subwoofer (Tallboy rear speakers for HTS3566D model) Docking station User Manual FM wire antenna 2008-03-27 11:21:41 AM z To enjoy the powerful surround sound from where it . USB device A Connect your portable audio player to 'DISC' mode. B Dock your Philips DVD Home Theater System...
Quick start guide
Page 2
... correct viewing channel, press the Channel Down button on the remote control until you are various setup options (Audio Setup, Video Setup, Preferences) available on the screen A Press OPTIONS. B Select the display language on this unit, use a red and white audio cables (not supplied) to connect the AUDIO IN-AUX1 or AUDIO IN-AUX2 jacks on the main unit to the AC power outlet. General Setup Disc Lock Display Dim OSD Language Screen Saver Sleep DivX(R) VOD Code Auto English...
... correct viewing channel, press the Channel Down button on the remote control until you are various setup options (Audio Setup, Video Setup, Preferences) available on the screen A Press OPTIONS. B Select the display language on this unit, use a red and white audio cables (not supplied) to connect the AUDIO IN-AUX1 or AUDIO IN-AUX2 jacks on the main unit to the AC power outlet. General Setup Disc Lock Display Dim OSD Language Screen Saver Sleep DivX(R) VOD Code Auto English...


