Leaflet
Page 2
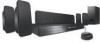
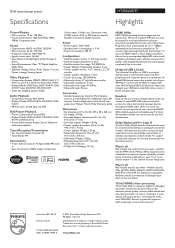
... freq range: 40-150 Hz • Subwoofer type: Passive Accessories • Included accessories: Dock for iPod, Remote Control, 2 x AAA Batteries, CVBS video cable, FM antenna, Product Registration Card, Quick start guide, User Manual,...RW or DVD+R DL. Experience unbeatable flexibility and the convenience of Koninklijke Philips Electronics N.V. With one device. 12-bit/108MHz video processing 12-bit...resulting in the comfort of surround processing from noise. DVD home theater system Specifications HTS3565D/37 Highlights Picture/Display • D/A converter: 12 bit, 108 MHz •...
... freq range: 40-150 Hz • Subwoofer type: Passive Accessories • Included accessories: Dock for iPod, Remote Control, 2 x AAA Batteries, CVBS video cable, FM antenna, Product Registration Card, Quick start guide, User Manual,...RW or DVD+R DL. Experience unbeatable flexibility and the convenience of Koninklijke Philips Electronics N.V. With one device. 12-bit/108MHz video processing 12-bit...resulting in the comfort of surround processing from noise. DVD home theater system Specifications HTS3565D/37 Highlights Picture/Display • D/A converter: 12 bit, 108 MHz •...
User manual
Page 6
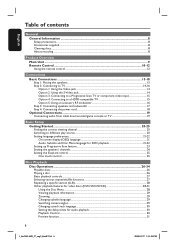
...contents General General Information ...8 Setup precautions...8 Accessories supplied ...8 Cleaning discs ...8 About recycling...8 Product Overview Main Unit ...9 Remote Control ...10-12 Using the remote control ...12 Connections Basic Connections ...13-18 Step 1: Placing the speakers...13 Step 2: Connecting to TV ...14-16......23 Setting the speakers' channels...24 Setting the EasyLink control ...25 One touch control...25 Disc Playback Disc Operations ...26-34 Playable discs ...26 Playing a disc ...26 Basic playback controls...27 Selecting various repeat/shuffle functions 27 Repeating a specific...
...contents General General Information ...8 Setup precautions...8 Accessories supplied ...8 Cleaning discs ...8 About recycling...8 Product Overview Main Unit ...9 Remote Control ...10-12 Using the remote control ...12 Connections Basic Connections ...13-18 Step 1: Placing the speakers...13 Step 2: Connecting to TV ...14-16......23 Setting the speakers' channels...24 Setting the EasyLink control ...25 One touch control...25 Disc Playback Disc Operations ...26-34 Playable discs ...26 Playing a disc ...26 Basic playback controls...27 Selecting various repeat/shuffle functions 27 Repeating a specific...
User manual
Page 8
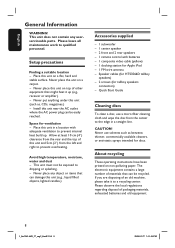
... on non-polluting paper. If you are disposing of this unit (e.g., liquid filled objects, lighted candles.) Accessories supplied - 1 subwoofer - 1 center speaker - 2 front and 2 rear speakers - 1 remote control with adequate ventilation to qualified personnel. Please observe the local regulations regarding disposal of materials that can be recycled. Space for tallboy speakers connection) - Allow...
... on non-polluting paper. If you are disposing of this unit (e.g., liquid filled objects, lighted candles.) Accessories supplied - 1 subwoofer - 1 center speaker - 2 front and 2 rear speakers - 1 remote control with adequate ventilation to qualified personnel. Please observe the local regulations regarding disposal of materials that can be recycled. Space for tallboy speakers connection) - Allow...
User manual
Page 10
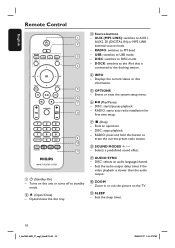
English Remote Control 1 2 3 4 5 6 7 8 9 10 11 a 2 (Standby-On) - AUX (MP3 LINK): switches to DISC mode. - DISC: switches to AUX1, AUX2, DI (DIGITAL IN) or MP3 LINK external source mode. - ...
English Remote Control 1 2 3 4 5 6 7 8 9 10 11 a 2 (Standby-On) - AUX (MP3 LINK): switches to DISC mode. - DISC: switches to AUX1, AUX2, DI (DIGITAL IN) or MP3 LINK external source mode. - ...

User manual
Page 11
... manual preset programming. - o í / ë (Previous/Next) - t SUBTITLE - u REPEAT A-B - DISC: selects movement direction in the menu. - Selects multi-channel surround, stereo or party mode. English Remote Control (continued) l OK - Enters a track/title/chapter number of a preset radio station. DISC: selects various repeat or shuffle modes; RADIO: press left or right for fast...
... manual preset programming. - o í / ë (Previous/Next) - t SUBTITLE - u REPEAT A-B - DISC: selects movement direction in the menu. - Selects multi-channel surround, stereo or party mode. English Remote Control (continued) l OK - Enters a track/title/chapter number of a preset radio station. DISC: selects various repeat or shuffle modes; RADIO: press left or right for fast...
User manual
Page 12
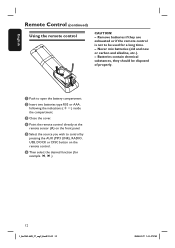
... Point the remote control directly at the remote sensor (iR) on the remote control. F Then select the desired function (for a long time. - English Remote Control (continued) Using the remote control CAUTION! - Never mix batteries (old and new or carbon and alkaline, etc.). - A Push to be disposed of properly. E Select the source you wish to control by pressing the... two batteries type R03 or AAA, following the indications (+-) inside the compartment. Batteries contain chemical substances, they are exhausted or if the remote control is not to open the battery compartment.
... Point the remote control directly at the remote sensor (iR) on the remote control. F Then select the desired function (for a long time. - English Remote Control (continued) Using the remote control CAUTION! - Never mix batteries (old and new or carbon and alkaline, etc.). - A Push to be disposed of properly. E Select the source you wish to control by pressing the... two batteries type R03 or AAA, following the indications (+-) inside the compartment. Batteries contain chemical substances, they are exhausted or if the remote control is not to open the battery compartment.
User manual
Page 20
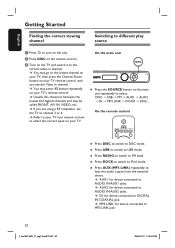
... 20 Press DISC to switch to FM band. Press RADIO to switch to DISC mode. B Press DISC on your TV's remote control. Usually this channel is between the lowest and highest channels and may go to select: DISC USB FM AUX1 AUX2 DI MP3...SOURCE button on the main unit repeatedly to the lowest channel on your TV, then press the Channel Down button on your TV remote control until you are using a RF modulator, set the TV to turn on the unit. You may press ° button repeatedly ... Turn on your TV. Refer to your TV user manual on how to select the correct input on the remote control.
... 20 Press DISC to switch to FM band. Press RADIO to switch to DISC mode. B Press DISC on your TV's remote control. Usually this channel is between the lowest and highest channels and may go to select: DISC USB FM AUX1 AUX2 DI MP3...SOURCE button on the main unit repeatedly to the lowest channel on your TV, then press the Channel Down button on your TV remote control until you are using a RF modulator, set the TV to turn on the unit. You may press ° button repeatedly ... Turn on your TV. Refer to your TV user manual on how to select the correct input on the remote control.

User manual
Page 21
... press . Audio, Subtitle and Disc Menu language for DVD playback You can select your country or region. B Press repeatedly to the illustrations shown on the remote control. { General Setup } icon appears. On-screen display (OSD) language The OSD (On-Screen Display) language for DVD playback. Preferences Audio Subtitle Disc Menu Parental PBC...
... press . Audio, Subtitle and Disc Menu language for DVD playback You can select your country or region. B Press repeatedly to the illustrations shown on the remote control. { General Setup } icon appears. On-screen display (OSD) language The OSD (On-Screen Display) language for DVD playback. Preferences Audio Subtitle Disc Menu Parental PBC...

User manual
Page 22
However, this does not change the audio or subtitle language respectively. Use the numeric keypad (0-9) on the remote control to confirm. Helpful Hints: - During DVD playback, you can only be changed via the DVD disc menu. 22 1_hts3565-66D_37_eng2_final813.i22 22 2008-03-27 3:...:01 PM E Repeat steps C ~ D for other settings. For some DVDs, the subtitle/audio/disc menu language can press the AUDIO SYNC or SUBTITLE on the remote control to enter the 4-digit language code 'XXXX' (see 'Language Code') and press OK to change the default settings you want is not available in the...
However, this does not change the audio or subtitle language respectively. Use the numeric keypad (0-9) on the remote control to confirm. Helpful Hints: - During DVD playback, you can only be changed via the DVD disc menu. 22 1_hts3565-66D_37_eng2_final813.i22 22 2008-03-27 3:...:01 PM E Repeat steps C ~ D for other settings. For some DVDs, the subtitle/audio/disc menu language can press the AUDIO SYNC or SUBTITLE on the remote control to enter the 4-digit language code 'XXXX' (see 'Language Code') and press OK to change the default settings you want is not available in the...

User manual
Page 23
... now completed and you have turned on the progressive scan mode on the TV and confirm your TV. C Press AUDIO SYNC on the remote control. In such a case, turn off (or set to interlaced mode.) Refer to the correct viewing channel for the this unit. Press ...manual. D Press repeatedly to your TV progressive scan mode, refer to select { Video Setup } icon, then press . G Turn on the remote control. A message appears on the remote control. B Press on the TV. Helpful Hints: - There are some progressive scan TV that the TV progressive scan mode is displayed A Press ç...
... now completed and you have turned on the progressive scan mode on the TV and confirm your TV. C Press AUDIO SYNC on the remote control. In such a case, turn off (or set to interlaced mode.) Refer to the correct viewing channel for the this unit. Press ...manual. D Press repeatedly to your TV progressive scan mode, refer to select { Video Setup } icon, then press . G Turn on the remote control. A message appears on the remote control. B Press on the TV. Helpful Hints: - There are some progressive scan TV that the TV progressive scan mode is displayed A Press ç...

User manual
Page 24
.... - Otherwise, the settings are closer to confirm. 24 1_hts3565-66D_37_eng2_final813.i24 24 2008-03-27 3:12:01 PM A In disc mode, press OPTIONS on the remote control. B Press repeatedly to 30 cm change in distance. - D Use keys to set the delay times (0 ms ~ 15 ms) for individual speakers. English Getting Started (continued...
.... - Otherwise, the settings are closer to confirm. 24 1_hts3565-66D_37_eng2_final813.i24 24 2008-03-27 3:12:01 PM A In disc mode, press OPTIONS on the remote control. B Press repeatedly to 30 cm change in distance. - D Use keys to set the delay times (0 ms ~ 15 ms) for individual speakers. English Getting Started (continued...
User manual
Page 25
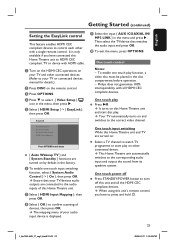
...the HDMI CEC compliant devices. This Home Theatre unit automatically switches to select { Video Setup } icon in the factory. When using this unit's remote control, you have to confirm scanning of devices, then press OK. It is displayed. H Select { OK } to press and hold 2. 25...E Select { HDMI Setup } > { EasyLink }, then press OK. EasyLink Auto Wakeup TV System Standby System Audio Control HDMI Input Mapping Press OPTIONS to the correct video channel. Philips does not guarantee 100% interoperability with HDMI cable. Your TV automatically turns on and switches to exit menu { Auto...
...the HDMI CEC compliant devices. This Home Theatre unit automatically switches to select { Video Setup } icon in the factory. When using this unit's remote control, you have to confirm scanning of devices, then press OK. It is displayed. H Select { OK } to press and hold 2. 25...E Select { HDMI Setup } > { EasyLink }, then press OK. EasyLink Auto Wakeup TV System Standby System Audio Control HDMI Input Mapping Press OPTIONS to the correct video channel. Philips does not guarantee 100% interoperability with HDMI cable. Your TV automatically turns on and switches to exit menu { Auto...
User manual
Page 26
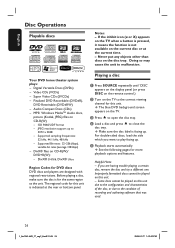
... Region Codes for more playback options and features. Playing a disc A Press SOURCE repeatedly until 'DISC' appears on the display panel (or press DISC on the remote control.) B Turn on the current disc or at the rear or bottom panel. C Press ç to the correct viewing channel for this unit. - For double-sided...
... Region Codes for more playback options and features. Playing a disc A Press SOURCE repeatedly until 'DISC' appears on the display panel (or press DISC on the remote control.) B Turn on the current disc or at the rear or bottom panel. C Press ç to the correct viewing channel for this unit. - For double-sided...
User manual
Page 27
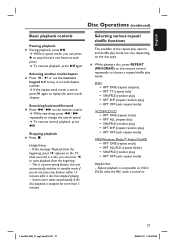
.../Windows Media™ Audio/ DivX® RPT ONE (repeat track) RPT ALL/FLD (repeat folder) SHUFFLE (random play mode are vary depending on the remote control repeatedly to step forward one frame at each press. Repeat playback is not possible on VCDs/ SVCDs when the PBC mode is a power-saving feature... press u. Helpful Hints: - Stopping playback Press Ç. If the repeat track mode is stopped for more than 5 minutes. Searching backward/forward Press m / M on the remote control. English Disc Operations (continued) Basic playback controls Pausing playback During playback, press u.
.../Windows Media™ Audio/ DivX® RPT ONE (repeat track) RPT ALL/FLD (repeat folder) SHUFFLE (random play mode are vary depending on the remote control repeatedly to step forward one frame at each press. Repeat playback is not possible on VCDs/ SVCDs when the PBC mode is a power-saving feature... press u. Helpful Hints: - Stopping playback Press Ç. If the repeat track mode is stopped for more than 5 minutes. Searching backward/forward Press m / M on the remote control. English Disc Operations (continued) Basic playback controls Pausing playback During playback, press u.
User manual
Page 28
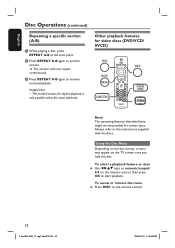
Always refer to resume normal playback. Using the Disc Menu Depending on the disc format, a menu may appear on the remote control. 28 1_hts3565-66D_37_eng2_final813.i28 28 2008-03-27 3:12:02 PM The marked section for certain discs. The section will now repeat continuously. To access ...) Repeating a specific section (A-B) A While playing a disc, press REPEAT A-B at the start playback. To select a playback feature or item Use keys or numeric keypad 0-9 on the remote control, then press OK to end the section. Helpful Hint: - B Press REPEAT A-B again to start point.
Always refer to resume normal playback. Using the Disc Menu Depending on the disc format, a menu may appear on the remote control. 28 1_hts3565-66D_37_eng2_final813.i28 28 2008-03-27 3:12:02 PM The marked section for certain discs. The section will now repeat continuously. To access ...) Repeating a specific section (A-B) A While playing a disc, press REPEAT A-B at the start playback. To select a playback feature or item Use keys or numeric keypad 0-9 on the remote control, then press OK to end the section. Helpful Hint: - B Press REPEAT A-B again to start point.
User manual
Page 33
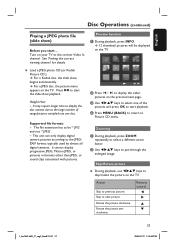
... select one of songs/pictures compiled into one disc. Zooming A During playback, press ZOOM repeatedly to skip/rotate the picture on the previous/next page. Remote control 1_hts3565-66D_37_eng2_final813.i33 33 33 2008-03-27 3:12:04 PM Skip/Rotate picture During playback, use keys to select a different zoom factor. Supported file...
... select one of songs/pictures compiled into one disc. Zooming A During playback, press ZOOM repeatedly to skip/rotate the picture on the previous/next page. Remote control 1_hts3565-66D_37_eng2_final813.i33 33 33 2008-03-27 3:12:04 PM Skip/Rotate picture During playback, use keys to select a different zoom factor. Supported file...
User manual
Page 34
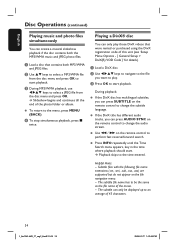
... that contains both the MP3/WMA music and JPEG photo files. D To stop simultaneous playback, press x twice. Use m / M on the remote control to the menu, press MENU (BACK). Slideshow begins and continues till the end of 45 characters. 34 1_hts3565-66D_37_eng2_final813.i34 34 2008-03-27 3:... - Subtitle files with the following file name extensions (.srt, .smi, .sub, .ssa, .ass) are supported but do not appear on the remote control to start playback. C Press OK to the time entered. Playback skips to start . Press INFO repeatedly until the Time Search menu appears, key in...
... that contains both the MP3/WMA music and JPEG photo files. D To stop simultaneous playback, press x twice. Use m / M on the remote control to the menu, press MENU (BACK). Slideshow begins and continues till the end of 45 characters. 34 1_hts3565-66D_37_eng2_final813.i34 34 2008-03-27 3:... - Subtitle files with the following file name extensions (.srt, .smi, .sub, .ssa, .ass) are supported but do not appear on the remote control to start playback. C Press OK to the time entered. Playback skips to start . Press INFO repeatedly until the Time Search menu appears, key in...
User manual
Page 35
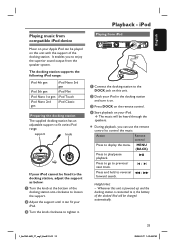
It enables you can use the remote control to control the music: Action Remote control Press to the docking station, adjust the support as below: A Turn the knob at the bottom of the docked iPod will be played on this ... cannot be charged automatically. 1_hts3565-66D_37_eng2_final813.i35 35 35 2008-03-27 3:12:04 PM C Turn the knob clockwise to the DOCK jack on the remote control. Playback - iPod Playing from iPod AUX 2 AUX 1 A Connect the docking station to tighten it on. B Dock your iPod in the docking station and turn it...
It enables you can use the remote control to control the music: Action Remote control Press to the docking station, adjust the support as below: A Turn the knob at the bottom of the docked iPod will be played on this ... cannot be charged automatically. 1_hts3565-66D_37_eng2_final813.i35 35 35 2008-03-27 3:12:04 PM C Turn the knob clockwise to the DOCK jack on the remote control. Playback - iPod Playing from iPod AUX 2 AUX 1 A Connect the docking station to tighten it on. B Dock your iPod in the docking station and turn it...

User manual
Page 36
... vary from the USB device. - The USB jack does not support the connection of 300 folders and 648 files. - When using multiple drives on the remote control to play or view the data files (JPEG, MP3, Windows Media™ Audio or DivX®) in the drive. B A message appears on this unit. When...
... vary from the USB device. - The USB jack does not support the connection of 300 folders and 648 files. - When using multiple drives on the remote control to play or view the data files (JPEG, MP3, Windows Media™ Audio or DivX®) in the drive. B A message appears on this unit. When...
User manual
Page 37
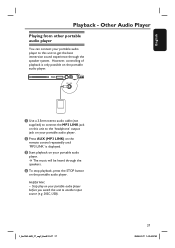
... switch this unit to the 'headphone' output jack on this unit to get the best immersion sound experience through the speakers. However, controlling of playback is only possible on the remote control repeatedly until 'MP3 LINK' is displayed. C Start playback on the portable audio player. Helpful Hint: - The music will be heard through...
... switch this unit to the 'headphone' output jack on this unit to get the best immersion sound experience through the speakers. However, controlling of playback is only possible on the remote control repeatedly until 'MP3 LINK' is displayed. C Start playback on the portable audio player. Helpful Hint: - The music will be heard through...


