
User manual
Page 2
... is not liable for any damage to or loss of any , programs data, or other information stored on the product, and installation or repair of antenna/signal source systems outside of the product. • Product repair and/or part replacement because of products damaged by these modifications. • A product used for their own products packaged with a product that can result...
... is not liable for any damage to or loss of any , programs data, or other information stored on the product, and installation or repair of antenna/signal source systems outside of the product. • Product repair and/or part replacement because of products damaged by these modifications. • A product used for their own products packaged with a product that can result...
User manual
Page 3
... box 4 Overview of the main unit 5 Overview of the remote control 6 4 Get started 8 Attach speakers to the main unit 8 Attach the stand 8 Connect AV devices 9 Connect power 12 Prepare the remote control 12 Turn on 13 Set clock 13 Enable Easylink 13 5 Play 13 Play from USB 13 Play connected AV devices 14 6 Adjust volume level and sound effect 14 Adjust volume level 14 Select a sound effect 14 Mute sound 15 Enable audio sync 15 7 Use more of your home theater...
... box 4 Overview of the main unit 5 Overview of the remote control 6 4 Get started 8 Attach speakers to the main unit 8 Attach the stand 8 Connect AV devices 9 Connect power 12 Prepare the remote control 12 Turn on 13 Set clock 13 Enable Easylink 13 5 Play 13 Play from USB 13 Play connected AV devices 14 6 Adjust volume level and sound effect 14 Adjust volume level 14 Select a sound effect 14 Mute sound 15 Enable audio sync 15 7 Use more of your home theater...
User manual
Page 4
... into your home theater. A polarized plug has two blades with dry cloth. • Do not block any way, such as the disconnected device, the disconnect device shall remain readily operable. com or www.eiae.org or www.recycle. 1 Important Read and understand all batteries correctly, + and - If damage is used as power-supply cord or plug is used , use caution...
... into your home theater. A polarized plug has two blades with dry cloth. • Do not block any way, such as the disconnected device, the disconnect device shall remain readily operable. com or www.eiae.org or www.recycle. 1 Important Read and understand all batteries correctly, + and - If damage is used as power-supply cord or plug is used , use caution...

User manual
Page 5
... This item incorporates copy protection technology that to which the receiver is protected by Philips Consumer Lifestyle may void the user's authority to features for help. These limits are not expressly approved by U.S. This equipment generates, uses and can radiate radio frequency energy and, if not installed and used in a residential installation. The 'exclamation point' calls attention to operate the equipment. The correct...
... This item incorporates copy protection technology that to which the receiver is protected by Philips Consumer Lifestyle may void the user's authority to features for help. These limits are not expressly approved by U.S. This equipment generates, uses and can radiate radio frequency energy and, if not installed and used in a residential installation. The 'exclamation point' calls attention to operate the equipment. The correct...
User manual
Page 6
.... CLASS 1 LASER PRODUCT 3 Your home theater system Congratulations on your purchase, and welcome to music, or play games. • Enjoy MP3/WMA music directly from your package: • Main unit • Speakers (x 2) • Digital subwoofer • Remote control (with Canadian ICES-003. Trademarks HDMI, and HDMI logo and High-Definition Multimedia Interface are trademarks of Dolby Laboratories. Dolby, Pro Logic, and the double...
.... CLASS 1 LASER PRODUCT 3 Your home theater system Congratulations on your purchase, and welcome to music, or play games. • Enjoy MP3/WMA music directly from your package: • Main unit • Speakers (x 2) • Digital subwoofer • Remote control (with Canadian ICES-003. Trademarks HDMI, and HDMI logo and High-Definition Multimedia Interface are trademarks of Dolby Laboratories. Dolby, Pro Logic, and the double...
User manual
Page 7
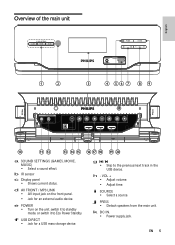
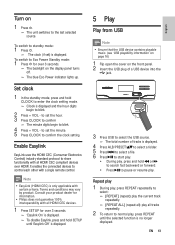
.... e POWER • Turn on the front panel. • Jack for a USB mass storage device. f USB DIRECT • Jack for an external audio device. h - d AV FRONT / MP3 LINK • AV input jack on the unit, switch it to standby mode, or switch it to the previous/next track in the USB device. Overview of the main unit English a b c d ef g h i OPTICAL HDMI IN 1 HDMI IN 2 HDMI OUT j kl m n o pq r s t a SOUND SETTINGS (GAMES, MOVIE, MUSIC) • Select a sound...
.... e POWER • Turn on the front panel. • Jack for a USB mass storage device. f USB DIRECT • Jack for an external audio device. h - d AV FRONT / MP3 LINK • AV input jack on the unit, switch it to standby mode, or switch it to the previous/next track in the USB device. Overview of the main unit English a b c d ef g h i OPTICAL HDMI IN 1 HDMI IN 2 HDMI OUT j kl m n o pq r s t a SOUND SETTINGS (GAMES, MOVIE, MUSIC) • Select a sound...
User manual
Page 8
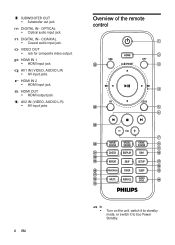
...; Optical audio input jack. o VIDEO OUT • Jack for composite video output. q AV1 IN (VIDEO, AUDIO L/R) • AV input jacks. Overview of the remote control a b y c d x e f w g v h i u j t s k l r m q p n o 6 EN a • Turn on the unit, switch it to standby mode, or switch it to Eco Power Standby. n DIGITAL IN - r HDMI IN 2 • HDMI input jack. s HDMI OUT • HDMI output jack. t AV2 IN (VIDEO, AUDIO L/R) • AV input jacks. COAXIAL • Coaxial audio input jack. m DIGITAL IN - p HDMI IN 1 • HDMI input jack. l SUBWOOFER...
...; Optical audio input jack. o VIDEO OUT • Jack for composite video output. q AV1 IN (VIDEO, AUDIO L/R) • AV input jacks. Overview of the remote control a b y c d x e f w g v h i u j t s k l r m q p n o 6 EN a • Turn on the unit, switch it to standby mode, or switch it to Eco Power Standby. n DIGITAL IN - r HDMI IN 2 • HDMI input jack. s HDMI OUT • HDMI output jack. t AV2 IN (VIDEO, AUDIO L/R) • AV input jacks. COAXIAL • Coaxial audio input jack. m DIGITAL IN - p HDMI IN 1 • HDMI input jack. l SUBWOOFER...
User manual
Page 9
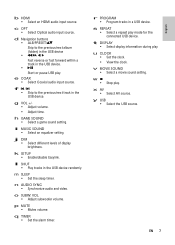
... Optical audio input source.. d Navigation buttons • ALB/PRESET/ Skip to the previous/next track in the USB device. • Start or pause USB play . h GAME SOUND • Select a game sound setting. VOL • Adjust subwoofer volume. y USB • Select the USB source. t DISPLAY • Select display information during play mode for the connected USB device. b HDMI • Select an HDMI audio input source. g VOL +/• Adjust volume. • Adjust time. p MUTE • Mutes volume. r PROGRAM • Program tracks in the USB device randomly. n AUDIO SYNC...
... Optical audio input source.. d Navigation buttons • ALB/PRESET/ Skip to the previous/next track in the USB device. • Start or pause USB play . h GAME SOUND • Select a game sound setting. VOL • Adjust subwoofer volume. y USB • Select the USB source. t DISPLAY • Select display information during play mode for the connected USB device. b HDMI • Select an HDMI audio input source. g VOL +/• Adjust volume. • Adjust time. p MUTE • Mutes volume. r PROGRAM • Program tracks in the USB device randomly. n AUDIO SYNC...
User manual
Page 10
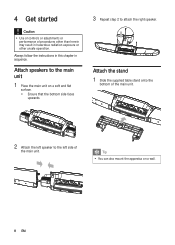
.... • Ensure that the bottom side faces upwards. 3 Repeat step 2 to the main unit 1 Place the main unit on a wall. 8 EN Attach speakers to attach the right speaker. 4 Get started Caution • Use of controls or adjustments or performance of the main unit. Always follow the instructions in this chapter in hazardous radiation exposure or other unsafe...
.... • Ensure that the bottom side faces upwards. 3 Repeat step 2 to the main unit 1 Place the main unit on a wall. 8 EN Attach speakers to attach the right speaker. 4 Get started Caution • Use of controls or adjustments or performance of the main unit. Always follow the instructions in this chapter in hazardous radiation exposure or other unsafe...
User manual
Page 11
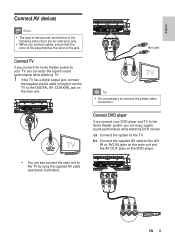
... 1 HDMI IN 2 AUDIO OUT L AUDIO R VIDEO EN 9 English Connect AV devices Note • The type of the jack. Connect DVD player If you can enjoy the superb sound performance while watching TV. 1 If the TV has a digital output jack, connect the supplied coaxial cable (orange) from the TV to the TV. OPTICAL HDMI IN 1 HDMI IN 2 HDMI OUT AUDIO OUT (DIGITAL) TV • You can also connect the main unit to the home theater...
... 1 HDMI IN 2 AUDIO OUT L AUDIO R VIDEO EN 9 English Connect AV devices Note • The type of the jack. Connect DVD player If you can enjoy the superb sound performance while watching TV. 1 If the TV has a digital output jack, connect the supplied coaxial cable (orange) from the TV to the TV. OPTICAL HDMI IN 1 HDMI IN 2 HDMI OUT AUDIO OUT (DIGITAL) TV • You can also connect the main unit to the home theater...
User manual
Page 12
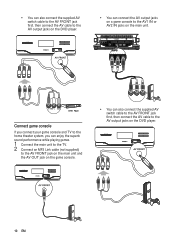
OPTICAL HDMI IN 1 HDMI IN 2 HDMI OUT AUDIO OUT L AUDIO R VIDEO Connect game console If you connect your game console and TV to the home theater system, you can enjoy the superb sound performance while playing games. 1 Connect the main unit to the TV. 2 Connect an MP3 Link cable (not supplied) to the AV FRONT jack on the main unit and the AV OUT jack on the game console...
OPTICAL HDMI IN 1 HDMI IN 2 HDMI OUT AUDIO OUT L AUDIO R VIDEO Connect game console If you connect your game console and TV to the home theater system, you can enjoy the superb sound performance while playing games. 1 Connect the main unit to the TV. 2 Connect an MP3 Link cable (not supplied) to the AV FRONT jack on the main unit and the AV OUT jack on the game console...
User manual
Page 13
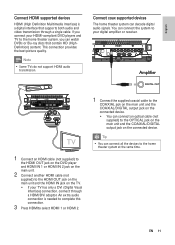
... optical cable (not supplied) to the OPTICAL jack on the main unit and the COAXIAL/DIGITAL output jack on the TV. • If your digital amplifier or receiver. If you connect your HDMI-compliant DVD players and TV to the home theater system, you can connect the system to the home theater system at the same time. EN 11 You can watch DVDs or Blu-ray discs that supports both audio and video...
... optical cable (not supplied) to the OPTICAL jack on the main unit and the COAXIAL/DIGITAL output jack on the TV. • If your digital amplifier or receiver. If you connect your HDMI-compliant DVD players and TV to the home theater system, you can connect the system to the home theater system at the same time. EN 11 You can watch DVDs or Blu-ray discs that supports both audio and video...
User manual
Page 14
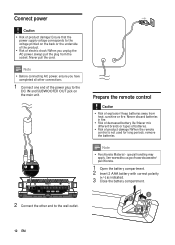
Ensure that the power supply voltage corresponds to the wall outlet. Never pull the cord. OPTICAL HDMI IN 1 HDMI IN 2 HDMI OUT 2 Connect the other connections. 1 Connect one end of the power plug to the DC IN and SUBWOOFER OUT jack on the back or the underside of the product. • Risk of electric shock! Connect power Caution • Risk of explosion! Prepare the remote control Caution • Risk...
Ensure that the power supply voltage corresponds to the wall outlet. Never pull the cord. OPTICAL HDMI IN 1 HDMI IN 2 HDMI OUT 2 Connect the other connections. 1 Connect one end of the power plug to the DC IN and SUBWOOFER OUT jack on the back or the underside of the product. • Risk of electric shock! Connect power Caution • Risk of explosion! Prepare the remote control Caution • Risk...
User manual
Page 15
... the clock setting mode. » Clock is displayed and the hour digits begin to control each other with certain criteria. Enable Easylink EasyLink uses the HDMI CEC (Consumer Electronics Control) industry standard protocol to share functionality with all tracks repeatedly. 2 To return to Eco Power Standby mode: 1 Press for over 3 seconds. » The backlight on the display panel turns off. » The blue Eco Power indicator lights up...
... the clock setting mode. » Clock is displayed and the hour digits begin to control each other with certain criteria. Enable Easylink EasyLink uses the HDMI CEC (Consumer Electronics Control) industry standard protocol to share functionality with all tracks repeatedly. 2 To return to Eco Power Standby mode: 1 Press for over 3 seconds. » The backlight on the display panel turns off. » The blue Eco Power indicator lights up...
User manual
Page 16
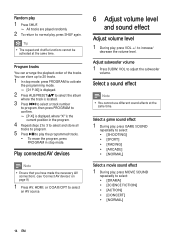
.... 1 In stop mode, press PROGRAM to activate the programming mode. » [01 P-00] is displayed. 2 Press ALB/PRESET/ to select the album where the track is located. 3 Press / to select a track number to program, then press PROGRAM to confirm. » [P-X] is displayed, where "X" is the current position in stop mode. Adjust subwoofer volume 1 Press SUBW. Select a game sound effect 1 During play, press GAME SOUND repeatedly to select: • [SHOOTING...
.... 1 In stop mode, press PROGRAM to activate the programming mode. » [01 P-00] is displayed. 2 Press ALB/PRESET/ to select the album where the track is located. 3 Press / to select a track number to program, then press PROGRAM to confirm. » [P-X] is displayed, where "X" is the current position in stop mode. Adjust subwoofer volume 1 Press SUBW. Select a game sound effect 1 During play, press GAME SOUND repeatedly to select: • [SHOOTING...
User manual
Page 17
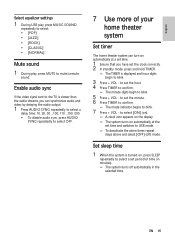
... disable audio sync, press AUDIO SYNC repeatedly to select OFF. 7 Use more of time (in the selected time. Enable audio sync If the video signal sent to the TV is slower than the audio streams, you have set the clock correctly. 2 In standby mode, press and hold TIMER. » The TIMER is turned on automatically at the set period of your home theater system Set timer The home theater system can turn on...
... disable audio sync, press AUDIO SYNC repeatedly to select OFF. 7 Use more of time (in the selected time. Enable audio sync If the video signal sent to the TV is slower than the audio streams, you have set the clock correctly. 2 In standby mode, press and hold TIMER. » The TIMER is turned on automatically at the set period of your home theater system Set timer The home theater system can turn on...
User manual
Page 18
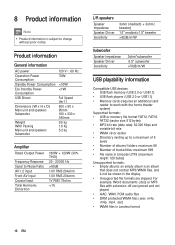
Product information General information AC power Operation Power Consumption Standby Power Consumption Eco Standby Power Consumption USB Direct Dimensions (W x H x D) Main unit and speakers Subwoofer Weight With Packing Main unit and speakers Subwoofer 120 V~, 60 Hz 70W 8 Product information Note • Product information is subject to change without prior notice.
Product information General information AC power Operation Power Consumption Standby Power Consumption Eco Standby Power Consumption USB Direct Dimensions (W x H x D) Main unit and speakers Subwoofer Weight With Packing Main unit and speakers Subwoofer 120 V~, 60 Hz 70W 8 Product information Note • Product information is subject to change without prior notice.
User manual
Page 19
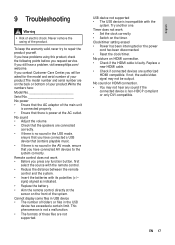
... not, the audio/video signal may not hear any function button, first select the source with the remote control. • Reduce the distance between the remote control and the system. • Insert the batteries with the system. If you have a problem, visit www.philips.com/ welcome. If you contact Customer Care Center, you request service. No sound • Adjust the volume. • Check that the speakers are on...
... not, the audio/video signal may not hear any function button, first select the source with the remote control. • Reduce the distance between the remote control and the system. • Insert the batteries with the system. If you have a problem, visit www.philips.com/ welcome. If you contact Customer Care Center, you request service. No sound • Adjust the volume. • Check that the speakers are on...

User manual
Page 20
...to safely mount the product to mark the drilling positions. 1 x wall mount bracket for the main unit and speakers 2 Drill holes as gas, water or electricity are harmed when you 'll need • Electric drill • Screwdriver • Pencil 18 EN ...speakers Caution • To find a suitable mounting location, make the necessary physical and wireless connections. • Mount the main unit and speakers to the wall. 1 Align the bracket in the chosen location on a wall. Ensure that no supply ducts such as marked. 4 x screws What else you drill the holes. Use a pencil to a wall...
...to safely mount the product to mark the drilling positions. 1 x wall mount bracket for the main unit and speakers 2 Drill holes as gas, water or electricity are harmed when you 'll need • Electric drill • Screwdriver • Pencil 18 EN ...speakers Caution • To find a suitable mounting location, make the necessary physical and wireless connections. • Mount the main unit and speakers to the wall. 1 Align the bracket in the chosen location on a wall. Ensure that no supply ducts such as marked. 4 x screws What else you drill the holes. Use a pencil to a wall...
User manual
Page 21
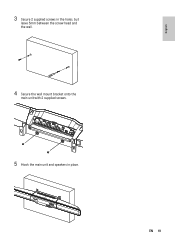
3 Secure 2 supplied screws in the holes, but leave 5mm between the screw head and the wall. 4 Secure the wall mount bracket onto the main unit with 2 supplied screws. 5 Hook the main unit and speakers in place. EN 19 English
3 Secure 2 supplied screws in the holes, but leave 5mm between the screw head and the wall. 4 Secure the wall mount bracket onto the main unit with 2 supplied screws. 5 Hook the main unit and speakers in place. EN 19 English


