Leaflet
Page 2
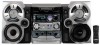
... switch to be extreme (see illustration). Shuffle One/All Discs Plays all CD functions (POWER, NEXT, PREVIOUS, PLAY, STOP, PAUSE, SHUFFLE, REPEAT, PROGRAM, CD123, CD DIRECT 1, 2, 3, G and F), AUX/CDR select, TUNER select, TAPE 1/2 select, AUTO REPLAY, TIMER ON/OFF, CLOCK, DISPLAY, SLEEP and sound enhancement features including MUTE, Digital Sound Control (DSC), Virtual Ambience Control (VAC), Incredible Surround, wOOx On/Off and wOOx Level. UPC Code: 0 37849918685 Product Dimensions: 10.4" W x 12.2" H x 15.4" D (electronics) 9.4" W x 13.8" H x 12.2" D (speakers...
... switch to be extreme (see illustration). Shuffle One/All Discs Plays all CD functions (POWER, NEXT, PREVIOUS, PLAY, STOP, PAUSE, SHUFFLE, REPEAT, PROGRAM, CD123, CD DIRECT 1, 2, 3, G and F), AUX/CDR select, TUNER select, TAPE 1/2 select, AUTO REPLAY, TIMER ON/OFF, CLOCK, DISPLAY, SLEEP and sound enhancement features including MUTE, Digital Sound Control (DSC), Virtual Ambience Control (VAC), Incredible Surround, wOOx On/Off and wOOx Level. UPC Code: 0 37849918685 Product Dimensions: 10.4" W x 12.2" H x 15.4" D (electronics) 9.4" W x 13.8" H x 12.2" D (speakers...
User manual
Page 2
What's more, your total satisfaction. NO USER-SERVICEABLE PARTS INSIDE. Lawrence J. MAC5097 For Customer Use Enter below the Serial No. Model Registration Returning your Warranty Registration Card right away guarantees you'll receive all the information and special offers which you qualify, plus easy access to accessories from your Philips product, you must return your Warranty Registration Card within your...
What's more, your total satisfaction. NO USER-SERVICEABLE PARTS INSIDE. Lawrence J. MAC5097 For Customer Use Enter below the Serial No. Model Registration Returning your Warranty Registration Card right away guarantees you'll receive all the information and special offers which you qualify, plus easy access to accessories from your Philips product, you must return your Warranty Registration Card within your...

User manual
Page 3
...; ™ ¡ ) ( * % & DISC CHANGE 3CD C H A N G E R DISC 1 3 DISC DIRECT PLAY DISC 2 DISC 3 OPEN • CLOSE CD / CD-R / CD-RW COMPATIBLE CD SYNCHRO RECORDING FWSTANDBY-ON MINI HIFI SYSTEM VOLUME PR G ISNUCRRREODIUBNLDE ECO POWER EV PRESET N DEMO STOP/ CLEAR PLAY• PAUSE EARCH • TUNIN DISPLAY PROG CLOCK• TIMER AUTO REPLAY DUBBING REC MUSIC LEVEL VOLUME INTERACTIVE VU METER CD 1•2•3 FM •AM CD TUNER SOURCE TAPE AUX TAPE 1•2 CDR / DVD ON •OFF WOOX LEVEL WOOX DYNAMIC AMPLIFICATION CONTROL SOUND NAVIGATION -
...; ™ ¡ ) ( * % & DISC CHANGE 3CD C H A N G E R DISC 1 3 DISC DIRECT PLAY DISC 2 DISC 3 OPEN • CLOSE CD / CD-R / CD-RW COMPATIBLE CD SYNCHRO RECORDING FWSTANDBY-ON MINI HIFI SYSTEM VOLUME PR G ISNUCRRREODIUBNLDE ECO POWER EV PRESET N DEMO STOP/ CLEAR PLAY• PAUSE EARCH • TUNIN DISPLAY PROG CLOCK• TIMER AUTO REPLAY DUBBING REC MUSIC LEVEL VOLUME INTERACTIVE VU METER CD 1•2•3 FM •AM CD TUNER SOURCE TAPE AUX TAPE 1•2 CDR / DVD ON •OFF WOOX LEVEL WOOX DYNAMIC AMPLIFICATION CONTROL SOUND NAVIGATION -
User manual
Page 7
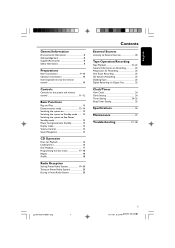
... Play 13 Demonstration mode 13-14 Switching the system on 14 Switching the system to Standby mode ........ 14 Switching the system to Eco Power Standby mode 14 Power Saving Automatic Standby 14 Display mode 14 Volume Control 14 Sound Navigation 15 CD Operation Discs for Playback 16 Loading Discs 16 Disc Playback 17 Programming the disc tracks 17-18 Repeat 18 Shuffle 18 Radio Reception Storing Preset Radio Stations 19-20 Tuning to Preset Radio Stations 20 Erasing a Preset Radio Station 20 Contents External Sources Listening to External Sources 20 Tape Operation...
... Play 13 Demonstration mode 13-14 Switching the system on 14 Switching the system to Standby mode ........ 14 Switching the system to Eco Power Standby mode 14 Power Saving Automatic Standby 14 Display mode 14 Volume Control 14 Sound Navigation 15 CD Operation Discs for Playback 16 Loading Discs 16 Disc Playback 17 Programming the disc tracks 17-18 Repeat 18 Shuffle 18 Radio Reception Storing Preset Radio Stations 19-20 Tuning to Preset Radio Stations 20 Erasing a Preset Radio Station 20 Contents External Sources Listening to External Sources 20 Tape Operation...
User manual
Page 8
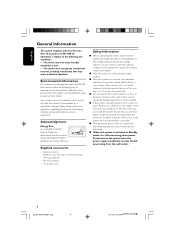
.... Remote control - FM wire antenna - AC power cord Safety Information G Before operating the system, check that may not cause harmful interference, and - G Place the system in a location with adequate ventilation to a warm location, or is identical with 21 CFR 1040.10. Should this product meets the ENERGY STARR guidelines for remote control - G The mechanical parts of the disc unit inside the system. G When the system is switched...
.... Remote control - FM wire antenna - AC power cord Safety Information G Before operating the system, check that may not cause harmful interference, and - G Place the system in a location with adequate ventilation to a warm location, or is identical with 21 CFR 1040.10. Should this product meets the ENERGY STARR guidelines for remote control - G The mechanical parts of the disc unit inside the system. G When the system is switched...
User manual
Page 9
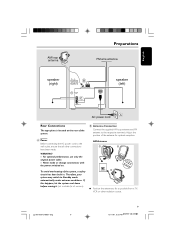
... PM 3139 115 21181 Adjust the position of the antenna for all other radiation source. AM Antenna To avoid overheating of the system. English AM loop antenna Preparations FM wire antenna speaker (right) RL LINE OUT AUX/ CDR IN B AM ANTENNA FM ANTENNA SUBWOOFER OUT DIGITAL OUT C R L + - - + SPEAKERS 6Ω AC MAINS speaker (left) AC power cord A Rear Connections The type plate is located at the rear of the system, a safety circuit has...
... PM 3139 115 21181 Adjust the position of the antenna for all other radiation source. AM Antenna To avoid overheating of the system. English AM loop antenna Preparations FM wire antenna speaker (right) RL LINE OUT AUX/ CDR IN B AM ANTENNA FM ANTENNA SUBWOOFER OUT DIGITAL OUT C R L + - - + SPEAKERS 6Ω AC MAINS speaker (left) AC power cord A Rear Connections The type plate is located at the rear of the system, a safety circuit has...
User manual
Page 10
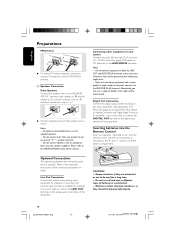
... the battery compartment. 2 1 Optional Connections The optional equipment and connecting cords are exhausted or not to the AUX/CDR IN terminals. Line Out Connection Connect this manual. C Speakers Connection Front Speakers Connect the speaker wires to the SPEAKERS (FRONT) terminals, right speaker to "R" and left and right OUT terminals of this output to the FM ANTENNA terminal. Please refer to the SPECIFICATIONS section of a TV,VCR, Laser Disc player, DVD player or CD Recorder...
... the battery compartment. 2 1 Optional Connections The optional equipment and connecting cords are exhausted or not to the AUX/CDR IN terminals. Line Out Connection Connect this manual. C Speakers Connection Front Speakers Connect the speaker wires to the SPEAKERS (FRONT) terminals, right speaker to "R" and left and right OUT terminals of this output to the FM ANTENNA terminal. Please refer to the SPECIFICATIONS section of a TV,VCR, Laser Disc player, DVD player or CD Recorder...

User manual
Page 11
... plug & play mode. VAC HALL, CONCERT, CINEMA, DISCO, ARCADE or CYBER. # INCREDIBLE SURROUND (IS) - to dub a tape. SOUND NAVIGATION - to select a disc tray for TUNER ........ DEMO STOP/CLEAR Ç for DEMO ......... (on the system only) to activate/ deactivate the demonstration. English Controls (main system's illustration on page 3) Controls on or to Eco Power Standby mode. 2 STANDBY ON y - to reset tape counter number. for CD to stop playback or recording to switch the system on the system and remote control...
... plug & play mode. VAC HALL, CONCERT, CINEMA, DISCO, ARCADE or CYBER. # INCREDIBLE SURROUND (IS) - to dub a tape. SOUND NAVIGATION - to select a disc tray for TUNER ........ DEMO STOP/CLEAR Ç for DEMO ......... (on the system only) to activate/ deactivate the demonstration. English Controls (main system's illustration on page 3) Controls on or to Eco Power Standby mode. 2 STANDBY ON y - to reset tape counter number. for CD to stop playback or recording to switch the system on the system and remote control...
User manual
Page 13
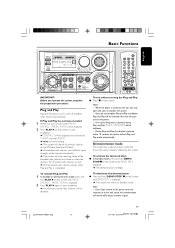
... system. - JOG DSC VAC EXT S IMPORTANT! FWSTANDBY-ON MINI HIFI SYSTEM Basic Functions VOLUME PR G ISNUCRRREODIUBNLDE English ECO POWER EV PRESET N DEMO PLAY• STOP/ PAUSE CLEAR EARCH • TUNIN DISPLAY PROG CLOCK• TIMER AUTO REPLAY DUBBING REC MUSIC LEVEL VOLUME INTERACTIVE VU METER CD 1•2•3 FM •AM CD TUNER SOURCE TAPE AUX TAPE 1•2 CDR / DVD ON •OFF WOOX LEVEL WOOX DYNAMIC AMPLIFICATION CONTROL SOUND NAVIGATION - Before you turn on the system...
... system. - JOG DSC VAC EXT S IMPORTANT! FWSTANDBY-ON MINI HIFI SYSTEM Basic Functions VOLUME PR G ISNUCRRREODIUBNLDE English ECO POWER EV PRESET N DEMO PLAY• STOP/ PAUSE CLEAR EARCH • TUNIN DISPLAY PROG CLOCK• TIMER AUTO REPLAY DUBBING REC MUSIC LEVEL VOLUME INTERACTIVE VU METER CD 1•2•3 FM •AM CD TUNER SOURCE TAPE AUX TAPE 1•2 CDR / DVD ON •OFF WOOX LEVEL WOOX DYNAMIC AMPLIFICATION CONTROL SOUND NAVIGATION - Before you turn on the system...
User manual
Page 14
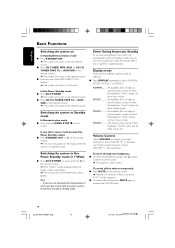
... will light up and the display screen will have full brightness. MODE 3 .......... G Press CD, TUNER, TAPE, AUX (or CD 123, TUNER, TAPE 1/2 or AUX/CDR on the system. To switch off . G Press DISPLAY repeatedly to increase (turn knob clockwise or press VOLUME +) or decrease (turn knob counter-clockwise or press VOLUME -) the sound level. MODE 2 .......... The VU meter and all LEDs will be muted. Note: - G Press CD 123, TUNER, TAPE 1/2 or AUX/ CDR on the remote control...
... will light up and the display screen will have full brightness. MODE 3 .......... G Press CD, TUNER, TAPE, AUX (or CD 123, TUNER, TAPE 1/2 or AUX/CDR on the system. To switch off . G Press DISPLAY repeatedly to increase (turn knob clockwise or press VOLUME +) or decrease (turn knob counter-clockwise or press VOLUME -) the sound level. MODE 2 .......... The VU meter and all LEDs will be muted. Note: - G Press CD 123, TUNER, TAPE 1/2 or AUX/ CDR on the remote control...
User manual
Page 15
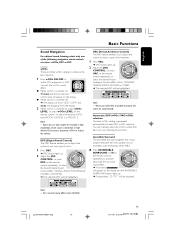
... navigation sound controls at high volume. You can manually select the wOOx setting that best suits your type of music. 1 Press DSC. ➜ DSC button lights up . ➜ If deactivated, "IS OFF" will be recorded in high modulation, which causes a distortion at a time : wOOx, DSC or VAC. Note: - Some discs or tapes might be displayed. G Press INCREDIBLE SURROUND (or IS on the remote control repeatedly) to switch ON...
... navigation sound controls at high volume. You can manually select the wOOx setting that best suits your type of music. 1 Press DSC. ➜ DSC button lights up . ➜ If deactivated, "IS OFF" will be recorded in high modulation, which causes a distortion at a time : wOOx, DSC or VAC. Note: - Some discs or tapes might be displayed. G Press INCREDIBLE SURROUND (or IS on the remote control repeatedly) to switch ON...
User manual
Page 16
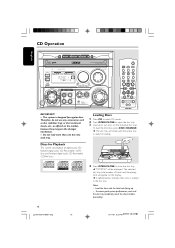
... the changer mechanism. - Load the discs with the label side facing up to open the disc tray. 3 Load up . - CD Operation English DISC CHANGE 3CD C H A N G E R DISC 1 3 DISC DIRECT PLAY DISC 2 DISC 3 OPEN • CLOSE CD / CD-R / CD-RW COMPATIBLE CD SYNCHRO RECORDING FWSTANDBY-ON MINI HIFI SYSTEM VOLUME ECO POWER DISPLAY PROG CLOCK• TIMER AUTO REPLAY DUBBING REC MUSIC LEVEL VOLUME INTERACTIVE VU METER EXT S EV PRESET N DEMO PLAY• STOP/ PAUSE CLEAR EARCH • TUNIN CD 1•2•3 FM •AM CD TUNER SOURCE TAPE AUX TAPE 1•2 CDR / DVD...
... the changer mechanism. - Load the discs with the label side facing up to open the disc tray. 3 Load up . - CD Operation English DISC CHANGE 3CD C H A N G E R DISC 1 3 DISC DIRECT PLAY DISC 2 DISC 3 OPEN • CLOSE CD / CD-R / CD-RW COMPATIBLE CD SYNCHRO RECORDING FWSTANDBY-ON MINI HIFI SYSTEM VOLUME ECO POWER DISPLAY PROG CLOCK• TIMER AUTO REPLAY DUBBING REC MUSIC LEVEL VOLUME INTERACTIVE VU METER EXT S EV PRESET N DEMO PLAY• STOP/ PAUSE CLEAR EARCH • TUNIN CD 1•2•3 FM •AM CD TUNER SOURCE TAPE AUX TAPE 1•2 CDR / DVD...
User manual
Page 19
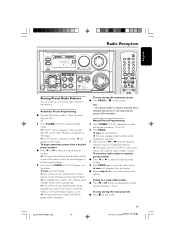
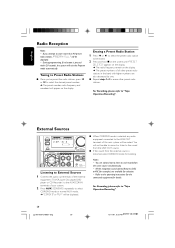
... MINI HIFI SYSTEM Radio Reception VOLUME PR G ISNUCRRREODIUBNLDE English ECO POWER DISPLAY PROG CLOCK• TIMER AUTO REPLAY DUBBING REC MUSIC LEVEL VOLUME INTERACTIVE VU METER EV PRESET N DEMO PLAY• STOP/ CLEAR PAUSE EARCH • TUNIN CD 1•2•3 FM •AM CD TUNER SOURCE TAPE AUX TAPE 1•2 CDR / DVD ON •OFF WOOX LEVEL WOOX DYNAMIC AMPLIFICATION CONTROL SOUND NAVIGATION - A few seconds later, the current radio frequency will appear on the display. Tuning to select TUNER mode...
... MINI HIFI SYSTEM Radio Reception VOLUME PR G ISNUCRRREODIUBNLDE English ECO POWER DISPLAY PROG CLOCK• TIMER AUTO REPLAY DUBBING REC MUSIC LEVEL VOLUME INTERACTIVE VU METER EV PRESET N DEMO PLAY• STOP/ CLEAR PAUSE EARCH • TUNIN CD 1•2•3 FM •AM CD TUNER SOURCE TAPE AUX TAPE 1•2 CDR / DVD ON •OFF WOOX LEVEL WOOX DYNAMIC AMPLIFICATION CONTROL SOUND NAVIGATION - A few seconds later, the current radio frequency will appear on the display. Tuning to select TUNER mode...
User manual
Page 20
... system until "PRESET DELETED" appears on the display. ➜ The radio frequency remain on the display. External Sources STANDBY-ON ECO POWER DISPLAY PROG CLOCK• TIMER AUTO REPLAY DUBBING REC MUSIC LEVEL INTERACTIVE VU MET EXT S EV PRESET N PR DEMO PLAY• STOP/ CLEAR PAUSE EARCH • TUNING CD 1•2•3 FM •AM CD TUNER SOURCE TAPE AUX TAPE 1•2 CDR / DVD ON •OFF WOOX LEVE WOOX DYNAMIC AMPLIFICATION CONTROL Listening to External Sources 1 Connect...
... system until "PRESET DELETED" appears on the display. ➜ The radio frequency remain on the display. External Sources STANDBY-ON ECO POWER DISPLAY PROG CLOCK• TIMER AUTO REPLAY DUBBING REC MUSIC LEVEL INTERACTIVE VU MET EXT S EV PRESET N PR DEMO PLAY• STOP/ CLEAR PAUSE EARCH • TUNING CD 1•2•3 FM •AM CD TUNER SOURCE TAPE AUX TAPE 1•2 CDR / DVD ON •OFF WOOX LEVE WOOX DYNAMIC AMPLIFICATION CONTROL Listening to External Sources 1 Connect...
User manual
Page 24
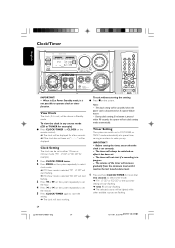
...-hour mode is set correctly. - Clock Setting The clock can switch on the system. Clock/Timer FWSTANDBY-ON MINI HIFI SYSTEM VOLUME English PR ISNUCRRREODIUBNLDE ECO POWER DISPLAY PROG CLOCK• TIMER AUTO REPLAY DUBBING REC MUSIC LEVEL VOLUME INTERACTIVE VU METER EXT S EV PRESET N DEMO STOP/ PLAY• PAUSE CLEAR EARCH • TUNING CD 1•2•3 FM •AM CD TUNER SOURCE TAPE AUX TAPE 1•2 CDR / DVD ON •OFF WOOX LEVEL WOOX DYNAMIC AMPLIFICATION CONTROL SOUND NAVIGATION - During clock setting, if no button is...
...-hour mode is set correctly. - Clock Setting The clock can switch on the system. Clock/Timer FWSTANDBY-ON MINI HIFI SYSTEM VOLUME English PR ISNUCRRREODIUBNLDE ECO POWER DISPLAY PROG CLOCK• TIMER AUTO REPLAY DUBBING REC MUSIC LEVEL VOLUME INTERACTIVE VU METER EXT S EV PRESET N DEMO STOP/ PLAY• PAUSE CLEAR EARCH • TUNING CD 1•2•3 FM •AM CD TUNER SOURCE TAPE AUX TAPE 1•2 CDR / DVD ON •OFF WOOX LEVEL WOOX DYNAMIC AMPLIFICATION CONTROL SOUND NAVIGATION - During clock setting, if no button is...
User manual
Page 27
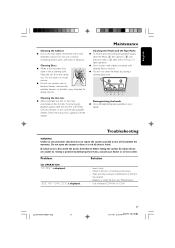
C BA B C Demagnetizing the heads ¶ Use a demagnetizing tape available at your dealer or service center. If you try to remedy a problem by playing a cleaning tape once. Problem Solution CD OPERATION "NO DISC" is inserted upside down. - Wait until the moisture condensation at the disc lens.To ensure good playback quality, clean the disc lens with Philips CD Lens Cleaner or any commercially available cleaner. English Maintenance...
C BA B C Demagnetizing the heads ¶ Use a demagnetizing tape available at your dealer or service center. If you try to remedy a problem by playing a cleaning tape once. Problem Solution CD OPERATION "NO DISC" is inserted upside down. - Wait until the moisture condensation at the disc lens.To ensure good playback quality, clean the disc lens with Philips CD Lens Cleaner or any commercially available cleaner. English Maintenance...
User manual
Page 28
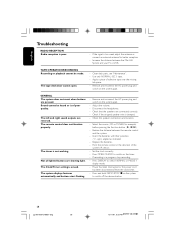
... parts, see "Maintenance". - Use only NORMAL (IEC I) tape. - Remove and reconnect the AC power plug and switch on the system again. - Not all lighted buttons are connected correctly. - The system displays features automatically and buttons start flashing. - Disconnect the headphones. - Check that the speakers are showing light. Check if the stripped speaker wire is of poor quality. Replace the batteries. - Press TIMER ON/OFF to switch on the system to select NORMAL or MODE 1 display mode. - Press DISPLAY to switch...
... parts, see "Maintenance". - Use only NORMAL (IEC I) tape. - Remove and reconnect the AC power plug and switch on the system again. - Not all lighted buttons are connected correctly. - The system displays features automatically and buttons start flashing. - Disconnect the headphones. - Check that the speakers are showing light. Check if the stripped speaker wire is of poor quality. Replace the batteries. - Press TIMER ON/OFF to switch on the system to select NORMAL or MODE 1 display mode. - Press DISPLAY to switch...
User manual
Page 29
... the model and serial numbers found on the product below. TO GET WARRANTY SERVICE IN U.S.A., PUERTO RICO OR U.S. You may keep both nearby. Warranty coverage begins the day you pay for the replacement or repair of purchase to this express warranty. Please contact Philips at the center. WHERE IS SERVICE AVAILABLE? LIMITED WARRANTY AUDIO SYSTEM One Year Free Labor One Year Free Service on Parts This product...
... the model and serial numbers found on the product below. TO GET WARRANTY SERVICE IN U.S.A., PUERTO RICO OR U.S. You may keep both nearby. Warranty coverage begins the day you pay for the replacement or repair of purchase to this express warranty. Please contact Philips at the center. WHERE IS SERVICE AVAILABLE? LIMITED WARRANTY AUDIO SYSTEM One Year Free Labor One Year Free Service on Parts This product...
Quick start guide
Page 1
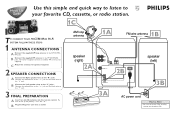
Hook Up Guide Use this simple and quick way to listen to your favorite CD, cassette, or radio station. 1C TO CONNECT YOUR FWC788 MINI HI-FI SYSTEM FOLLOW THESE STEPS: 1 ANTENNA CONNECTIONS A Connect the supplied AM loop antenna to the "+" jack. 3 FINAL PREPARATION A Insert two (2) AA batteries into an outlet. Connect the colored wire to the "-" jack and the black wire to the AM ANTENNA jacks. AM loop antenna 1A 1B FM wire antenna speaker (right) 2A R L LINE...
Hook Up Guide Use this simple and quick way to listen to your favorite CD, cassette, or radio station. 1C TO CONNECT YOUR FWC788 MINI HI-FI SYSTEM FOLLOW THESE STEPS: 1 ANTENNA CONNECTIONS A Connect the supplied AM loop antenna to the "+" jack. 3 FINAL PREPARATION A Insert two (2) AA batteries into an outlet. Connect the colored wire to the "-" jack and the black wire to the AM ANTENNA jacks. AM loop antenna 1A 1B FM wire antenna speaker (right) 2A R L LINE...
Quick start guide
Page 2
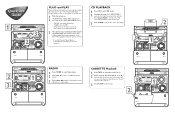
... SURROUND VAC XT FW-996 MINI HIFI SYSTEM 3STANDBY-ON ECO POWER DISPLAY PROG CLOCK- Plug and Play will reactivate next time you turn the system on the left. tray. Quick Use Guide 1 DISC CHANGE DISC 1 THREE DISC DIRECT PLAY DISC 2 DISC 3 FW-996 MINI HIFI SYSTEM STANDBY-ON OPENCLOSE CD/CDR/CD-RW COMPATIBLE CD SYNCHRO RECORDING 3 VOLUME PR INCREDIBLE SURROUND ECO POWER EV PRESET NE DEMO STOP/ CLEAR PLAYPAUSE SEARCH-TUNING DISPLAY PROG 2CLOCK- Press OPEN•CLOSE to 40). JOG DSC DBB TAPE 1 TAPE 1 DISC CHANGE DISC 1 THREE DISC DIRECT PLAY DISC 2 DISC...
... SURROUND VAC XT FW-996 MINI HIFI SYSTEM 3STANDBY-ON ECO POWER DISPLAY PROG CLOCK- Plug and Play will reactivate next time you turn the system on the left. tray. Quick Use Guide 1 DISC CHANGE DISC 1 THREE DISC DIRECT PLAY DISC 2 DISC 3 FW-996 MINI HIFI SYSTEM STANDBY-ON OPENCLOSE CD/CDR/CD-RW COMPATIBLE CD SYNCHRO RECORDING 3 VOLUME PR INCREDIBLE SURROUND ECO POWER EV PRESET NE DEMO STOP/ CLEAR PLAYPAUSE SEARCH-TUNING DISPLAY PROG 2CLOCK- Press OPEN•CLOSE to 40). JOG DSC DBB TAPE 1 TAPE 1 DISC CHANGE DISC 1 THREE DISC DIRECT PLAY DISC 2 DISC...


