Quick start guide
Page 1
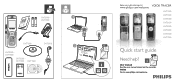
DVT7000 INDEX/ a MENU DVT7000 DVT3500 - Online Go to www.philips.com/welcome. Rwegwistewr y.opuhr pilriopdsuc.tcaondmge/twsuepplocrot amt e User manual User manual See the user manual stored on the recorder. DVT7000 DVT5500 - DVT7000 DVT1500 DVT3500 F I L EX: VEPoXHiceIPLLIPOSR E R Music start.htm Rwegwistewr y.opuhr pilriopdusc.tcaondmge/twsuepplocrot amt e User manual Register your product and get support at www.philips.com/welcome DVT1000 DVT1500 DVT3000 DVT3100 DVT3500 DVT5000 DVT5500 DVT7000 Quick start guide DVT3000 - wRewgiswter.pyohurilpiprosd.ucctoamnd /gewt...
DVT7000 INDEX/ a MENU DVT7000 DVT3500 - Online Go to www.philips.com/welcome. Rwegwistewr y.opuhr pilriopdsuc.tcaondmge/twsuepplocrot amt e User manual User manual See the user manual stored on the recorder. DVT7000 DVT5500 - DVT7000 DVT1500 DVT3500 F I L EX: VEPoXHiceIPLLIPOSR E R Music start.htm Rwegwistewr y.opuhr pilriopdusc.tcaondmge/twsuepplocrot amt e User manual Register your product and get support at www.philips.com/welcome DVT1000 DVT1500 DVT3000 DVT3100 DVT3500 DVT5000 DVT5500 DVT7000 Quick start guide DVT3000 - wRewgiswter.pyohurilpiprosd.ucctoamnd /gewt...
User manual
Page 3
DVT7000) 3.3.5 Remote control (DVT5500, DVT7000) 3.4 Start-up microphone 23 7 4.11.4 How to use the phone pick-up screen 3.4.1 Menu overview 4 First steps 4.1 Inserting the batteries 4.2 Charging the rechargeable batteries in the device 4.3 Power on/off 4.4 Initial installation process 4.4.1 Select language 4.4.2 Set date & time 4.5 Show recording and device information 4.6 Enable/disable the keypad lock Table of contents 1 Important safety information 1.1 Safety instructions 2 About this user manual 2.2 Symbols used 3 Digital Voice Tracer 3.1 Product highlights 3.2 What's in the box ...
DVT7000) 3.3.5 Remote control (DVT5500, DVT7000) 3.4 Start-up microphone 23 7 4.11.4 How to use the phone pick-up screen 3.4.1 Menu overview 4 First steps 4.1 Inserting the batteries 4.2 Charging the rechargeable batteries in the device 4.3 Power on/off 4.4 Initial installation process 4.4.1 Select language 4.4.2 Set date & time 4.5 Show recording and device information 4.6 Enable/disable the keypad lock Table of contents 1 Important safety information 1.1 Safety instructions 2 About this user manual 2.2 Symbols used 3 Digital Voice Tracer 3.1 Product highlights 3.2 What's in the box ...
User manual
Page 4
... - DVT7000) 9.1.3 Set recording quality 9.1.4 Set microphone sensitivity 9.1.5 Enable/disable wind filter (DVT3000 - DVT7000) 50 38 9.3.4 AUTO-OFF 51 38 9.3.5 Alarm clock 51 38 9.3.6 Enable/disable key and signal tones 52 39 10 Service 53 40 10.1 Service functions 53 40 10.1.1 Display device information 53 40 10.1.2 Memory formatting 53 10.2 Replacing batteries or rechargeable power packs 54 40 10.3 Replacing the remote control battery (DVT5500, DVT7000) 54 41 10.4 Updating the firmware...
... - DVT7000) 9.1.3 Set recording quality 9.1.4 Set microphone sensitivity 9.1.5 Enable/disable wind filter (DVT3000 - DVT7000) 50 38 9.3.4 AUTO-OFF 51 38 9.3.5 Alarm clock 51 38 9.3.6 Enable/disable key and signal tones 52 39 10 Service 53 40 10.1 Service functions 53 40 10.1.1 Display device information 53 40 10.1.2 Memory formatting 53 10.2 Replacing batteries or rechargeable power packs 54 40 10.3 Replacing the remote control battery (DVT5500, DVT7000) 54 41 10.4 Updating the firmware...
User manual
Page 5
... the device. Connect the device to ensure proper operation of at an official collection point. 1.1.2 Memory cards • The device supports microSD memory cards up to excessive heat caused by being trapped, particularly at the plugs and where cables exit the housing. • Back up your data and recordings. The manufacturer makes no liability for trouble free operation. • Formatting a memory card erases all safety instructions to a computer or use an external battery charger. • Fully charge...
... the device. Connect the device to ensure proper operation of at an official collection point. 1.1.2 Memory cards • The device supports microSD memory cards up to excessive heat caused by being trapped, particularly at the plugs and where cables exit the housing. • Back up your data and recordings. The manufacturer makes no liability for trouble free operation. • Formatting a memory card erases all safety instructions to a computer or use an external battery charger. • Fully charge...
User manual
Page 8
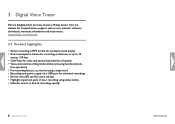
... important parts of your recording using index marks • Calendar search to avoid missing a single word • Recording and power supply via a USB port for unlimited recordings • Slot for microSD card for clear and natural reproduction of contents free operation) • Pre-recording feature, to find all recordings quickly 8 Digital Voice Tracer Table of speech • Voice-activated recording mode without pressing buttons (hands- 3 Digital Voice Tracer We are delighted that you have chosen a Philips device.
... important parts of your recording using index marks • Calendar search to avoid missing a single word • Recording and power supply via a USB port for unlimited recordings • Slot for microSD card for clear and natural reproduction of contents free operation) • Pre-recording feature, to find all recordings quickly 8 Digital Voice Tracer Table of speech • Voice-activated recording mode without pressing buttons (hands- 3 Digital Voice Tracer We are delighted that you have chosen a Philips device.

User manual
Page 10
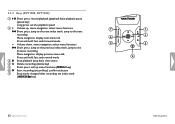
data is playing back Yellow - 3.3 Product overviews 3.3.1 Front and rear sides (DVT1000, DVT1500) a Power on/off key, keypad lock b Microphone c Status LED: Red - device is being transferred to/from the computer d Display e Speaker f Micro USB connection for the computer (not shown) g Operating panel with keys h External microphone socket (stereo jack plug, 3.5mm) i Headphone socket (stereo jack plug, 3.5mm) j Battery compartment k Slot for memory card (microSD card) 10 Digital Voice Tracer MENU INDEX/ a MIC EAR Table of contents device is recording Green -
data is playing back Yellow - 3.3 Product overviews 3.3.1 Front and rear sides (DVT1000, DVT1500) a Power on/off key, keypad lock b Microphone c Status LED: Red - device is being transferred to/from the computer d Display e Speaker f Micro USB connection for the computer (not shown) g Operating panel with keys h External microphone socket (stereo jack plug, 3.5mm) i Headphone socket (stereo jack plug, 3.5mm) j Battery compartment k Slot for memory card (microSD card) 10 Digital Voice Tracer MENU INDEX/ a MIC EAR Table of contents device is recording Green -
User manual
Page 12
...e Short press: record playback (playback key), playback pause (pause key) Long press: set the playback speed b + Volume up menu functions (MENU key) f g Start recording (record key), confirm selection g Stop mode: change folder, recording: set index mark (INDEX/a key) 12 Digital Voice Tracer Table of contents Volume down, menu navigation: select menu functions h Short press: jump to the previous index mark, jump to the previous recording Menu navigation: display previous menu tab Press and hold: fast seek rewind mode c j Stop playback (stop key), close menu d z Delete recording (delete key...
...e Short press: record playback (playback key), playback pause (pause key) Long press: set the playback speed b + Volume up menu functions (MENU key) f g Start recording (record key), confirm selection g Stop mode: change folder, recording: set index mark (INDEX/a key) 12 Digital Voice Tracer Table of contents Volume down, menu navigation: select menu functions h Short press: jump to the previous index mark, jump to the previous recording Menu navigation: display previous menu tab Press and hold: fast seek rewind mode c j Stop playback (stop key), close menu d z Delete recording (delete key...

User manual
Page 13
...), playback pause (pause key) Long press: set the playback speed d + Volume up menu functions (MENU key) h g Start recording (record key), confirm selection i Stop mode: change folder, recording: set index mark (INDEX/a key) Table of the soft function keys depends on the operating condition; DVT7000) a DVT5000 - Volume down, menu navigation: Select menu functions h Short press: jump to the previous index mark, jump to the previous recording Menu navigation: display next menu tab Press and hold: fast seek rewind mode e j Stop Playback (stop key), close Menu f ERASE: Erase recording (Erase...
...), playback pause (pause key) Long press: set the playback speed d + Volume up menu functions (MENU key) h g Start recording (record key), confirm selection i Stop mode: change folder, recording: set index mark (INDEX/a key) Table of the soft function keys depends on the operating condition; DVT7000) a DVT5000 - Volume down, menu navigation: Select menu functions h Short press: jump to the previous index mark, jump to the previous recording Menu navigation: display next menu tab Press and hold: fast seek rewind mode e j Stop Playback (stop key), close Menu f ERASE: Erase recording (Erase...
User manual
Page 15
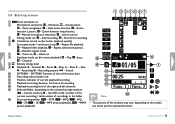
...; Battery charge level i j Playback: S - Recording paused, V W - Search j DVT5000 - microSD card) / number of the current recording / total number of contents Digital Voice Tracer 15 SHQ, ƒ - Normal, { - Slow, U - Fast, g - Recording | - SP, † - MP3 (music playback), ‰ - Dictation, ¯ - Jazz, Ê - PCM, ... - LP, „ - Table of recordings in source c Editing mode set (for better playback quality) e Set repeat mode / continuous loop: Â - Repeat file playback, Á - Auto zoom function, µ - Zoom function: long distance...
...; Battery charge level i j Playback: S - Recording paused, V W - Search j DVT5000 - microSD card) / number of the current recording / total number of contents Digital Voice Tracer 15 SHQ, ƒ - Normal, { - Slow, U - Fast, g - Recording | - SP, † - MP3 (music playback), ‰ - Dictation, ¯ - Jazz, Ê - PCM, ... - LP, „ - Table of recordings in source c Editing mode set (for better playback quality) e Set repeat mode / continuous loop: Â - Repeat file playback, Á - Auto zoom function, µ - Zoom function: long distance...
User manual
Page 16
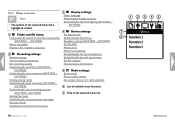
... settings Set microphone sensitivity Set recording quality Enable/disable wind filter (DVT3000 - DVT7000) d Õ Device settings: Set date & time Enable/disable ClearVoice Equalizer settings (DVT3000 - DVT7000) Enable/disable pre-recording function (DVT3000 - DVT7000) Setting the timer Enable/disable voice-activated recording Set auto divide Selecting an external sound source c Ô Display settings: Select language Adjusting the display contrast Enable/disable the back lighting (DVT3000 - DVT7000) Enable/disable noise reduction (DVT3000 - a Ò Folder and file menu: Using...
... settings Set microphone sensitivity Set recording quality Enable/disable wind filter (DVT3000 - DVT7000) d Õ Device settings: Set date & time Enable/disable ClearVoice Equalizer settings (DVT3000 - DVT7000) Enable/disable pre-recording function (DVT3000 - DVT7000) Setting the timer Enable/disable voice-activated recording Set auto divide Selecting an external sound source c Ô Display settings: Select language Adjusting the display contrast Enable/disable the back lighting (DVT3000 - DVT7000) Enable/disable noise reduction (DVT3000 - a Ò Folder and file menu: Using...

User manual
Page 26
... transferred from the computer to the Music folder of contents Use the Voice folder for recordings and the Music folder for music files. 3 Copy or move files to your computer or delete files to archive recordings and free up to 99 music files. 4.12.2 Disconnecting from a computer 1 Select Eject USB in the y/ä folder of the device on the device. If you want to delete all data, use the File Explorer to access the device data to installing additional software...
... transferred from the computer to the Music folder of contents Use the Voice folder for recordings and the Music folder for music files. 3 Copy or move files to your computer or delete files to archive recordings and free up to 99 music files. 4.12.2 Disconnecting from a computer 1 Select Eject USB in the y/ä folder of the device on the device. If you want to delete all data, use the File Explorer to access the device data to installing additional software...
User manual
Page 27
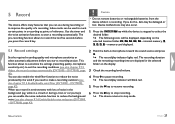
... noise reduction (DVT3000 - Table of reference. This function allows to customize the settings (recording quality, microphone sensitivity etc.) to mark certain points in the selected folder on the selected location folder: u, v, w, x, y - Index marks can enable the noise reduction function to stop mode. When you record in microphone toward the sound source and press g. Caution • Do not remove batteries or rechargeable batteries from the device while it is stopped to pause recording...
... noise reduction (DVT3000 - Table of reference. This function allows to customize the settings (recording quality, microphone sensitivity etc.) to mark certain points in the selected folder on the selected location folder: u, v, w, x, y - Index marks can enable the noise reduction function to stop mode. When you record in microphone toward the sound source and press g. Caution • Do not remove batteries or rechargeable batteries from the device while it is stopped to pause recording...
User manual
Page 28
..., you connect an external microphone to stop the current recording and start a long recording session, replace or recharge the batteries before you begin. Press the { REC/PAUSE key to adjust the microphone sensitivity. • If you should set the external source (see also chapter 9.1.12 Set auto divide, page 46). • Each folder can store up settings menu for microphone sensitivity and recording quality. 5.1.1 Record using the USB cable. Press the j STOP key to the device, the recording source will switch automatically...
..., you connect an external microphone to stop the current recording and start a long recording session, replace or recharge the batteries before you begin. Press the { REC/PAUSE key to adjust the microphone sensitivity. • If you should set the external source (see also chapter 9.1.12 Set auto divide, page 46). • Each folder can store up settings menu for microphone sensitivity and recording quality. 5.1.1 Record using the USB cable. Press the j STOP key to the device, the recording source will switch automatically...

User manual
Page 36
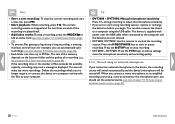
.... 4 Press g to confirm the deletion. Sequential file numbers are reassigned automatically. 7 Use + / - Connect the device to a computer if you want to rename or delete entire folders. 1 Press the INDEX/a button while the device is stopped (start -up screen) to select a folder in mind that you no longer need. XX The recording is deleted. Caution • Only delete the recordings that deleted recordings can delete individual recordings from the device. Press the j key to split...
.... 4 Press g to confirm the deletion. Sequential file numbers are reassigned automatically. 7 Use + / - Connect the device to a computer if you want to rename or delete entire folders. 1 Press the INDEX/a button while the device is stopped (start -up screen) to select a folder in mind that you no longer need. XX The recording is deleted. Caution • Only delete the recordings that deleted recordings can delete individual recordings from the device. Press the j key to split...
User manual
Page 41
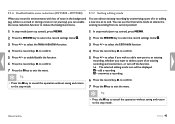
... the file and the less recordings you to suit the recording conditions. to select the Quality settings function. 4 Press the record key, g, to focus on the front microphone and filter sounds from a long distance away. 1 In stop mode. XX The selected quality setting icon will be displayed. ‡ - longer recording time, format: MP3, 8 kbit/s 9.1.4 Set microphone sensitivity You can create. 1 In stop mode. 9.1.3 Set recording quality Use the recording quality settings to select the record settings menu Ó...
... the file and the less recordings you to suit the recording conditions. to select the Quality settings function. 4 Press the record key, g, to focus on the front microphone and filter sounds from a long distance away. 1 In stop mode. XX The selected quality setting icon will be displayed. ‡ - longer recording time, format: MP3, 8 kbit/s 9.1.4 Set microphone sensitivity You can create. 1 In stop mode. 9.1.3 Set recording quality Use the recording quality settings to select the record settings menu Ó...
User manual
Page 42
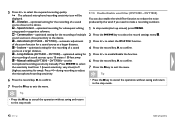
Conversation - during recording to the stop mode. 42 Settings Table of sound sources up screen), press MENU. 2 Press the h / b key to the device. ± - Tip • Press the j key to cancel the operation without saving and return to the device. ² - Lecture - DVT7000) - set the microphone/recording sensitivity manually. to select the Wind filter function. 4 Press the record key, g, to 15 meters / 50 feet away. ¸ - Dictation - optimized setting for the...
Conversation - during recording to the stop mode. 42 Settings Table of sound sources up screen), press MENU. 2 Press the h / b key to the device. ± - Tip • Press the j key to cancel the operation without saving and return to the device. ² - Lecture - DVT7000) - set the microphone/recording sensitivity manually. to select the Wind filter function. 4 Press the record key, g, to 15 meters / 50 feet away. ¸ - Dictation - optimized setting for the...
User manual
Page 43
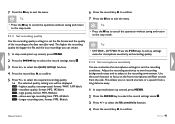
... current position! 1 In stop mode (start -up screen), press MENU. 2 Press the h / b key to select the record settings menu Ó. 3 Press + / - to select the Noise reduction function. 4 Press the record key, g, to exit the menu. add a recording Æ - overwrite a recording 6 Press the record key, g, to confirm. 7 Press the j key to confirm. 5 Press + / - to select if you wish to add a new part to an existing recording, whether you can...
... current position! 1 In stop mode (start -up screen), press MENU. 2 Press the h / b key to select the record settings menu Ó. 3 Press + / - to select the Noise reduction function. 4 Press the record key, g, to exit the menu. add a recording Æ - overwrite a recording 6 Press the record key, g, to confirm. 7 Press the j key to confirm. 5 Press + / - to select if you wish to add a new part to an existing recording, whether you can...
User manual
Page 45
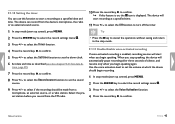
... you stop speaking, the device will start recording at a specified time. 11 Press + / - Use the voice activation level to set station before you begin speaking. set the volume at a specified date and time. The device will automatically pause recording after three seconds of contents Settings 45 to select the Timer function. 4 Press the record key, g, to select the record settings menu Ó. 9 Press + / - to select the Record source function to set the alarm clock. 6 Set date and time...
... you stop speaking, the device will start recording at a specified time. 11 Press + / - Use the voice activation level to set station before you begin speaking. set the volume at a specified date and time. The device will automatically pause recording after three seconds of contents Settings 45 to select the Timer function. 4 Press the record key, g, to select the record settings menu Ó. 9 Press + / - to select the Record source function to set the alarm clock. 6 Set date and time...
User manual
Page 53
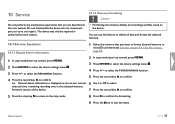
... to delete all recordings and files saved on the screen: current 6 Use + / - to select. You can use this user manual. Table of the device. 7 Press the record key, g, to confirm. 5 Press the stop key j to return to the stop mode (start-up screen), press MENU. 3 Press h / b to select the device settings menu Õ. 2 Press h / b to select the device settings menu Õ. 4 Press + / - date and time, remaining recording time in the selected memory, firmware version of contents Service 53 10 Service 10.1.2 Memory formatting...
... to delete all recordings and files saved on the screen: current 6 Use + / - to select. You can use this user manual. Table of the device. 7 Press the record key, g, to confirm. 5 Press the stop key j to return to the stop mode (start-up screen), press MENU. 3 Press h / b to select the device settings menu Õ. 2 Press h / b to select the device settings menu Õ. 4 Press + / - date and time, remaining recording time in the selected memory, firmware version of contents Service 53 10 Service 10.1.2 Memory formatting...
Leaflet
Page 3
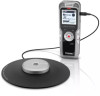
...; USB cable • Quick start guide • 2 × AAA rechargeable batteries • 360° meeting microphone • Carry case • Stereo headphones premium • Wireless remote control Connectivity • Headphones: 3.5 mm • Microphone: 3.5 mm, Built-in microphone, Microphone socket • Micro-SD card socket • USB: High-speed USB 2.0 Convenience • Firmware upgradeable • Keypad lock • Multi language: English, French, German, Spanish, Italian, Russian, Polisch, Simplified Chinese • Variable playback speed • Voice volume...
...; USB cable • Quick start guide • 2 × AAA rechargeable batteries • 360° meeting microphone • Carry case • Stereo headphones premium • Wireless remote control Connectivity • Headphones: 3.5 mm • Microphone: 3.5 mm, Built-in microphone, Microphone socket • Micro-SD card socket • USB: High-speed USB 2.0 Convenience • Firmware upgradeable • Keypad lock • Multi language: English, French, German, Spanish, Italian, Russian, Polisch, Simplified Chinese • Variable playback speed • Voice volume...


