Leaflet
Page 2
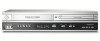
...unbeatable convenience - allowing you to VHS tape, and vice versa. All Rights reserved. DVD/VCR Player Direct Dubbing Specifications DVP3050V/37 Highlights Picture/Display • D/A converter: 10 bit, 54 MHz • Picture enhancement: Progressive Scan, 3:2 pull... 60Hz • Power consumption: 25 W • Standby power consumption: < 4 W Accessories • Cables: RF Cable, AV Cable (1x) • Remote control: Zappa+ (OEM made) • Batteries: 2 x AA • User Manual: English, Spanish & French (includes Quick User Guide) • Warranty Card: Philips (USA) Product ...
...unbeatable convenience - allowing you to VHS tape, and vice versa. All Rights reserved. DVD/VCR Player Direct Dubbing Specifications DVP3050V/37 Highlights Picture/Display • D/A converter: 10 bit, 54 MHz • Picture enhancement: Progressive Scan, 3:2 pull... 60Hz • Power consumption: 25 W • Standby power consumption: < 4 W Accessories • Cables: RF Cable, AV Cable (1x) • Remote control: Zappa+ (OEM made) • Batteries: 2 x AA • User Manual: English, Spanish & French (includes Quick User Guide) • Warranty Card: Philips (USA) Product ...

User manual
Page 2
...the industry.What's more, your purchase guarantees you'll receive all the information and special offers for many years to come. As a member of the PHILIPS "family," you're entitled to protection by one of the best-built, bestbacked products available today.We'll do not remove product covering. To get... For Customer Use Enter below , so don't miss out. which is our way of saying welcome and thanks for investing in our power to keep you happy with PHILIPS makes you eligible for which you can count on file, so no additional paperwork will be sure to complete and return your Product...
...the industry.What's more, your purchase guarantees you'll receive all the information and special offers for many years to come. As a member of the PHILIPS "family," you're entitled to protection by one of the best-built, bestbacked products available today.We'll do not remove product covering. To get... For Customer Use Enter below , so don't miss out. which is our way of saying welcome and thanks for investing in our power to keep you happy with PHILIPS makes you eligible for which you can count on file, so no additional paperwork will be sure to complete and return your Product...
User manual
Page 3
...remove the cover or attempt to service this product and may cause harmful interference to the point of Conformity Model Number: DVP3050V/37 Trade Name: Philips Responsible Party: Philips Consumer Electronics North America P.O. Cet appareil numérique de la classe B est conforme à la norme NMB003 du...be displayed in accordance with 21 Center for proper grounding - If there are designed to remove the disc and unplug the AC power cord from Dolby Laboratories. Note to Part 15 of the FCC Rules.These limits are questions regarding your TV set compatibility with 525...
...remove the cover or attempt to service this product and may cause harmful interference to the point of Conformity Model Number: DVP3050V/37 Trade Name: Philips Responsible Party: Philips Consumer Electronics North America P.O. Cet appareil numérique de la classe B est conforme à la norme NMB003 du...be displayed in accordance with 21 Center for proper grounding - If there are designed to remove the disc and unplug the AC power cord from Dolby Laboratories. Note to Part 15 of the FCC Rules.These limits are questions regarding your TV set compatibility with 525...
User manual
Page 4
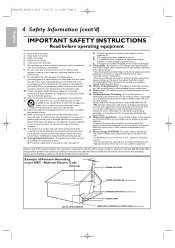
...not compromise these materials may be placed on or pinched particularly at plugs, convenience receptacles, and the point where they exit from power lines. 20. The appliance should not be regulated due to provide some protection against voltage surges and built up static charges. ... that produce heat. 9. Battery Usage CAUTION - Do not block any way, such as radiators, heat registers, stoves, or other . Protect the power cord from being walked on this apparatus. 22. Use only with a cart, stand, tripod, bracket, or table specified by the manufacturer, or ...
...not compromise these materials may be placed on or pinched particularly at plugs, convenience receptacles, and the point where they exit from power lines. 20. The appliance should not be regulated due to provide some protection against voltage surges and built up static charges. ... that produce heat. 9. Battery Usage CAUTION - Do not block any way, such as radiators, heat registers, stoves, or other . Protect the power cord from being walked on this apparatus. 22. Use only with a cart, stand, tripod, bracket, or table specified by the manufacturer, or ...
User manual
Page 7
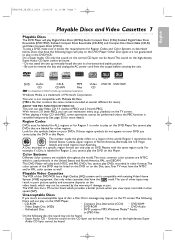
... not be labeled for ALL regions or for Region 1 in a horizontal and stable position. • Be sure to remove the disc and unplug the AC power cord from the output before carrying the unit. H9820UD_IB_EN_1_0210 2/14/05 11:16 AM Page 7 English Playable Discs and Video Cassettes 7 Playable Discs The DVD...
... not be labeled for ALL regions or for Region 1 in a horizontal and stable position. • Be sure to remove the disc and unplug the AC power cord from the output before carrying the unit. H9820UD_IB_EN_1_0210 2/14/05 11:16 AM Page 7 English Playable Discs and Video Cassettes 7 Playable Discs The DVD...
User manual
Page 8
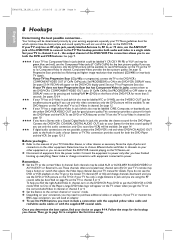
...AUDIO OUT jacks to the correct channel or "source" mode. ● Depending on the DVD/VCR. If your choice on page 9), set the TV to power only after you have a Stereo with a Coaxial Digital Audio In jack, this audio connection, only Disc sound (no Disc in the DVD/VCR's DISPLAY ...menu. Set PROGRESSIVE to power. If you use only this video connection, only the DVD picture will not use only this provides the clearest sound for the best picture quality...
...AUDIO OUT jacks to the correct channel or "source" mode. ● Depending on the DVD/VCR. If your choice on page 9), set the TV to power only after you have a Stereo with a Coaxial Digital Audio In jack, this audio connection, only Disc sound (no Disc in the DVD/VCR's DISPLAY ...menu. Set PROGRESSIVE to power. If you use only this video connection, only the DVD picture will not use only this provides the clearest sound for the best picture quality...
User manual
Page 9
... your TV owner's manual for 3-5 seconds. During playback, press and hold (VCR) PLAY B on the front of the DVD/VCR for assistance. 3 Plug in the power cord of your TV.Turn on the TV and set your TV to the ANTENNA IN jack on the DVD/VCR. See your DVD/VCR... TV, you purchase it to put the DVD/VCR in VCR mode. Go to page 16 before turning it to channel 3 or 4. 4 Plug in the power cord of the DVD/VCR.You are ready to the ANT-OUT (Antenna Out) jack on the DVD/VCR (as customary with most VCRs). Change...
... your TV owner's manual for 3-5 seconds. During playback, press and hold (VCR) PLAY B on the front of the DVD/VCR for assistance. 3 Plug in the power cord of your TV.Turn on the TV and set your TV to the ANTENNA IN jack on the DVD/VCR. See your DVD/VCR... TV, you purchase it to put the DVD/VCR in VCR mode. Go to page 16 before turning it to channel 3 or 4. 4 Plug in the power cord of the DVD/VCR.You are ready to the ANT-OUT (Antenna Out) jack on the DVD/VCR (as customary with most VCRs). Change...

User manual
Page 10
... need the RF coaxial cable connection between the Cable Box/Satellite Receiver and the DVD/VCR as the one you want to record in the power cord of your TV.Turn on . Go to turn on the DVD/VCR. There are two ways to connect your Cable Box/Satellite Receiver to... will appear on the front of the DVD/VCR. 2) Press SKIP ∑/CH o or SKIP w/CH p to set it to channel 3 or 4. 5 Plug in the power cord of the DVD/VCR.You are recording. ● You can only program a timer recording for one channel at the Cable Box/Satellite Receiver. ●...
... need the RF coaxial cable connection between the Cable Box/Satellite Receiver and the DVD/VCR as the one you want to record in the power cord of your TV.Turn on . Go to turn on the DVD/VCR. There are two ways to connect your Cable Box/Satellite Receiver to... will appear on the front of the DVD/VCR. 2) Press SKIP ∑/CH o or SKIP w/CH p to set it to channel 3 or 4. 5 Plug in the power cord of the DVD/VCR.You are recording. ● You can only program a timer recording for one channel at the Cable Box/Satellite Receiver. ●...

User manual
Page 11
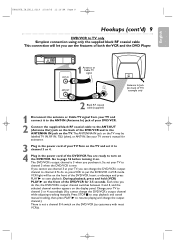
...'s output channel (03 or 04).The DVD/VCR's output channel is channel 3 when the DVD/VCR is set it to channel 3 or 4. 5 Plug in the power cord of the DVD/VCR.You are ready to turn on the DVD/VCR. H9820UD_IB_EN_1_0210 2/14/05 11:16 AM Page 11 English Hookups (cont... RF coaxial cable to connect the OUT jack on the Cable Box/Satellite Receiver to the ANTENNA IN jack on the TV. 4 Plug in the power cord of your TV.Turn on the TV and set to the DVD/VCR's output channel (03 or 04).
...'s output channel (03 or 04).The DVD/VCR's output channel is channel 3 when the DVD/VCR is set it to channel 3 or 4. 5 Plug in the power cord of the DVD/VCR.You are ready to turn on the DVD/VCR. H9820UD_IB_EN_1_0210 2/14/05 11:16 AM Page 11 English Hookups (cont... RF coaxial cable to connect the OUT jack on the Cable Box/Satellite Receiver to the ANTENNA IN jack on the TV. 4 Plug in the power cord of your TV.Turn on the TV and set to the DVD/VCR's output channel (03 or 04).
User manual
Page 12
... appear on the TV screen when you are using the RF coaxial cable for the DVD Player of the TV and the DVD/VCR to a power outlet.Turn on the TV and set it to the red and white AUDIO IN jacks on the TV. If you get the TV on... video cable.To connect the supplied RF coaxial cable, see step 2 on page 9.To connect the supplied yellow video cable, see step 3a. 4 Connect the power cords of the DVD/VCR.Therefore, in the Player, a large DVD Video logo will not use the VCR features or view TV channels at the...
... appear on the TV screen when you are using the RF coaxial cable for the DVD Player of the TV and the DVD/VCR to a power outlet.Turn on the TV and set it to the red and white AUDIO IN jacks on the TV. If you get the TV on... video cable.To connect the supplied RF coaxial cable, see step 2 on page 9.To connect the supplied yellow video cable, see step 3a. 4 Connect the power cords of the DVD/VCR.Therefore, in the Player, a large DVD Video logo will not use the VCR features or view TV channels at the...
User manual
Page 13
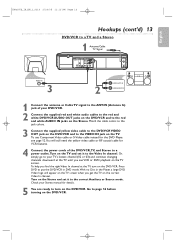
... AUDIO (RIGHT) IN 1 Connect the antenna or Cable TV signal to the ANT-IN (Antenna In) jack of the DVD/VCR,TV, and Stereo to a power outlet.Turn on the Stereo and set it to page 16 before turning on the TV. Match the cable colors to the jack colors. 3 Connect... no Disc in the Player, a large DVD Video logo will still need the yellow video cable or RF coaxial cable for VCR features. 4 Connect the power cords of your Stereo manual for the DVD Player, see page 12.You will appear on the TV screen when you see VCR or DVD...
... AUDIO (RIGHT) IN 1 Connect the antenna or Cable TV signal to the ANT-IN (Antenna In) jack of the DVD/VCR,TV, and Stereo to a power outlet.Turn on the Stereo and set it to page 16 before turning on the TV. Match the cable colors to the jack colors. 3 Connect... no Disc in the Player, a large DVD Video logo will still need the yellow video cable or RF coaxial cable for VCR features. 4 Connect the power cords of your Stereo manual for the DVD Player, see page 12.You will appear on the TV screen when you see VCR or DVD...
User manual
Page 14
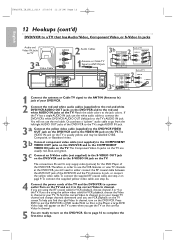
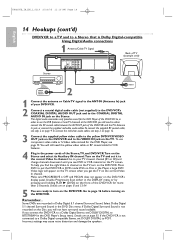
... to the correct Video In channel. Remember... To help you connect the DVD/VCR to a Dolby Digital Stereo, set DOLBY DIGITAL to BITSTREAM in the power cords of the DVD/VCR. H9820UD_IB_EN_1_0210 2/14/05 11:16 AM Page 14 English 14 Hookups (cont'd) DVD/VCR to a TV and to a Stereo that...
... to the correct Video In channel. Remember... To help you connect the DVD/VCR to a Dolby Digital Stereo, set DOLBY DIGITAL to BITSTREAM in the power cords of the DVD/VCR. H9820UD_IB_EN_1_0210 2/14/05 11:16 AM Page 14 English 14 Hookups (cont'd) DVD/VCR to a TV and to a Stereo that...
User manual
Page 16
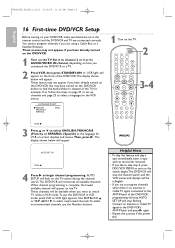
... appear. To put the DVD/VCR in English. • If you have turned on the TV. Helpful Hints • To skip this process if the power fails. STANDBY-ON SEARCH MODE DISPLAY REPEAT REPEAT AUDIO A-B SUBTITLE ZOOM ANGLE SKIP / CH RETURN TITLE CLEAR/RESET SLOW 2 VCR DISC/VCR MENU VCR/TV...
... appear. To put the DVD/VCR in English. • If you have turned on the TV. Helpful Hints • To skip this process if the power fails. STANDBY-ON SEARCH MODE DISPLAY REPEAT REPEAT AUDIO A-B SUBTITLE ZOOM ANGLE SKIP / CH RETURN TITLE CLEAR/RESET SLOW 2 VCR DISC/VCR MENU VCR/TV...
User manual
Page 17
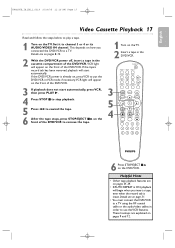
... OK STOP PLAY PAUSE TIMER SET MARKER RECORD SPEED 1 45 89 2 3 67 0 +10 6 Press STOP/EJECT CA on pages 9 and 12. If the DVD/VCR power is ON, playback will appear on pages 8-14. 2 With the DVD/VCR...
... OK STOP PLAY PAUSE TIMER SET MARKER RECORD SPEED 1 45 89 2 3 67 0 +10 6 Press STOP/EJECT CA on pages 9 and 12. If the DVD/VCR power is ON, playback will appear on pages 8-14. 2 With the DVD/VCR...
User manual
Page 18
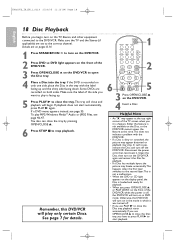
... Disc is loaded and ready for playback. • When you press OPEN/CLOSE A or PLAY (DVD) on the front of the DVD/VCR when the power is not available on the DVD/VCR to stop . See page 7 for playback. • If a Disc has multiple layers, the picture may stop playback. ...Helpful Hints • An "X" may appear at this DVD/VCR will play only certain Discs. Disconnect the power cord, then reconnect it was turned off the DVD/VCR. If you use PLAY B to close the Disc tray, playback starts automatically. Remember, this time...
... Disc is loaded and ready for playback. • When you press OPEN/CLOSE A or PLAY (DVD) on the front of the DVD/VCR when the power is not available on the DVD/VCR to stop . See page 7 for playback. • If a Disc has multiple layers, the picture may stop playback. ...Helpful Hints • An "X" may appear at this DVD/VCR will play only certain Discs. Disconnect the power cord, then reconnect it was turned off the DVD/VCR. If you use PLAY B to close the Disc tray, playback starts automatically. Remember, this time...

User manual
Page 19
... Indicates the elapsed playing time of the current Title or Track; Display Messages about current Disc operations appear here. Cassette Compartment Insert a video cassette here. POWER ON VIDEO L AUDIO R REW F.FWD STOP/EJECT PLAY RECORD CHANNEL VCR DVD SOURCE STOP PLAY DVD Display Panel Appears when a repeat function is active Appears...
... Indicates the elapsed playing time of the current Title or Track; Display Messages about current Disc operations appear here. Cassette Compartment Insert a video cassette here. POWER ON VIDEO L AUDIO R REW F.FWD STOP/EJECT PLAY RECORD CHANNEL VCR DVD SOURCE STOP PLAY DVD Display Panel Appears when a repeat function is active Appears...
User manual
Page 20
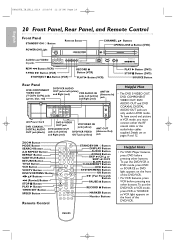
... 11:16 AM Page 20 English 20 Front Panel, Rear Panel, and Remote Control Front Panel STANDBY-ON y Button Remote Sensor POWER ON Light AUDIO and VIDEO In jacks STANDBY-ON POWER ON VIDEO L AUDIO R ONE TOUCH RECORDING ¥ LONG PLAY REW F.FWD STOP/EJECT PLAY RECORD CHANNEL KL Buttons OPEN/CLOSE... sound and picture in VCR mode, press VCR or SOURCE so VCR light appears on the front of the DVD/VCR. IN ANT-OUT AC Power Cord DVD COAXIAL DIGITAL AUDIO OUT jack (black) DVD S-VIDEO OUT jack DVD AUDIO OUT VCR VIDEO IN jack (yellow) ANT-OUT jacks Left (white...
... 11:16 AM Page 20 English 20 Front Panel, Rear Panel, and Remote Control Front Panel STANDBY-ON y Button Remote Sensor POWER ON Light AUDIO and VIDEO In jacks STANDBY-ON POWER ON VIDEO L AUDIO R ONE TOUCH RECORDING ¥ LONG PLAY REW F.FWD STOP/EJECT PLAY RECORD CHANNEL KL Buttons OPEN/CLOSE... sound and picture in VCR mode, press VCR or SOURCE so VCR light appears on the front of the DVD/VCR. IN ANT-OUT AC Power Cord DVD COAXIAL DIGITAL AUDIO OUT jack (black) DVD S-VIDEO OUT jack DVD AUDIO OUT VCR VIDEO IN jack (yellow) ANT-OUT jacks Left (white...

User manual
Page 22
... you press DISC/VCR MENU. If so, follow the instructions from step 3 above. • Press DISPLAY until the time appears on the TV screen. • Power failures of the week will flash on this page. 2 Press K or L to select CLOCK SET.Then, press B. 3 While the MONTH space is flashing, press K or...
... you press DISC/VCR MENU. If so, follow the instructions from step 3 above. • Press DISPLAY until the time appears on the TV screen. • Power failures of the week will flash on this page. 2 Press K or L to select CLOCK SET.Then, press B. 3 While the MONTH space is flashing, press K or...
User manual
Page 33
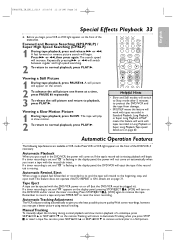
... available in slow motion. 2 To return to give you the best possible picture quality.With some recordings, however, you insert a tape with the DVD/VCR power on the front of the DVD/VCR, if necessary. Viewing a Still Picture 1 During tape playback, press PAUSE k. The tape will not come on the ... tape in a Still picture. Tape Eject A tape can also press SKIP ∑/CH K or SKIP w/CH L to remove vertical jitter in the DVD/VCR, the power will come on the screen. 2 To advance the still picture one frame at a time, press PAUSE k repeatedly. 3 To release the still picture and return to...
... available in slow motion. 2 To return to give you the best possible picture quality.With some recordings, however, you insert a tape with the DVD/VCR power on the front of the DVD/VCR, if necessary. Viewing a Still Picture 1 During tape playback, press PAUSE k. The tape will not come on the ... tape in a Still picture. Tape Eject A tape can also press SKIP ∑/CH K or SKIP w/CH L to remove vertical jitter in the DVD/VCR, the power will come on the screen. 2 To advance the still picture one frame at a time, press PAUSE k repeatedly. 3 To release the still picture and return to...

User manual
Page 57
... the DVD/VCR in DVD mode. Asterisks (*) will appear instead of the DVD/VCR. 2 While playback is stopped, press SYSTEM/MENU. If you desire. • A power failure will not erase your password. Press OK, and proceed to enter a 4-digit password. PARENTAL PARENTAL LEVEL ALL PASSWORD CHANGE OK 6 Press the Number buttons...
... the DVD/VCR in DVD mode. Asterisks (*) will appear instead of the DVD/VCR. 2 While playback is stopped, press SYSTEM/MENU. If you desire. • A power failure will not erase your password. Press OK, and proceed to enter a 4-digit password. PARENTAL PARENTAL LEVEL ALL PASSWORD CHANGE OK 6 Press the Number buttons...

