

Leaflet
Page 3
...consumption: 50 W • Standby power consumption: 3 Accessories • Included Accessories: AC Power Cord, Coax RF antenna cable, Quick start guide, User Manual, Remote Control, Audio/Video cable, Batteries for remote control Dimensions • Set weight: 4.3 kg • Set dimensions (W x H x D): 430...dimensions (W x H x D): 486 x 111 x 400 mm • Weight incl. All Rights reserved. www.philips.com DVD Recorder/Hard Disk with Flex Time and i.LINK digital input Specifications DVDR520H/37 Picture/Display • Aspect ratio: 4:3, 16:9 • D/A converter: 10 bit, 54 MHz •...
...consumption: 50 W • Standby power consumption: 3 Accessories • Included Accessories: AC Power Cord, Coax RF antenna cable, Quick start guide, User Manual, Remote Control, Audio/Video cable, Batteries for remote control Dimensions • Set weight: 4.3 kg • Set dimensions (W x H x D): 430...dimensions (W x H x D): 486 x 111 x 400 mm • Weight incl. All Rights reserved. www.philips.com DVD Recorder/Hard Disk with Flex Time and i.LINK digital input Specifications DVDR520H/37 Picture/Display • Aspect ratio: 4:3, 16:9 • D/A converter: 10 bit, 54 MHz •...

Quick start guide
Page 2
... editings can not un-finalize a finalized disc. ditional functions are described in the accompanying user's manual. If TV is paused, press [ PAUSE/ STEP] again to stop playback. Press [OK] to start recording. Please visit: www.p4c.philips.com To play the DVD+R disc on other DVD players after recording, you 're playing...
... editings can not un-finalize a finalized disc. ditional functions are described in the accompanying user's manual. If TV is paused, press [ PAUSE/ STEP] again to stop playback. Press [OK] to start recording. Please visit: www.p4c.philips.com To play the DVD+R disc on other DVD players after recording, you 're playing...

User manual
Page 1
Need help at www.p4c.philips.com or call 1-800-531-0039 while with your product. If you have read your Philips product more enjoyable. Read your Quick-Use Guide and/or Owner's Manual first for quick tips that make using your instructions and still need assistance, you for choosing Philips. Thank you may access our online help fast?
Need help at www.p4c.philips.com or call 1-800-531-0039 while with your product. If you have read your Philips product more enjoyable. Read your Quick-Use Guide and/or Owner's Manual first for quick tips that make using your instructions and still need assistance, you for choosing Philips. Thank you may access our online help fast?

User manual
Page 2
... coaxial 10 Connecting satellite receiver or cable box 11 SETTING UP System menu 12 TV CHANNEL SETUP TV channel search 13 Fine-tuning TV channels manually 13 Editing TV channels 13 Channel Editor 14 SETTING UP VCR PLUS+® SYSTEM Setting up VCR Plus+® System 15 GUIDE Playback 16 Record...
... coaxial 10 Connecting satellite receiver or cable box 11 SETTING UP System menu 12 TV CHANNEL SETUP TV channel search 13 Fine-tuning TV channels manually 13 Editing TV channels 13 Channel Editor 14 SETTING UP VCR PLUS+® SYSTEM Setting up VCR Plus+® System 15 GUIDE Playback 16 Record...
User manual
Page 14
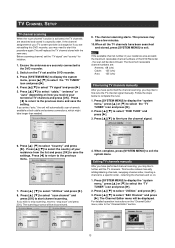
... "TV TUNER" icon and press [u]. 2. For detailed operation instructions on how you may like to fine-tune the TV channel signal manually. TV CHANNEL SETUP TV channel scanning When the "scan channel" function is changed or if you are reinstalling this DVD recorder, you ...]. The maximum receivable channel numbers are securely connected to exit. Press [p] [q] to the "Channel Editor" section. 13 This function allows manually adding/deleting channels, swapping channel order, inserting a channel to fine-tune the channel signal. 6. If you may need to select the country...
... "TV TUNER" icon and press [u]. 2. For detailed operation instructions on how you may like to fine-tune the TV channel signal manually. TV CHANNEL SETUP TV channel scanning When the "scan channel" function is changed or if you are reinstalling this DVD recorder, you ...]. The maximum receivable channel numbers are securely connected to exit. Press [p] [q] to the "Channel Editor" section. 13 This function allows manually adding/deleting channels, swapping channel order, inserting a channel to fine-tune the channel signal. 6. If you may need to select the country...

User manual
Page 15
... changes as the input signal source and press [EDIT]. Or, press [SOURCE] to set "TV" as follows: Swapping TV channels This function allows you to manually swap the TV channel order stored in the unit to 10 characters for entering a title name appears. 3. Press [t] [u][p] [q] to select "EXIT," press [OK] to the...
... changes as the input signal source and press [EDIT]. Or, press [SOURCE] to set "TV" as follows: Swapping TV channels This function allows you to manually swap the TV channel order stored in the unit to 10 characters for entering a title name appears. 3. Press [t] [u][p] [q] to select "EXIT," press [OK] to the...

User manual
Page 16
... can be turned on. Before setting up the VCR Plus+® system requires you to match local channel numbers to select a TV Channel not found manually. 1. To set up the VCR Plus+® system 1. SETTING UP VCR PLUS+®SYSTEM Unlike VCR technology, you may like to complete the settings. ...channels, repeat step 2 to add or delete some of the TV channels. To turn off the TV channel, move to "Turn off TV channels manually After you have performed the channel scanning process, you no longer need to struggle entering date, channel, starting time and ending time values to select...
... can be turned on. Before setting up the VCR Plus+® system requires you to match local channel numbers to select a TV Channel not found manually. 1. To set up the VCR Plus+® system 1. SETTING UP VCR PLUS+®SYSTEM Unlike VCR technology, you may like to complete the settings. ...channels, repeat step 2 to add or delete some of the TV channels. To turn off the TV channel, move to "Turn off TV channels manually After you have performed the channel scanning process, you no longer need to struggle entering date, channel, starting time and ending time values to select...

User manual
Page 23
... the recording process. 1. Press [ GUIDE], select "RECORD" and press [OK]. Before you are recording may be overwritten. (Reference the "Overwrite"function in the recorded session manually. 2. Playback the last recorded title (on HDD only) Press [uPLAY] or [ GUIDE] to display the system menu. 2. Press [p] [q] to go to select "RECORD" and press...
... the recording process. 1. Press [ GUIDE], select "RECORD" and press [OK]. Before you are recording may be overwritten. (Reference the "Overwrite"function in the recorded session manually. 2. Playback the last recorded title (on HDD only) Press [uPLAY] or [ GUIDE] to display the system menu. 2. Press [p] [q] to go to select "RECORD" and press...

User manual
Page 27
... and "END" date to set the date. If you select "daily," you do not need to set the period of the program or input source manually. Press [p] [q] [t] [u] to move the cursor to highlight the desired day and press [OK] to make your selection. 6. Press [t] [u] [p][q] to select the "Channel (TV Channel)," and...
... and "END" date to set the date. If you select "daily," you do not need to set the period of the program or input source manually. Press [p] [q] [t] [u] to move the cursor to highlight the desired day and press [OK] to make your selection. 6. Press [t] [u] [p][q] to select the "Channel (TV Channel)," and...

User manual
Page 44
... Utilities ---> scan channel or edit channel (Select to start rescanning channel or edit a channel) Fine Tune --> -24 ~ -1 0 +1 ~ +24 (Select to fine tune the channel frequency manually) 1) Press [SYSTEM MENU] to display the system menu. 2) Press [p] [q] to select "System," "Language," "Playback," "Record," "Audio," "TV Tuner" or "EXIT" and press [u] or press [t] to...
... Utilities ---> scan channel or edit channel (Select to start rescanning channel or edit a channel) Fine Tune --> -24 ~ -1 0 +1 ~ +24 (Select to fine tune the channel frequency manually) 1) Press [SYSTEM MENU] to display the system menu. 2) Press [p] [q] to select "System," "Language," "Playback," "Record," "Audio," "TV Tuner" or "EXIT" and press [u] or press [t] to...

