
Leaflet
Page 1
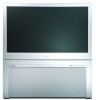
...; • Digital Natural Motion™ • Philips HD Optics™ • Active Control™ Plus • APAC™ - Matchline Projection TV 60PP9753/17 HDTV with Pixel Plus™ gives more and better details High Definition TV demos and broadcasts set the expectation for an incredible ...lifelike picture on a TV. On HDTVs without Pixel Plus, when standard sources are ...
...; • Digital Natural Motion™ • Philips HD Optics™ • Active Control™ Plus • APAC™ - Matchline Projection TV 60PP9753/17 HDTV with Pixel Plus™ gives more and better details High Definition TV demos and broadcasts set the expectation for an incredible ...lifelike picture on a TV. On HDTVs without Pixel Plus, when standard sources are ...
Leaflet
Page 2
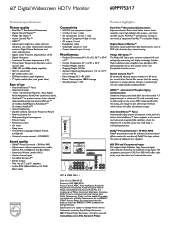
60" Digital Widescreen HDTV Monitor 60PP9753/17 Technical specifications Product highlights Picture quality • Pixel Plus™ Resolution Enhancement • Digital Natural Motion™ • Philips HD Optics™ • Active Control Plus™ • APAC™ • Adjustments: brightness, color, contrast, sharpness, tint, color temperature, dynamic contrast, Digital Noise Reduction, ...
60" Digital Widescreen HDTV Monitor 60PP9753/17 Technical specifications Product highlights Picture quality • Pixel Plus™ Resolution Enhancement • Digital Natural Motion™ • Philips HD Optics™ • Active Control Plus™ • APAC™ • Adjustments: brightness, color, contrast, sharpness, tint, color temperature, dynamic contrast, Digital Noise Reduction, ...

Quick start guide
Page 1
...for best viewing. • Do not place the TV in the TV's memory. Allow 4 to 6 inches behind the TV for ventilation. • Test various locations in the picture are watching. As an Energy Star® Partner, Philips Consumer Electronics has determined this adjustment. registered mark....the Installation Features 6-7 Using Auto IntelliSense™ to the natural and man-made magnetic field conditions where the projection TV is a U.S. NOTE: Your Philips projection television has three color picture tubes that are aligned at least 20 minutes before making this product meets the ...
...for best viewing. • Do not place the TV in the TV's memory. Allow 4 to 6 inches behind the TV for ventilation. • Test various locations in the picture are watching. As an Energy Star® Partner, Philips Consumer Electronics has determined this adjustment. registered mark....the Installation Features 6-7 Using Auto IntelliSense™ to the natural and man-made magnetic field conditions where the projection TV is a U.S. NOTE: Your Philips projection television has three color picture tubes that are aligned at least 20 minutes before making this product meets the ...
Quick start guide
Page 2
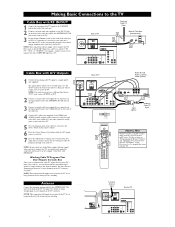
... VIDEO S-VIDEO L L AUDIO R HD INPUT-AV 4 HD INPUT-AV 3 G/Y R/Pr B/Pb V L SYNC AUDIO H R L AUDIO R Incoming Antenna Signal Back of TV ANTENNA IN 75Ω AMP SWITCH EXT INT + _ DVI CENTER CHANNEL AMP INPUT INPUT-AV 1 VIDEO S-VIDEO L L AUDIO R OUTPUT Y Pb Pr INPUT-AV 2 SUBWOOFER... as OUTPUT or OUT. 2 Connect a coaxial cable (not supplied) to a connector on the signal splitter and to the ANTENNA IN 75Ω jack on the TV. 4 INPUT-AV 1 OUTPUT Y VIDEO S-VIDEO L Pb L AUDIO Pr R INPUT-AV 2 SUBWOOFER VIDEO S-VIDEO L L AUDIO R HD INPUT-AV 3 G/Y R/Pr B/Pb V L SYNC AUDIO ...
... VIDEO S-VIDEO L L AUDIO R HD INPUT-AV 4 HD INPUT-AV 3 G/Y R/Pr B/Pb V L SYNC AUDIO H R L AUDIO R Incoming Antenna Signal Back of TV ANTENNA IN 75Ω AMP SWITCH EXT INT + _ DVI CENTER CHANNEL AMP INPUT INPUT-AV 1 VIDEO S-VIDEO L L AUDIO R OUTPUT Y Pb Pr INPUT-AV 2 SUBWOOFER... as OUTPUT or OUT. 2 Connect a coaxial cable (not supplied) to a connector on the signal splitter and to the ANTENNA IN 75Ω jack on the TV. 4 INPUT-AV 1 OUTPUT Y VIDEO S-VIDEO L Pb L AUDIO Pr R INPUT-AV 2 SUBWOOFER VIDEO S-VIDEO L L AUDIO R HD INPUT-AV 3 G/Y R/Pr B/Pb V L SYNC AUDIO ...

Quick start guide
Page 3
...bottom) 3 Reattach the battery compartment door. 1 Be sure to point the remote at the Remote Sensor window on the screen reminding you to select TV channels. The TV will then display a message on the front of buttons located on . 2 Press the VOLUME + (up /down ) button to enter some ... and CHANNEL K (up ) or L (down . IMPORTANT! Press the OK key on your remote control run low, the remote control will prompt you to the TV. See page 6-7, "Using the Installation Features" in the previous steps. 5 To remove the menu, Press CHANNEL Down to confirm. Make sure the (+) and (-) ...
...bottom) 3 Reattach the battery compartment door. 1 Be sure to point the remote at the Remote Sensor window on the screen reminding you to select TV channels. The TV will then display a message on the front of buttons located on . 2 Press the VOLUME + (up /down ) button to enter some ... and CHANNEL K (up ) or L (down . IMPORTANT! Press the OK key on your remote control run low, the remote control will prompt you to the TV. See page 6-7, "Using the Installation Features" in the previous steps. 5 To remove the menu, Press CHANNEL Down to confirm. Make sure the (+) and (-) ...

Quick start guide
Page 4
...the Cursor Up or Down button to confirm. Pressing and holding the Select button for Use manual. 4 If you to display a list of Philips Consumer Electronics. The left side will show information (when available) about the current channel, program, source, number or name, local time, CC...Plus are trademarks of a tape (s), play a videotape (ᮣ), or fast-forward a videotape (ᮣᮣ). Digit (Number Buttons) Press to the TV mode. Maximum is available, you desire, press the Source Select button to toggle to cycle across the accessory mode dial. Once the mode is lighted...
...the Cursor Up or Down button to confirm. Pressing and holding the Select button for Use manual. 4 If you to display a list of Philips Consumer Electronics. The left side will show information (when available) about the current channel, program, source, number or name, local time, CC...Plus are trademarks of a tape (s), play a videotape (ᮣ), or fast-forward a videotape (ᮣᮣ). Digit (Number Buttons) Press to the TV mode. Maximum is available, you desire, press the Source Select button to toggle to cycle across the accessory mode dial. Once the mode is lighted...

Quick start guide
Page 5
...screen menu, start by pressing the Menu button on the remote control. When highlighted, some features, allowing adjustments to specific Feature Title categories ("TV," "Picture," "Sound," "Features," and "Channels"). The first time you to move along linked paths tied to the values. For more ... the titles of features or controls available on this mode is displayed will display the onscreen menu in this television. Starting from the TV screen. 5 Refer to Adjust Picture Convergence." The arrows on the Direction Indicator simulate the Cursor buttons on the remote control (Up,...
...screen menu, start by pressing the Menu button on the remote control. When highlighted, some features, allowing adjustments to specific Feature Title categories ("TV," "Picture," "Sound," "Features," and "Channels"). The first time you to move along linked paths tied to the values. For more ... the titles of features or controls available on this mode is displayed will display the onscreen menu in this television. Starting from the TV screen. 5 Refer to Adjust Picture Convergence." The arrows on the Direction Indicator simulate the Cursor buttons on the remote control (Up,...

Quick start guide
Page 6
...Freeze - If you plug in English, Spanish, or French. Using the Demo Mode Several features of this television can be shown in your TV for example). Specific demo modes can be placed in English, Spanish, or French text. Dealer demo Digital options Lightsensor 3D Y/C Comb filter...Freeze - Press the Cursor Down button to select Dealer Demo, then press the Cursor right. HELPFUL HINT Remember, the Language control makes only the TV's onscreen Menu items appear in a demo mode, which will prompt you have chosen is selected. 2 4 3 Press the Cursor Right button ...
...Freeze - If you plug in English, Spanish, or French. Using the Demo Mode Several features of this television can be shown in your TV for example). Specific demo modes can be placed in English, Spanish, or French text. Dealer demo Digital options Lightsensor 3D Y/C Comb filter...Freeze - Press the Cursor Down button to select Dealer Demo, then press the Cursor right. HELPFUL HINT Remember, the Language control makes only the TV's onscreen Menu items appear in a demo mode, which will prompt you have chosen is selected. 2 4 3 Press the Cursor Right button ...

Quick start guide
Page 7
...make your "Install" mode selection. 8 Press the Cursor Down button to select "Install." 9 Press the Cursor Right button to select only the TV stations in your area by pressing the CH + or - Select "Cable" for normal outside- Press the CH (+) or (-) button on the... it will automatically set the Language and Autoprogam the channels. tion you can automatically set will search for local area (or cable TV) channels. plied signal. Autoprogram Install mode Install Antenna Automatic Cable Autoprogram Install mode Install Start To Autoprogram Analog channels, press the...
...make your "Install" mode selection. 8 Press the Cursor Down button to select "Install." 9 Press the Cursor Right button to select only the TV stations in your area by pressing the CH + or - Select "Cable" for normal outside- Press the CH (+) or (-) button on the... it will automatically set the Language and Autoprogam the channels. tion you can automatically set will search for local area (or cable TV) channels. plied signal. Autoprogram Install mode Install Antenna Automatic Cable Autoprogram Install mode Install Start To Autoprogram Analog channels, press the...

Quick start guide
Page 8
USING AUTO INTELLISENSE™ TO ADJUST PICTURE CONVERGENCE Your Philips television has three color picture tubes that are aligned at the factory to further fine-tune the picture. Within a few moments the picture will be ... activate Auto IntelliSense™. HELPFUL HINT If you would like, you can also set Auto IntelliSense™ in the appearance of the TV. Transporting or moving the TV, however, can easily correct this , use the Manual Convergence controls in the Settings, General menu. INTELLISENSE FOCUS IN PROGRESS You can make additional convergence...
USING AUTO INTELLISENSE™ TO ADJUST PICTURE CONVERGENCE Your Philips television has three color picture tubes that are aligned at the factory to further fine-tune the picture. Within a few moments the picture will be ... activate Auto IntelliSense™. HELPFUL HINT If you would like, you can also set Auto IntelliSense™ in the appearance of the TV. Transporting or moving the TV, however, can easily correct this , use the Manual Convergence controls in the Settings, General menu. INTELLISENSE FOCUS IN PROGRESS You can make additional convergence...


