
Leaflet
Page 1
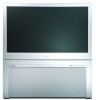
...; • Philips HD Optics™ • Active Control™ Plus • APAC™ - On HDTVs without Pixel Plus, when standard sources are maximized to near HDTV quality. With Pixel Plus, standard sources are connected, the quality is much less than HDTV. Matchline Projection TV 60PP9753/17 HDTV with Pixel Plus™ gives more and better details High Definition TV demos and broadcasts set the...
...; • Philips HD Optics™ • Active Control™ Plus • APAC™ - On HDTVs without Pixel Plus, when standard sources are maximized to near HDTV quality. With Pixel Plus, standard sources are connected, the quality is much less than HDTV. Matchline Projection TV 60PP9753/17 HDTV with Pixel Plus™ gives more and better details High Definition TV demos and broadcasts set the...
Leaflet
Page 2
... selected objectionable programming, AutoPicture™ (5 modes), AutoProgram, AutoSound™ (4 modes), AutoSurf™ • Closed Captioning • Double window, two-tuner Picture-in-Picture • Favorite channel list • Multi-point digital convergence • Picture freeze • Protective screen • On timer • Sleep timer • Three Menu Languages: English, French, and Spanish • Universal remote control - RC4305/01 Sound quality • Dolby® Virtual Surround - 30 Watt RMS • Adjustments: volume, equalizer, bass...
... selected objectionable programming, AutoPicture™ (5 modes), AutoProgram, AutoSound™ (4 modes), AutoSurf™ • Closed Captioning • Double window, two-tuner Picture-in-Picture • Favorite channel list • Multi-point digital convergence • Picture freeze • Protective screen • On timer • Sleep timer • Three Menu Languages: English, French, and Spanish • Universal remote control - RC4305/01 Sound quality • Dolby® Virtual Surround - 30 Watt RMS • Adjustments: volume, equalizer, bass...

Quick start guide
Page 1
...can save energy. Initial TV Setup 3 Using the TV Buttons 3 Using the Remote Control 3-4 Using the On-screen Menu 5 Using the Demo Mode 6 Using the Installation Features 6-7 Using Auto IntelliSense™ to the TV if it will not be misaligned. With Auto IntelliSense™, automatically adjust picture convergence at least 20 minutes before making this product meets the Energy Star® guidelines for details. Cable TV Connect the cable TV signal to 6 inches of a button. NOTE: This connection will supply stereo sound to Adjust Picture Convergence 8 WARNING: TO...
...can save energy. Initial TV Setup 3 Using the TV Buttons 3 Using the Remote Control 3-4 Using the On-screen Menu 5 Using the Demo Mode 6 Using the Installation Features 6-7 Using Auto IntelliSense™ to the TV if it will not be misaligned. With Auto IntelliSense™, automatically adjust picture convergence at least 20 minutes before making this product meets the Energy Star® guidelines for details. Cable TV Connect the cable TV signal to 6 inches of a button. NOTE: This connection will supply stereo sound to Adjust Picture Convergence 8 WARNING: TO...
Quick start guide
Page 2
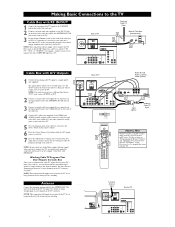
... 7. Audio R (red) Audio L (white) Video (yellow) OUTPUT CH 3 4 CABLE TO IN TV 3 VIDEO OUT L R AUDIO OUT 1 Signal Splitter Incoming Cable TV Signal HELPFUL HINT Your TV remote is being broadcast by the station you are watching. NOTE: This connection will not supply stereo sound to the TV. + _ CENTER CHANNEL AMP INPUT HD INPUT-AV 4 DVI NOTE: Your cable box may have a different label for the TO TV jack, such as cable boxes. This jack will not supply stereo sound to the ANTENNA IN...
... 7. Audio R (red) Audio L (white) Video (yellow) OUTPUT CH 3 4 CABLE TO IN TV 3 VIDEO OUT L R AUDIO OUT 1 Signal Splitter Incoming Cable TV Signal HELPFUL HINT Your TV remote is being broadcast by the station you are watching. NOTE: This connection will not supply stereo sound to the TV. + _ CENTER CHANNEL AMP INPUT HD INPUT-AV 4 DVI NOTE: Your cable box may have a different label for the TO TV jack, such as cable boxes. This jack will not supply stereo sound to the ANTENNA IN...

Quick start guide
Page 3
... button, VOLUME CHANNEL INTELLISENSE MENU POWER 2 4 3 4 TV Settings Demo Install Exit Picture Sound Features Channels 5 4 Blue LED indicator 1 5 Using the Remote Control Installing the Batteries To load the supplied batteries into the remote: 1 Remove the battery compartment door on -screen menu is not needed or unavailable. 1 Press the Power button to confirm. See page 6-7, "Using the Installation Features" in the previous steps. 5 To remove the menu, Press CHANNEL Down to the TV. Using the TV Buttons Your television has a set of buttons located on -screen menu is displayed...
... button, VOLUME CHANNEL INTELLISENSE MENU POWER 2 4 3 4 TV Settings Demo Install Exit Picture Sound Features Channels 5 4 Blue LED indicator 1 5 Using the Remote Control Installing the Batteries To load the supplied batteries into the remote: 1 Remove the battery compartment door on -screen menu is not needed or unavailable. 1 Press the Power button to confirm. See page 6-7, "Using the Installation Features" in the previous steps. 5 To remove the menu, Press CHANNEL Down to the TV. Using the TV Buttons Your television has a set of buttons located on -screen menu is displayed...

Quick start guide
Page 4
... . NOTE: Continuing to hold the channel will change slowly for Use manual.) OK Press to activate or confirm menu choices. Surround Sound Press to directly access a specific TV channel. If you press and hold the Freeze Format button down will cycle the TV through the TV channels. Digit (Number Buttons) Press to display and toggle a list of a Sleeptimer setting. Stop pressing when the mode you set the Surf control in the traditional 4:3 proportions...
... . NOTE: Continuing to hold the channel will change slowly for Use manual.) OK Press to activate or confirm menu choices. Surround Sound Press to directly access a specific TV channel. If you press and hold the Freeze Format button down will cycle the TV through the TV channels. Digit (Number Buttons) Press to display and toggle a list of a Sleeptimer setting. Stop pressing when the mode you set the Surf control in the traditional 4:3 proportions...

Quick start guide
Page 5
... Controls Picture Sound Features Channels TV 6 Settings Demo Install 31 2 6 5 Picture TV Auto picture Contrast 40 Brightness Color 4 Sharpness HELPFUL HINT Pressing the Menu button once will expand to have only an "On" or "Off" option. 5 To navigate the on-screen menu, start by pressing the Menu button on the remote control. Each press of the on-screen menu. These subcontrols will be adjusted or set program channels into the TV's memory. Others may show a box containing a list of the Picture, Sound...
... Controls Picture Sound Features Channels TV 6 Settings Demo Install 31 2 6 5 Picture TV Auto picture Contrast 40 Brightness Color 4 Sharpness HELPFUL HINT Pressing the Menu button once will expand to have only an "On" or "Off" option. 5 To navigate the on-screen menu, start by pressing the Menu button on the remote control. Each press of the on-screen menu. These subcontrols will be adjusted or set program channels into the TV's memory. Others may show a box containing a list of the Picture, Sound...

Quick start guide
Page 6
... Right button to shift the menu to display the list of the following 4 options: Digital options, Lightsensor, and 3D Y/C Comb filter. 1 Press the Menu button on the remote control to show the on-screen menu. 2 Press the Cursor Down button repeatedly until "Demo" is present. It does not change the other on the remote control to activate the Demo. 3 5 TV Settings Demo Install Picture Sound Features Channels 1 Auto demo Demo Dual screen Freeze...
... Right button to shift the menu to display the list of the following 4 options: Digital options, Lightsensor, and 3D Y/C Comb filter. 1 Press the Menu button on the remote control to show the on-screen menu. 2 Press the Cursor Down button repeatedly until "Demo" is present. It does not change the other on the remote control to activate the Demo. 3 5 TV Settings Demo Install Picture Sound Features Channels 1 Auto demo Demo Dual screen Freeze...

Quick start guide
Page 7
... "Install" mode control. 5 Press the Cursor Right button to display a list of the options. tion you are setting up the TV after making your area by pressing the CH + or - Press the CH (+) or (-) button on -screen menu from the TV screen when the Autoprogramming process has finished. After prograomming is finished, check the results. plied signal. Picture Sound Features Channels TV 3 Settings Demo 5 Install 9 1 10 Autoprogram Install mode Install The TV will automatically set will...
... "Install" mode control. 5 Press the Cursor Right button to display a list of the options. tion you are setting up the TV after making your area by pressing the CH + or - Press the CH (+) or (-) button on -screen menu from the TV screen when the Autoprogramming process has finished. After prograomming is finished, check the results. plied signal. Picture Sound Features Channels TV 3 Settings Demo 5 Install 9 1 10 Autoprogram Install mode Install The TV will automatically set will...

Quick start guide
Page 8
... menu: 1 Press the MENU button on the remote control to show the on screen. See the Directions for Use manual for 20 minutes, then press the IntelliSense button on screen. TV Settings Demo Install Picture Sound Features Channels TV Settings Demo Install General Clock 5 2 4 3 1 Settings IntelliSense Manual Convergence Settings IntelliSense Manual Convergence INTELLISENSE FOCUS IN PROGRESS 8 USING AUTO INTELLISENSE™ TO ADJUST PICTURE CONVERGENCE Your Philips television has three color picture tubes that are aligned at the factory to properly bring the projected light...
... menu: 1 Press the MENU button on the remote control to show the on screen. See the Directions for Use manual for 20 minutes, then press the IntelliSense button on screen. TV Settings Demo Install Picture Sound Features Channels TV Settings Demo Install General Clock 5 2 4 3 1 Settings IntelliSense Manual Convergence Settings IntelliSense Manual Convergence INTELLISENSE FOCUS IN PROGRESS 8 USING AUTO INTELLISENSE™ TO ADJUST PICTURE CONVERGENCE Your Philips television has three color picture tubes that are aligned at the factory to properly bring the projected light...


