Leaflet
Page 2
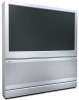
...(5 modes), Auto Program, AutoSound™ (4 modes), AutoSurf™ • Closed Captioning • Favorite channel list • Picture freeze • On timer • Sleep timer • Three Menu Languages: English, French, and Spanish • Universal remote control - Epic 60" High Definition Projection TV 60PW9363 Technical specifications Product highlights Picture quality • Active Control™ • APAC™ • Eye Fidelity™ • Adjustments: brightness, color, picture, sharpness, color temperature, and dynamic contrast • Digital Color Transient...
...(5 modes), Auto Program, AutoSound™ (4 modes), AutoSurf™ • Closed Captioning • Favorite channel list • Picture freeze • On timer • Sleep timer • Three Menu Languages: English, French, and Spanish • Universal remote control - Epic 60" High Definition Projection TV 60PW9363 Technical specifications Product highlights Picture quality • Active Control™ • APAC™ • Eye Fidelity™ • Adjustments: brightness, color, picture, sharpness, color temperature, and dynamic contrast • Digital Color Transient...

User manual
Page 3
....eiae.org 16. or D. An outdoor antenna should be connected to the grounding system of cable entry as power-supply cord or plug is required when the apparatus has been damaged in performance; Only use caution when moving the cart/apparatus combination to operate normally or exhibits a marked change in any of Antenna Grounding as to provide some protection against...
....eiae.org 16. or D. An outdoor antenna should be connected to the grounding system of cable entry as power-supply cord or plug is required when the apparatus has been damaged in performance; Only use caution when moving the cart/apparatus combination to operate normally or exhibits a marked change in any of Antenna Grounding as to provide some protection against...
User manual
Page 4
... Factory Service Locations 65-66 Limited Warranty 72 QUICK USE AND SETUP GUIDE Refer to the simple Quick Use and Setup Quick Use and Setup Guide Rear-projection HDTV Monitor Guide (supplied with your TV) for details on the following: • Basic TV connections • Television and remote-control operation • On-screen menu controls • How to select the AV2 input source. 1 Cable TV Signal ANTENNA IN 75Ω 2 Back of TV Back of Cable Box (example only) CABLE IN TO TV OUTPUT CH 3 4 3 DVI INPUT-AV 1 VIDEO S-VIDEO L L AUDIO R OUTPUT Y Pb Pr INPUT...
... Factory Service Locations 65-66 Limited Warranty 72 QUICK USE AND SETUP GUIDE Refer to the simple Quick Use and Setup Quick Use and Setup Guide Rear-projection HDTV Monitor Guide (supplied with your TV) for details on the following: • Basic TV connections • Television and remote-control operation • On-screen menu controls • How to select the AV2 input source. 1 Cable TV Signal ANTENNA IN 75Ω 2 Back of TV Back of Cable Box (example only) CABLE IN TO TV OUTPUT CH 3 4 3 DVI INPUT-AV 1 VIDEO S-VIDEO L L AUDIO R OUTPUT Y Pb Pr INPUT...

User manual
Page 5
... DVI and Component Inputs-DVI supports High-definition Copy Protected digital video input for flawless convergence of progressive scan, which reduces annoying motion artifacts. Multipoint Digital Convergence (35 point) brings the accuracy of digital technology for connection to the picture. You can save energy. Three-line digital comb filter provides improved chroma/luminance separation to compliant settop boxes. Offering vertical-edge enhancement and virtually no external splitter is the National Television Standards...
... DVI and Component Inputs-DVI supports High-definition Copy Protected digital video input for flawless convergence of progressive scan, which reduces annoying motion artifacts. Multipoint Digital Convergence (35 point) brings the accuracy of digital technology for connection to the picture. You can save energy. Three-line digital comb filter provides improved chroma/luminance separation to compliant settop boxes. Offering vertical-edge enhancement and virtually no external splitter is the National Television Standards...

User manual
Page 7
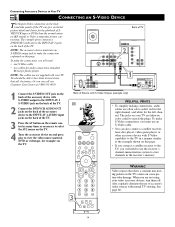
... side jack-panel inputs (recognized by the TV as DVD players, laser-disc players, video-game players, satellite receivers, or other devices. 5 AUDIO inputs (INPUT-AV 1, INPUT-AV 2, and TV's side jack panel [AV3])-use to connect radio-frequency (RF) signals from the audio output jacks on page 59. • Among the 480i-compatible inputs (ANTENNA IN 75Ω, INPUT AV-1, INPUT AV-2, and the side jack panel), you will provide you with the best picture possible...
... side jack-panel inputs (recognized by the TV as DVD players, laser-disc players, video-game players, satellite receivers, or other devices. 5 AUDIO inputs (INPUT-AV 1, INPUT-AV 2, and TV's side jack panel [AV3])-use to connect radio-frequency (RF) signals from the audio output jacks on page 59. • Among the 480i-compatible inputs (ANTENNA IN 75Ω, INPUT AV-1, INPUT AV-2, and the side jack panel), you will provide you with the best picture possible...

User manual
Page 8
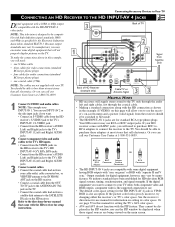
... channels in -Picture (PIP) feature is supported by manufacturer, you may not be compatible with high-definition signal standards 1080i and 480p as HD receivers (1080i or 480p) or DVD players with progressive-scan capability (480p). If the picture looks grossly incorrect, try changing the color-space setting on the TV. • The PIP (Picture-in this television. ANTENNA IN 75Ω DVI INPUT-AV 1 VIDEO S-VIDEO L L AUDIO R OUTPUT Y Pb Pr INPUT-AV 2 VIDEO S-VIDEO L L AUDIO R HD INPUT-AV 5 2 1 HD INPUT...
... channels in -Picture (PIP) feature is supported by manufacturer, you may not be compatible with high-definition signal standards 1080i and 480p as HD receivers (1080i or 480p) or DVD players with progressive-scan capability (480p). If the picture looks grossly incorrect, try changing the color-space setting on the TV. • The PIP (Picture-in this television. ANTENNA IN 75Ω DVI INPUT-AV 1 VIDEO S-VIDEO L L AUDIO R OUTPUT Y Pb Pr INPUT-AV 2 VIDEO S-VIDEO L L AUDIO R HD INPUT-AV 5 2 1 HD INPUT...

User manual
Page 11
... use your TV. PICTURE SOUND FEATURES INSTALL TREBLE BASS BALANCE AVL INCR . SURROUND POWER 7 TV 5 SWAP SOUND VCR PIP CH DN UP ACC ACTIVE CONTROL FREEZE 3 PICTURE STATUS/ EXIT MENU/ SELECT SOUND INCR . ANTENNA IN 75Ω Back of TV HD INPUT-AV 5 DVI HD INPUT-AV 4 G/Y INPUT-AV 1 VIDEO S-VIDEO L L AUDIO R OUTPUT Y Pb Pr INPUT-AV 2 VIDEO S-VIDEO L L AUDIO R 1 R/Pr B/Pb V L SYNC AUDIO H R AUX/TV INPUT R L PHONO INPUT Back of the hi-fi system. 2 See the section below . NOTE: The cables...
... use your TV. PICTURE SOUND FEATURES INSTALL TREBLE BASS BALANCE AVL INCR . SURROUND POWER 7 TV 5 SWAP SOUND VCR PIP CH DN UP ACC ACTIVE CONTROL FREEZE 3 PICTURE STATUS/ EXIT MENU/ SELECT SOUND INCR . ANTENNA IN 75Ω Back of TV HD INPUT-AV 5 DVI HD INPUT-AV 4 G/Y INPUT-AV 1 VIDEO S-VIDEO L L AUDIO R OUTPUT Y Pb Pr INPUT-AV 2 VIDEO S-VIDEO L L AUDIO R 1 R/Pr B/Pb V L SYNC AUDIO H R AUX/TV INPUT R L PHONO INPUT Back of the hi-fi system. 2 See the section below . NOTE: The cables...

User manual
Page 12
... not supplied with interlaced output. If you are often color coded. For example, besides YPbPr, you will accept 480i (interlaced) output signals only. If you connect a satellite receiver to the TV, you may differ depending on audio and video cables are attempting to use of a DVD player with your TV's jack panel) or S-Video connections. NOTE: The INPUT-AV 1 YPbPr jacks will need to use the receiver's channel-memorization system to store channels in the receiver...
... not supplied with interlaced output. If you are often color coded. For example, besides YPbPr, you will accept 480i (interlaced) output signals only. If you connect a satellite receiver to the TV, you may differ depending on audio and video cables are attempting to use of a DVD player with your TV's jack panel) or S-Video connections. NOTE: The INPUT-AV 1 YPbPr jacks will need to use the receiver's channel-memorization system to store channels in the receiver...

User manual
Page 13
...; two cables for -use manual for information. • The default color-space setting for changing from the L(eft) and R(ight) AUDIO OUT jacks on the back of the DVD player to the HD INPUT-AV 4 AUDIO L(eft) and R(ight) jacks on placing your DVD player's directions-for-use manual. See page 60. 3 VIDEO OUT Y VIDEO PB SELECT PR S I /P (interlaced/progressive scan) switch located on screen to see the DVD picture through the DVD disc's menu...
...; two cables for -use manual for information. • The default color-space setting for changing from the L(eft) and R(ight) AUDIO OUT jacks on the back of the DVD player to the HD INPUT-AV 4 AUDIO L(eft) and R(ight) jacks on placing your DVD player's directions-for-use manual. See page 60. 3 VIDEO OUT Y VIDEO PB SELECT PR S I /P (interlaced/progressive scan) switch located on screen to see the DVD picture through the DVD disc's menu...
User manual
Page 14
... on and press play to view the video source material (DVD or videotape, for the left channel. NOTE: The cables are not supplied with S-Video Output (example only) DIGITAL AUDIO OUT COMPONENT PCM / BITSTREAM VIDEO OUT Y Cr Cb S-VIDEO OPTICAL COAXIAL OUT AV2 POWER TV SWAP VCR PIP CH ACC ACTIVE CONTROL FREEZE DN UP SOUND PICTURE HELPFUL HINTS • To simplify making connections, audio cables are likewise color coded to match the plugs...
... on and press play to view the video source material (DVD or videotape, for the left channel. NOTE: The cables are not supplied with S-Video Output (example only) DIGITAL AUDIO OUT COMPONENT PCM / BITSTREAM VIDEO OUT Y Cr Cb S-VIDEO OPTICAL COAXIAL OUT AV2 POWER TV SWAP VCR PIP CH ACC ACTIVE CONTROL FREEZE DN UP SOUND PICTURE HELPFUL HINTS • To simplify making connections, audio cables are likewise color coded to match the plugs...
User manual
Page 15
... JACK REMOTE AUDIO AUDIO L L R R VCR CONTROL DIGITAL AUDIO OUT VIDEO VIDEO S-VIDEO OUT TO TV CH 3 CH 4 IN FROM ANT SATELLITE IN Back of TV 1 DVI INPUT-AV 1 VIDEO S-VIDEO L L AUDIO R 1OUTPUT Y Pb Pr INPUT-AV 2 VIDEO S-VIDEO L L AUDIO R HD INPUT-AV 5 HD INPUT-AV 4 G/Y R/Pr B/Pb V L SYNC AUDIO H R 2 2 L AUDIO R Signal from a satellite dish antenna to the SATELLITE IN jack on -screen menu and a picture (valid signal) from your TV offers both component video and RGB outputs, component video is the suggested connection to use manual that...
... JACK REMOTE AUDIO AUDIO L L R R VCR CONTROL DIGITAL AUDIO OUT VIDEO VIDEO S-VIDEO OUT TO TV CH 3 CH 4 IN FROM ANT SATELLITE IN Back of TV 1 DVI INPUT-AV 1 VIDEO S-VIDEO L L AUDIO R 1OUTPUT Y Pb Pr INPUT-AV 2 VIDEO S-VIDEO L L AUDIO R HD INPUT-AV 5 HD INPUT-AV 4 G/Y R/Pr B/Pb V L SYNC AUDIO H R 2 2 L AUDIO R Signal from a satellite dish antenna to the SATELLITE IN jack on -screen menu and a picture (valid signal) from your TV offers both component video and RGB outputs, component video is the suggested connection to use manual that...

User manual
Page 41
... set the TV to turn off at a specific time while you are watching another channel, or when the TV is in standby mode. (Standby mode is when the TV is highlighted. POWER 9 7TV SWAP SOUND 3,4, VCR ACC PIP CH ACTIVE CONTROL FREEZE DN UP PICTURE 5 STATUS/ EXIT MENU/ SELECT 8VOL MUTE 2CH 6 123 456 789 TV/VCR A/CH 0 SURF POSITION PIP 1 FEATURES TIMER TIME START TIME STOP TIME CHANNEL ACTIVATE FEATURES TIMER TIME START TIME STOP TIME CHANNEL ACTIVATE FEATURES TIMER TIME...
... set the TV to turn off at a specific time while you are watching another channel, or when the TV is in standby mode. (Standby mode is when the TV is highlighted. POWER 9 7TV SWAP SOUND 3,4, VCR ACC PIP CH ACTIVE CONTROL FREEZE DN UP PICTURE 5 STATUS/ EXIT MENU/ SELECT 8VOL MUTE 2CH 6 123 456 789 TV/VCR A/CH 0 SURF POSITION PIP 1 FEATURES TIMER TIME START TIME STOP TIME CHANNEL ACTIVATE FEATURES TIMER TIME START TIME STOP TIME CHANNEL ACTIVATE FEATURES TIMER TIME...

User manual
Page 43
...; Changing the channel or adjusting the volume during the last minute of a Timer setting will cancel the shutting off of the TV. • Thirty seconds before the set changes to the channel you set the TIME, START TIME, STOP TIME, and CHANNEL, you must activate the Timer for it to operate. Your options are ONCE, DAILY, or OFF. 6 Press the STATUS/EXIT button to exit the menu. PICTURE SOUND FEATURES INSTALL TIMER AutoLock PIP CLOSED CAP...
...; Changing the channel or adjusting the volume during the last minute of a Timer setting will cancel the shutting off of the TV. • Thirty seconds before the set changes to the channel you set the TIME, START TIME, STOP TIME, and CHANNEL, you must activate the Timer for it to operate. Your options are ONCE, DAILY, or OFF. 6 Press the STATUS/EXIT button to exit the menu. PICTURE SOUND FEATURES INSTALL TIMER AutoLock PIP CLOSED CAP...

User manual
Page 54
... screen without border bars. Pictures appear more comfortable with video sources connected to your TV's standard inputs-ANTENNA, AV1, CVI, AV2, or AV3 (side panel)-access your HD set . EXPAND 4:3 Zooms the picture vertically and horizontally. 4:3 EVENING WORLD NEWS TONIGHT'S HEADLINES EXPAND 4:3 EVENING WORLD NEWS TONIGHT'S HEADLINES PANORAMA Stretches the outer parts of the picture horizontally and causes some vertical expansion. Selecting a Picture Format Using the Remote Control Use your TV's picture...
... screen without border bars. Pictures appear more comfortable with video sources connected to your TV's standard inputs-ANTENNA, AV1, CVI, AV2, or AV3 (side panel)-access your HD set . EXPAND 4:3 Zooms the picture vertically and horizontally. 4:3 EVENING WORLD NEWS TONIGHT'S HEADLINES EXPAND 4:3 EVENING WORLD NEWS TONIGHT'S HEADLINES PANORAMA Stretches the outer parts of the picture horizontally and causes some vertical expansion. Selecting a Picture Format Using the Remote Control Use your TV's picture...

User manual
Page 61
... a particular channel • Use the number buttons on the remote instead of the remote sensor window. • Clean the remote control and the remote sensor window on the power strip is not blown. • Check to see scrolling images Check to ensure that the batteries are using the remote control and point the remote toward the remote-sensor window on a wall switch. You see if the TV is set 's convergence and adjust if necessary...
... a particular channel • Use the number buttons on the remote instead of the remote sensor window. • Clean the remote control and the remote sensor window on the power strip is not blown. • Check to see scrolling images Check to ensure that the batteries are using the remote control and point the remote toward the remote-sensor window on a wall switch. You see if the TV is set 's convergence and adjust if necessary...

User manual
Page 62
... set the AUDIO OUT control correctly.) TV displays wrong channel or no color or colors are not able to adjust the convergence. See pages *Q-4 and *Q-5. 62 See page *Q-3 for the location of the Mute button. • Check the Audio Out and Speaker controls. See pages *Q-1, *Q-2, 7-10, and 12-16. • If you may need to get sound • Check the Volume buttons on the remote control or on the equipment or TV. See pages *Q-2 (TV buttons...
... set the AUDIO OUT control correctly.) TV displays wrong channel or no color or colors are not able to adjust the convergence. See pages *Q-4 and *Q-5. 62 See page *Q-3 for the location of the Mute button. • Check the Audio Out and Speaker controls. See pages *Q-1, *Q-2, 7-10, and 12-16. • If you may need to get sound • Check the Volume buttons on the remote control or on the equipment or TV. See pages *Q-2 (TV buttons...
User manual
Page 63
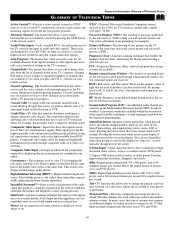
... receiver, DVD player, S (Super)-VHS videocassette recorder, or video games. Component video inputs allow the separate reception of the TV, used to add or delete channels from regular antenna or cable signals and stores only active broadcast stations in one small picture, or PIP). High-definition Television (HDTV) • High-resolution digital television. buttons on -screen text boxes to change the general color balance between the last two channels viewed by the television (or VCR) to receive higher picture resolution and offer sound-connection...
... receiver, DVD player, S (Super)-VHS videocassette recorder, or video games. Component video inputs allow the separate reception of the TV, used to add or delete channels from regular antenna or cable signals and stores only active broadcast stations in one small picture, or PIP). High-definition Television (HDTV) • High-resolution digital television. buttons on -screen text boxes to change the general color balance between the last two channels viewed by the television (or VCR) to receive higher picture resolution and offer sound-connection...

User manual
Page 64
...49 Settings review, 52 Setup Code, 45 TV ratings, 48 Understanding AutoLock™, 44 Unrated broadcasts, 50 AutoPicture™, 26 Auto Program, *Q-5, 63 AutoSound™, 25 AutoSurf™, 27 AV Button, 24 AVL Control, 34 B Balance Control, 33 Bass Boost Control, 38 Bass Control, 33 Brightness Control, 30 Buttons (TV), *Q-2 Buttons (Remote), *Q-3 C Cables, 6 Channel Edit Control, *Q-5, 63 Cleaning (TV/Screen), 60 Clock (See Timer Control) Closed Captioning Control, 53, 63 Coaxial Cable (Definition), 63 Color Control, 30 Color-space Control, 59 Color Temp Control, 30 Component Video Inputs...
...49 Settings review, 52 Setup Code, 45 TV ratings, 48 Understanding AutoLock™, 44 Unrated broadcasts, 50 AutoPicture™, 26 Auto Program, *Q-5, 63 AutoSound™, 25 AutoSurf™, 27 AV Button, 24 AVL Control, 34 B Balance Control, 33 Bass Boost Control, 38 Bass Control, 33 Brightness Control, 30 Buttons (TV), *Q-2 Buttons (Remote), *Q-3 C Cables, 6 Channel Edit Control, *Q-5, 63 Cleaning (TV/Screen), 60 Clock (See Timer Control) Closed Captioning Control, 53, 63 Coaxial Cable (Definition), 63 Color Control, 30 Color-space Control, 59 Color Temp Control, 30 Component Video Inputs...

Quick start guide
Page 2
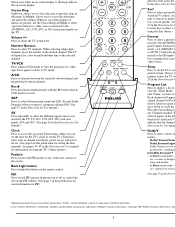
... among the signal inputs you can still change some of the basic picture and sound settings with the buttons on -screen menus. When operating the remote control, point the remote toward the remote sensor window on . Remote Sensor Window Power Standby Button REMOTE CONTROL INSTALLING BATTERIES T o load the supplied batteries into place. POINTING THE REMOTE Press the TV mode button on the remote to ensure that the (+) and (-) ends of the TV buttons. 1 Press POWER/STANDBY to turn the TV on -screen menu. buttons to...
... among the signal inputs you can still change some of the basic picture and sound settings with the buttons on -screen menus. When operating the remote control, point the remote toward the remote sensor window on . Remote Sensor Window Power Standby Button REMOTE CONTROL INSTALLING BATTERIES T o load the supplied batteries into place. POINTING THE REMOTE Press the TV mode button on the remote to ensure that the (+) and (-) ends of the TV buttons. 1 Press POWER/STANDBY to turn the TV on -screen menu. buttons to...
Quick start guide
Page 3
... select TV channels. Number Buttons Press to select various fac modes. TV/VCR Press while in the Directions for Use manual.) Clock Press to access the on-screen Timer menu, where you can set the time for information on -screen displays or menus are trademarks of the screen. Press again to return to the HD inputs ( box or progressive-scan-c video source. A/CH Press to alternate between main sound and SAP (Second Audio Program...
... select TV channels. Number Buttons Press to select various fac modes. TV/VCR Press while in the Directions for Use manual.) Clock Press to access the on-screen Timer menu, where you can set the time for information on -screen displays or menus are trademarks of the screen. Press again to return to the HD inputs ( box or progressive-scan-c video source. A/CH Press to alternate between main sound and SAP (Second Audio Program...


