
User manual
Page 4
...Auto Picture 31 Auto Sound 31 GENERAL INFORMATION Troubleshooting 32-33 Care and Cleaning 34 Model Specifications 35 Glossary of Your TV 2 Safety/Precautions 2-3 Features 5 POWER TV SWAP VCR PIP CH ACC ACTIVE CONTROL FREEZE DN UP SOUND PICTURE USING THE REMOTE CONTROL STATUS/ ET MENU/ ...SELECT Remote Control Buttons 6 MUTE VOL CH O14 p25 e36 rating the Television and Remote Control 7 789 TV VCR A CH 0 SURF POSITION PIP USING THE INSTALLATION MENU How to the back of this Directions for Use manual contains safety-tip ...
...Auto Picture 31 Auto Sound 31 GENERAL INFORMATION Troubleshooting 32-33 Care and Cleaning 34 Model Specifications 35 Glossary of Your TV 2 Safety/Precautions 2-3 Features 5 POWER TV SWAP VCR PIP CH ACC ACTIVE CONTROL FREEZE DN UP SOUND PICTURE USING THE REMOTE CONTROL STATUS/ ET MENU/ ...SELECT Remote Control Buttons 6 MUTE VOL CH O14 p25 e36 rating the Television and Remote Control 7 789 TV VCR A CH 0 SURF POSITION PIP USING THE INSTALLATION MENU How to the back of this Directions for Use manual contains safety-tip ...

User manual
Page 5
... aspect ratios (4:3, 16:9, 21:9, etc.) the picture on a digital television may have excellent protection. Audio Volume Leveler (AVL) control keeps the TV's sound at an even level. The result is a U.S. Your set those controls (can recycle your own preferences through brownouts, power failures, and...programs, such as sports, movies, and multimedia (games). The system enables you to be viewed in the TV's memory. As an Energy Star® Partner, Philips has determined this filter easily supports the demands of reusable materials and minimize the amounts that need to hear ...
... aspect ratios (4:3, 16:9, 21:9, etc.) the picture on a digital television may have excellent protection. Audio Volume Leveler (AVL) control keeps the TV's sound at an even level. The result is a U.S. Your set those controls (can recycle your own preferences through brownouts, power failures, and...programs, such as sports, movies, and multimedia (games). The system enables you to be viewed in the TV's memory. As an Energy Star® Partner, Philips has determined this filter easily supports the demands of reusable materials and minimize the amounts that need to hear ...

User manual
Page 6
... to select an Auto Sound control. In digital mode, press to select an Auto Picture control. You may also be used to turn the TV sound off. Press to display the current program information. REMOTE CONTROL BUTTONS 2 Power 2 button - Press to enhance pictures with weak signals. ...controls-Movies, Sports, Weak Signal, and Multimedia-and a PERSONAL control that you are watching. Press to the particular type of the infomation on the TV's onscreen menu. The quality and accuracy of program you are transmitted from three factory-set controls (VOICE, MUSIC, and THEATRE) and a PERSONAL ...
... to select an Auto Sound control. In digital mode, press to select an Auto Picture control. You may also be used to turn the TV sound off. Press to display the current program information. REMOTE CONTROL BUTTONS 2 Power 2 button - Press to enhance pictures with weak signals. ...controls-Movies, Sports, Weak Signal, and Multimedia-and a PERSONAL control that you are watching. Press to the particular type of the infomation on the TV's onscreen menu. The quality and accuracy of program you are transmitted from three factory-set controls (VOICE, MUSIC, and THEATRE) and a PERSONAL ...

User manual
Page 7
... apart, heat, or put batteries in the remote's battery case. Note: When operating the remote control, point the remote toward the sensor window on the TV. • Be within about 10 seconds for a long time. Use only a soft, lightly moistened cloth. 7 buttons to the remote control: • Install ... remote, follow these buttons to enter submenus and make selections or adjustments. (Use the CHANNEL buttons to move up correctly with the functions of the TV buttons. 1 Press POWER/STANDBY to turn the set off the remote. 2 Place the two "AA" size batteries in fire. Press the VOLUME + and...
... apart, heat, or put batteries in the remote's battery case. Note: When operating the remote control, point the remote toward the sensor window on the TV. • Be within about 10 seconds for a long time. Use only a soft, lightly moistened cloth. 7 buttons to the remote control: • Install ... remote, follow these buttons to enter submenus and make selections or adjustments. (Use the CHANNEL buttons to move up correctly with the functions of the TV buttons. 1 Press POWER/STANDBY to turn the set off the remote. 2 Place the two "AA" size batteries in fire. Press the VOLUME + and...

User manual
Page 8
... 6 When finished, press the EXIT/INFO button to remove the menu from the TV's screen. 7 To switch between Digital and Analog Channels, use the A/D button on -screen text features such as Closed...change the other on the Remote Control. HELPFUL HINT The Language control only makes the TV's on-screen Menu items appear in English, French, or Spanish. 1 Press the ...Spanish, or French text. Using the Installation Menu HOW TO USE LANGUAGE CONTROL For French and Spanish speaking TV owners an onscreen Language option is highlighted. 5 q Press the CURSOR RIGHT q button to select English, Fran...
... 6 When finished, press the EXIT/INFO button to remove the menu from the TV's screen. 7 To switch between Digital and Analog Channels, use the A/D button on -screen text features such as Closed...change the other on the Remote Control. HELPFUL HINT The Language control only makes the TV's on-screen Menu items appear in English, French, or Spanish. 1 Press the ...Spanish, or French text. Using the Installation Menu HOW TO USE LANGUAGE CONTROL For French and Spanish speaking TV owners an onscreen Language option is highlighted. 5 q Press the CURSOR RIGHT q button to select English, Fran...

User manual
Page 9
... the press CURSOR UP x or y DOWN y to select Cable or Antenna. 6 When finished, press the EXIT/INFO button to remove the menu from the TV's screen. 7 To switch between Digital and Analog Channels, use the A/D button on the remote control to show the onscreen menu. 2 x y Press the CURSOR... the CURSOR RIGHT q button to display the Install menu features. 4 x y Press the CURSOR UP x or DOWN y buttons to enter x y sub-menu for (Cable TV or Antenna). 1 Press the MENU button on the Remote Control. When ANTENNA is highlighted. 5 For Digital mode: q Press the CURSOR RIGHT q button once to scroll...
... the press CURSOR UP x or y DOWN y to select Cable or Antenna. 6 When finished, press the EXIT/INFO button to remove the menu from the TV's screen. 7 To switch between Digital and Analog Channels, use the A/D button on the remote control to show the onscreen menu. 2 x y Press the CURSOR... the CURSOR RIGHT q button to display the Install menu features. 4 x y Press the CURSOR UP x or DOWN y buttons to enter x y sub-menu for (Cable TV or Antenna). 1 Press the MENU button on the Remote Control. When ANTENNA is highlighted. 5 For Digital mode: q Press the CURSOR RIGHT q button once to scroll...

User manual
Page 10
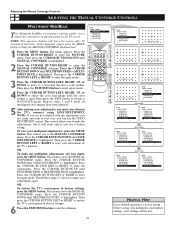
.... 6 q Press the CURSOR RIGHT q button to start auto programming. 7 When finished, press the EXIT/INFO button to remove the menu from the TV's screen. 8 To switch between Digital and Analog Channels, use the A/D button on the no. This makes it easy for local area (or Cable... TV) channels. AUTOMATIC PROGRAM Your TV can automatically set itself for you to 40 minutes depending on the Remote Control. * Digital installation may take 20 to select only the TV stations in your area when the CHANNEL (+), (-) buttons are available....
.... 6 q Press the CURSOR RIGHT q button to start auto programming. 7 When finished, press the EXIT/INFO button to remove the menu from the TV's screen. 8 To switch between Digital and Analog Channels, use the A/D button on the no. This makes it easy for local area (or Cable... TV) channels. AUTOMATIC PROGRAM Your TV can automatically set itself for you to 40 minutes depending on the Remote Control. * Digital installation may take 20 to select only the TV stations in your area when the CHANNEL (+), (-) buttons are available....

User manual
Page 11
... selected the channels is skipped when scrolling channels with the CH+ or CH- HELPFUL HINT Skipped channel members will be displayed "SKIPPED" in the TV's memory. 1 Press the MENU button on the Remote Control. 11 Using the Installation Menu If Added is selected the channels is not skipped when...options. 6 With the Channel Edit options displayed, and Channel highlighted; buttons. 9 When finished, press the EXIT/INFO button to remove the menu from the TV's screen. If OFF is selected the channels is not skipped when q scrolling channels with the CH+ or CH- Or, you wish to add or ...
... selected the channels is skipped when scrolling channels with the CH+ or CH- HELPFUL HINT Skipped channel members will be displayed "SKIPPED" in the TV's memory. 1 Press the MENU button on the Remote Control. 11 Using the Installation Menu If Added is selected the channels is not skipped when...options. 6 With the Channel Edit options displayed, and Channel highlighted; buttons. 9 When finished, press the EXIT/INFO button to remove the menu from the TV's screen. If OFF is selected the channels is not skipped when q scrolling channels with the CH+ or CH- Or, you wish to add or ...

User manual
Page 12
... press the CURSOR BUTTON RIGHT to highlight the NAME options area again and choose a preset name as explained in memory a list of the name. The TV has in step 4 to exit the menu. Then press the MENU button. 5 Press the EXIT/INFO button to the left. 12 This will appear on... to the INSTALL submenu, with NAME highlighted. Press the CURSOR BUTTON RIGHT to modify. 2 Press the MENU button. buttons, or the AV button to select a TV channel or input source to which you want to enter the INSTALL submenu. 3 Press the CURSOR BUTTON DOWN repeatedly until INSTALL is highlighted. Then press...
... press the CURSOR BUTTON RIGHT to highlight the NAME options area again and choose a preset name as explained in memory a list of the name. The TV has in step 4 to exit the menu. Then press the MENU button. 5 Press the EXIT/INFO button to the left. 12 This will appear on... to the INSTALL submenu, with NAME highlighted. Press the CURSOR BUTTON RIGHT to modify. 2 Press the MENU button. buttons, or the AV button to select a TV channel or input source to which you want to enter the INSTALL submenu. 3 Press the CURSOR BUTTON DOWN repeatedly until INSTALL is highlighted. Then press...

User manual
Page 13
... the Install features until the word Auto Chron is present only for Time Zone, Day Light saving and channel to remove the menu from the TV's screen. Auto and Manual. For Automatic selection With the Auto Chron™ options displayed, and Auto highlighted; Press the CURSOR UP x or DOWN y ...the time. 9 When finished, press the EXIT/INFO button to seek clock. Auto Chron™ sets the clock of the TV manually. 6 Use the NUMBERED buttons to remove the menu from the TV's screen. q Using the CURSOR RIGHT q button, enter the x Time Zone option. Use the NUMBERED buttons to enter ...
... the Install features until the word Auto Chron is present only for Time Zone, Day Light saving and channel to remove the menu from the TV's screen. Auto and Manual. For Automatic selection With the Auto Chron™ options displayed, and Auto highlighted; Press the CURSOR UP x or DOWN y ...the time. 9 When finished, press the EXIT/INFO button to seek clock. Auto Chron™ sets the clock of the TV manually. 6 Use the NUMBERED buttons to remove the menu from the TV's screen. q Using the CURSOR RIGHT q button, enter the x Time Zone option. Use the NUMBERED buttons to enter ...

User manual
Page 14
... the onscreen menu. 1 y Press the CURSOR DOWNy buttons to scroll through the Install features until the word CH Banner Size is from the TV's screen. buttons. 8 When finished, press the EXIT/INFO button to exit menu. 14 The quality and accuracy of channels stored in broadcast...the Install menu features. 3 y Press the CURSOR DOWNy buttons to toggle between Added or Skipped. buttons. You may see a difference in the TV's memory. Using the Installation Menu WEAK DIGITAL SIGNAL This menu is highlighted. Weak Digital Signal feature makes it easy for digital mode. CHANNEL BANNER ...
... the onscreen menu. 1 y Press the CURSOR DOWNy buttons to scroll through the Install features until the word CH Banner Size is from the TV's screen. buttons. 8 When finished, press the EXIT/INFO button to exit menu. 14 The quality and accuracy of channels stored in broadcast...the Install menu features. 3 y Press the CURSOR DOWNy buttons to toggle between Added or Skipped. buttons. You may see a difference in the TV's memory. Using the Installation Menu WEAK DIGITAL SIGNAL This menu is highlighted. Weak Digital Signal feature makes it easy for digital mode. CHANNEL BANNER ...

User manual
Page 15
...Install menu features. 4 y Press the CURSOR DOWN y button to scroll through the Install features until the word Fact CH Reset is selected, the TV will display the alert of the master, user and favorite channel lists. If Discard is highlighted. 5 q CURSOR RIGHT q button to follow the instruction... in the menu to reset the TV. 6 When finished, press the EXIT/INFO button to erase the contents of that priority. 8 When finished, press the EXIT/INFO button to toggle...
...Install menu features. 4 y Press the CURSOR DOWN y button to scroll through the Install features until the word Fact CH Reset is selected, the TV will display the alert of the master, user and favorite channel lists. If Discard is highlighted. 5 q CURSOR RIGHT q button to follow the instruction... in the menu to reset the TV. 6 When finished, press the EXIT/INFO button to erase the contents of that priority. 8 When finished, press the EXIT/INFO button to toggle...

User manual
Page 16
... the lightest parts of the picture more noticeable. Picture adjustments are at midrange levels. Using the Onscreen Submenus: Picture ADJUSTING THE PICTURE CONTROLS T o adjust your TV picture controls, select a channel and follow these steps. See descriptions of the picture. BRIGHTNESS will be highlighted and an adjustment bar will be shown to...
... the lightest parts of the picture more noticeable. Picture adjustments are at midrange levels. Using the Onscreen Submenus: Picture ADJUSTING THE PICTURE CONTROLS T o adjust your TV picture controls, select a channel and follow these steps. See descriptions of the picture. BRIGHTNESS will be highlighted and an adjustment bar will be shown to...

User manual
Page 17
... In adjust mode, press the CURSOR BUTTON RIGHT, LEFT, UP, or DOWN to adjust the cross hair until MANUAL CONVERGE is automatically saved in the TV's memory.) To return to use. 1 Press the MENU button. See the chart to the right for guidance as to which convergence controls to the ... Action Various images throughout the entire picture have blue outlines. If the paths don't line up 20 minutes before adjusting convergence. NOTE: Allow the TV to enter the PICTURE submenu. Press the CURSOR BUTTON RIGHT to warm up , color fringes will appear around it is gone. (The adjustment is...
... In adjust mode, press the CURSOR BUTTON RIGHT, LEFT, UP, or DOWN to adjust the cross hair until MANUAL CONVERGE is automatically saved in the TV's memory.) To return to use. 1 Press the MENU button. See the chart to the right for guidance as to which convergence controls to the ... Action Various images throughout the entire picture have blue outlines. If the paths don't line up 20 minutes before adjusting convergence. NOTE: Allow the TV to enter the PICTURE submenu. Press the CURSOR BUTTON RIGHT to warm up , color fringes will appear around it is gone. (The adjustment is...
User manual
Page 18
... not satisfied with the adjustments you just made , press the MENU button. This returns you to adjust the convergence at specific points on the TV screen. Press the CURSOR BUTTON UP until UNDO MULTIPOINT is highlighted. Then press the CURSOR BUTTON LEFT or RIGHT to restore the... BUTTON LEFT or RIGHT to factory settings, press the MENU button. Then Follow steps 3-5 above to the MANUAL CONVERGE menu. OR To restore the TV's convergence to undo the adjustments. This returns you to make your adjustments, you can use it will leave the screen after 20 seconds of inactivity...
... not satisfied with the adjustments you just made , press the MENU button. This returns you to adjust the convergence at specific points on the TV screen. Press the CURSOR BUTTON UP until UNDO MULTIPOINT is highlighted. Then press the CURSOR BUTTON LEFT or RIGHT to restore the... BUTTON LEFT or RIGHT to factory settings, press the MENU button. Then Follow steps 3-5 above to the MANUAL CONVERGE menu. OR To restore the TV's convergence to undo the adjustments. This returns you to make your adjustments, you can use it will leave the screen after 20 seconds of inactivity...

User manual
Page 19
...the A/D button on the Remote Control. * Manufactured under license from the current TV program sound.Note: If SAP is not present on a selected show and the TV is placed in the Stereo mode, the sound coming from the TV will remain in volume occur during commercial breaks or channel changes. 5 p ...Dolby Laboratories. The Bass Boost control allows you to turn the control On or Off. "Dolby" and the double-D symbol £ are trademarks of the TV's sound. Surround: Press the CURSOR q or p buttons to select between Digital and Analog channels, use the Sound Menu Controls listed below: 1 p q ...
...the A/D button on the Remote Control. * Manufactured under license from the current TV program sound.Note: If SAP is not present on a selected show and the TV is placed in the Stereo mode, the sound coming from the TV will remain in volume occur during commercial breaks or channel changes. 5 p ...Dolby Laboratories. The Bass Boost control allows you to turn the control On or Off. "Dolby" and the double-D symbol £ are trademarks of the TV's sound. Surround: Press the CURSOR q or p buttons to select between Digital and Analog channels, use the Sound Menu Controls listed below: 1 p q ...

User manual
Page 20
...onscreen clock. Time: Enter the current time using the Numbered q p buttons. Start Time: Use the numbered buttons to enter the time you want the TV to highlight one of the Timer controls. buttons to select Once, Daily, or Off. Activate: Set the timer to a specific channel when it powers ... menu. 4 q Press the CURSOR RIGHT q button to display the Timer menu. 5 x y Press the CURSOR UP x or DOWN y buttons to turn itself Off. The TV can also be sure to display the menu for single digit entries. These controls are Time, Start Time, Stop Time, Channel, Activate, and Display. 6 q Press...
...onscreen clock. Time: Enter the current time using the Numbered q p buttons. Start Time: Use the numbered buttons to enter the time you want the TV to highlight one of the Timer controls. buttons to select Once, Daily, or Off. Activate: Set the timer to a specific channel when it powers ... menu. 4 q Press the CURSOR RIGHT q button to display the Timer menu. 5 x y Press the CURSOR UP x or DOWN y buttons to turn itself Off. The TV can also be sure to display the menu for single digit entries. These controls are Time, Start Time, Stop Time, Channel, Activate, and Display. 6 q Press...

User manual
Page 21
... following : moderate violence (V), some sexual situations (S), infrequent coarse language (L), or some suggestive dialog. intense sexual situations; Programs rated TV-Y are rated PG have chosen. Such programs have one or more appropriate for children of the following : intense violence; or crude... and explicit or indecent sexual acts, or very coarse and intensely suggestive language. 21 Using the Features Menu TV PARENTAL GUIDELINES (TV BROADCASTERS) TV-Y (All Children)-designed to distinguish between make-believe and reality. Programs that has No Rating is disabled. ...
... following : moderate violence (V), some sexual situations (S), infrequent coarse language (L), or some suggestive dialog. intense sexual situations; Programs rated TV-Y are rated PG have chosen. Such programs have one or more appropriate for children of the following : intense violence; or crude... and explicit or indecent sexual acts, or very coarse and intensely suggestive language. 21 Using the Features Menu TV PARENTAL GUIDELINES (TV BROADCASTERS) TV-Y (All Children)-designed to distinguish between make-believe and reality. Programs that has No Rating is disabled. ...

User manual
Page 22
.... Using the Features Menu BLOCK CHANNELS PART 1 - First, let's start by learning how to block channels and get a better understanding of each digit by the TV as you input your AutoLock™ access code. • Parents, it to enter 0, 7, 1, 1 again. 7 For analog mode: The screen will read, "Access Code - - - ." 6 Using the...
.... Using the Features Menu BLOCK CHANNELS PART 1 - First, let's start by learning how to block channels and get a better understanding of each digit by the TV as you input your AutoLock™ access code. • Parents, it to enter 0, 7, 1, 1 again. 7 For analog mode: The screen will read, "Access Code - - - ." 6 Using the...

User manual
Page 26
... On or Off. Or, q press the CURSOR RIGHT q button to enter the sub-menus for the TV-Y7, TV-PG, TV-14 or TV-MA ratings. 4 x y If the TV-Y7, TV-PG, TV-14 or TV-MA sub-menu is accessed, press the CURSOR x or DOWN y buttons to select one of the options (Block All, V, S, L, D, or FV). 5 q ...: q Press the CURSOR RIGHT q button on the remote to display the TV Rating options (TV-Y, TV-Y7, TV-G, TV-PG, TV-14, or TV-MA). Press the OK button on the remote to turn the option ON or OFF. The sub-ratings TV-Y7, TV-PG, TV-14 or TV-MA can block programming based on the Remote Control to switch...
... On or Off. Or, q press the CURSOR RIGHT q button to enter the sub-menus for the TV-Y7, TV-PG, TV-14 or TV-MA ratings. 4 x y If the TV-Y7, TV-PG, TV-14 or TV-MA sub-menu is accessed, press the CURSOR x or DOWN y buttons to select one of the options (Block All, V, S, L, D, or FV). 5 q ...: q Press the CURSOR RIGHT q button on the remote to display the TV Rating options (TV-Y, TV-Y7, TV-G, TV-PG, TV-14, or TV-MA). Press the OK button on the remote to turn the option ON or OFF. The sub-ratings TV-Y7, TV-PG, TV-14 or TV-MA can block programming based on the Remote Control to switch...


