User manual
Page 1
Read your User Manual first for choosing Philips. If you have read your instructions and still need assistance you for quick tips that make using your product. 3135 035 22232 3/24/04 Need help at www.p4c.philips.com or call 1-800-531-0039 while with your Philips product more enjoyable. User Manual ADVANCED INSTRUCTIONS HDTV 51PP9910 55PP9910 Thank you may access our online help fast?
Read your User Manual first for choosing Philips. If you have read your instructions and still need assistance you for quick tips that make using your product. 3135 035 22232 3/24/04 Need help at www.p4c.philips.com or call 1-800-531-0039 while with your Philips product more enjoyable. User Manual ADVANCED INSTRUCTIONS HDTV 51PP9910 55PP9910 Thank you may access our online help fast?
User manual
Page 9
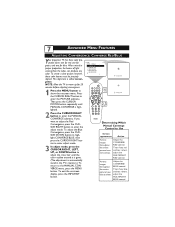
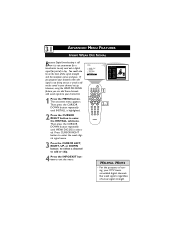
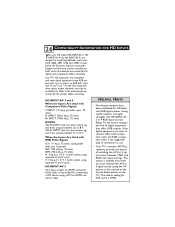
..., press the CURSOR RIGHT, LEFT, UP, or DOWN button to adjust the cross hair until MANUAL CONVERGE is highlighted. 2 Press the CURSOR RIGHT button to enter the MANUAL CONVERGE submenu. Then press the CURSOR DOWN button repeatedly until the color outline around it is gone.... (The adjustment is called convergence. PICTURE MANUAL CONVERGE CONVERGE RED CONVERGE BLUE MULTIPOINT RED MULTIPOINT BLUE SAVE MULTIPOINT Converge Red 1 Converge Red 2,3 Determining Which Manual Converge Control to Use Screen appearance Action Various images throughout the entire picture...
..., press the CURSOR RIGHT, LEFT, UP, or DOWN button to adjust the cross hair until MANUAL CONVERGE is highlighted. 2 Press the CURSOR RIGHT button to enter the MANUAL CONVERGE submenu. Then press the CURSOR DOWN button repeatedly until the color outline around it is gone.... (The adjustment is called convergence. PICTURE MANUAL CONVERGE CONVERGE RED CONVERGE BLUE MULTIPOINT RED MULTIPOINT BLUE SAVE MULTIPOINT Converge Red 1 Converge Red 2,3 Determining Which Manual Converge Control to Use Screen appearance Action Various images throughout the entire picture...

User manual
Page 10
... until SAVE MULTIPOINT is gone.Then press the INFO/EXIT button to return to enter the MANUAL CONVERGE submenu. To undo the multipoint adjustments you must activate SAVE MULTIPOINT. PICTURE MANUAL CONVERGE CONVERGE RED CONVERGE BLUE MULTIPOINT RED L MULTIPOINT BLUE É SAVE MULTIPOINT L 1,5 ...or RIGHT button. 6 Press the INFO/EXIT button to a cross hair that has a color outline. Repeat steps 3 and 4 until MANUAL CONVERGE is highlighted. 8 ADVANCED MENU FEATURES ADJUSTING CONVERGENCE: MULTIPOINT RED/BLUE T he Multipoint Red/Blue Convergence controls allow you to show the ...
... until SAVE MULTIPOINT is gone.Then press the INFO/EXIT button to return to enter the MANUAL CONVERGE submenu. To undo the multipoint adjustments you must activate SAVE MULTIPOINT. PICTURE MANUAL CONVERGE CONVERGE RED CONVERGE BLUE MULTIPOINT RED L MULTIPOINT BLUE É SAVE MULTIPOINT L 1,5 ...or RIGHT button. 6 Press the INFO/EXIT button to a cross hair that has a color outline. Repeat steps 3 and 4 until MANUAL CONVERGE is highlighted. 8 ADVANCED MENU FEATURES ADJUSTING CONVERGENCE: MULTIPOINT RED/BLUE T he Multipoint Red/Blue Convergence controls allow you to show the ...

User manual
Page 31
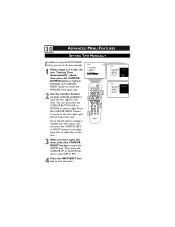
... INFO/EXIT button to exit the menu. INSTALL AUTO PROGRAM CHANNEL EDIT LANGUAGE TUNER MODE AutoChron SET TIME AUTO MANUAL INSTALL AUTO PROGRAM CHANNEL EDIT LANGUAGE TUNER MODE AutoChron SET TIME AUTO MANUAL 7 1 5 2,3, 4 6 TIME ZONE? YES NO SEARCH FOR TIME ENTER CHANNEL - - PBS PLEASE WAIT...PACIFIC DAYLIGHT SAVING TIME? Then press the CURSOR DOWN button repeatedly until you will automatically maintain the correct time using the AutoChron™ MANUAL option (see panel 30). 1 Press the MENU button. After successful setup, AutoChron™ will need to locate the correct channel ...
... INFO/EXIT button to exit the menu. INSTALL AUTO PROGRAM CHANNEL EDIT LANGUAGE TUNER MODE AutoChron SET TIME AUTO MANUAL INSTALL AUTO PROGRAM CHANNEL EDIT LANGUAGE TUNER MODE AutoChron SET TIME AUTO MANUAL 7 1 5 2,3, 4 6 TIME ZONE? YES NO SEARCH FOR TIME ENTER CHANNEL - - PBS PLEASE WAIT...PACIFIC DAYLIGHT SAVING TIME? Then press the CURSOR DOWN button repeatedly until you will automatically maintain the correct time using the AutoChron™ MANUAL option (see panel 30). 1 Press the MENU button. After successful setup, AutoChron™ will need to locate the correct channel ...
User manual
Page 32
... steps 1-3 in the section "Setting Time Automatically" above, then press the CURSOR DOWN button to highlight MANUAL and CURSOR RIGHT button to enter the MANUAL time input area. 2 Use the number buttons on your remote control to input the first digit for the time. If you should need to change a ...number you have input the time, press the CURSOR RIGHT button to enter the AM/PM area. 30 ADVANCED MENU FEATURES SETTING TIME MANUALLY In addition to using the AUTOCHRON setting, you can also press the CURSOR BUTTON UP or DOWN to select a digit.
... steps 1-3 in the section "Setting Time Automatically" above, then press the CURSOR DOWN button to highlight MANUAL and CURSOR RIGHT button to enter the MANUAL time input area. 2 Use the number buttons on your remote control to input the first digit for the time. If you should need to change a ...number you have input the time, press the CURSOR RIGHT button to enter the AM/PM area. 30 ADVANCED MENU FEATURES SETTING TIME MANUALLY In addition to using the AUTOCHRON setting, you can also press the CURSOR BUTTON UP or DOWN to select a digit.
User manual
Page 33
... DIG SIG is weak it is not uncommon for part of a day. INSTALL CHANNEL EDIT LANGUAGE TUNER MODE AutoChron WEAK DIG SIG SET TIME AUTO MANUAL Weak digital Signal ˚ 15 DTV skipped 16 DTV skipped 17 DTV skipped 18 DTV skipped 19 DTV skipped 20 DTV skipped 21 DTV skipped...
... DIG SIG is weak it is not uncommon for part of a day. INSTALL CHANNEL EDIT LANGUAGE TUNER MODE AutoChron WEAK DIG SIG SET TIME AUTO MANUAL Weak digital Signal ˚ 15 DTV skipped 16 DTV skipped 17 DTV skipped 18 DTV skipped 19 DTV skipped 20 DTV skipped 21 DTV skipped...

Quick start guide
Page 1
If you have read your instructions and still need assistance you for quick tips that make using your Philips product more enjoyable. User Manual SET-UP AND BASIC GUIDE HDTV 51PP9910 55PP9910 Thank you may access our online help fast? Read your product. 3135 035 22222 3/24/04 Need help at www.p4c.philips.com or call 1-800-531-0039 while with your User Manual first for choosing Philips.
If you have read your instructions and still need assistance you for quick tips that make using your Philips product more enjoyable. User Manual SET-UP AND BASIC GUIDE HDTV 51PP9910 55PP9910 Thank you may access our online help fast? Read your product. 3135 035 22222 3/24/04 Need help at www.p4c.philips.com or call 1-800-531-0039 while with your User Manual first for choosing Philips.
Quick start guide
Page 21
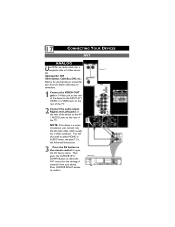
... AV button on the rear of the device to select the AV1 source for the viewing of the TV. Refer to the directions-for-use manual for : VCR Other Options: Cable Box, DVD, etc... NOTE: If the device is a mono (nonstereo) unit, connect only the left audio cable, which uses a composite...
... AV button on the rear of the device to select the AV1 source for the viewing of the TV. Refer to the directions-for-use manual for : VCR Other Options: Cable Box, DVD, etc... NOTE: If the device is a mono (nonstereo) unit, connect only the left audio cable, which uses a composite...

Quick start guide
Page 22
... the device is a mono (nonstereo) unit, connect only the left audio cable, which uses a composite video or S-Video connection. Refer to the directions-for-use manual for your device. 18 CONNECTING YOUR DEVICES AV2 ANALOG Use AV2 for any device which usually has a white connector.
... the device is a mono (nonstereo) unit, connect only the left audio cable, which uses a composite video or S-Video connection. Refer to the directions-for-use manual for your device. 18 CONNECTING YOUR DEVICES AV2 ANALOG Use AV2 for any device which usually has a white connector.

Quick start guide
Page 23
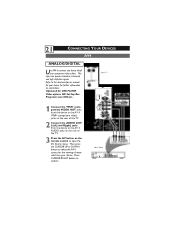
... side panel of the TV. 2 Connect the audio output R(ight) and L(eft) jacks on the side panel of the device to the directions-for-use manual for : Game Console Other Options: VCR, Cable Box, Camcorder, etc... Refer to the AUDIO jacks on the rear of the TV. Press CURSOR RIGHT button...
... side panel of the TV. 2 Connect the audio output R(ight) and L(eft) jacks on the side panel of the device to the directions-for-use manual for : Game Console Other Options: VCR, Cable Box, Camcorder, etc... Refer to the AUDIO jacks on the rear of the TV. Press CURSOR RIGHT button...

Quick start guide
Page 24
Press CURSOR RIGHT button to connect any device which uses component video cables. It is the only AV with H,V sync use manual for further information on the rear of the TV. 3 Press the AV button on the remote control to the directions-for-use AV3. for your ...
Press CURSOR RIGHT button to connect any device which uses component video cables. It is the only AV with H,V sync use manual for further information on the rear of the TV. 3 Press the AV button on the remote control to the directions-for-use AV3. for your ...
Quick start guide
Page 25
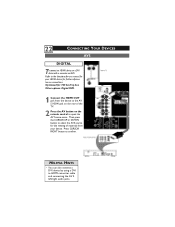
... connect any device which uses component video cables. 21 CONNECTING YOUR DEVICES AV4 ANALOG/DIGITAL Use AV4 to confirm. Refer to the directions-for-use manual for : DVD PLAYER Other options: HD Set-Top Box Progressive scan DVD,etc... 1 Connect the YPbPr (component) VIDEO OUT jacks from the device to the...
... connect any device which uses component video cables. 21 CONNECTING YOUR DEVICES AV4 ANALOG/DIGITAL Use AV4 to confirm. Refer to the directions-for-use manual for : DVD PLAYER Other options: HD Set-Top Box Progressive scan DVD,etc... 1 Connect the YPbPr (component) VIDEO OUT jacks from the device to the...
Quick start guide
Page 26
... and connecting the AV 5 left/right audio jacks. 22 CONNECTING YOUR DEVICES AV5 DIGITAL To connect an HDMI device or a DVI device with a converter use manual for your device. Refer to the AV 5 HDMI jack on the rear of materials from the device to the directions-for-use AV5.
... and connecting the AV 5 left/right audio jacks. 22 CONNECTING YOUR DEVICES AV5 DIGITAL To connect an HDMI device or a DVI device with a converter use manual for your device. Refer to the AV 5 HDMI jack on the rear of materials from the device to the directions-for-use AV5.
Quick start guide
Page 30
... the digital equipment you have been established for connecting a DVI device using the AV button on the remote or the Source Select button on your Philips TV will not be compatible with Component Video Signals Y INPUT: 1.0 Vp-p (includes sync), 75 ohms Pr INPUT: 700m Vp-p, 75 ohms Pb ... outputs labeled Cb or B-Y. HD INPUT-AV 5 This input accepts an HDMI connector. The option is available only when you want to use manual for the digital source equipment before connecting. The Pr INPUT jack can also receive signals from outputs labeled Cr or R-Y. Output standards may vary...
... the digital equipment you have been established for connecting a DVI device using the AV button on the remote or the Source Select button on your Philips TV will not be compatible with Component Video Signals Y INPUT: 1.0 Vp-p (includes sync), 75 ohms Pr INPUT: 700m Vp-p, 75 ohms Pb ... outputs labeled Cb or B-Y. HD INPUT-AV 5 This input accepts an HDMI connector. The option is available only when you want to use manual for the digital source equipment before connecting. The Pr INPUT jack can also receive signals from outputs labeled Cr or R-Y. Output standards may vary...

Leaflet
Page 2
...It which detract from noise. All Rights reserved. projection HDTV 55" For preview purpose only 55PP9910/17 Technical specifications Product highlights Picture/Display • Aspect ratio: 16:9 • Size...32°F to 105°F (0° C to help reduce the chances of Koninklijke Philips Electronics N.V. Coaxial Digital Audio SPDIF An SPDIF coaxial cable is a processing technology for ... the audio. It is designed to 40° C) • HDTV Tuner Built-in manual: English • Convenience Enhancements: Electronic Programming Guide, Vchip and parental lock, Auto Program...
...It which detract from noise. All Rights reserved. projection HDTV 55" For preview purpose only 55PP9910/17 Technical specifications Product highlights Picture/Display • Aspect ratio: 16:9 • Size...32°F to 105°F (0° C to help reduce the chances of Koninklijke Philips Electronics N.V. Coaxial Digital Audio SPDIF An SPDIF coaxial cable is a processing technology for ... the audio. It is designed to 40° C) • HDTV Tuner Built-in manual: English • Convenience Enhancements: Electronic Programming Guide, Vchip and parental lock, Auto Program...

