

Owner's Manual
Page 3
Parts of your select sewing machine 1 Connection socket "foot control with main cord" 2 Main switch 3 Handwheel release disk 4 Handwheel 5 Bobbin winder 6 Lid with stitches 7 Extra spool holder 8 Spool holder with spool cap 9 Take-up lever 10 Needle thread tension dial 11 Threading path 12 Thread cutter 13 Needle threader (1540) 14 Presser foot holder with presser foot 15 Removable accessory tray 16 Base plate 17 IDT System / Integrated Dual Feed (1540/1530) 18 Needle holder with fixing screw 19 Presser foot lifter 20 Button for "reverse sewing" 21 Stitch length dial 22 Stitch selection ...
Parts of your select sewing machine 1 Connection socket "foot control with main cord" 2 Main switch 3 Handwheel release disk 4 Handwheel 5 Bobbin winder 6 Lid with stitches 7 Extra spool holder 8 Spool holder with spool cap 9 Take-up lever 10 Needle thread tension dial 11 Threading path 12 Thread cutter 13 Needle threader (1540) 14 Presser foot holder with presser foot 15 Removable accessory tray 16 Base plate 17 IDT System / Integrated Dual Feed (1540/1530) 18 Needle holder with fixing screw 19 Presser foot lifter 20 Button for "reverse sewing" 21 Stitch length dial 22 Stitch selection ...

Owner's Manual
Page 5
... sewing machine is used or where oxygen is required around the sewing machine needle. 16. Close attention is necessary when this sewing machine is designed and manufactured for examination, repair, electrical or mechanical adjustment. 8. Never drop or insert any opening blocked. Do not operate where aerosol (spray) products are being administered. 12. Special care is being used by the manufacturer as threading needle, changing needle, threading bobbin, or changing presser foot, etc. 20. The wrong plate...
... sewing machine is used or where oxygen is required around the sewing machine needle. 16. Close attention is necessary when this sewing machine is designed and manufactured for examination, repair, electrical or mechanical adjustment. 8. Never drop or insert any opening blocked. Do not operate where aerosol (spray) products are being administered. 12. Special care is being used by the manufacturer as threading needle, changing needle, threading bobbin, or changing presser foot, etc. 20. The wrong plate...

Owner's Manual
Page 6
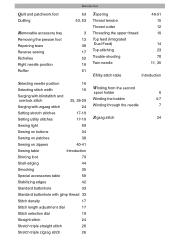
Contents Accessories and needles Accessory tray Appliqué Appliqué foot Bias-tape binder Blind stitch Bobbin case Buttonholes Changing the needle plate Changing the needle Cleaning and oiling Closed overlock stitch Cording foot Covering stitch Darning with the elastic stitch Darning with the straight stitch Darning Decorative sewing Drawing up the bobbin thread Dropping the feed dog Elastic stitch Elastic stitches Electrical connection Embroidering with a dense zigzag stitch Eyelet embroidery Feather stitch Felling foot Free arm Fringe foot Introduction 55-56 3 51 62 61 25 8-9 33, ...
Contents Accessories and needles Accessory tray Appliqué Appliqué foot Bias-tape binder Blind stitch Bobbin case Buttonholes Changing the needle plate Changing the needle Cleaning and oiling Closed overlock stitch Cording foot Covering stitch Darning with the elastic stitch Darning with the straight stitch Darning Decorative sewing Drawing up the bobbin thread Dropping the feed dog Elastic stitch Elastic stitches Electrical connection Embroidering with a dense zigzag stitch Eyelet embroidery Feather stitch Felling foot Free arm Fringe foot Introduction 55-56 3 51 62 61 25 8-9 33, ...
Owner's Manual
Page 7
... overlock stitch 25, 28-29 Winding the bobbin 4-7 Serging with zigzag stitch 24 Winding through the needle 7 Setting stretch stitches 17-19 Setting utility stitches 17-19 Zigzag stitch 24 Sewing light 69 Sewing on buttons 34 Sewing on patches 38 Sewing on zippers 40-41 Sewing table Introduction Shirring foot 79 Shell-edging 44 Smocking 35 Special accessories table 58 Stabilizing edges 42 Standard buttonhole 33 Standard buttonhole with gimp thread 33 Stitch density 17 Stitch length adjustment dial 17 Stitch selection dial 19 Straight stitch 24 Stretch...
... overlock stitch 25, 28-29 Winding the bobbin 4-7 Serging with zigzag stitch 24 Winding through the needle 7 Setting stretch stitches 17-19 Setting utility stitches 17-19 Zigzag stitch 24 Sewing light 69 Sewing on buttons 34 Sewing on patches 38 Sewing on zippers 40-41 Sewing table Introduction Shirring foot 79 Shell-edging 44 Smocking 35 Special accessories table 58 Stabilizing edges 42 Standard buttonhole 33 Standard buttonhole with gimp thread 33 Stitch density 17 Stitch length adjustment dial 17 Stitch selection dial 19 Straight stitch 24 Stretch...
Owner's Manual
Page 8
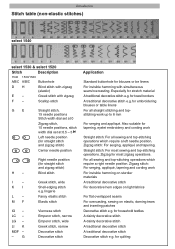
... stitch, narrow Decorative stitch Decorative stitch Application Standard buttonhole for most sewing and top-stitching operations. for tapering, eyelet embroidery and cording work For invisible hemming on sturdier materials A traditional decorative stitch For decorative hem edges on light fabrics For flat 0.5 - 5 Left needle position (for stretch material A traditional decorative stitch e.g. Introduction Stitch table (non-elastic stitches) select 1540 select 1530 & select 1520 Stitch Description 1540 1530/1520 A/B/C A/B/C Buttonhole D H Blind stitch with zigzag (elastic...
... stitch, narrow Decorative stitch Decorative stitch Application Standard buttonhole for most sewing and top-stitching operations. for tapering, eyelet embroidery and cording work For invisible hemming on sturdier materials A traditional decorative stitch For decorative hem edges on light fabrics For flat 0.5 - 5 Left needle position (for stretch material A traditional decorative stitch e.g. Introduction Stitch table (non-elastic stitches) select 1540 select 1530 & select 1520 Stitch Description 1540 1530/1520 A/B/C A/B/C Buttonhole D H Blind stitch with zigzag (elastic...

Owner's Manual
Page 9
... easily Open overlock stitch A closing and serging seam on sportswear and workwear H - I K K I L - KM - - Cover stitch F - M F IG - inside seams as well as a covering stitch Cord stitch A loose decorative stitch Heavy open overlock stitch A closing and serging seam for ornamental hem seams. Penant stitch A decorative stitch also used as seams on heavy materials Decorative stitch Embellishment G - H Stretch triple zigzag stitch, 15 needle positions Stitch width knob 0.5 - 5 For sewing elastic bands on elastic materials or seams on elastic thread, overstitching...
... easily Open overlock stitch A closing and serging seam on sportswear and workwear H - I K K I L - KM - - Cover stitch F - M F IG - inside seams as well as a covering stitch Cord stitch A loose decorative stitch Heavy open overlock stitch A closing and serging seam for ornamental hem seams. Penant stitch A decorative stitch also used as seams on heavy materials Decorative stitch Embellishment G - H Stretch triple zigzag stitch, 15 needle positions Stitch width knob 0.5 - 5 For sewing elastic bands on elastic materials or seams on elastic thread, overstitching...

Owner's Manual
Page 11
Operate your Pfaff select Operate your Pfaff select Electrical connection Removable accessory tray Bobbins Bobbin case Threading the needle Needle threader Pulling up the bobbin thread Presser foot lifter Thread cutter Changing the presser foot IDT System/Integrated Dual Feed Changing the needle Needle thread tension Lowering the feed dog Stitch width dial Needle position dial Reverse sewing Stitch length dial Stitch selection 2 3 4-7 8-9 10 11 12 13 12 13 14 15 15 15 16 16 17 17 18-19 1
Operate your Pfaff select Operate your Pfaff select Electrical connection Removable accessory tray Bobbins Bobbin case Threading the needle Needle threader Pulling up the bobbin thread Presser foot lifter Thread cutter Changing the presser foot IDT System/Integrated Dual Feed Changing the needle Needle thread tension Lowering the feed dog Stitch width dial Needle position dial Reverse sewing Stitch length dial Stitch selection 2 3 4-7 8-9 10 11 12 13 12 13 14 15 15 15 16 16 17 17 18-19 1
Owner's Manual
Page 13
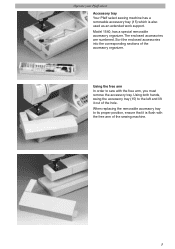
... extended work support. When replacing the removable accessory tray to sew with the free arm of the sewing machine. 3 Using the free arm In order to its proper position, ensure that it out of the hole. The enclosed accessories are numbered. Operate your Pfaff select Accessory tray Your Pfaff select sewing machine has a removable accessory tray (15) which is flush with the free arm, you must remove the accessory tray. Sort the enclosed accessories into the corresponding sections of the accessory organizer. Model...
... extended work support. When replacing the removable accessory tray to sew with the free arm of the sewing machine. 3 Using the free arm In order to its proper position, ensure that it out of the hole. The enclosed accessories are numbered. Operate your Pfaff select Accessory tray Your Pfaff select sewing machine has a removable accessory tray (15) which is flush with the free arm, you must remove the accessory tray. Sort the enclosed accessories into the corresponding sections of the accessory organizer. Model...
Owner's Manual
Page 15
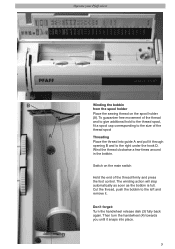
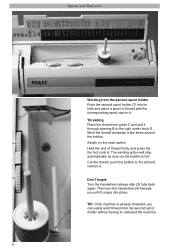
... hook D. Operate your Pfaff select B A D Winding the bobbin from the spool holder Place the sewing thread on the main switch Hold the end of the thread spool Threading Place the thread into guide A and pull it through opening B and to the left and remove it snaps into place. 5 To guarantee free movement of the thread and to give additional hold to the thread spool, fit a spool cap corresponding to the size of the thread...
... hook D. Operate your Pfaff select B A D Winding the bobbin from the spool holder Place the sewing thread on the main switch Hold the end of the thread spool Threading Place the thread into guide A and pull it through opening B and to the left and remove it snaps into place. 5 To guarantee free movement of the thread and to give additional hold to the thread spool, fit a spool cap corresponding to the size of the thread...
Owner's Manual
Page 16
... and remove it snaps into guide C and pull it . Then turn the handwheel (4) towards you can easily wind thread from the second spool holder Push the second spool holder (7) into its hole and place a spool of thread firmly and press the the foot control. The winding action will stop automatically as soon as the bobbin is already threaded, you until it . Wind the thread clockwise a few times around the bobbin.
... and remove it snaps into guide C and pull it . Then turn the handwheel (4) towards you can easily wind thread from the second spool holder Push the second spool holder (7) into its hole and place a spool of thread firmly and press the the foot control. The winding action will stop automatically as soon as the bobbin is already threaded, you until it . Wind the thread clockwise a few times around the bobbin.
Owner's Manual
Page 25
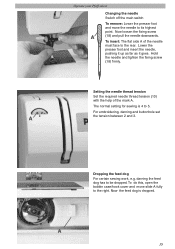
... sewing work, e.g. A 15 Lower the presser foot and insert the needle, pushing it up as far as it goes. To do this, open the bobbin case/hook cover and move the needle to its highest point. Now the feed dog is 4 to be dropped. To insert: The flat side A of the mark A. For embroidering, darning and buttonhole set A the tension between 2 and 3. Operate your Pfaff select Changing the needle Switch off the main switch To remove: Lower the presser foot...
... sewing work, e.g. A 15 Lower the presser foot and insert the needle, pushing it up as far as it goes. To do this, open the bobbin case/hook cover and move the needle to its highest point. Now the feed dog is 4 to be dropped. To insert: The flat side A of the mark A. For embroidering, darning and buttonhole set A the tension between 2 and 3. Operate your Pfaff select Changing the needle Switch off the main switch To remove: Lower the presser foot...

Owner's Manual
Page 33
... threads are interlaced below the lower fabric. The top-stitch needle position is too low, the threads are interlaced above the top fabric. Perfect tension Too high tension Too low tension Topstitching Straight stitch G (1540)/E (1530, 1520) can always guide the sewing foot along the guide marks on the needle plate or use the edge guide (standard accessory No.8). Check the tension with fixing screw B. Utility stitches and practical sewing Needle thread tension To ensure perfect sewing results, the needle and bobbin thread tensions...
... threads are interlaced below the lower fabric. The top-stitch needle position is too low, the threads are interlaced above the top fabric. Perfect tension Too high tension Too low tension Topstitching Straight stitch G (1540)/E (1530, 1520) can always guide the sewing foot along the guide marks on the needle plate or use the edge guide (standard accessory No.8). Check the tension with fixing screw B. Utility stitches and practical sewing Needle thread tension To ensure perfect sewing results, the needle and bobbin thread tensions...

Owner's Manual
Page 34
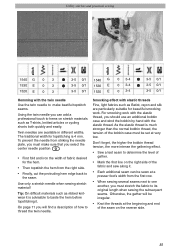
... the fabric edge. Please ensure that the needle is very useful. When overcasting the edge, make sure the needle goes into the material and over pin C, thus preventing curling of 3-5 mm (do some sewing jobs by changing the needle position, e.g. For overcasting difficult materials, blind stitch foot No. 3 is at its highest position when adjusting the needle position. You can be guided along edge guide B. When sewing, the thread...
... the fabric edge. Please ensure that the needle is very useful. When overcasting the edge, make sure the needle goes into the material and over pin C, thus preventing curling of 3-5 mm (do some sewing jobs by changing the needle position, e.g. For overcasting difficult materials, blind stitch foot No. 3 is at its highest position when adjusting the needle position. You can be guided along edge guide B. When sewing, the thread...

Owner's Manual
Page 36
... stitch length. 1540 G 3-5 Stretch 1530 E 3-5 Stretch 1520 E 3-5 Stretch 3-5 0/1 3-5 0/1 3-5 0/1 Stretch triple zigzag stitch The stretch triple zigzag stitch is a highly elastic and decorative seam which is very suitable for sewing all seams where great strength is used for hems on T-shirts and underwear. • Serge the edge of the hem. • Fold the hem inwards at the required width. • Topstitch the hem from the right side. 26 Utility stitches and practical sewing select select 1540 G 1530...
... stitch length. 1540 G 3-5 Stretch 1530 E 3-5 Stretch 1520 E 3-5 Stretch 3-5 0/1 3-5 0/1 3-5 0/1 Stretch triple zigzag stitch The stretch triple zigzag stitch is a highly elastic and decorative seam which is very suitable for sewing all seams where great strength is used for hems on T-shirts and underwear. • Serge the edge of the hem. • Fold the hem inwards at the required width. • Topstitch the hem from the right side. 26 Utility stitches and practical sewing select select 1540 G 1530...

Owner's Manual
Page 39
When overlocking, if you select a needle position other than center, and stitch width other than 5 , make sure the needle does not strike the bar of the needle, not to the left. You can also be joined effortlessly with this stitch. Pullover stitch (Model 1540) This stitch is fed to add a woolen thread under light tension. 29 Stretch 5- Stretch 1530 - - - 1520 - - - 3-5 0/1 -- -- Make sure that the sleeve cuff is stretched while it is being...
When overlocking, if you select a needle position other than center, and stitch width other than 5 , make sure the needle does not strike the bar of the needle, not to the left. You can also be joined effortlessly with this stitch. Pullover stitch (Model 1540) This stitch is fed to add a woolen thread under light tension. 29 Stretch 5- Stretch 1530 - - - 1520 - - - 3-5 0/1 -- -- Make sure that the sleeve cuff is stretched while it is being...
Owner's Manual
Page 45
... higher the bobbin thread tension, the more intense the gathering effect. • Sew a test seam to determine the level of gather. • Mark the first line on the reverse side. 35 Utility stitches and practical sewing stitch stitch 1540 G 0 3 1530 E 0 3 1520 E 0 3 3-5 0/1 3-5 0/1 3-5 0/1 1540 G 1530 E 1520 E 0 3-4 0 3-4 0 3-4 3-5 0/1 3-5 0/1 3-5 0/1 Hemming with the twin needle Use the twin needle to make sure that you select the center needle position . • First fold and iron the width of fabric desired for...
... higher the bobbin thread tension, the more intense the gathering effect. • Sew a test seam to determine the level of gather. • Mark the first line on the reverse side. 35 Utility stitches and practical sewing stitch stitch 1540 G 0 3 1530 E 0 3 1520 E 0 3 3-5 0/1 3-5 0/1 3-5 0/1 1540 G 1530 E 1520 E 0 3-4 0 3-4 0 3-4 3-5 0/1 3-5 0/1 3-5 0/1 Hemming with the twin needle Use the twin needle to make sure that you select the center needle position . • First fold and iron the width of fabric desired for...
Owner's Manual
Page 59
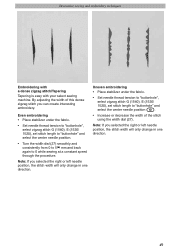
... change in one direction. 49 Note: If you selected the right or left needle position, the stitch width will only change in one direction. By adjusting the width of the stitch using the width dial (27). Decorative sewing and embroidery techniques Embroidering with a dense zigzag stitch/Tapering Tapering is easy with your select sewing machine. Even embroidering • Place stabilizer under the fabric. • Set needle thread tension to "buttonhole", select zigzag stitch G (1540), E (1530/ 1520), set stitch length to "buttonhole" and select the center needle position...
... change in one direction. 49 Note: If you selected the right or left needle position, the stitch width will only change in one direction. By adjusting the width of the stitch using the width dial (27). Decorative sewing and embroidery techniques Embroidering with a dense zigzag stitch/Tapering Tapering is easy with your select sewing machine. Even embroidering • Place stabilizer under the fabric. • Set needle thread tension to "buttonhole", select zigzag stitch G (1540), E (1530/ 1520), set stitch length to "buttonhole" and select the center needle position...

Owner's Manual
Page 68
... Only use straight stitch in center needle position! Accessories and needles Presser feet (special accessory) for top feed) Knit-edge foot Darning foot Teflon valances For cording For eyelet embroidery For hemming edges For hemming edges For sewing knitted fabrics For darning damaged pieces For sewing leather a. They are available at an extra charge from your dealer Accessory Appliqué foot Open appliqué foot Bias tape binder (remove foot holder) Cording foot, 5 grooves (twin needle with needle spacing 1.6 to 2.0) Cording foot, 7 grooves (twin needle with needle spacing...
... Only use straight stitch in center needle position! Accessories and needles Presser feet (special accessory) for top feed) Knit-edge foot Darning foot Teflon valances For cording For eyelet embroidery For hemming edges For hemming edges For sewing knitted fabrics For darning damaged pieces For sewing leather a. They are available at an extra charge from your dealer Accessory Appliqué foot Open appliqué foot Bias tape binder (remove foot holder) Cording foot, 5 grooves (twin needle with needle spacing 1.6 to 2.0) Cording foot, 7 grooves (twin needle with needle spacing...

Owner's Manual
Page 78
... to apply the oil in place. Maintenance and trouble-shooting Changing the needle plate Switch off the main switch • Remove the needle plate and lower the feed dog. • Clean the feed dog and hook area with the brush. • Apply a drop of oil (every 15 to 20 hours of operation) to the hook. Cleaning and oiling Switch off the main switch It is maintenance free and must not be oiled. 68 The more...
... to apply the oil in place. Maintenance and trouble-shooting Changing the needle plate Switch off the main switch • Remove the needle plate and lower the feed dog. • Clean the feed dog and hook area with the brush. • Apply a drop of oil (every 15 to 20 hours of operation) to the hook. Cleaning and oiling Switch off the main switch It is maintenance free and must not be oiled. 68 The more...

Owner's Manual
Page 80
.... Insert new needle. Feed dog is bent or blunt. If you are nearby. 70 The wrong needle is inserted Needle is lowered, slide A (see page 27) Push slide B (see page 27) to the hook. Seam is sewn unevenly The tension needs adjusting Thread is too thick, slubbed or hard The bobbin thread is not properly inserted. Machine is poor or has slubs in . Maintenance and trouble-shooting Trouble-shooting Problem: The machine skips stitches The needle...
.... Insert new needle. Feed dog is bent or blunt. If you are nearby. 70 The wrong needle is inserted Needle is lowered, slide A (see page 27) Push slide B (see page 27) to the hook. Seam is sewn unevenly The tension needs adjusting Thread is too thick, slubbed or hard The bobbin thread is not properly inserted. Machine is poor or has slubs in . Maintenance and trouble-shooting Trouble-shooting Problem: The machine skips stitches The needle...


